Page is loading ...

ELECTRICAL
Stud
Detector
User Guide

Contents
Welcome Section
General Information & Safety
Instructions
Contents & Features
General Layout
Setting Up
• Installing The Battery
• Turning On/O
Operating
• Selecting A Mode
• Calibrating Before Use
• Stud Scanning Mode
• Stud Scanning On Dierent Surfaces
• Metal Scanning Mode
• AC Power Cable Scanning Mode
Trouble Shooting
Specifications
1.
2-3.
4.
5-6.
7.
8-13.
14.
15.
Copyright © 2018-2019 Thunderbolt Photography, Richard Ross. All rights reserved.
All Photos and Illustrations may not be reproduced or used in any manner whatsoever without the express
written permission of the copyright holder.

1.
Welcome Section
Congratulations!
You have made an excellent choice with the purchase of this quality WORKZONE
®
product.
By doing so you now have the assurance and peace of mind which comes from
purchasing a product that has been manufactured to the highest standards of
performance and safety, supported by the high quality standards of Quesh Ltd.
We want you to be completely satised with your purchase, so this WORKZONE
®
product is backed by a comprehensive manufacturer’s 3 year warranty and
outstanding after sales service through our dedicated helpline.
We hope you enjoy using this product for many years to come.
If you require technical support or in the unlikely event that your purchase is
faulty, please telephone our helpline for immediate assistance. Faulty product
claims made within the 3 year warranty period will be repaired or replaced free
of charge provided that you have a satisfactory proof of purchase.
(keep your receipt safe)
This does not aect your statutory rights. However be aware that the warranty
will become null and void if the product is found to have been deliberately
damaged, misused and/or disassembled.

General Information &
Safety Instructions
This Stud Detector is powered by a 9V square battery.
Do not dispose of batteries in your household waste.
Please contact your local authority for details on safe disposal.
Do not expose this product to damp or moist conditions.
• Never throw batteries into a re or expose to excessive heat sources.
• If batteries are swallowed, please seek immediate medical attention.
• Always ensure correct +/- battery polarity when installing batteries.
• Do not recharge non-rechargeable batteries.
Equipment, which is marked with the WEEE logo
(as shown on the left), should not be thrown away with your household
waste. Contact your local authority waste disposal department, as they
will be able to provide details of the recycling options available in your
area.
Electrical and electronic equipment (WEEE) contains materials, parts
and substances, which can be dangerous to the environment and
harmful to human health if the waste of electrical and electronic
equipment (WEEE) is not disposed of correctly.
Equipment, which is marked with the WEEE logo
(as shown on the left), should not be thrown away with your household
waste. Contact your local authority waste disposal department, as they
will be able to provide details of the recycling options available in your
area
The EU Declaration of Conformity
can be downloaded from www.quesh.co.uk.
2.

3.
General Information &
Safety Instructions
WARNING
DO NOT rely exclusively on the detector to locate items behind scanned
surfaces. Use information sources such as plans, visible electrical and pipe
outlets/entry points to locate objects before penetrating the surface.
• DO NOT assume that there is no live cabling within a wall.
• DO NOT take actions that could be dangerous.
• ALWAYS disconnect power, gas and water before penetrating a surface.
Failure to follow these directions may result in electrical shock, re and/or
serious injury/property damage.
Live AC Cable Detection
The detector has constant AC power cable warning alert that works in all modes.
When a live AC source is detected the icon will appear on the screen.
Exercise extreme caution in this circumstance where AC power is present.
General Product Care
• Keep the Stud Detector dry and clean
• Avoid shock, vibrations and extreme heat
• Check the battery before use
• Please remove the battery for long term storage

4.
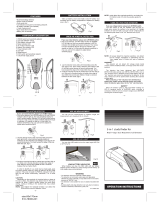
Contents & Features
Contents
1 x Stud Detector
1 x 9V Battery
1 x User Guide
Features
• Detects wood, metal and unshielded AC cables
• Scans up to a depth of 2.36” (60mm)
• 3 preset stud depths
• 3 material presets
• Easy calibration
• Backlit screen
• Low power warning
• Battery powered
NO USER SERVICEABLE PARTS INSIDE

5.
General Layout
On/O
Calibrate
Screen
Mode
Centre Mark
STUD DETECTOR

6.
General Layout
SCREEN ICONS
1 Inch
Scan Depth
½ Inch
Scan Depth
Move Right
Metal Mode
1½ Inch
Scan Depth
Low Power
Move Left
AC Power
Mode
Wood Mode
AC Power
Cable
Edge
Indicator
Left Edge
Indicator
Right Edge
Indicator
Center
Indicator

7.
Setting Up
Installing The Battery
This product is supplied with a 9V battery. To t the battery please remove the
battery from it’s wrapper. Open the battery bay by pushing the tab towards the
top of the detector on the battery cover and lifting the cover up.
Connect the 9V battery to the correct terminals and place it in the battery bay.
Replace the battery cover by inserting the holding pins rst at the top of the bay
and closing the cover down so the tab locks in to place.
Turning On/Off
To turn the Stud Detector on or o, give the ‘On/O’ button a quick press. If the
Stud Detector is left unused for 3 minutes, it will turn itself o.

8.
Operating
Selecting A Mode
The Stud Detector has three modes of use:
• Stud Detection
• Metal Detection
• AC Power Detection
You will need to repeatedly press the button to cycle through the available
modes to make your selection.
The options will be:
> > > >
The rst three options are for stud detecting at dierent depths, which are ½”
(12.7mm), 1” (25.4mm) and 1 ½” (38.1mm).
The forth option is for detecting metal, such as ½” rebar up to a depth of 2.36”
(60mm).
The nal option is for detecting AC power cables up to a depth of 2” (51mm).
Calibrating Before Use
After a mode has been selected you will need to calibrate the detector.
THIS MUST BE DONE EVERY TIME THE DETECTOR HAS BEEN TURNED
ON FOR USE. To do this place the detector at against any surface, but away
from AC cable and metal. Press and hold the ‘Calibrate’ button on the side of the
hand grip until you see the indicator bar drop on the screen and a beep can be
heard. Wait 2-3 seconds before use.
WARNING
DO NOT rely exclusively on the detector to locate items behind scanned
surfaces. Use information sources such as plans, visible electrical and pipe
outlets/entry points to locate objects before penetrating the surface.

9.
Operating
Stud Scanning Mode
To scan for studs make sure the detector has been set to one of the rst three
settings and calibrated as mentioned on page 7, place the detector’s back at
against the surface you want to scan. In a slow paced motion move the detector
up right across the surface in the direction you want to scan.
When you are close to a stud there will be an
arrow point the direction of an object
detected. Move slowly in the direction
indicated. The center levels bar will rise or
lower depending on how close you are to an
object.
As soon as the detector shows a line next
to the arrow you will have found edge of the
stud. Use the ‘V’ groove to mark the centre
of the stud with a pencil if required.

10.
Operating
When the detector nds the center of the
stud, there will be an audible beep. The
screen will show a full level bar, an arrow at
the top and ‘CENTER’ and the bottom. Use
the ‘V’ groove to mark the centre of the stud
with a pencil if required.
Keep moving in the same direction, if
required to nd the other stud edge. Look
for the opposite arrow with a line. this will
indicate the opposite edge to the one
previously found. Use the ‘V’ groove to
mark the centre of the stud with a pencil if
required.
If you go too far the arrows on the screen
will indicate which direction to move in if it
detects an object. The center levels bar will
rise or lower depending on how close you
are to an object.

11.
Operating
Stud Scanning On Different Surfaces
The detector will behave dierently and results vary depending on what type of
material it is scanning though.
WARNING
DO NOT rely exclusively on the detector to locate items behind scanned
surfaces. Use information sources such as plans, visible electrical and pipe
outlets/entry points to locate objects before penetrating the surface.
• WALLPAPER
Normally this is ok to scan over. However, if the wallpaper contains metallic foil
or bres or has been freshly hung within 6 weeks, results will be inaccurate and
possibly unusable.
• FRESHLY PAINTED SURFACE
Scanning over this type of surface is ok. However, if the wall has been freshly
painted within the last 2 weeks results can be inaccurate.
• LATH & PLASTER
Due to irregularities of the plaster thickness, this type of surface is not suitable
for scanning in ‘Stud’ mode . It is recommended that you change to ‘Metal’
mode and try scanning for nail heads in the lath pieces attached to the studs.
If this surface has been reinforced with metal mesh, the detector will be unable
to scan through it.
• EXTREMELY TEXTURED WALLS & CEILINGS
To scan over this type of surface, use a piece of cardboard placed on the wall or
ceiling. Set the detector to ‘1½”’ scan mode . Place the detector on the
cardboard and scan across as normal. If you are getting irregular results please
change the detector to ‘Metal’ mode and scan for nail or screw heads in studs
or joists.

12.
Operating
• WOOD (SUB)FLOORING & GYPSUM DRY WALL OVER PLYWOOD
The detector will have trouble scanning through this mix of material and results
will be inaccurate. You will need to use the ‘1½”’ scan mode and the
indicator will show a weak signal only.
• CONCRETE, CARPET & PADDING
The detector will operate through these types of material.
You may get results with the ‘Metal’ scan mode and scan for nail and screw
heads.
Metal Scanning Mode
This mode will allow you to scan for metal nails, screws, pipes, trunking, etc.
To scan for metal make sure the detector has been set to ‘Metal’ mode and
calibrated as mentioned on page 7. To achieve a more accurate reading you will
need to scan in two passes.
• FIRST PASS
As the detector has been calibrated, press and hold the ‘Calibrate’ button on the
side of the detector hand grip and move in the direction you want to scan. When
the scan bar reaches the top, mark the position on the surface using a pencil and
the ‘V’ grove and the top of the detector. Continue scanning across until you get
the indicator drops a little. Move back again until the indicator is as the top and
mark the position as previously done. This is the general area.
• SECOND PASS
Once you have marked the general area, place the detector on one of the marks
and turn it o, then on, select the ‘Metal’ mode and recalibrate. This will increase
the accuracy of the reading. Do a second pass of the area in the same manner
as the rst pass, and mark as required. The center point between the two marks
will be the approximate middle. You can do this step multiple times to get an
even more accurate reading.

13.
Operating
AC Power Cable Scanning Mode
This mode will allow you to scan for metal nails, screws, pipes, trunking, etc.
To scan for metal make sure the detector has been set to ‘AC Power’ mode
and calibrated as mentioned on page 7. To achieve a more accurate reading you
will need to scan in two passes or more.
WARNING
Electrical eld detection will not work beyond a depth of 2” (51mm) from the
scanned surface. Conduits encased in concrete, behind sheer plywood, metallic
wall coverings or damp wall conditions will cause very limited detection and may
not be detected at all.
• FIRST PASS
As the detector has been calibrated, press and hold the ‘Calibrate’ button on the
side of the detector hand grip and move in the direction you want to scan. When
the scan bar reaches the top, mark the position on the surface using a pencil and
the ‘V’ grove and the top of the detector. Continue scanning across until you get
the indicator drops a little. Move back again until the indicator is as the top and
mark the position as previously done. This is the general area.
• SECOND PASS
Once you have marked the general area, place the detector on one of the marks
and turn it o, then on, select the ‘Metal’ mode and recalibrate. This will increase
the accuracy of the reading. Do a second pass of the area in the same manner
as the rst pass, and mark as required. The center point between the two marks
will be the approximate middle. You can do this step multiple times to get an
even more accurate reading.

14.
Problem Cause Solution
Not turning on. Flat battery. Change battery.
Not detecting correctly, low
battery indicator present.
Battery charge to low to
operate correctly.
Change battery.
Detecting other objects while
in stud mode.
Electrical wiring, plastic or
metal pips may be touching
the back of the scanned
surface area.
Double and triple studs can
be found round doors and
windows
Scan the area in Metal mode
an AC Power mode to
determine if either is present.
Check for other studs spaced
either side. A stud reading is
approximately 1½” (38.1mm)
anything larger or smaller
away from a door or window
frame is unlikely to be stud.
Scan for edges and work
from there.
Area of detected AC power
appears larger than the
actual wiring.
AC power can spread laterally
as much as 12” (310mm)
either side on a drywall
surface.
Repeat the second pass
process to locate the source.
See page 13.
Area of detected metal
appears larger than actual
size.
Metals density can register
as larger object.
Repeat the second pass
process to locate the object.
See page 12.
You suspect electrical wiring,
but unable to detect any.
Wiring may run deeper than
2” (51mm).
Wiring maybe shielded by
a conduit, behind a metallic
covering or shear plywood.
Make sure the electrics are
on for scanning purposes. Try
using Metal mode if you are
still not picking up AC voltage
and scan for the metal aspect
of the wring.
Trouble Shooting
When in doubt always ask/seek a trade professional.

15.
Specifications
Stud Detector
General
Dimensions:
Approximate Weight:
Battery
Battery Type:
68mm x 34mm x 168mm
149g
9V ‘Square’

Warranty
This product is warranted to be free from defects in workmanship and parts for a period of 36
months from the date of purchase. Defects that occur within this warranty period, under normal
use and care, will be repaired, replaced or refunded at our discretion, solely at our option with
no charge for parts and labour. The benets covered by this warranty are in addition to all rights
and remedies in respect of the product the consumer has under existing U.K. laws.
Proof of Purchase
This warranty is valid for the original purchase and is not transferable.
Please keep your purchase receipt as proof of purchase and as proof of the date of when the
purchase was made. The receipt must be presented with the warranty card when making a claim
under this warranty.
Service during the Warranty Period
Please ensure the product is properly packaged so as to ensure that no damage occurs in
transit. Also make sure that you have included a detailed explanation of the problem.
Extent of the Warranty
This warranty is limited to defects in workmanship or parts. All defective products or parts will
be repaired or replaced. This warranty does not extend to accessories.
Normal Wear and Tear
This warranty does not cover normal wear and tear of the product or parts.
Exclusions
• Any defect caused by accident, misuse, abuse, improper installation or operation,
lack of reasonable care, unauthorised modication, loss of parts, tampering or
attempted repair by a person not authorised by the distributor.
• Any product that has been damaged by lightning strike either directly or indirectly,
or on a main’s or vehicle outlet power surge or liquid ingress.
• Any product that has not been installed, operated or maintained in accordance
with the manufacturer’s operating instructions provided with the product.
• Any product that has been used for purposes other than domestic use.
• The product if it is located outside of the U.K. and Ireland
• Any damage caused by improper power input or improper cable connection.
This warranty does not aect your statutory rights.
Warranty Certificate
3
YEAR
WARRANTY

Stud Detector
Return your completed card to:
Quesh Limited
B7, First Business Park
First Avenue, Crewe
Cheshire
CW1 6BG
United Kingdom
Email:
AFTERSALES SUPPORT
MODEL: 11334 PRODUCT CODE: 11334 01/2019
01270 508538
1800 995 036 www.quesh.co.uk
IRE
GB
Phone lines available Monday to Friday 9am - 5pm.
Call cost local rate per minute from a landline,
calls from mobiles may vary
3
YEAR
WARRANTY
Description of malfunction:
Your Details:
Name:
Address:
Date of purchase*:
*We recommend you keep the receipt with this warranty card.
Location of purchase:
Email:

/