Page is loading ...

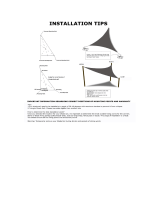
Turnbuckle for tensioning
sail-opposite side could be
replaced with Snap Hook-
Minimum of 2 turnbuckles
per Sail for maintaining
proper tension.
Sail D Ring
Pad Eye or
Eye Bolt
SunShade Sail Installation Tips
Tools needed: Ladder, drill with appropriate bits, screw driver, hammer, possible chain, cable or rope.
Read the instructions prior to starting in order to determine any additional hardware needs!!
1- Sight Selection- Determine where you want to create shade with your Sail. Lay the unit out to determine
the best potential points to which you want to attach the Sail via the “D” rings at the corners of the Sail.
You may choose to use trees to attach the unit. Keep in mind the direction of the sun and where you want
the shade projected. It may be necessary to have the Sail slightly to one side of the point where you want
shade projected. Keep in mind as the sun moves, shade also moves. If a child’s play area is involved you
may want to consider the time of day when most frequently used by the child. Another option is to use
multiple units placed at strategic points.
2- Installation/location of xing points- If you purchased a triangular Sail, you have 3 points to secure the
sail. A square or quadrilateral sail will have 4 points to secure. Depending upon installation requirements,
you may have enough hardware supplied (note some units are sold without hardware). Several types
of hardware may be required. Either pad eyes (shown) or eye bolts which are available at any hardware
store are needed for each point of attachment and are used as the permanent xing point to a structure
such as a pole, tree, fence or house. Once you have the Sail laid out you may want to realign the corners
toward a xing point (house, pole, tree). Once you have identied the points (either 3 or 4 depending on
the Sail) you will install a pad eye or eye bolt to each xing point. The corners of the Sails should
be hooked to the Sail with an “S” hook or snap hook with the exact amount of tension on the Sail. Keep in
mind that two of the Sail’s xing accessories must be tensioning devices, i.e., turnbuckle as shown or
strap (ratcheting device). In addition, you may need something, i.e., cable, rope, chain, etc. to extend from
the pad eye or eye bolt to the Sail.
3- Be Creative- You may need to add a metal or wooden post as a xing point off the end of a patio or deck.
You may need a chain or cable to extend the sail from the structural xing point to the point you need. You
may actually install 3 or 4 poles in an area around the play area to which a Sail could be attached. The
beauty of the Sail is its versatility and exibility. Use multiple units at different heights to give structure and
balance to the garden.
4- The Key point to remember is the need for at least two tensioning devices which allow for
adequate tension on the Sail to prevent drooping. The xing points are up to you as long as they
are aligned correctly. Use the amount of chain, cable or rope to achieve the correct distance from the
structural xing point to the Sail “D” Ring. On the corner points of the Sail to which a tensioning device is
not used we suggest either an “S” hook or a Snap hook as shown. This allows for the attachment of the
“D” ring to the structural xing point.
5- Assistance in mounting your Sail- Once you have the 3 or 4 xing points located, install an eye bolt or
pad eye securely in place at each of these points, you are ready to install or mount the Sail. We
recommend having an extra person to help since you will be using a ladder. If mounting a square Sail
hook the snap hook onto the “D” ring and then the snap hook to the pad eye. You may be using a cable or
chain extension and require an additional snap hook to secure to the xing point. Next move to the op
posite corner. You may have a chain or cable extension here also and need a snap hook. This corner
will also need a tensioning device like a turnbuckle or ratchet strap. The correct length of any
extending cable or chain is critical since you must allow room to attach the tension device and tighten until
the Sail is pulled tight. Next move to the other corners and repeat the process. Once in place, you may
want to move back to the initial point and retighten. The same installation procedure is used with a triangle
except there are no opposite points. You will use only one tensioning device on a triangular Sail.
PLEASE NOTE;
These Installation Tips are to be used only as a guide and installation requirements will vary based on each
installation. PIC America, LTD. accepts no responsibility for damage or injury. Should you have any ques-
tions concerning correct installation at your site, it is your responsibility to contact a reputable builder or
qualied engineer prior to installation.
*Fire or open Flame should not be used under or near this fabric as continuous exposure could melt or ignite.
*Do not use chlorine on this product to clean as it will reduce the life of the fabric.
*Do not wash in chlorine bleach product or washing machine.
A garden hose with a mild detergent solution and warm water can be used to clean this product.
This product is manufactured for PIC America, LTD., 1730 Five Points Lane, Fuquay-Varina, NC 27526
WARRANTY:
King Canopy provides a 90-day limited warranty on this product. You must return the enclosed form to us to
obtain warranty service. This King Canopy product is warranted by King Canopy to be free from defects in
material and workmanship for 90 days from date of purchase. Should you make a claim against this warranty,
you will be required to show proof of purchase at that time. Please retain your receipt for future presentation.
During this period, if the Product is found to be defective in material or workmanship, King Canopy will at its
option, either repair or replace this Product without charge, subject to the following conditions, limitations and
exclusions:
1. This warranty extends to the original consumer purchaser only and is not assignable or transferable.
2. This warranty shall not apply to any Product which has been subjected to misuse, abuse, abnormal use,
negligence, alteration or accident.
3. This warranty does not apply to any defects or damage directly or indirectly caused by or resulting from the
use of unauthorized replacement parts.
4. In returning this product for repair or replacement under this warranty, the original consumer must prepay
all postage, shipping transportation, insurance and delivery cost and the product must be delivered in either its
original carton or a similar package affording an equal degree of protection. King Canopy will not be respon-
sible for any loss or damage incurred in connection with the return of this product.
*If additional poles or posts are used they must be installed with concrete or properly buried
in order to adjust Sail’s proper tension.
Additional Hardware which could be used in installation.
Snap Hook
Eye Bolt
/


