Page is loading ...

www.ihomeangel.com Page: - 1 - / 3
Item Number: A03478
WARNING (To reduce the risk of fire, electric shock, or injury to persons):
1. We suggest installation by a licensed electrician.
2. Please read the instruction carefully and save it as you may need it at later time.
3. Before you start, NEVER attempt any work without shutting off the electricity until the work is done. A). Go to the main
fuse, or circuit breaker, box in your home. Place the main power switch in the “OFF” position. B). Place the wall switch
in the “OFF” position.
4. Mounting surface should be clean, dry, flat, strong enough and 1/4” larger than the canopy on all side. Any gaps between
the mounting surface and canopy exceeding 3/16” should be corrected as required.
5. Make sure that the ceiling or wall can stand the weight of the lamp before fixture.
6. Make sure the voltage you are using is 120V. The maximum wattage is 40W per bulb.
7. Keep the lamp away from acidic and basic objects in case of damaging the surface of the lamp.
8. When replacing bulb, you should turn off or unplug the lamp and you must wait until it is cool as bulbs get hot quickly.
9. The safety instructions appearing in this manual are not meant to cover all possible conditions that may occur. It must
be understood that common sense, caution and care must be used with any electrical products.
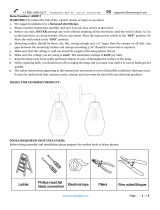
IMAGE FOR FINISHED PRODUCT:
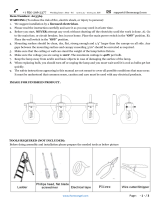
TOOLS REQUIRED (NOT INCLUDED):
Before doing assembly and installation please prepare the needed tools as below picture
+1 850 296 2377 Working hours : Mon - Fri 9:00 a.m. - 16:00 p.m. EST support@ihomeangel.com

www.ihomeangel.com Page: - 2 - / 3
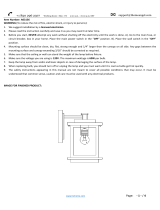
PARTS INCLUDING:
(C)Mounting plate (1)
(F) Back plate (1)
(G) Ball knob (2)
(H)Green ground screw (1)
( I ) Socket cap (2)
(J) Glass shade (2)
ACCESSORIES ENCLOSED:
(A) Anchor (2)
(D) Wood screw (2)
(B)Plastic wire connector (3)
(E) Mounting screw (2)
ASSEMBLY & INSTALLATION INSTRUCTIONS:
1. Carefully remove the fixture from the carton and check that all parts and
accessories are included as shown in the above illustration
2. Turn off power
Before you start to make installation, NEVER attempt any work without shutting off the electricity until the work is
done. A). Go to the main fuse, or circuit breaker, box in your home. Place the main power switch in the “OFF” position.
B). Place the wall switch in the “OFF” position.
3. Make assembly
+1 850 296 2377 Working hours : Mon - Fri 9:00 a.m. - 16:00 p.m. EST support@ihomeangel.com

www.ihomeangel.com Page: - 3 - / 3
Step A1: Unscrew the ball knobs(G) from the back plate(F) then gently remove the mounting plate (C)
Step A2: Secure mounting plate (C) to outlet box with mounting screws (E), plastic wall anchors (A) and wood screws (F).
Step A3: Make wire connections
Connect wires as below wires connecting shown. TAKE NOTE OF YOUR WIRE COLOR OF FIXTURE ,NEVER CONNECT
WIRE TO GROUND WIRE
Connect ground wire according to below chart Connect wires according to below chart
Twist plastic wire connector (B)until wires are tightly joined together,wrap each connector with approved electrical tape and
carefully tuck all wires into the outlet box
Step A4: Align the holes in the back plate (F) with the mounting screws, then attach the back plate (F) using the
previously removed knob balls(G). Hand tighten until snug.
Step A5: Install bulbs (Not included. Please do not exceed the maximum capacity recommended on the socket.)
Thread the glass (J) onto the socket cap (I) till tight.
4. Check everything installed properly, then you could turn on the light. Enjoy !
CLEANING
To clean, wipe fixture with a soft cloth. Clean glass with a mild soap. Do not use abrasive materials such as
scouring pads or powders, steel wool or abrasive paper.
ORDERING PARTS
Keep this sheet for future reference, and in case you need to order replacement parts. All parts for this fixture
can be ordered from place of purchase. Be sure to use exact wording from illustration when ordering parts.
+1 850 296 2377 Working hours : Mon - Fri 9:00 a.m. - 16:00 p.m. EST support@ihomeangel.com
/