Page is loading ...

THIS DOCUMENT AND ITS CONTENT BELONGS TO EverySight LTD. AND CONTAINS
EverySight PROPRIETARY INFORMATION. THIS DOCUMENT AND THE INFORMATION
CONTAINED IN IT OR ANY PART THEREOF MAY NOT BE COPIED IN ANY WAY AND MAY
NOT BE USED IN WHOLE OR PARTS THEREOF IN ANY WAY WITHOUT THE WRITTEN
CONSENT OF EverySight LTD.
2014 EverySight Ltd. Proprietary
Raptor User Manual

Raptor User Manual
2017 EverySight Ltd. Proprietary Page 2 of 46 Rev 1.0
Important Safety Instructions ............................................................................................................................. 4
What’s in the Box? .................................................................................................................................................... 6
Getting to Know Your Raptor .............................................................................................................................. 6
Charging Your Raptor ............................................................................................................................................. 6
Installing the Everysight App on Your Smartphone ................................................................................... 7
Turning Your Raptor Smartglasses On ............................................................................................................ 7
Pairing Your Raptor With Your Smartphone ................................................................................................ 8
Pairing Your Raptor With Your iPhone....................................................................................................... 8
Pairing Your Raptor With Your Android Phone ................................................................................... 10
Adjusting Your Raptor’s Display Using Your Smartphone after the initial setup ....................... 13
Everysight App Settings ...................................................................................................................................... 14
Becoming Familiar With the Raptor Navigation Gestures .................................................................... 16
Adjusting Brightness and Volume .................................................................................................................. 18
Adding/Removing Bluetooth Devices and Sensors (Optional) .......................................................... 20
Configure Your Raptor’s Screen Layout ....................................................................................................... 20
Just Ride ..................................................................................................................................................................... 21
Navigation Ride ...................................................................................................................................................... 23
Download the Map(s) ...................................................................................................................................... 23
Copy the Map(s) to Your Raptor ................................................................................................................. 23
Copying Map(s) from Your Apple Mac ................................................................................................ 23
Copying Map(s) from Your Windows PC ............................................................................................ 24
Create a Route for Your Ride (Optional) ................................................................................................. 25
Copying the Route to Your Raptor ............................................................................................................. 26
Going for a navigation ride............................................................................................................................ 26
Workout ride ........................................................................................................................................................... 29
Building Your Training ................................................................................................................................... 29
Creating a Workout .......................................................................................................................................... 30
Copying the Workout to Your Raptor ....................................................................................................... 31
Going for a workout Ride ............................................................................................................................... 32
After Your Ride ....................................................................................................................................................... 34
Downloading Media ......................................................................................................................................... 34

Raptor User Manual
2017 EverySight Ltd. Proprietary Page 3 of 46 Rev 1.0
Powering Down Your Raptor ....................................................................................................................... 35
Using and Configuring the Raptor’s Camera .......................................................................................... 36
Voice Commands .................................................................................................................................................... 37
“Take a Picture” ............................................................................................................................................ 37
“Record a Video” ........................................................................................................................................... 37
“Brightness Down” ...................................................................................................................................... 37
“Volume Down” ............................................................................................................................................. 37
“Touch Off” ...................................................................................................................................................... 37
“Just Ride” ........................................................................................................................................................ 37
Cleaning Your Raptor ........................................................................................................................................... 38
Interchangeable Visor .......................................................................................................................................... 39
Rx Insert for Visor............................................................................................................................................. 40
Raptor Controller - What’s in the Box? ......................................................................................................... 41
Getting to Know Your Controller ..................................................................................................................... 41
Pairing Your Controller ....................................................................................................................................... 41
Support ...................................................................................................................................................................... 43
Privacy Policy .......................................................................................................................................................... 43
Warrenty ................................................................................................................................................................... 43
Notices: ...................................................................................................................................................................... 43
RF Exposure Information (SAR)- FCC ...................................................................................................... 43
FCC Compliance ................................................................................................................................................. 43
IC Caution ............................................................................................................................................................. 44
RF Exposure Information (SAR)- IC .......................................................................................................... 44
EU Declaration of Conformity ...................................................................................................................... 45
Disposal ................................................................................................................................................................. 45
Trademarks ......................................................................................................................................................... 45

Raptor User Manual
2017 EverySight Ltd. Proprietary Page 4 of 46 Rev 1.0
Important Safety Instructions
Please read this manual before using this device to ensure you will enjoy your Raptor under safe
and proper use.
i. Read these instructions.
ii. Keep these instructions.
iii. Heed all warnings.
iv. Follow all instructions.
v. Neither Raptor nor any of its accessories are designed for self-service or repair.
Unauthorized repairs or modification may result in permanent damage and invalidate
your warranty coverage. Refer all servicing to Everysight. Servicing is required when
the device has been damaged in any way, including but not limited to damage to the
power supply cord or plug, being dropped or hit by heavy objects, or exposure to
excessive rain or moisture (including immersion or spills).
• DO NOT USE THIS DEVICE WHILE DRIVING ANY MOTOR VEHICLE.
• Do not use this device near water.
• Keep the device away from deliberate exposure to liquids of any kind.
• Clean only with dry cloth.
• Install in accordance with the manufacturer's instructions.
• Only use attachments/accessories specified by the manufacturer.
• Avoid extreme heat or cold, which may damage your device and accessories.
• Maximum ambient temperature for charging mode is 104°F (40°C).
• Ideal operating temperatures are 32° to 104° F (0° to 40° C) and Ideal storing temperatures
are 14° to 140° F (-10° to 60° C).
• Stop using your device for a while if the device is overheated.
• Keep away from children and pets; parts can cause injury or damage, including choking
hazard, if placed in mouth.
• Exposures to high audio volume for extended periods may damage your hearing and may
distract you while riding; lower the volume to a safe and comfortable level to reduce risks.
WARNINGS
Lithium battery and battery disposal information
A lithium-ion battery is used in this device. Inaccurate or improper handling of the Li-Ion
rechargeable battery (such as incinerating, deforming, bending, modifying, attempting to insert
foreign objects into the battery, shorting the contacts, trying to disassemble, or exposing the
battery to water or high temperatures, among other things that are even more obvious) may cause
leakage, heat, smoke, explosion, or fire and may result in personal injury and/or damage to
property.
YOU MUST NOT ATTEMPT TO REMOVE THE BATTERY. The battery in this device is not intended
to be replaced by the consumer. If you believe the battery is damaged or needs to be replaced,
take the device to a service center for inspection and replacement.

Raptor User Manual
2017 EverySight Ltd. Proprietary Page 5 of 46 Rev 1.0
If at any time you witness a device being charged starting to balloon, swell up, smoke or heat
up, discontinue the charging process immediately, disconnect the device and observe it in a safe
place for approximately 15 minutes. Contact manufacturer for service instructions.
Don't leave the device near a fire or heat source or high temperature location; never dispose
of in a fire or incinerator.
Don’t leave, charge or use the device in any space where the temperature may exceed 60º C/
140º F.
Don't immerse in or spray the device with water.
Don't pierce the device with any sharp object.
Don't strike with heavy objects or drop the device on any hard surface.
Don't attempt to disassemble or modify the device or charger.
Don't put the device into a microwave or conventional oven, dryer, or high-pressure container.
Stop using the device if it becomes abnormally hot, discolored, or deformed, or if you detect
abnormal conditions during use, charging, or storage.
MAGNETS
This device contains magnetic materials which might affect the operation of implantable medical
devices and therefore should be kept at a distance from persons with any medical device
implants in their body. Please contact your physician for further information on how using this
device might affect the operation of your implant.

Raptor User Manual
2017 EverySight Ltd. Proprietary Page 6 of 46 Rev 1.0
Congratulations on purchasing your brand new Raptor Smartglasses. This Manual will help
you become familiar with the Raptor, and allow you to use them in the best manner
possible.
What’s in the Box?
Your Raptor comes wrapped in it’s hard carrying case along with:
1. A soft carrying case.
2. A Micro-USB wall charging unit.
3. A data cable.
4. A Quick start guide and safety instructions.
5. Grip enhancing adhesives.
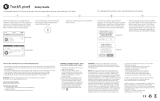
Getting to Know Your Raptor
Note: Your Raptor comes with Grip Enhancing Adhesives that will help keep your glasses in
place and provide extra comfort. They should be placed on the inside of your Temple Arms
and over the proximity sensor as shown in the illustration below.
• These areas should be wiped off to ensure that no dust or dirt is present while
applying the adhesives
• The Grip Adhesive for that sits over the proximity sensor has space cut out so that
the sensor can still function properly, be sure it is aligned to rest against your
forehead without covering the proximity sensor
Charging Your Raptor
We send out your Raptor smartglasses partly charged and we recommend that you fully
charge them before your first ride.
When the battery is depleted, It should take about two hours to fully charge your Raptor.
When your Raptor is fully charged you'll have up to 8 hours of normal use.
To charge your Raptor, open the USB cover located on the end of your Raptor's left arm. Use
the provided Micro-USB wall charging unit and data cable.

Raptor User Manual
2017 EverySight Ltd. Proprietary Page 7 of 46 Rev 1.0
When your Raptor is charging, the indicator light located on the underside of the left temple
arm hinge (next to the power button) should be active and red.
You’ll know when it is fully charged, when the indicator light changes from red to green.
You can see the battery indicator in the BEAM
tm
display of your Raptor (When powered on)
and in Everysight's APP on your smartphone when connected to your Raptor.
For further safety instruction refer to ……………. (safety/legal usage terms)
Installing the Everysight App on Your Smartphone
• Download and Install the App from the App store or the Google Play app store
• When the App is installed, sign into the App by using your Gmail account, Facebook
account, or by using your email and clicking "create new account".
Turning Your Raptor Smartglasses On
• Press and hold the power button on the underside of the left Temple arm hinge for
two seconds, or until the display turns on.
• When Raptor is powered up, it makes a notification sound. If you can't hear the
notification sound, please check the volume level of your Raptor.
• Prior to initial setup or if setup is completed but the Raptor shifts from its
original position (i.e. you are using a different helmet, shifting of the
nosepiece etc.), Raptor display may be distorted or out of focus. Refer to the
"Personal fit" section in this manual to learn how to adjust the display.

Raptor User Manual
2017 EverySight Ltd. Proprietary Page 8 of 46 Rev 1.0
Pairing Your Raptor With Your Smartphone
Before continuing with this guide, it is important to pair your Raptor smartglasses with
your smartphone (iPhone or Android). Once it is paired using Bluetooth, you will be able
to adjust the display on the Raptor smartglasses, load and unload routes, and generally
manage your smartglasses.
Pairing Your Raptor With Your iPhone
Follow these steps to pair your Raptor with your iPhone using Bluetooth. Please note
that your Raptor actually pairs over Bluetooth twice. The first pairing is to connect to
Everysight's app and the second pairing is to allow phone connectivity (phone calls and
messages).
1. Your Raptor smartglasses will be displaying an image
indicating to you that you need to open the Everysight app on
your iPhone.Your Raptor's identification number will be
shown in the BEAM
tm
display (Everysight_XXX)
2. On your iPhone go to Settings > Bluetooth. Look for a device
called Everysight_XX. In this example we see Everysight_529.
3. If there is more than one Raptor device present, make sure to
choose the device with the identification number that is
displayed in your Raptor device's BEAM
tm
display.
4. Tap on your device to start the pairing process.
5. When prompted, tap Pair to connect your Raptor device to the
App, and complete the first Bluetooth pairing step.

Raptor User Manual
2017 EverySight Ltd. Proprietary Page 9 of 46 Rev 1.0
6. Next the Everysight app will request permission for phone
notifications (phone calls and messages). Once you click
‘Setup’, simply follow the instructions on the app.
7. The Raptor's innovative BEAM
tm
technology display needs to
be adjusted to your unique facial structure. The following two
steps will ensure a clear and tailored display while using your
Raptor smartglasses.
Please note! Adjustments may need to be made in cases where
the Raptor's display is moved (i.e. using a different helmet,
shifting of the nosepiece etc.),
7.1. Adjusting the Raptor's nosepiece for your comfort
and the security of your smartglasses. (PUT YOUR
HELMET ON!!)
The goal of this step is to adjust the Raptor for your
comfort; make sure that the nosepiece is comfortable, that
the Raptor is secured in place and resting flush against
your forehead.
The helmet affects the Raptor's position on your face
and the display's location accordingly. Therefore,
MAKE SURE YOU ARE WEARING YOUR HELMET with
the straps sitting underneath the glasses.
The nosepiece was designed to be adjusted; you can open,
close or tilt the nosepiece forward or back for your
comfort and security so the Raptor doesn't move while
riding.
Hint: If you wish to do this later, you can
always change this feature by accessing your
settings menu in the Everysight App and
selecting ‘Start HFP Setup’

Raptor User Manual
2017 EverySight Ltd. Proprietary Page 10 of 46 Rev 1.0
7.2. Adjusting the display using the App
The goal of this step is to achieve a clear and complete
view of the Raptor's display within the center of your field
of vision.
To ensure best view of the display, be in a bright place
and look at least 18 ft. into the distance.
The display position may not seem centered if you
attempt to adjust the display while looking at a
nearby object.
Use the directional arrows in the app to move the
Raptor's display up, down, left or right. Position the
display so that you can see it comfortably and within the
center of your field of vision.
If you can't fit the complete display into your field of
vision, zoom in and out by using the Minus and Plus
symbols. The optimal zoom is between 90-100%.
7.3. If after adjusting the display using the app you still feel
you are having trouble seeing a clear and complete
display, try to repeat steps #7.1 and #7.2 until you reach
comfort, security and clear display.
Pairing Your Raptor With Your Android Phone
Follow these steps to pair your Raptor with your Android phone using Bluetooth. You
may want your riding helmet nearby to ensure the best possible fit.
1. Your Raptor smartglasses will be displaying an image
indicating to you that you need to open the Everysight app
on your iPhone.Your Raptor's identification number will
be shown in the BEAM
tm
display (Everysight_XXX)
Tip: If the display won't move further in a
certain direction, try zooming out further and
then continuing to adjust the placement of the
display.

Raptor User Manual
2017 EverySight Ltd. Proprietary Page 11 of 46 Rev 1.0
2. On your Android smartphone, you will be asked to turn
Bluetooth on. Click Yes.
3. Proceed to Connect my Glasses.
4. On your iPhone go to Settings > Bluetooth. Look for a
device called Everysight_XX. In this example we see
Everysight_529.
5. If there is more than one Raptor device present, make sure
to choose the device with the identification number that is
displayed in your Raptor device's BEAM
tm
display.
6. Tap on your device to start the pairing process.
7. When prompted, tap Pair to connect your Raptor device
to the App, and complete the Bluetooth pairing step.

Raptor User Manual
2017 EverySight Ltd. Proprietary Page 12 of 46 Rev 1.0
8. The following page is requesting permissions for
notifications such as SMS and Phone Calls. Once you select
‘Give notifications access’, simply put a checkmark next to
the Everysight Application. If you do not wish this feature
to be active immediately, you can click ‘Not now’ and edit
the permissions later in your Settings and selecting
Enable/Disable Notifications.
9. The Raptor's innovative BEAM
tm
technology display needs
to be adjusted to your unique facial structure. The
following two steps will ensure a clear and tailored display
while using your Raptor smartglasses.
Please note! Adjustments may need to be made in cases
where the Raptor's display is moved (i.e. using a different
helmet, shifting of the nosepiece etc.),
9.1 Adjusting the Raptor's nosepiece for your comfort and the
security of your smartglasses. (PUT YOUR HELMET ON!!)
The goal of this step is to adjust the Raptor for your comfort;
make sure that the nosepiece is comfortable, that the Raptor is
secured in place and resting flush against your forehead.
The helmet affects the Raptor's position on your face
and the display's location accordingly. Therefore,
MAKE SURE YOU ARE WEARING YOUR HELMET with
the straps sitting underneath the glasses.
The nosepiece was designed to be adjusted; you can open,
close or tilt the nosepiece forward or back for your
comfort and security so the Raptor doesn't move while
riding.

Raptor User Manual
2017 EverySight Ltd. Proprietary Page 13 of 46 Rev 1.0
9.2 Adjusting the display using the App
The goal of this step is to achieve a clear and complete view of
the Raptor's display within the center of your field of vision.
To ensure best view of the display, be in a bright place and
look at least 18 ft. into the distance.
The display position may not seem centered if you
attempt to adjust the display while looking at a nearby
object.
Use the directional arrows in the app to move the
Raptor's display up, down, left or right. Position the
display so that you can see it comfortably and within the
center of your field of vision.
If you can't fit the complete display into your field of
vision, zoom in and out by using the Minus and Plus
symbols. The optimal zoom is between 90-100%.
Adjusting Your Raptor’s Display Using Your Smartphone after the initial setup
If you wish to adjust the display after the initial setup, you can always use the Raptor app on
your Smartphone to adjust the position of the display. Adjusting the display may be needed
to improve your experience or in case the case that the Raptor's display is moved (i.e. using
a different helmet, shifting of the nosepiece etc.),
Please Note: If you are setting up your Raptor for the first time, please refer to section #5
on this user manual.
Please note: Before continuing with these steps, make sure that you are wearing your
riding helmet and Raptor glasses. Make sure that your helmet’s straps are underneath your
Raptor glasses. This is important, otherwise you may get everything setup and then when
you put your helmet on, it may move the display out of focus.
Tip: If the display won't move further in a
certain direction, try zooming out further and
then continuing to adjust the placement of the
display.

Raptor User Manual
2017 EverySight Ltd. Proprietary Page 14 of 46 Rev 1.0
1. Open the Everysight app on your phone. Tap on the
information bar, and then tap Display Settings.
2. Use the directional arrows in the app to move the Raptor's
display up, down, left or right. Position the display so that
you can see it comfortably and within the center of your
field of vision.
If you can't fit the complete display into your field of
vision, zoom in and out by using the Minus and Plus
symbols. The optimal zoom is between 90-100%.
Everysight App Settings
The Everysight App allows you to adjust any of the settings relating to connectivity between
your phone and Raptor Smartglasses at any time. This gives you complete control over the
data and permissions being shared between the devices.
1. On the iPhone or Android, to access settings:
a. Tap the three bars at the bottom left hand side of the app
that say More
b. Then tap Settings
Tip: If the display won't move further in a
certain direction, try zooming out further and
then continuing to adjust the placement of the
display.

Raptor User Manual
2017 EverySight Ltd. Proprietary Page 15 of 46 Rev 1.0
2. For iPhone users:
a. Phone Calls being sent to the glasses can be turned
on or off with the toggle
b. The Phone Notifications toggle can also be turned
on or off for notifications such as text messages
i. If you didn’t pair your phone during the
‘stay connected’ portion of your setup to
your glasses, scroll down to ‘Start HFP
Setup’ at the bottom of the settings page
c. You can turn the GPS data pairing with you phone
off.
i. Turning off this feature means you won’t
be able to track your physical route,
distance travelled or use the navigation
feature
d. The Ride Notifications toggle is for your phone to
send you a notification once your ride has been
ended and this can be turned on or off
e. You can show your location and see friends around
you by toggling on or off the ‘Live Friends’ feature
i. The ‘Friend Request Interval’ slider
indicates how often (in seconds) your app
searches for other people using this app
ii. The phone can search as frequently as
every 2 seconds, or as infrequently as
every 60 seconds
f. The ‘Save Media’ toggle when turned on will save
photos that were downloaded from the glasses
into the phone’s photo gallery.
i. If this feature is turned off, pictures and
videos will only be saved in the App under
media
3. For Android Users under the Connectivity Tab:
a. See the device you are connected to or Reconfigure
with a new device
b. You can also click to enable WiFi to connect the
glasses to a WiFi network to complete an Over the
Air (OTA) Update
c. You can turn the GPS data pairing with you phone
off.
i. Turning off this feature means you won’t
be able to track your physical route,
distance travelled or use the navigation
feature
d. If your Android phone has a built in barometer,
you can use the information provided by the
barometer to capture the relevant information
e. Phone Calls being sent to the glasses can be turned
on or off with the toggle

Raptor User Manual
2017 EverySight Ltd. Proprietary Page 16 of 46 Rev 1.0
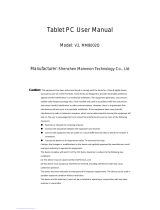
Becoming Familiar With the Raptor Navigation Gestures
One of the main ways of operating the Raptor is via the
Touchpad that is embedded into the right Temple arm.
The Touchpad responds to swiping and tapping gestures in
the same way a Touchpad on a laptop does. Using these
gestures, you can navigate around the Raptor interface, and perform actions like taking a
picture or recording a video.
Tip: Using concise gesture movements will help you to easily learn to control and operate
Raptor.
f. Bluetooth Settings can be accessed easily by
clicking on Bluetooth Settings
g. The Ride Notifications toggle is for your phone to
send you a notification once your ride has been
ended and this can be Enabled or Disabled
h. Screen Broadcasting Toggled on or off
i. Screen Broadcasting allows you to see and
control what is being displayed by the
BEAM
tm
technology on your visor but
through your app
ii. When toggled on, go back to the main
screen
iii. Tap on the Information Bar
iv. Tap on the Controller Tab
v. Have complete view and control of your
glasses from your App
4. For Android Users under the Social Tab
a. You can show your location and see friends around
you by toggling on or off the ‘Live Friends’ feature
i. You can see within what range your friends
are located with the Friends Range slider
ii. The ‘Friend Request Interval’ slider
indicates how often (in seconds) your app
searches for other people using this app
iii. The phone can search as frequently as
every 2 seconds, or as infrequently as
every 60 seconds

Raptor User Manual
2017 EverySight Ltd. Proprietary Page 17 of 46 Rev 1.0
• Swipe forwards or backwards to rotate the carousel. Use
one finger in a long continuous swipe motion. Don’t hold
your finger on the touchpad before or after the gesture.
• Tap to select an item. The item that will be selected is
always the one that is centered and includes its label.
Swipe down to go back one screen.
• Swipe up is used for specific actions only like
disconnecting a sensor or shuffling a song. Please refer to
the relevant sections for more information. to deselect an
item. For example, if you had previously paired with a
Smartphone, swiping up on the phone’s icon, will deselect
it.
• Tap and Hold on any screen to show the list of running
apps and have access to Adjustments screen where you
can adjust brightness and volume.
• Double Tap on any screen to activate your camera in
order to record a video or take a picture. See camera
section for more details.

Raptor User Manual
2017 EverySight Ltd. Proprietary Page 18 of 46 Rev 1.0
Adjusting Brightness and Volume
Display brightness can be adjusted at any time to fit to different visors, weather and lighting
conditions. Raptor's default brightness level is 7 out of 9 (A greater value means a brighter
display). Finding the right level of brightness is per individual preference. Indoor or dark
environments will require a lower brightness level while a bright environment will require
a higher level of brightness.
1. To access the Brightness or Volume settings, simply Tap
and Hold on the touchpad on the side of your Raptor until
the running apps menu appears
2. Swipe to Either Brightness or Volume and Tap to Select
a. In this example, we see that Brightness has been
selected as shown by the strength bar indicated at
the bottom
b. To adjust the level of brightness, Swipe Forwards
for the screen to be brighter, Swipe Backwards
for the screen to be less bright.
3. To Exit the selected feature (i.e. Brightness) Swipe Down
a. This will bring you back to the screen you were on
when you initiated step 1.

Raptor User Manual
2017 EverySight Ltd. Proprietary Page 19 of 46 Rev 1.0
4. You can also adjust the brightness level of the display at
any time by using voice control. To activate the Voice
Commands, simply say: “Go Everysight’’.
Once active, either say "Brightness up" or "Brightness
down" in order to adjust brightness.
5. The same can be done for Volume: Tap and Hold on the
touchpad on the side of your Raptor until the menu
appears
6. Swipe to the Volume icon and Tap to Select
7. To increase the speaker volume Swipe Forwards, To
decrease the speaker volume Swipe Backwards.
8. To Exit the selected feature (i.e. Volume) Swipe Down
a. This will bring you back to the screen you were on
when you initiated step 1.
9. You can also adjust the volume level at any time by using
voice control. To activate the Voice Commands, simply
say: “Go Everysight’’.
Once active, either say "Volume up" or " Volume down"
in order to adjust volume.

Raptor User Manual
2017 EverySight Ltd. Proprietary Page 20 of 46 Rev 1.0
Adding/Removing Bluetooth Devices and Sensors (Optional)
You can pair Everysight Raptor with the Raptor Controller and additional Bluetooth sensors
like: a Heart Rate Monitor, a power meter, speed, and cadence giving you deeper insight to
your rides.
10. On your Raptor glasses main menu, navigate by swiping
the touchpad to Settings. Tap to select.
11. Once in the Settings menu, navigate to Sensors and
Devices. Tap to select.
12. Once in the Sensors and Devices menu, navigate to the
device or sensor you want to connect to. Tap on the device
or sensor type to begin a Bluetooth scan, now swipe until
you see your device name and tap on it to pair it with your
Raptor.
13. Once connected, you will be returned to the sensors and
devices menu and the device or sensor you are connected
to, will be highlighted in green.
14. To Remove a Sensor or Device, simply rotate the carousel
until the desired sensor is centered and includes it’s label
and Swipe Up to disconnect from this device.
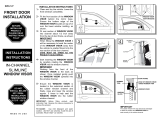
Configure Your Raptor’s Screen Layout
Your Raptor can display up to six customized screens of information and statistics while you
are riding. Once setup, you can swipe forward to
change between them as you ride.
Each display contains one primary and 4 secondary
display fields that can measure up to 7 different
metrics, depending on the sensors connected to Raptor
(Speed, cadence, heart rate, power, distance, elevation
and time).
/