Page is loading ...

1. Attach nipple(-a) to the mounting strap, then secure it with a
washer and hex nut.
2. Attach the mounting strap to the outlet box by using two
mounting screws.
3. Carefully thread the wires through the upper fixture and loop,
screw the upper fixture onto nipple(-c) securely.
4. Secure the loop onto nipple(-b).
5. Adjust the arms of the fixture according to the drawing of the
package.
Important:
a. The arms should be positioned with equal distances
between them.
b. The arms should be fixed securely.
6. Choose the length of the chain you need, then weave the fixture
wire and the fixture grounding wire through the chain. Then
connect one end of the chain with the loop by using the loop lock.
7. Secure the top loop to nipple(-a) tightly.
8. Thread the fixture wire and fixture grounding wire through the
collar, canopy, top loop, nipple(-a) and mounting strap.
9. Connect the other end of the chain with the top loop by using the
loop lock.
10. Pull out the outlet wires and house grounding wire from the outlet
box. Make wire connections with wire nuts:
---The smooth wire (marked) from the fixture to the black wire
from the power source.
---The ridged wire (unmarked) from the fixture to the white wire
from the power source.
---Attach the fixture grounding wire to the mounting strap with
the green grounding screw. Then connect it to the house
grounding wire with the wire nut.
Carefully put the wires back into the outlet box.
11. Attach the canopy to the mounting strap by inserting the top
loop, then secure it with the collar.
12. Attach a rubber pad, glass holder and decorative cap to the
holder by inserting nipple(-d), then secure them with the finial.
13. Attach the candle covers and glass caps onto the sockets,
then install bulbs (not included). See relamping label at
socket area or packaging for maximum allowed wattage.
14. Install the crystal drops and pearl strands as shown in
diagram.
Note: To replace broken crystal drops -Open the pins
to remove the crystal drops, hook the new crystal drops,
and then close back pins. Avoid bending the pins into
sharp angle.
15. Turn on the power at the main fuse or circuit
breaker box.
WARNING: BE SURE TO SHUT OFF POWER AT THE MAIN FUSE OR CIRCUIT
BREAKER BOX BEFORE INSTALLING OR SERVICING THIS FIXTURE.
NOTE: 1. Before installing, consult local electrical codes for wiring and grounding requirements.
2. READ AND SAVE THIS INSTRUCTION.
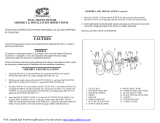
Fixture Wire
Chain
Mounting Screw
Nipple(-a)
Fixture Grounding
Wire
Collar
Top Loop
Canopy
Mounting Strap
Green Grounding Screw
Hex Nut
Wire Nut
Washer
Outlet Box
House Grounding Wire
Loop Lock
Loop Lock
Loop
Upper Fixture
Socket
Candle Cover
Glass Cap
Nipple(-b)
Nipple(-c)
Arm
Pearl Strand
Holder
Nipple(-d)
Rubber Pad
Glass Holder
Decorative Cap
Finial
1
3
3
3
2
Note: Spare crystal
drops are enclosed
in hardware bag.
(3) PCS.
(3) PCS.
(15) PCS.
1
2 3
Assembly Instructions
Aimee Chandelier # HAME0855
/