Aquasana THD-UV-STD Installation guide

Type
Installation guide

This manual is also suitable for

Installation Instructions
EQ-WELL-UV Whole House Well Water Filter
Welcome to the Aquasana experience. You are about to enjoy
clean, clear water and the peace of mind that comes from
knowing award winning filter technology is working for you.
Installation must comply with state and local laws.
Contents
5-micron pre-filter unit
Model: EQ-PRE34.20PTW
0.35-micron post-filter unit
Model: EQ-PRE34PTW
EQ-WELL-UV Rhino
UV anti-bacterial post-filter
Model: AQ-UV-STD
Install kit:
1
2 support brackets
2
1 filter housing wrench
3
1 ball type shut o valve
4
6 nipples ¾” x 3”
5
3 unions
6
1 Hose Adaptor
Replace:
EQ-304.20
Replace:
PFC.35
Replace:
AQ-UV-STD-LAMP
UV post-filter
mounting kit
You can be confident your Aquasana Whole House system is
providing clean, clear water to every tap in your home.
1
2
3
4
5
6
Installation – check precautions before installing
1. KEEP THE UNIT IN AN UPRIGHT POSITION AT ALL TIMES.
2. Remove the red shipping caps from the inlet & outlet ports on the main housing.
3. Precondition the unit by “surge flushing”: It is very important that this system is flushed
properly prior to final installation. The granular carbon medium used in the bottom tank
contains 1-2% by volume of carbon fines that should be flushed out prior to use. The best
method for purging these carbon fines from the media bed is “surge flushing”:
Using the supplied adapter, connect a garden hose to the inlet port so that the water will
flow into the system and out of the outlet port. Slowly turn on the water and allow the
discolored water to flow from the outlet into a bucket or drain. The first few gallons will
appear black and cloudy due to carbon fines. After an initial 2-5 minute flushing, begin a
period of “surge flushing.” Turn the water supply on for 30 seconds and then off for 30
seconds repeatedly for 5-10 minutes or until initial surge of water is completely clear and
free from discoloration and cloudiness. Once the unit has been properly flushed, be sure
the white washers are properly set inside the inlet and outlet ports. Disconnect it from
the garden hose and position it for final installation.
4. Turn o water supply prior to installation.
5. Install the unit to the main water supply using the supplied components. Do not over tighten
fittings, as this may cause leakage and broken fittings. Do NOT use pipe dope. The use of pipe
dope voids the warranty. You may use NSF-certified pipe primer, glue and plumbers tape.
6. IMPORTANT: The inlet piping assembly (valve, pre-filter, main filter unit, post-filter, UV filter,
union and nipples) must be firmly braced and supported.
7. Once installation is complete, slowly turn the water on and inspect for leaks.
8. Once the unit is installed and checked for leaks, open the water faucet closest to the installed
unit and allow water to run for 5-10 minutes for the final flushing period.
THIS UNIT MUST BE INSTALLED BY A
LICENSED PLUMBER TO VALIDATE THE WARRANTY
Shut-o
5-micron
pre-filter
0.35-micron
post-filter
UV FIlter
EQ-Well-R
Direction of flow
The EQ-Well-UV system filters out sediment, protects your home from the
scale that comes from hard water and includes a UV filter to kill bacteria.
Mounting bracket and plumbing
This guide covers installation and maintenance of a basic “generic” system. Installer determines
configuration of each system and must adapt these instructions to meet the specific
requirements for that configuration. Using pipe dope voids the warranty. All inter-component
connections use standard plumbing components and tools.
Additional UV installation instructions
Caution: do not use any damaged component.
If damage is found, contact Aquasana at 866-662-6885.
1. Unpack boxes and verify that all required components are included.
2. Inspect each component for damage.
3. Determine location for installation of the UV system:
A. The UV well water filter system must be installed with the sumps oriented vertically.
B. Mounting point should allow sucient room above and below UV system to service the
sumps and UV lamp without removing the UV system. The minimum space is 20” (above
and below).
4. For ease of mounting, reduce the weight of the larger systems by removing the sumps and
filters prior to installing the mounting bracket.
5. Select a location and install the mounting bracket using the provided screws
Warnings
• Follow instructions carefully!
• Never look directly at a lighted UV lamp.
• Ultraviolet rays can be harmful to eyes.
• Always shut o water to system and disconnect power when servicing.
• Assembly is required before installation.
• Internal components are fragile.
• This system must be installed in accordance with applicable city, country, and local
plumbing codes.
• Aquasana products are designed to provide years of trouble-free service if properly
maintained.
• Retain these instructions for future service or usage information.
UV Filter Kit Installation Guide
The control module must
be mounted higher than
the UV system.
Sub-micron
Post-Filter
Attach mounting
brackets to the wall.
Mount UV filter.
Direction of flow
To House
Attach the male end of the flex hose
to the UV inlet. (Use plumber’s tape)
Attach the
female end of
the flex hose to
4” threaded
nipple. (Use
plumber’s tape)
Position control
module to allow for a
drip loop on the cord.
Rhino
®
Whole House Water Filter
The UV Filter included with your Aquasana
Whole House Well Water filter is the best line of
defense against bacteria that other filters dont treat.
Operating specifications
Installation of the filter must comply with existing state and local plumbing codes.
Sediment pre-filter cartridges should be changed as needed. (When you can no longer
detect the original white color of the filter, it is time for replacement. Sediment levels vary
greatly, so regular visual inspections are reccommended during the first year. )
Install on cold water lines only. Operating temperature range: 40° – 90°F.
Protect unit from freezing.
Do not install the unit on its side. It needs to be installed upright to maximize contact with
media. It is recommended your system be installed inside and out of direct sunlight. If this
is not possible and the system is outdoors or in a sunny area, the installation requires the
use of sun-proof sumps. Please contact our sales and service department 866-662-6885 to
discuss the specifics of your installation.
Cleaning: use only warm, soapy water to clean the outside of the housing. Rinse well with
fresh, clean water. Never use chemical cleaning products on the filters exterior surface
because they may damage the filter housing.
Precautions
• Aquasana recommends using only plastic fittings to connect the inlet and outlet ports of the
UV well water filter system. Use of metal male fittings inside of plastic female threaded heads
voids the warranty.
• Do not install clear or translucent tubing on the outlet side of the UV filter.
• Do not over-tighten fittings connected to inlet/outlet ports of the UV well water filter system.
• Water pressure must not exceed 75 psi or a pressure regulator must be used. Warranty is void
if the unit is used with pressure exceeding 75 psi. Higher pressures may damage equipment
and may not allow for proper exposure time with UV lamp.
• Do not install pump on outlet side of system as damage to the quartz sleeve may occur.
If pump is required, install it on inlet side of system and verify output pressure does not
exceed 75 psi.
• The system will not function properly if water flow is reversed.
• Filter is only to be used on a cold water line.
• Aquasana is not liable for consequential or incidental damages due to improper installation.
Use and care
• Customization options are available to address any specific concerns you may have. The best
way to establish your specific needs is to conduct a water test. Contact us by phone at 866-
662-6885 to make arrangements and get recommendations.
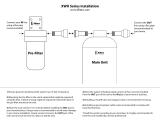
Component one: Sediment pre-filter
• Sediment levels vary from one location to another. During the first year of use, a visual
inspection monthly is recommended. The sediment pre-filter is white when you initially install
it. Once you can no longer see white, it is time to replace the filter with a new one (EQ-304-
20). Allowing sediment to continue to collect can cause clogging and prevent the flow of
water into your home.
Component two: Rhino 2-stage whole house filter
• This filter unit has a capacity of 500,000 gallons (may vary depending on water conditions.)
You replace the unit in its entirety every 500,000 gallons. Check with your plumber at the
time of installation about adding a meter to your system. Typically the average family of four
will consume that amount in 3-5 years. Unions are located on each side of the tank for ease of
replacement. To replace the filter, it is not necessary to contract a plumber. The replacement
tank part number is EQ-Well-R.
Component three: Post Filter
• The post-filter, utilized to remove particulates up to 60 times smaller than the eye can see,
should be replaced every nine months. This is an important step in the sterilization of bacteria
in the UV disinfection process. The water needs to be as pristine as possible to prevent
harmful bugs “hiding” behind any particulates. An added benefit is that any cysts (such as
giardia or cryptosporidium) will also be captured.
Component four: UV disinfectant
• Annual replacement of the bulb is a must. Contact Aquasana directly for the replacement
bulb: part number AQ-UV-STD-LAMP. The steps to replace the bulb are included with the
replacement bulb.
Do not use with water that is microbiologically unsafe or of unknown
water quality without adequate disinfection before or after the system.
Systems certified for cyst reduction may be used on disinfected waters
that may contain filterable cysts.
Pure Satisfaction
All Aquasana products oer a 90-day 100% money-back guarantee.
(A five-year warranty is included, which covers defects in materials
and workmanship.) If for any reason you are not satisfied with
your purchase, simply call us or the dealer you purchased from for
a Return Authorization Code, and a full refund will be promptly
issued upon return. Thank you for choosing Aquasana!
Specifications
Model: EQ-Well-UV
Replacement cartridges:
Main tanks: EQ-Well-R
Pre-filter: EQ-304-20
Post-filter: PFC.35
UV-bulb kit: AQ-UV-STD-LAMP
Rated service flow: 7 gpm
Max working pressure: 75 psi
Max operating temperature: 40-90° F
Max capacity: 500,000 gal
(System capacity may vary depending on water conditions)
The EQ-Well-UV system provides clean water from your well
that is safe for consumption and will extend the life of your
appliances by reducing sediment and scaling.
This lter system is designed and tested for use with genuine Aquasana parts including
replacement lters and all hardware. Use of parts from other manufacturers may result in
loss of contaminant reduction performance, system damage or failure. Use of parts from
other manufacturers will also void your warranty. Please visit www.aquasana.com for all
replacement parts.
Aquasana, Inc.
6310 Midway Road
Haltom City, Texas 76117
866.662.6885 USA
877.332.7873 Canada
www.aquasana.com
For exclusive deals
facebook.com/aquasana
twitter.com/aquasana
eqWellUVinstall_20170413
  • Page 1 1
  • Page 2 2
  • Page 3 3
  • Page 4 4
  • Page 5 5
  • Page 6 6
  • Page 7 7

Aquasana THD-UV-STD Installation guide

Type
Installation guide
This manual is also suitable for

Ask a question and I''ll find the answer in the document

Finding information in a document is now easier with AI