Page is loading ...

Bernini Rechargeable Garden
Fountain Owners Manual


PLEASE READ FIRST BEFORE RETURNING
Please call us for assistance at 0203 617 1773
or email us at: customercare@berninifountainsuk.com
If you have any questions regarding assembly, parts, or operation,
please visit our website at www.Berninifountainsuk.com. You will nd
instructional videos on how to assemble and operate your fountain, and
keeps you up to date on our newest products. You can also email us
with any questions you have.
This product comes with a six (6) month limited warranty
against materials and workmanship.
Please review the list of accessories included with your
Bernini™ fountain on the next page. Please note, images of parts
are not to scale with one another.


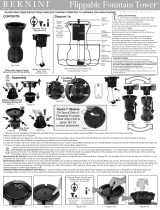
CONTENTS
1 Step 1: Assembling Base & Large Bowl
2 Bowl Locking System
4 Step 2: Preparing e Large Bowl For e Floral Plate
5 Attaching e Water Pump Tube
5 Filling Your Fountain
6 Step 3: Installing e Floral Plate
7 Installing e Floral Plate
8 Floral Plate Alignment Notches
9 Step 4: Connection Port & Battery Installation
10 Connecting e Battery
11 Inserting the Battery Compartment Door
12 Removing e Battery Compartment Door
13 Step 5: Water Spray Tip Alignment & Adjustment
14 Water Spray Tip Alignment & Adjustment
14 Adjustment Points
15 LED /Lights Adjustment
15 Spray Nozzle Adjustment
16 Step 6: Fountain Startup
17 Prior to Startup
17 Operating your Fountain
20 Step 7: Installation Of e Dancing Water Attachment & Bird Finial
21 Dancing Water Attachment Installation
21 Bird Finial Installation
23 Troubleshooting & Maintenance
23 Cleaning Your Fountain
23 Cleaning Out e Spray Nozzle Plugs
24 Cleaning e Spray Nozzles
24 Cleaning e Spray Nozzle Holes
24 Cleaning e Finial Drain Tubes
25 Cold Storage
25 Recharging e Battery
26 Cleaning e Water Pumps
26 Water Pump Air Filters
26 Water Pump Impeller
27 Priming e Water Pump
28 Water Pump Tray
28 Water Pump Electrical Connectors
30 Using Leveling Shims
30 Weighing Down Your Fountain
30 Water Pump Connection

Parts for Your Bernini™ Fountain
Battery Compartment
Door
Finial
Base
Large Bowl
(2 Water Pumps
& LED Lights
pre-installed)
Rechargeable
Battery
Parts for your
Bernini
™
Fountain:
Floral Plate
Dancing Water
Attachment
Extension Tube
Leveling Shim
Connection Port
Battery Charger
Water Pump
Tube
Parts for Your
Bernini
™
Fountain:
Bird Attachments
Black Foam
Ring
Spare Fine
Mesh Filter

Remember if you need help contact Customer Care: 0203 617 1773
|1
Assembling
Base &
Large Bowl
You will need:
Base
Step 1:
Large Bowl
(2 Water Pumps
& LED Lights
pre-installed)

2|
Remember if you need help contact Customer Care: 0203 617 1773
Step1: Be sure to
place the base of
your fountain on a
rm, at surface.
Step 3:. Set the Large Bowl
on the Base ensure that
you line up the inner locking
grooves and apply downward
pressure on the Base with
your foot to hold it in place &
prevent it from turning.
Note: You will notice that there are two dierent sized tabs on the bottom of the Large
Bowl and there are two corresponding grooves in the top of the Base.
These tabs t together and lock when turned clockwise.
Bottom of Large Bowl Top of Base
Bowl Locking System
A look at how the bowl locking system works on your Fountain.
Step 2:.On the bottom of
the large bowl you will nd
two black cables. Feed
these cables thought the
base.

|3
Remember if you need help contact Customer Care: 0203 617 1773
Step 4: Turn the large bowl a
quarter turn clockwise to lock it
into place.
At this point, your fountain should look like the
image above. Go to the next page for the next
step to setup your new Bernini™ Fountain.
Note: If one or both of the Water Pumps has come out of the Water Pump
mounting plate simply push it back into the designated holder until it locks
into place. Refer to the picture below for correct positioning.
You will have three cables
hanging down inside of the
Base. These will be connected
in a later step.

Remember if you need help contact Customer Care: 0203 617 1773
4|
You will need:
Assembled
Base &
Large Bowl
Step 2:
Preparing The
Large Bowl For
The Floral Plate
Water Pump Tube

Remember if you need help contact Customer Care: 0203 617 1773
|5
In this step you will be
installing the tube on to the
Center Water Pump.
Step 1: Hold the water pump
tube and place the bigger
end onto the center water
pump.
Step 2: Push into place with
minimal force.
Attaching The Water Pump Tube
Note : One end of the Water Pump Tube is larger than the other, ensure to
connect larger end towards the Water Pump.
At this point, your fountain should look
like the image on the right. Go to the next
page for the next step to setup your new
Bernini™ Fountain.
Fill Your Fountain
After you have assembled the water pump you can now ll the Large Bowl until the
water is about 1 inch (2.5 centimeters) from the top of the tabs.

Remember if you need help contact Customer Care: 0203 617 1773
6|
You will need:
Step 3:
Installing
The Floral
Plate
Floral Plate
Fountain
Assembled

Remember if you need help contact Customer Care: 0203 617 1773
|7
Step 4: Rest the Floral Plate
on the tabs built into the
Large Bowl.
Step 3: Position the Floral
Plate so that the curved cut
outs in the Floral Plate are
aligned with the LED Lights
and spray tips.
Installing The Floral Plate
After installing the Water Pump Tube, you are now ready to install the
Floral Plate to the fountain.
Step 1: The Floral Plate can
be heavy, hold it with both
hands.
Step 2: Align the Water
Pump Tube with the hole in
the middle of the Floral Plate.
Step 5: Install the Black
Foam Ring in to the center
of the Floral Plate around the
Water Pump Tube.
In the Large Bowl there are
small tabs for the Floral Plate
to sit on. Make sure that your
Floral Plate is resting on the
correct spot.

Remember if you need help contact Customer Care: 0203 617 1773
8|
At this point, your fountain should look like the image on the
left. Go to the next page for the next step to setup your new
Bernini™ Fountain.
This shows the Black Foam Ring installed
properly.
You will notice 4 small notches in the Floral
Plate. These notches are to align the Floral
Plate in the Large Bowl which should align
with the point shape in the bowl. If they do
not, lift the oral plate up and rotate to next
position and set back down until they
line up. Note: this is not critical, this
just to help properly align the plate
& bowl.
Floral Plate Alignment Notches

Remember if you need help contact Customer Care: 0203 617 1773
|9
You will need:
Fountain
Assembled
Step 4:
Connection Port
& Battery
Installation
Rechargeable
Battery
Battery
Compartment
Door
Connection Port

10|
Remember if you need help contact Customer Care: 0203 617 1773
Connecting The Battery
Step 2: Connect the color
coded cords from inside the
Base to the corresponding
color coded receptacles on
the Connection Port.
Use the image below for
more help on connecting the
battery.
Step 3: Place your
connection port inside
the designated angled
area located at the back
of your fountain base.
(See illustration below)
Step 4: Place the Battery
inside of the compartment in
front of the Connection Port.
(See illustration)
DO NOT PLACE
BATTERY UPSIDE DOWN
INSIDE OF BATTERY
COMPARTMENT.
Step 1: In the open Battery
Compartment, you will see
three cords hanging down
that you must connect to
the Connection Port.
If you do not see the three
cables inside the battery
compartment, reach up into the
base and gently pull them down
until they are hanging inside the
battery compartment.
Gray
Black
Blue
Red
Gray
(Battery)
Blue
(ABCD Button)
Red
(LED Lights)
Black
(Water Pump)
A
A
B
B
C
C
D
D
NOTE: USE CAUTION WHEN PLACING BATTERY INSIDE THE COMPARTMENT,
DUE TO THE MANUFACTURING PROCESS THERE MIGHT BE SHARP EDGES.
*

Remember if you need help contact Customer Care: 0203 617 1773
11
Step 1: Start by lining up the
notch in the bottom of the
Battery Compartment Door with
the notch in the bottom of the
battery opening.
Step 2: Push the Battery
Compartment Door in toward
the Base. You will know it is in
position when the magnet locks
the door in place.
Once the door is in place,
you may notice a small notch
in the bottom left corner of
the Battery Compartment
Door. This is for the optional
Bernini™ solar panel cord.
Inserting The Battery Compartment Door
After you have connected the cables inside your fountain to the Rechargeable Battery,
you should then place the Battery Compartment Door on the Base of the fountain.
* NOTE: The Connection
of the Water Pump cable
(black cable) screws
together to ensure a tight &
secure connection.

Remember if you need help contact Customer Care: 0203 617 1773
12|
Step 1: Carefully disconnect
the Battery Compartment
Door from the Base by gently
pulling outward from the top.
Step 2: Then, pull the
Battery Compartment door
up and out to remove from
the Base.
DO NOT OVEREXTEND THE
BATTERY COMPARTMENT
DOOR BY PULLING DOWN!
This may cause damage to
your new Bernini™ Fountain.
At this point, your fountain should look like the
image on the left. Go to the next page for the next
step to setup your new Bernini™ Fountain.
Removing The Battery Compartment Door

|13
Remember if you need help contact Customer Care: 0203 617 1773
You will need:
Water Spray Tip
Alignment &
Adjustment
Step 5:
Fountain Assembled

14|
Remember if you need help contact Customer Care: 0203 617 1773
Water Spray Tip Alignment & Adjustment
Next you will adjust the 4 water tips in the Large Bowl. If 1 or all the 4 water tips in the
large bowl require adjustment please refer to the illustration bellow.
Adjustment Points
Adjustment 1: This adjustment will move the spray pattern up and down only.
Adjustment 2:
This adjustment will move the spray pattern up and down or left and right.
NOTE:
The nut for adjustment point 2 comes from the factory pre-tightened
for proper tension. However if you nd that the adjustment tension has
loosened , this nut can be tightened to achieve proper tension but do not
overtightened or damaged may occur.
Adjustment
Point
Adjustment
Point
360
o
Adjustment
Up/Down
Adjustment
/