Page is loading ...

FAQs
Q: Can I use it with only one rod?
A: Yes! The towers can stand on their own without either rod attached.
Q: How many shelves do I need to install?
A: You only need to install shelves at the bottom and very top of each tower.
Q: Can I install the shelves in any order?
A: Yes! Customize the unit to fit your storage needs. Make sure there is a top
and bottom shelf for stability.
Specifications
Dimensions: 48" W x 16" D x 72" H
Overall weight capacity: 350 lbs.
Weight capacity per small shelf: 40 lbs.
Weight capacity per large shelf: 100 lbs.
Weight capacity per rod: 35 lbs.
Customer Service:
Tel 1.310.533.3800
Tel 1.800.323.5565
Fax 1.310.533.3899
Monday through Friday 9:00 am - 4:30 pm (Pacific Time)
Seville Classics, Inc.
Torrance, CA 90501 USA
www.sevilleclassics.com
©2019 Seville Classics, In
AR190306
ASSEMBLY INSTRUCTIONS
Model #: SHE05816
Thank you for choosing Seville Classics! We hope that you enjoy your
commercial-grade steel wire shelving! Please read through this guide for
parts list, assembly instructions, frequently asked questions and further
contact information.
Important: Retain for future reference, read carefully.
Please make sure you have all the parts before assembly.

Parts List
Please make sure you have all the parts on this list.
A.
Bottom poles (6)
(Threaded end)
B.
Top poles (6)
(Plastic cap on end)
C.
Screw Connectors
(May be attached to Pole)
(6)
D.
Slip Sleeves (24)
E.
Long Shelves (2)
F.
Small Shelves (2)
G.
Rod Bracket (2)
H.
Hooks (4)
I.
Hanging Rods (2)
J.
Screws (4)
K.
Leveling Feet (6)
1
6

5
2
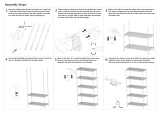
STEP 7.
Secure HOOKS (H) on the top
LARGE SHELF (E) and ROD
BRACKET (G). Attach HANGING
RODS (I) with SCREWS (J).
Congratulations!
Enjoy your new closet organizer.
Assembly Instructions
STEP 1.
Screw LEVELING FEET (K) or
into base of
BOTTOM POLES (A).
Snap SLIP SLEEVES (D) around the
grooves on BOTTOM POLES (A) for
your lowest shelf.
STEP 2.
Fit LARGE SHELF (E) over the top of
the 4
poles and over SLIP SLEEVES
(D).
Lightly tap shelf into place.
TIP!
Adjust the depth of the
HOOKS (H) to offset the rods for
more hanging space.

4
3
STEP 3.
Repeat STEPS 1-2 for next
SMALL SHELF (F).
STEP 4.
Screw in TOP POLES (B).
Fit SHELF (E) and SHELF (F) over
Fit the ROD BRACKETS (G) over
the top of the 4
poles and over
SLIP SLEEVES (D).
Lightly tap shelf into place.
STEP 5.
Fit SMALL SHELF (F) over the top
of the 4 poles and over SLIP
SLEEVES (D).
Lightly tap shelf into place.
STEP 6.
Fit LARGE SHELF (E) over the top
of the 4 poles and over SLIP
SLEEVES (D).
Lightly tap shelf into place.
TIP! If tower is too high to place
final shelf, tilt the unit on its side.
/