RAB Lighting ALED5S78N/D10 USA Operating instructions
- Category
- Motorcycle Accessories
- Type
- Operating instructions

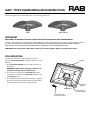
ALED TYPE V SQUARE INSTALLATION INSTRUCTIONS
Thank you for buying RAB lighting xtures. Our goal is to design the best quality products to get the job done right. We’d like to hear your comments.
Call the Marketing Department at 888-RAB-1000 or email: marketing@rabweb.com
®
IMPORTANT
READ CAREFULLY BEFORE INSTALLING FIXTURE. RETAIN THESE INSTRUCTIONS FOR FUTURE REFERENCE.
Fixtures must be wired in accordance with the National Electrical Code and all applicable local codes. Proper grounding is required
for safety. THIS PRODUCT MUST BE INSTALLED IN ACCORDANCE WITH THE APPLICABLE INSTALLATION CODE BY A PERSON
FAMILIAR WITH THE CONSTRUCTION AND OPERATION OF THE PRODUCT AND THE HAZARDS INVOLVED.
WARNING: Make certain power is OFF before installing or maintaining xture. No user serviceable parts inside.
Housing Wires
Housing
Tenon Pole
Adaptor
(5) Set Screw 5/8”
(to secure 3”Tenon)
POLE MOUNTING
The xture is suitable for outdoor applications in wet
locations. Tenon Pole Adaptor can t tenon with 3” or 2-3/8”
diameter.
1. Place Tenon Pole Adaptor over tenon. Be careful not to
pinch wires.
WARNING: To prevent wiring damage or abrasion, do
not expose wiring to edges of sharp objects.
2. For 3” tenon use shorter tenon Set Screw 5/8” and for
2-3/8” tenon use longer tenon Set Screw 1-1/4” to secure
the Housing to tenon.
3. Use appropriate UL approved wire connectors as required
by code to complete wiring with supply wires. Be careful
not to pinch wires. Knot the wires for strain relief.
(5) Set Screw 1-1/4”
(to secure 2/”Tenon)
ALED5S ALED5S with PCT

ALED TYPE V SQUARE INSTALLATION INSTRUCTIONS
Thank you for buying RAB lighting xtures. Our goal is to design the best quality products to get the job done right. We’d like to hear your comments.
Call the Marketing Department at 888-RAB-1000 or email: marketing@rabweb.com
®
TROUBLESHOOTING
1. Check that the line voltage at xture is correct. Refer to
wiring directions.
2. Is the xture grounded properly?
CLEANING & MAINTENANCE
CAUTION: Be sure xture temperature is cool enough
to touch. Do not clean or maintain while xture is
energized.
1. Clean glass lens with non-abrasive glass cleaning
solution.
2. Do not open xture to clean the LED. Do not touch the
LED.
ALED5S IN-0116
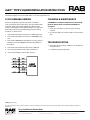
010V DIMMABLE WIRING
Universal voltage driver permits operation at 120V thru
277V, 50 or 60 Hz. 0-10V control wires must be rated for 300V
minimum. Units ordered with (/480/D10) sux are 480V.
Factory ordered xtures with sux (/D10/PCT) are 120V-277V
twist-lock photocell. For 0-10V Dimming, follow the wiring
directions as shown below.
1. Connect the black xture lead to the (+) LINE supply lead.
2. Connect the white xture lead to the (-) COMMON supply
lead.
3. Connect the GROUND wire from xture to supply ground.
Do NOT connect the GROUND of the dimming xture to
the output.
4. Connect the purple xture lead to the (V+) DIM lead.
5. Connect the gray xture lead to the (V-) DIM lead.
6. Cap the yellow xture lead. Do NOT connect.
Easy Installation & Product Help
Tech Help Line
Call our experts 888 RAB-1000
©2016 RAB LIGHTING Inc.
Northvale, New Jersey 07647 USA
rabweb.com
Visit our website for product info
email
Answered promptly sales@rabweb.com
Note: These instructions do not cover all details or variations in equipment nor do they provide for every possible situation during installation operation or
maintenance.
Pending: Pat. pending

RECEPTICLE OPTIONS
Thank you for buying RAB lighting xtures. Our goal is to design the best quality products to get the
job done right. We’d like to hear your comments. Call the Marketing Department at 888-RAB-1000,
or email: marketing@rabweb.com
IMPORTANT
READ CAREFULLY BEFORE INSTALLING FIXTURE. RETAIN THESE INSTRUCTIONS
FOR FUTURE REFERENCE.
RAB xtures must be wired in accordance with the National Electrical
Code and all applicable local codes. Proper grounding is required
for safety. This product must be installed in accordance with the
applicable installation code by a person familiar with the construction
and operation of the product and the hazards involved.
WARNING: Make certain power is OFF before installing or
maintaining xture.
5PR 7PR-IN-1216
Note: These instructions do not cover all details or variations in equipment nor do
they provide for every possible situation during installation, operation or maintenance.
Easy Installation & Product Help
Tech Help Line
Call our experts 888 RAB-1000
©2016 RAB LIGHTING Inc.
Northvale, New Jersey 07647 USA
rabweb.com
Visit our website for product info
email
Answered promptly sales@rabweb.com
5 PIN RECEPTACLE
Units ordered with (/5PR) sux is supplied with 5-Pin receptacle
without photocell.
7 PIN RECEPTACLE
Units ordered with (/7PR) sux is supplied with 7-Pin receptacle
without photocell. Brown and Orange wires from the 7-Pin receptacle
are not connected and are reserved to DALI or other control systems.

ALED TYPE V WITH WS SENSOR
Thank you for buying RAB lighting xtures. Our goal is to design the best quality products to get the job done right. We’d like to hear your comments.
Call the Marketing Department at 888-RAB-1000 or email: marketing@rabweb.com
®
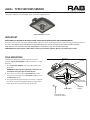
POLE MOUNTING
The xture is suitable for outdoor applications in wet
locations. Tenon Pole Adaptor can t tenon with 3” or 2-3/8”
diameter.
1. Place Tenon Pole Adaptor over tenon. Be careful not to
pinch wires.
WARNING: To prevent wiring damage or abrasion, do
not expose wiring to edges of sharp objects.
2. For 3” tenon use shorter tenon Set Screw 5/8” and for
2-3/8” tenon use longer tenon Set Screw 1-1/4” to secure
the Housing to tenon.
3. Use appropriate UL approved wire connectors as required
by code to complete wiring with supply wires. Be careful
not to pinch wires. Knot the wires for strain relief.
IMPORTANT
READ CAREFULLY BEFORE INSTALLING FIXTURE. RETAIN THESE INSTRUCTIONS FOR FUTURE REFERENCE.
Fixtures must be wired in accordance with the National Electrical Code and all applicable local codes. Proper grounding is required
for safety. THIS PRODUCT MUST BE INSTALLED IN ACCORDANCE WITH THE APPLICABLE INSTALLATION CODE BY A PERSON
FAMILIAR WITH THE CONSTRUCTION AND OPERATION OF THE PRODUCT AND THE HAZARDS INVOLVED.
WARNING: Make certain power is OFF before installing or maintaining xture. No user serviceable parts inside.
Housing Wires
Housing
Tenon Pole
Adaptor
(5) Set Screw 5/8”
(to secure 3”Tenon)
(5) Set Screw 1-1/4”
(to secure 2/”Tenon)
ALED5S with WS Sensor Sensor
WS Sensor

ALED TYPE V WITH WS SENSOR
Thank you for buying RAB lighting xtures. Our goal is to design the best quality products to get the job done right. We’d like to hear your comments.
Call the Marketing Department at 888-RAB-1000 or email: marketing@rabweb.com
®
TROUBLESHOOTING
1. Check that the line voltage at xture is correct. Refer to
wiring directions.
2. Is the xture grounded properly?
CLEANING & MAINTENANCE
CAUTION: Be sure xture temperature is cool enough
to touch. Do not clean or maintain while xture is
energized.
1. Clean glass lens with non-abrasive glass cleaning
solution.
2. Do not open xture to clean the LED. Do not touch the
LED.
ALED5S WS IN-0418
Easy Installation & Product Help
Tech Help Line
Call our experts 888 RAB-1000
©2016 RAB LIGHTING Inc.
Northvale, New Jersey 07647 USA
rabweb.com
Visit our website for product info
email
Answered promptly sales@rabweb.com
Note: These instructions do not cover all details or variations in equipment nor do they provide for every possible situation during installation operation or
maintenance.
Pending: Pat. pending
www.wattstopper.com
800.879.8585
Wiring Diagrams
Non-Dimming
Driver
LINE
NEUTRAL
NEUTRAL
LOAD
* GROUND
Occupancy Sensor
5E4
800.879.8585
www.wattstopper.com
15195r1
LOAD
LINE
NEUT
(violet)
(grey)
18-20 AWG Solid CU Wire Only
230 VAC, 50 Hz
1200W max ballast
FSP-211
GRND
DIM-
DIM+
14-18 AWG Solid CU Wire Only
High/Low PIR
Non-Dimming Driver
Dimming
Driver
LINE
NEUTRAL
NEUTRAL
*GROUND
GRAY (-)
VIOLET (+)
LOAD
Occupancy Sensor
5E4
800.879.8585
www.wattstopper.com
15195r1
LOAD
LINE
NEUT
(violet)
(grey)
18-20 AWG Solid CU Wire Only
230 VAC, 50 Hz
1200W max ballast
FSP-211
GRND
DIM-
DIM+
14-18 AWG Solid CU Wire Only
High/Low PIR
Dimming Driver
Figure 4. FSP-211 wiring with non-dimming ballast or LED driver.
Figure 3. FSP-211 wiring with dimming ballast or LED driver.
Note: The FSP-211 must be properly grounded.
010V DIMMABLE WIRING WITH WS
SENSOR
Universal voltage driver and WS Sensor permits operation
at 120V thru 277V, 50 or 60 Hz. For 0-10V Dimming with WS
Sensor, follow the wiring directions.
1. Connect the black xture lead to the LOAD of WS Sensor .
2. Connect LINE of WS Sensor to LINE supply lead.
3. Connect the white xture lead and NEUTRAL of WS Sensor
to the COMMON supply lead.
4. Connect the GROUND wire from xture and WS Sensor
to supply ground. Do NOT connect the GROUND of the
dimming xture to the output.
5. Connect the purple xture lead to DIM + of WS Sensor
6. Connect the gray xture lead to the DIM - of WS Sensor
lead.
7. Cap the yellow xture lead, if present. Do NOT connect.
-
 1
1
-
 2
2
-
 3
3
-
 4
4
-
 5
5


RAB Lighting ALED5S78N/D10 USA Operating instructions
- Category
- Motorcycle Accessories
- Type
- Operating instructions
Ask a question and I''ll find the answer in the document
Finding information in a document is now easier with AI
Related papers
-
RAB Lighting ALED150HSW Operating instructions
-
RAB Lighting ALED2T125NRG/PCS2 Operating instructions
-
-
RAB Lighting ALED4T150NW/D10/LC Operating instructions
-
-
-
-
RAB Lighting ALED5S150Y/D10/LC Operating instructions
-
-
RAB Lighting IVAT3-75LPA740ZU Operating instructions
Other documents
-
 PQL -83441PC LED V2 Post Top Fixture User manual
-
 Hyperikon HyperUFOE150-50 Installation guide
-
Legrand FSP-202 Low Voltage 0-10V PIR Fixture Integrated Outdoor Sensor User guide
-
-
Legrand FSIR-100 User manual
-
 Linmore LED AH1 Ace LED High Bay User manual
-
Keystone KT-ALED210 User manual
-
Keystone KT-ALED100-S2-OSA-NM-840-VDIM Owner's manual


