11
20
17a
23
21a
23
22
21
17
19
18
11
12
15
14
13
16
17a
24a
24b
8
24
22
21
20a
NOTE: Hot & cold valves are labeled: cold=blue & hot=red.
-Remove top nut and turn bottom nut with fiber washer down
the valve until it stops.
-Insert valve through hole from below and install top nut
(if applicable), and adjust to proper height, see Fig. 4A
(also refer to "A" dimension table on page 1).
-Tighten the bottom nut to secure the valve.
-Install trim parts (base ring if applicable), escutcheon and handle
and tighten handle set screws with Allen key provided.
REMINDER: Please retain allen key as handles may
require re-tightening with normal use.
-Attach flex lines to valve and spout tee. Hand-tighten. Then go
1/4 to 1/2 turn more with wrench (not supplied). Do not overtighten.
Connect faucet to water supply:
IMPORTANT: Flush supply lines of all debris prior to connecting to lavatory
valve bodies. Debris remaining in the line will damage valve bodies and
cause leaking. Failure to flush the lines could result in voiding the warranty.
5 Install "P" trap:
-Connect your waste "P" trap
to the drain tailpiece.
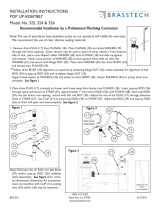
Fig. 4A
Drain
Tailpiece
"P" Trap
(not supplied)
Angle Stop
(not supplied)
Valve
Body
Supply Riser
(not supplied)
2 Install valve bodies:
-Connect supply risers from the angle stops.
NOTE:
P-trap, angle stops, and supply risers
are not supplied. We recommend genuine
Cal-Trim parts available at your authorized
California Faucets dealer.
Installation Note for series:
# 32, 33, 34, 35, 36, 43, 57, 60, 61, 67, 68 & 69.
The trim to those products do not require a top nut to be installed
on the valve (See Fig. 4A)
The decorative base ring and escutcheon takes the place of the
top nut. (See Fig. 4B).
Fig. 4B
Top
Nut
Fiber Washer
Bottom Nut
Valve Body
Flex Line
Brass Nut
(Supplied)
"A"
Sink/
Countertop
Decorative
Base Ring
Valve
Pg 2
4
3
WS
ii
30
0
Install pop-up assembly.
-Remove COLLAR (11) from pop-up assembly and apply
silicone CAULK
(12) (or equivalent) to underside of COLLAR (11)
CAUTION: Do not use or any oil base sealant that may damage finish
-insert drain BODY (17) from underside through sink drain HOLE (13)
& attach to COLLAR (11)
-Align BALL ROD HOLE (17a) toward rear of sink and firmly tighten
FLANGE NUT
(16) against FRICTION WASHER (15), MACK WASHER
(14) and sink drain HOLE (13)
-Remove TAILPIECE (18) from drain BODY (17), apply thread SEALANT
(19) to TAILPIECE (18) threads and tighten into drain BODY (17)
-Insert STOPPER (20) into COLLAR (11) & rotate off-set HOOK (20a) to
front of sink to accept BALL ROD
(21)
-Remove spring CLIP (24a) from BALL ROD (21)
-Place CONE WASHERS (23) on both sides of ball rod BALL (21a) with
NUT
(22) to backside
-Insert BALL ROD (21) into body BALL ROD HOLE (17a) and through
off-set HOOK
(20a)
-Tighten NUT (22), but allow BALL ROD (21) to freely move up & down
-Place STRAP
(24) onto LIFT ROD (8) and tighten THUMB-SCREW (24b)
-Place one end of CLIP (24) onto BALL ROD (21), then STRAP (24), gently
squeeze CLIP
(24a) and slide other end of CLIP (24a) onto BALL ROD (21)
-Check proper operation of STOPPER (20) and adjust by sliding STRAP (24)
on LIFT ROD (8) as necessary