Page is loading ...

Installation/Owner’s Manual
1603
1603
1603
Copyright 2009 DoorKing, Inc. All rights reserved.
Copyright 2020 DoorKing
®
, Inc. All rights reserved.
Use this manual for circuit board 1601-010 Revision W or higher.
Date Installed:
Installer/Company Name:
Phone Number:
Leave Manual with Owner
Barrier Gate Operator with Auto Spike System
Circuit Board
Serial Number
and Revision Letter:
CL
AS
S
C
E
R
T
IF
IE
D
TO
C
A
N
/
CSA
C2
2
.2
NO.
2
4
7
CONFORM
S
T
O
AN
S
I/
UL
-3
2
5
VEHICU
LAR
GATE
O
PERA
TO
R
HP
5
3
3
8
2
M
O
DE
L
SE
RI
AL
VO
LT
S
PHAS
E
AM
PS
6
0
Hz
M
AX GA
T
E
L
O
A
D
Do
o
r
K
i
n
g
,
In
c
.,
In
gl
e
wo
o
d
, CA
Moving Gate Can Cause
Serious Injury or Death
KEE
P CLEAR!
Gate may mov
e
at any time
without prior warning.
Do not let children operate the gate or play
in the gate area.
This entrance is for vehicles only.
Pedestrians
must use separate ent
ranc
e.
THIS PRODUCT IS TO BE INSTALLED AND SERVICED BY A TRAINED GATE SYSTEMS TECHNICIAN ONLY.
Visit
www.dkslocator.com
to find a professional installing and servicing dealer in your area.
CAUTION: Installation and use of traffic control spike unit in areas that are subject to freezing
weather with the potential of snow and ice accumulation is not recommended.
The unit may freeze in the up position and cause unintended injury or damage due the
inability of the spikes to retract.
Conforms To UL STD 325
Certified To CSA STD C22.2 # 247
1603-065-H-5-20

1603-065-H-5-20
2
UL 325 Entrapment Protection
Class I - Residential
Vehicular Gate Operator
Class II - Commercial/General Access
Vehicular Gate Operator
Class III - Industrial/Limited Access
Vehicular Gate Operator
Class IV -
Restricted Access
Vehicular Gate Operator
A vehicular gate operator (or system) intended for use in garages
or parking areas associated with a residence of one-to four single
families.
A vehicular gate operator (or system) intended for use in a
commercial location or building such as a multi-family housing
unit (five or more single family units), hotel, garages, retail store,
or other buildings accessible by or servicing the general public.
A vehicular gate operator (or system) intended for use in an
industrial location or building such as a factory or loading dock
area or other locations not accessible by or intended to service
the general public.
A vehicular gate operator (or system) intended for use in a
guarded industrial location or building such as an airport security
area or other restricted access locations not servicing the general
public, in which unauthorized access is prevented via supervision
by security personnel.
UL 325 Classifications
Authorized
Personnel ONLY
Entrapment Protection Types
Gate Operator Category
Type A - Inherent entrapment protection system.
Type B1 - Non-contact sensor (photoelectric sensor or the equivalent).
Type B2 - Contact sensor (edge device or equivalent).
Type C - Inherent force limiting, inherent adjustable clutch or inherent pressure relief device.
Type D - Actuating device requiring constant pressure to maintain opening or closing motion of the gate.
* B1 and B2 means of entrapment protection must be MONITORED.
Vertical Barrier Note: Barrier gate operators (arm)
that is not intended to move toward a rigid object
closer than 16 inches (406 mm) are not required to
be provided with a means of entrapment protection.
Horizontal Slide, Vertical Lift, Vertical Pivot Swing, Vertical Barrier (Arm)
A, B1*, B2* or D A, B1*, B2*, C or D
Effective January 12, 2016
STATE PRISON
ident
e Operator
or system) inte
Safety - 1

1603-065-H-5-20
3
SPEED
LIMIT
5
Safety Information for Vertical Barrier Arm and Spikes
Traffic Light
Speed Bump
Hazard Stripes
E
B
D
F
E
G
C
G
Helps increase distance
and time between vehicles.
No stopping or standing zone.
Permanently painted on pavement
and easily visible.
Separate
Pedestrian
Walkway
Located so pedestrians
cannot come in contact
with the barrier arm.
Non-Contact Sensor
C
Minimizes the potential of the arm lowering on
vehicular or other traffic that loops cannot sense.
Contact Sensor
D
Minimizes the potential of the arm lowering on
vehicular or other traffic that loops cannot sense.
Spike Warning and Illumination
E
It is extremely important that traffic spikes are
installed in an area that is illuminated and clearly
marked with spike warning signs (DoorKing’s
model 1615 illuminated warning sign kits).
Speed Limit Sign
F
Warning Signs
B
Helps control traffic.
Down Loop
A
Minimizes the potential of the
arm closing when a vehicle is
present. Number and
placement of loop(s) is
dependent on the application.
MOVING ARM
can
cause vehicle damage,
serious injury or death.
STAY CLEAR
of arm
at all times.
NO:
Pedestrians
Bicycles
Motorcycles
WARNING
Helps control traffic.
STOP
SEVERE TIRE
DAMAGE
NO PEDESTRIANS
IN TRAFFIC LANE
PROCEED ONLY WHEN
SPIKES ARE DOWN
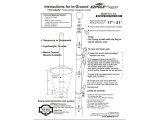
Photo Beam no higher than 27.5” above grade.
21” is typical for most installations.
B
C
A
Moving Gate Can Cause
Serious Injury or Death
KEEP CLEAR! Gate may move at any time
without prior warning.
Do not let children operate the gate or play
in the gate area.
This entrance is for vehicles only.
Pedestrians must use separate entrance.
Permanently mounted on operator and
arm and easily visible.
Moving Gate Can Cause
Serious Injury or Death
KEEP CLEAR! Gate may move at any time
without prior warning.
Do not let children operate the gate or play
in the gate area.
This entrance is for vehicles only.
Pedestrians must use separate entrance.
MOVING ARM
can
cause vehicle damage,
serious injury or death.
STAY CLEAR
of arm
at all times.
NO:
Pedestrians
Bicycles
Motorcycles
WARNING
Safety - 2

1603-065-H-5-20
4
Safety Information for Vertical Barrier Arm and Spikes
• Make sure all warning signs are on operator and arm and are easily visible.
• Do not install the operator in such a way that the arm moves within 2 feet of a rigid object.
• Spike Warning. It is extremely important that the traffic spikes are clearly marked with a warning sign of potential hazard to
vehicles and the spike area is well illuminated.
• Speed limit through barrier area is 5 MPH. Install speed bumps, warning signs and hazard stripes where visible in the area
of the barrier gate, failure to do so may result in injury, damage to operator and vehicle.
• Users should be familiar with proper use of operator, these include; hardware operation, reversing functions and testing,
reversing loops, inherent reversing system, electric edges, photoelectric cells related external devices and possible hazards.
• Keep adults, children and objects away from operator and HAZARD ZONES.
• Automotive traffic only - No bicycles or motorcycles.
Pedestrians MUST be provided with separate access.
• All electrical connections should be made in accordance with local electrical codes.
• Security features should be installed to avoid unauthorized use.
• Controls must be installed far enough away from the operator to avoid any contact when operating the controls but no
further away from the operator than 50 ft. If the installed hardware is in violation of these restrictions remove the operator
from service immediately and contact your service dealer.
• When manually operating the gate operator arm, the user MUST make sure that the gate area is clear BEFORE operating the
controls. Any activity in the entrance and exit lanes should be monitored to ensure a safe operation when opening or closing
the barrier gate. The motion of the barrier boom must be directly observable by the person operating the barrier. While the
barrier boom is in motion NO pedestrian and NO vehicle shall be in the immediate vicinity of the barrier.
• When removing the operator lift the arm to the full open position and shut off power at the service panel.
• Operators and components should be properly installed and maintained following the recommended service schedule,
test the operator monthly. Keep all debris away from operator housing vents and off of arm. Contact your service dealer for
any maintenance or repairs.
• Vehicular operators can produce high levels of force, it is important that you are aware and eliminate possible HAZARDS;
Pinch Points, Entrapment Areas, Absence of Controlled Pedestrian Access, Traffic Backup.
Reduce the risk of injury or death,
read and follow all instructions.
Familiarize yourself with safety warnings, instructions, illustrations, and wiring guidelines to
ensure that the installation is performed in a safe and professional manner. Prior to installation
check all local building codes and ordinances to ensure compliance.
9
4
7
GHT4
Important: Barrier gate operator CANNOT sense a person under
the raised arm.
This scenario is VERY DANGEROUS and MUST NEVER OCCUR!!
M
ov
i
ng
G
at
e
C
a
n
C
a
u
s
e
Se
r
i
o
u
s
In
j
ury
o
r D
e
a
t
h
K
E
E
P
C
L
E
A
R
!
G
a
t
e
m
a
y
m
ov
e
a
t
a
n
y
ti
me
w
i
t
h
o
u
t
p
r
i
o
r
w
a
r
n
i
n
g
.
D
o
n
o
t
l
e
t
c
h
i
l
d
r
e
n
o
p
e
r
a
t
e
t
h
e
g
a
t
e
o
r
p
l
a
y
i
n
t
h
e
g
a
te
a
r
e
a
.
T
h
i
s
e
n
t
r
a
n
c
e
i
s
f
o
r
v
e
h
i
c
l
e
s
o
n
l
y
.
P
e
d
e
s
tr
i
a
n
s
mu
s
t
u
s
e
s
e
p
a
ra
t
e
e
nt
r
a
n
c
e
.
M
OV
I
N
G A
R
M
c
a
n
c
a
u
s
e
v
e
h
ic
le
d
a
m
a
g
e
,
s
e
r
io
us
i
n
j
u
r
y
o
r
d
e
a
th.
S
T
A
Y
C
L
E
A
R
o
f
a
r
m
a
t
a
ll
t
i
m
e
s
.
N
O
:
P
e
d
e
s
t
r
ia
n
s
B
i
c
y
c
l
e
s
M
o
t
o
r
c
y
c
l
e
s
W
A
R
N
I
N
G
Moving Gate Can Cause
Serious Injury or Death
KEEP CLEAR! Gate may move at any time
without prior warning.
Do not let children operate the gate or play
in the gate area.
This entrance is for vehicles only.
Pedestrians must use separate entrance.
M
o
v
i
n
g
G
a
t
e
Ca
n
C
a
u
se
Se
r
i
o
u
s
I
n
j
u
r
y
o
r
D
e
a
t
h
K
E
E
P
C
L
E
A
R
!
Ga
t
e
ma
y
mo
v
e
a
t
a
n
y
t
i
me
w
i
t
h
o
u
t
p
r
i
o
r
w
a
r
n
i
n
g
.
D
o
n
o
t
l
e
t
c
h
i
l
d
r
e
n
o
p
e
r
a
t
e
t
h
e
g
a
t
e
o
r
p
la
y
i
n
t
h
e
g
a
t
e
a
r
e
a
.
Th
i
s
e
n
t
r
a
n
c
e
i
s
f
o
r
v
e
h
i
cl
e
s
o
n
l
y
.
P
e
d
e
s
t
r
i
a
n
s
mu
s
t
u
s
e
s
e
p
a
r
a
t
e
e
n
t
r
a
n
c
e
.
M
O
V
I
N
G
AR
M
c
a
n
c
a
u
s
e
v
e
h
i
c
l
e
d
a
m
a
ge
,
s
e
r
i
ou
s
i
n
j
ur
y
o
r
d
ea
t
h.
S
TA
Y
CL
E
A
R
o
f
a
r
m
a
t
a
l
l
t
i
m
e
s
.
N
O
:
P
e
de
s
t
r
i
an
s
B
i
c
y
c
l
e
s
M
o
t
o
r
c
y
c
l
e
s
W
A
R
N
I
N
G
Ca
n
C
a
u
se
y
o
r
D
e
a
t
h
a
n
y
t
i
me
Ga
t
e
ma
y
mo
v
e
a
t
a
a
a
r
n
i
n
g
.
Ga
t
e
Ga
t
e
o
r
p
la
y
r
e
n
o
p
e
r
a
t
e
t
h
e
g
a
t
e
o
o
n
i
n
g
.
r
n
i
n
g
a
.
ee
i
s
f
o
r
v
e
h
i
cl
e
s
o
n
l
y
.
.
a
a
n
c
e
.
r
a
a
mu
s
t
u
s
e
s
e
p
a
r
a
t
e
e
n
t
s
f
o
r
v
e
h
i
cl
e
s
o
n
l
y
.
s
f
o
r
v
e
h
i
cl
e
s
o
n
l
y
.
Safety - 3

1603-065-H-5-20
5
Quick Guide - 1
Function is dependent on the setting of programming SW 1, switch 6.
When switch 6 is OFF, this input will cause the
operator to rotate the arm to the up position. If the arm
is in the down cycle, this input will reverse the arm to
the up position. If this terminal has a constant input,
the arm will remain in the up position regardless of any
down input or timer command to rotate down.
When switch 6 is ON, this input will cause the operator
to rotate the arm to the up position when it is down,
and will cause the operator to rotate the arm to the
down position when it is up. If the auto timer is turned
ON (Not recommended if switch 6 is ON), this input
will override the timer and rotate the arm to the down
position. If the arm is in the down cycle, this input will
reverse the arm to the up position.
DANGER
HIGH VOLTAGE!
NC NO
1234567891011121314
Function is dependent on the setting of programming SW 1, switches 1 and 4.
With switch 1 OFF and switch 4 ON, activation and then deactivation of
this input will rotate the arm to the down position, provided that the
deactivation of the input happens while the arm is in the full up
position. This input will override the auto timer if it is turned ON. If the
arm is in the down position, traveling in the down cycle, or traveling in
the up cycle, activation and deactivation of this input has no effect on
the arm.
With switches 1 and 4 are ON, activation and then deactivation of this
input will rotate the arm to the down position after it reaches the full
up position regardless of when the deactivation of the input occurred.
When switch 4 is OFF, this input is identical to the reverse input,
terminal 9.
Function is dependent on the setting
of programming SW 1, switch 8.
When switch 8 is ON, the
function of this input is
identical to terminal 6.
When switch 8 is OFF,
this terminal becomes
the logic output of the up
loop detector.
Function is dependent on the setting
of programming SW 1, switch 5.
When switch 5 is OFF,
activation of the down
loop will activate the
relay.
When switch 5 is ON,
activation of the UP loop
will activate the relay.
When the arm is in the down position,
activation of this input has no effect.
When the arm is in the up position,
activation of this input will prevent the arm
from rotating to the down position. If the
arm is in the down cycle, activation of this
input will reverse the arm to the up
position.
This input is used when sequencing the
1603 with a slide or swing gate operator in
PAMS applications. Activation of this input
will rotate the arm to the up position one
time, and activates the enable up input.
This input is used when sequencing the
1603 with a slide or swing gate operator in
PAMS applications. This input is only active
after a MOMENTARY UP input is received.
Activation of this input will rotate the arm
to the up position or reverse an arm in the
down cycle to the up position.
Relay contacts can be set
for Normally Open (NO)
or Normally
Closed (NC)
operation.
Contact rating
is 1 amp
maximum at 24 Volts.
NC
NO
11
12
13
10
9
6
8
7
SW 1
1
ON
2 3 4 5 6 7 8
SW 1
1
ON
2 3 4 5 6 7 8
SW 1
1
ON
2 3 4 5 6 7 8
SW 1
1
ON
2 3 4 5 6 7 8
Low Voltage Common
Dry Relay Contact
Dry Relay Contact
ENABLE UP Input
MOMENTARY UP Input
REVERSE Input
DOWN/REVERSE Input
UP INPUT or UP LOOP Output
UP Input
24 VAC - 250 mA max.
115 VAC Motor
115 VAC Motor
115 VAC Power
115 VAC Neutral
QUICK GUIDE: Terminal Descriptions
Input LEDs
#6 #11#10#9#8#7
Input LEDs:
The LED that is
above the
terminal wiring
input will light
when that
terminal input
gets activated.
Relay Contacts
See page 7 for terminal wiring.
Terminal #5 Note:
Exceeding 250 mA of
power from this
terminal may cause the
circuit board
transformer to overheat,
causing intermittent
problems.

1603-065-H-5-20
6
1603 SPECIFICATIONS
Operator Extension Section
P/N 1603-168
Required
Extension Section
P/N 1603-170
Optional
Spike Section
P/N 1603-165
End Cap
P/N 1610-240
1603 Aluminum Arm
Folding arm assembly can be installed for low headroom application.
1603 Auto Spike System
Up to 3 spike sections can connect together.
1603 Housing
Drawings not to scale
Class of Operation
Model 1603 - UL 325 Class II, III, IV – ETL Listed
Type of Gate
Single Traffic Lane Vehicular Barrier Gate Only
Arm Types
Aluminum – Straight or Folding Arm
Max Arm Length
14 Ft.
Max Spike Length
9 Ft. (Three 3-ft spike sections)
Gate Cycles
High Cycle
Speed
90° in approximately 1.5 seconds
Pedestrian Protection
Inherent entrapment sensing system (Type A)
Provision for connection of a non-contact sensor
(Type B1) and/or contact sensor (Type B2)
Model # Horsepower - Volts
1/2 HP - 115 VAC
1/2 HP - 115 VAC
1603-180
1603-181
Amp
5.7
5.7
Convenience
Open
No
Yes
Use this manual for the Model 1603 operators with circuit board 1601-010 Rev W or higher ONLY.
DoorKing, Inc. reserves the right to make changes in the products described in this manual without notice and without obligation of DoorKing, Inc. to notify any persons
of any such revisions or changes. Additionally, DoorKing, Inc. makes no representations or warranties with respect to this manual. This manual is copyrighted, all rights
reserved. No portion of this manual may be copied, reproduced, translated, or reduced to any electronic medium without prior written consent from DoorKing, Inc.
Note: 208/230/460/575 VAC input voltage can be
connected to the operator by installing an “Optional”
High Voltage Kit (P/N 2600-266).
15.26”
43.6”
38.5”
15.74”
CLASS
CERTIFIED TO
CAN/CSA C22.2 NO. 247
CONFORMS TO
ANSI/UL-325
VEHICULAR GATE OPERATOR
HP
53382
MODEL
SERIAL
VOLTS PHASE
AMPS 60 Hz
MAX GATE LOAD
DoorKing, Inc., Inglewood, CA
13”
Moving Gate Can Cause
Serious Injury or Death
KEEP CLEAR! Gate may move at any time
without prior warning.
Do not let children operate the gate or play
in the gate area.
This entrance is for vehicles only.
Pedestrians must use separate entrance.
14 Ft. Aluminum Arm Only
P/N 1601-520
Aluminum Arm Mounting Kit
P/N 1601-242
Aluminum Folding Arm Kit
P/N 1601-610
Foam Padding for 14 Ft. Arm
P/N 1601-260
LED 14 Ft. Aluminum Arm Only
P/N 1601-522
LED Aluminum Arm Mounting Kit
P/N 1601-535
LED Aluminum Arm Break-Away Mounting Kit
P/N 1601-285
Standard Aluminum Arm
Lighted Aluminum Arm
Type of wiring to be used on ALL external devices:
A) Type CL2, CL2P, CL2R, or CL2X.
B) Other cable with equivalent or better electrical,
mechanical, and flammability ratings.

1603-065-H-5-20
1
SECTION 1 - INSTALLATION OF OPERATOR
2
2
3
3
4
1.1 Operator Positioning and Conduit Requirements
1.2 Concrete Pad Requirements
1.3 Mount Operator
1.4 Dual Operator Installation (Primary/Secondary)
SECTION 2 - WIRING 5
5
5
6
7
2.1 High Voltage Wire Runs
2.2 High Voltage Terminal Connections
2.3 Main Terminal Description
2.4 Control Wiring
SECTION 9 - TECHNICAL INSTRUCTIONS 29
9.1 Maintenance Schedule
9.2 Diagnostics Check
9.3 Troubleshooting
9.4 Accessories Parts List
Wiring Schematics
29
30
30-31
32
33-34
SECTION 5 - ARM INSTALLATION 17
5.1 Mounting Hub
5.2 Mounting Aluminum Arm
17
17
SECTION 6 - ADJUSTMENTS 18
6.1 1601 Circuit Board Description and Adjustments
6.2 DIP-Switch SW 1 and SW 2 Settings
6.3 Magnetic Limit Adjustment
6.4 Reverse Sensor Adjustment
6.5 Manual Operation of Arm and Spikes
18
19-21
22
22
23
SECTION 7 - OPTIONAL CONVENIENCE OPEN SYSTEM 24
7.1 Circuit Board Settings and Descriptions
7.2 DC System Wire Schematic
24
25
SECTION 8 - OPTIONAL ACCESSORIES INSTALLATION 26
8.1 Contact Sensor (Reversing Edge)
8.2 Fan Kit
8.3 Heater Kit
26
27
28
TABLE OF CONTENTS
SECTION 4 - LOOP DETECTOR LANE SETUPS
12
13
14
15
16
4.1 Entry Lane Only
4.2 Exit Lane Only
4.3 2-Way Traffic Lane
4.4 Ticket Spitter Entry Lane
4.5 Operator Timer ON Entry Lane (No Down Loop)
12
SECTION 3 - INSTALLATION OF AUTO SPIKE SYSTEM
8
9
10
11
3.1 Connect Sections Together on Concrete Pad
3.2 Test Spikes when Operator Positioned on LEFT side
3.3 Test Spikes when Operator Positioned on RIGHT side
3.4 Secure EACH Section to Concrete
8
IMPORTANT SAFETY INFORMATION
Safety-1-3
QUICK GUIDE - TERMINAL DESCRIPTIONS
Quick Guide-1
SPECIFICATIONS FOR 1603 Previous Page

1603-065-H-5-20
2
1.1 Operator Positioning and Conduit Requirements
SECTION 1 - INSTALLATION OF OPERATOR
• The conduit requirements are for a typical barrier gate operator installation. The conduit requirements for your
application may vary from this depending on your specific needs.
• Use only sweeps for conduit bends. Do not use 90° connectors as this will make wire pulls very
difficult and can cause damage to wire insulation.
• We suggest that minimum 3/4-inch conduit be used.
• Never run low voltage rated wire insulation in the same conduit as high voltage rated wire insulation.
• Be sure that all conduits are installed in accordance with local codes.
Primary/Secondary Interconnection Cable (Dual Operator Application Only)
Prior to beginning the installation of the barrier gate operator, we suggest that you become familiar with the instruc-
tions, illustrations, and wiring guide-lines in this manual. This will help insure that your installation is performed in
an efficient and professional manner.
The proper installation of the vehicular barrier gate operator is an extremely important and integral part of the
overall access control system. Check all local building ordinances and building codes prior to installing this
operator. Be sure your installation is in compliance with local codes.
The spike’s drive chain MUST be reversed so spikes rotate in correct direction when operator is on RIGHT side,
see section 3.3.
Note: Operator shown mounted on the LEFT side (preferred).
Access Door
STOP
SEVERE TIRE
DAMAGE
NO PEDESTRIANS
IN TRAFFIC LANE
PROCEED ONLY WHEN
SPIKES ARE DOWN
Elbow
NO
Sweep
YES
Control and/or P.A.M.S. Wires (Low Voltage wire insulation)
Loop Lead-In Wires (Low Voltage wire insulation)
AC Input Power (High Voltage wire insulation)
Illuminated Sign AC Input Power
(High Voltage wire insulation)
Sign Sold
Separately
Traffic Direction
Operator Mounted on LEFT Side of Traffic Lane Preferred (Factory Set)
Access Door
Conduit Runs
Traffic Direction
Operator Mounted on RIGHT Side of Traffic Lane
DO NOT install operator or spikes on asphalt.
Inside
Operator
Conduit Area
Conduit Area
Access Door
Conduit Runs
MOVING ARM
can
cause vehicle damage,
serious injury or death.
STAY CLEAR
of arm
at all times.
NO:
Pedestrians
Bicycles
Motorcycles
WARNING
Moving Gate Can Cause
Serious Injury or Death
KEEP CLEAR! Gate may move at any time
without prior warning.
Do not let children operate the gate or play
in the gate area.
This entrance is for vehicles only.
Pedestrians must use separate entrance.
MOVING ARM
can
cause vehicle damage,
serious injury or death.
STAY CLEAR
of arm
at all times.
NO:
Pedestrians
Bicycles
Motorcycles
WARNING
CLASS
CERTIFIED TO
CAN/CSA C22.2 NO. 247
CONFORMS TO
ANSI/UL-325
VEHICULAR GATE OPERATOR
HP
53382
MODEL
SERIAL
VOLTS PHASE
AMPS 60 Hz
MAX GATE LOAD
DoorKing, Inc., Inglewood, CA

1603-065-H-5-20
3
Inside Operator
1.2 Concrete Pad Requirements
1.3 Mount Operator
Depth of concrete under the operator
is determined by soil conditions and
local building codes.
6”
6”
6”
20”
1
2
3
6”
DO NOT install operator
or spikes on asphalt.
Traffic Direction
32” Minimum
Center operator
and spik
e
s along width
of concrete pad.
32”
Min
6” Minimum
Embedded Wire Mesh
15.5”
18”
The operator and auto spike system must ONLY be installed on a concrete pad with
a minimum 6 inch depth. The concrete pad must be FLAT and LEVEL (Check local
building codes for restrictions). Reinforced concrete recommended.
It is recommended that the
“Spike” sections not exceed
9 feet (Three 3-Ft spike sections)
for proper operation.
Concrete length: 2 spike sections 124.5”
Concrete length:
3 spike sections 160.5”
Embedded Wire Mesh
Sections MUST lay flat and level to operate properly!
Sleeve Anchors
Conduit
Approximate position of conduit runs.
Access Door
Secure the operator to the concrete
pad with the mounting flange using
1/2” x 3” minimum sleeve anchors
(not supplied).
Sleeve Anchor
1/2
DO NOT secure sections at this time.
Remove breather pin from gear
reducer AFTER the operator has
been secured in place.
36”
36”
7”
Note: Operator
shown mounted
on the LEFT side
of traffic lane
(preferred).
Note: Operator extension
section REQUIRED to
connect to operator.
Moving Gate Can Cause
Serious Injury or Death
KEEP CLEAR! Gate may move at any time
without prior warning.
Do not let children operate the gate or play
in the gate area.
This entrance is for vehicles only.
Pedestrians must use separate entrance.
MOVING ARM
can
cause vehicle damage,
serious injury or death.
STAY CLEAR
of arm
at all times.
NO:
Pedestrians
Bicycles
Motorcycles
WARNING
C
L
A
S
S
C
E
R
T
I
F
I
E
D
T
O
C
A
N
/
C
S
A
C
2
2
.
2
N
O
.
2
4
7
C
O
N
F
O
R
M
S
T
O
A
N
S
I
/
U
L
-
3
2
5
V
EH
I
C
U
LA
R
G
A
T
E
O
P
E
R
AT
O
R
H
P
5
3
3
8
2
M
O
D
E
L
S
E
R
I
A
L
V
O
L
T
S
P
H
A
S
E
A
M
P
S
6
0
H
z
M
A
X
G
A
T
E
L
O
A
D
D
o
o
r
K
i
n
g
,
I
n
c
.
,
I
n
g
l
e
w
o
o
d
,
C
A
Moving
Gate Can Ca
u
se
Serious Injury or
D
eat
h
KEE
P
C
LEAR! G
ate may
move
at a
ny time
wi
t
hout
prio
r warning.
Do not le
t
children operate
t
he
gate
or play
in the gat
e area.
This entr
ance
is for
vehicles only
.
Pedestrians
must
use
separate en
t
rance.
C
L
A
S
S
C
E
R
T
I
F
IE
D
T
O
CA
N
/
CS
A
C
2
2
.
2
NO
.
2
4
7
C
O
N
FO
R
M
S
T
O
A
N
S
I
/
U
L-
3
25
V
E
H
IC
U
L
A
R
G
AT
E
O
P
E
R
A
T
O
R
H
P
5
3
3
8
2
M
O
D
E
L
SER
I
A
L
V
O
L
TS
P
H
A
S
E
AM
P
S
6
0
Hz
M
A
X
G
AT
E
L
O
A
D
D
oo
r
K
i
n
g
,
In
c
.
, I
n
g
l
e
wo
o
d,
C
A
M
ov
i
ng
G
a
t
e
C
a
n C
a
us
e
S
e
r
i
o
u
s
I
n
ju
r
y
o
r
D
e
a
t
h
K
E
E
P
C
L
E
A
R
!
G
a
t
e
m
ay
m
o
v
e
a
t
a
n
y
t
i
m
e
w
i
t
h
o
u
t
p
r
i
o
r
w
a
r
ni
n
g
.
D
o
n
ot
l
e
t c
h
i
l
d
r
e
n
o
p
e
r
at
e
th
e
ga
t
e
o
r
p
l
a
y
i
n
t
h
e
g
a
t
e
ar
e
a
.
T
h
i
s
en
t
r
a
nc
e
i
s
fo
r
v
e
h
i
c
l
e
s
on
l
y
.
P
e
d
e
s
t
r
i
an
s
m
u
s
t
u
s
e
s
e
p
a
r
ate
e
n
t
r
a
n
c
e
.
CLASS
CERTIFIED TO
CAN/CSA C22.2 NO. 247
CONFORMS TO
ANSI/UL-325
VEHICULAR GATE OPERATOR
HP
53382
MODEL
SERIAL
VOLTS PHASE
AMPS 60 Hz
MAX GATE LOAD
DoorKing, Inc., Inglewood, CA

1603-065-H-5-20
4
Install dual operators the same as installing two single operators except for:
• There are no end cap sections used for the spikes.
• RIGHT side operator spike’s drive chain will need to be reversed, see section 3.3.
• Operators need to be wired together with an interconnection cable (Sold separately).
• Each operator requires AC power.
• Both operator’s DIP-switches (SW 1, SW 2) must be set the same.
• Connect all loop detectors and access control devices to the PRIMARY operator ONLY.
REVERSE
SENSITIVITY
TIME
DELAY
POWER
1
ON
2 3 4 5 6 7 81
ON
2 3 4 5 6 7 8
NC NO
UP
LOOP
DOWN
LOOP
12345678 9 10 11 12 13 14
1601
Sold separately from DoorKing.
4 wires used (8 - 18 AWG wires total).
Primary Operator
Circuit Board
REVERSE
SENSITIVITY
TIME
DELAY
POWER
1
ON
2 3 4 5 6 7 81
ON
2 3 4 5 6 7 8
NC NO
UP
LOOP
DOWN
LOOP
123456 7 8910 11 12 13 14
1601
Secondary Operator
Circuit Board
SW 1
SW 1, switch 4 is ON.
SW 1, switch 5 is OFF.
SW 1, switch 8 is OFF.
When using Reverse Loops:
DIP-Switch settings: SW 1, switch 4 is OFF. SW 1, switch 5 is OFF. SW 1, switch 8 is OFF. Set other DIP-switches
based on gate operation preferences. See page 16 for reverse loop wiring.
Interconnection cable: The BROWN wire must be connected to SECONDARY TERMINAL #9 along with the
GRAY wire. All other terminal wire connections are the same as shown above.
Set other DIP-switches
based on gate operation
preferences.
Yellow
Brown
Gray
Orange
Yellow
Brown
Reverse loops
Gray
Orange
UP Loop Detector
Settings using
Down Loop
DOWN Loop Detector
Illustration shows four 3-ft spike sections (12 ft. of spikes).
Each operator controls two 3-ft spike sections.
Inside Property
Traffic Lane
1.4 Dual Operator Installation (Primary/Secondary)
For use in areas needing more than three 3-Ft spike sections (9 ft. of spikes) in a traffic lane.
Up to six 3-Ft spike sections (18 ft. of spikes) can be used with dual operators.
Jumper
Wire
Jumper
Wire
1
ON
2 3 4 5 6 7 8
Primary/Secondary
Interconnection Cable
Traffic Direction
Traffic Direction
LEFT Side RIGHT Side
Secondary
Operator
Primary
Operator

1603-065-H-5-20
5
2.1 High Voltage Wire Runs
2.2 High Voltage Terminal Connections
This table illustrates the high voltage AC power wire size and distance limitations.
Model
Type
Voltage
Required
Amps
Required
Wire Size / Max Distance in Feet
115 5.7
12 AWG 10 AWG 8 AWG 6 AWG
1603 1/2 HP
SECTION 2 - WIRING
Before attempting to connect any wiring to the operator, be sure that the circuit breaker in the electrical panel is in the OFF
position. Permanent wiring must be installed to the operator as required by local electrical codes. It is recommended that a
licensed electrical contractor perform this work.
Since building codes vary from city to city, we highly recommend that you check with your local building department prior
to installing any permanent wiring to be sure that all wiring to the operator (both high and low voltage) complies with local
code requirements.
THIS GATE OPERATOR MUST BE PROPERLY GROUNDED!!
The distance shown in the chart is measured in “Feet” from the operator to the power source. If power wiring is greater than
the maximum distance shown, it is recommended that a service feeder be installed. When large gauge wire is used, a separate
junction box must be installed for the operator connection. The wire table is based on stranded copper wire. Wire run calcula-
tions are based on the NEC recommended maximum 3% voltage drop on the power line, plus an additional 10% reduction in
distance to allow for other losses in the system.
Never run low voltage rated wire insulation in the same conduit as high voltage rated wire insulation.
• Route incoming high voltage power in it’s OWN conduit.
• Be sure wiring is installed in accordance with local codes.
Be sure to color code all wiring.
• It is recommended that a surge suppressor be installed on
the high voltage power lines to help protect the operator
and circuit board from surges and power fluctuations.
• Dual operators (Primary/Secondary) require AC power to
each operator.
Keep wire clear of all moving parts.
DO NOT power up and cycle the operator until
the “DIP-Switches” have been set for the 1603
model (See pages 18 and 19).
The operator will not function properly unless the
switches have been correctly set.
“Optional” Heater Installation Note: When installing a heater, refer to the “high voltage AC power wire size
and distance limitations” table on the instruction sheet with the heater kit for AC power wire run limitations.
170 275 460 690
“Optional” High Voltage Kit Installation Note: When installing the high voltage kit for 208/230/460/575 VAC input power,
refer to the “high voltage AC power wire size and distance limitations” table on the instruction sheet with the
high voltage kit (P/N 2600-266) for AC power wire run limitations.
DANGER
HIGH VOLTAGE!
Chassis
Ground
HotNeu
White - Neutral
Black - 115 VAC Hot
Green - Chassis Ground
Note: A separate power disconnect
switch may be needed in your area. Check
local building codes before installation.
Note: “Optional”
High Voltage Kit
black and white wires
connect the same as
shown above.
High Voltage
AC Power Wire
External Power
Disconnect
Switch
AC POWER
ON
OFF
115 VAC
AC Power Terminal

1603-065-H-5-20
6
Function is dependent on the setting of programming SW 1, switch 6.
When switch 6 is OFF, this input will cause the
operator to rotate the arm to the up position. If the arm
is in the down cycle, this input will reverse the arm to
the up position. If this terminal has a constant input,
the arm will remain in the up position regardless of any
down input or timer command to rotate down.
When switch 6 is ON, this input will cause the operator
to rotate the arm to the up position when it is down,
and will cause the operator to rotate the arm to the
down position when it is up. If the auto timer is turned
ON (Not recommended if switch 6 is ON), this input
will override the timer and rotate the arm to the down
position. If the arm is in the down cycle, this input will
reverse the arm to the up position.
DANGER
HIGH VOLTAGE!
NC NO
1234567891011121314
2.3 Main Terminal Description
Function is dependent on the setting of programming SW 1, switches 1 and 4.
With switch 1 OFF and switch 4 ON, activation and then deactivation of
this input will rotate the arm to the down position, provided that the
deactivation of the input happens while the arm is in the full up
position. This input will override the auto timer if it is turned ON. If the
arm is in the down position, traveling in the down cycle, or traveling in
the up cycle, activation and deactivation of this input has no effect on
the arm.
With switches 1 and 4 are ON, activation and then deactivation of this
input will rotate the arm to the down position after it reaches the full
up position regardless of when the deactivation of the input occurred.
When switch 4 is OFF, this input is identical to the reverse input,
terminal 9.
Function is dependent on the setting
of programming SW 1, switch 8.
When switch 8 is ON, the
function of this input is
identical to terminal 6.
When switch 8 is OFF,
this terminal becomes
the logic output of the up
loop detector.
Function is dependent on the setting
of programming SW 1, switch 5.
When switch 5 is OFF,
activation of the down
loop will activate the
relay.
When switch 5 is ON,
activation of the UP loop
will activate the relay.
When the arm is in the down position,
activation of this input has no effect.
When the arm is in the up position,
activation of this input will prevent the arm
from rotating to the down position. If the
arm is in the down cycle, activation of this
input will reverse the arm to the up
position.
This input is used when sequencing the
1603 with a slide or swing gate operator in
PAMS applications. Activation of this input
will rotate the arm to the up position one
time, and activates the enable up input.
This input is used when sequencing the
1603 with a slide or swing gate operator in
PAMS applications. This input is only active
after a MOMENTARY UP input is received.
Activation of this input will rotate the arm
to the up position or reverse an arm in the
down cycle to the up position.
Relay contacts can be set
for Normally Open (NO)
or Normally
Closed (NC)
operation.
Contact rating
is 1 amp
maximum at 24 Volts.
NC
NO
11
12
13
10
9
6
8
7
SW 1
1
ON
2 3 4 5 6 7 8
SW 1
1
ON
2 3 4 5 6 7 8
SW 1
1
ON
2 3 4 5 6 7 8
SW 1
1
ON
2 3 4 5 6 7 8
Low Voltage Common
Dry Relay Contact
Dry Relay Contact
ENABLE UP Input
MOMENTARY UP Input
REVERSE Input
DOWN/REVERSE Input
UP INPUT or UP LOOP Output
UP Input
24 VAC - 250 mA max.
115 VAC Motor
115 VAC Motor
115 VAC Power
115 VAC Neutral
Input LEDs:
The LED that is
above the
terminal wiring
input will light
when that
terminal input
gets activated.
Relay Contacts
Input LEDs
#6 #11#10#9#8#7
Terminal #5 Note:
Exceeding 250 mA of
power from this
terminal may cause the
circuit board
transformer to overheat,
causing intermittent
problems.

1603-065-H-5-20
7
Moving Gate Can Cause
Serious Injury or Death
KEEP CLEAR! Gate may move at any time
without prior warning.
Do not let children operate the gate or play
in the gate area.
This entrance is for vehicles only.
Pedestrians must use separate entrance.
CLASS
CERTIFIED TO
CAN/CSA C22.2 NO. 247
CONFORMS TO
ANSI/UL-325
VEHICULAR GATE OPERATOR
HP
53382
MODEL
SERIAL
VOLTS PHASE
AMPS 60 Hz
MAX GATE LOAD
DoorKing, Inc., Inglewood, CA
MOVING ARM
can
cause vehicle damage,
serious injury or death.
STAY CLEAR
of arm
at all times.
NO:
Pedestrians
Bicycles
Motorcycles
WARNING
Com
REVERSE
SENSITIVITY
TIME
DELAY
POWER
1
ON
2 3 4 5 6 7 8 1
ON
2 3 4 5 6 7 8
NC NO
UP
LOOP
DOWN
LOOP
1234567 8910 11 12 13 14
1601
Non-Contact Sensor (Photo Sensors)
2.4 Control Wiring for Single/Primary Operator
1. Com
3. 24 Volt
2. Relay
3-Wire Radio Receiver
Up-Inputs
Down-Inputs
Manual Gate Control Toggle
P/N 1200-017
User MUST make sure gate area IS CLEAR
before manually operating gate arm.
OPEN
HOLD OPEN
WARNING
Coax Antenna Kit
P/N 1514-073
Antenna mounted outside
operator housing.
21” Typical Beam Height.
27.5” Max. Beam Height.
Contact and Non-Contact Sensors Note:
Helps minimizes the potential of the arm
lowering on vehicular or other traffic that
loops cannot sense.
Contact Sensor (Reversing Edge)
See page 26
DoorKing Access Control System (Model 1833, 1835, 1837 or
1838) tracker system can be connected.
This system can keep track of gate operator cycle count, shorted
inputs, loop detector problems, any forced entry attempts, if the
gate has struck anything during the open or close cycle, power
interruptions, etc.
For more detailed information refer to the Tracker Installation and
Wiring Manual, DoorKing P/N 2358-010.
Terminal 6 required only if the tracker board will activate the gate
operator. Refer to the manual 2358-065 for detailed information.
Gat
e
Tracker
(
Quad Box
Shown)
R
EVE
R
S
E
S
EN
SI
T
I
VITY
TIM
E
D
ELA
Y
P
OW
E
R
1
ON
2 3 4 5 6 7 81
ON
2 3 4 5 6 7 8
N
C
N
O
U
P
LO
OP
D
OW
N
LO
OP
Electronic
Box Assembly
115 VAC
Convenience
Outlets
Power safety and
opening devices
that require 115
VAC power.
Up toggle position: User toggles switch up to hold gate open.
Center toggle position: Is neutral for normal operation.
REVERSE
REV
SENSITIVITY
SEN
Y
Gate Operator
Data Terminal
24 VAC - 250 mA max.
Up Input
Down/Reverse Input
Reverse Input
Low Voltage Common
Terminal #5 Note:
Exceeding 250 mA of power from this terminal may cause the circuit
board transformer to overheat, causing intermittent problems.
Type of wiring to be used on ALL external devices:
A) Type CL2, CL2P, CL2R, or CL2X.
B) Other cable with equivalent or better electrical,
mechanical, and flammability ratings.

1603-065-H-5-20
8
Sections MUST lay flat, even, straight and centered on concrete.
3.1 Connect Sections Together on Concrete Pad
SECTION 3 - AUTO SPIKE SYSTEM INSTALLATION
The operator and auto spike system must be installed on a flat and level concrete pad with a minimum 6 inch depth (Check local
building codes for restrictions). Reinforced concrete recommended. It is recommended that the “Spike” sections not exceed
9 feet (Three 3-Ft spike sections) for proper operation.
Snap all sections together using socket connectors with spikes aligned in UP position.
DO NOT anchor them to the concrete at this time.
Traffic Direction
Note: Operator shown
mounted on the LEFT side
of traffic lane (preferred).
Note: Operator extension
section with torsion shaft
REQUIRED to connect to
operator.
CORRECT Spike Positions
The spikes will retract towards oncoming traffic.
Spike to Spike Connection
Socket
Connector
Socket
Connector
Align Spikes
Extension to Spike Connection
(Optional)
Torsion Shaft to Spikes Connection
(REQUIRED)
Traffic Direction
UP Position
RETRACTED Position
Operator
Operator
E
xtension
Section
C
LAS
S
C
E
R
T
I
F
I
E
D
T
O
CA
N
/
C
SA
C
2
2.
2
N
O
.
2
4
7
C
ON
F
O
R
M
S
TO
A
N
S
I
/
U
L
-
3
25
V
E
HI
C
UL
A
R
G
A
T
E
OP
E
RA
T
OR
H
P
5
3
3
8
2
M
O
D
E
L
S
ER
I
A
L
V
O
L
T
S
P
H
A
S
E
A
M
P
S
6
0
H
z
M
A
X
G
A
TE
LO
A
D
D
o
o
r
K
i
n
g
,
I
n
c
.,
I
n
g
l
e
wo
o
d
,
CA
Mo
v
i
ng Gate Ca
n
Caus
e
Serious Inju
r
y or De
a
th
KEEP
C
L
EA
R
! Gate
ma
y
move at any time
w
i
thout pr
i
o
r
w
ar
ni
ng.
D
o not
l
et ch
i
l
dr
en operate t
he gate
or pl
ay
in the gate ar
ea.
Th
i
s entr
ance i
s for
vehi
cl
es onl
y
.
Pedestr
i
ans
must us
e
s
e
parate entr
ance.

1603-065-H-5-20
9
3.2 Test Spikes when Operator positioned on LEFT side
Spike Adjustment
DO NOT anchor the sections to the concrete until the spikes
have been tested and they operate smoothly. If spikes are not
in the correct UP and RETACTED positions during operation as
shown on previous page, some adjustment will be required
(See below).
With operator in the spikes UP position, loosen both
turnbuckles on crossed chain inside the operator to
release chain from the lower sprocket....
....replace the chain back onto lower sprocket and
tighten both turnbuckles after spikes have been
adjusted to the correct position.
....spikes can now be adjusted to
the correct UP position as shown.
Lower Sprocket
Turnbuckles
C
L
A
S
S
C
E
R
T
IF
I
E
D
T
O
C
A
N
/
C
S
A
C
2
2
.
2
N
O.
2
4
7
C
O
N
F
O
R
M
S
T
O
A
N
S
I
/U
L
-3
2
5
V
E
H
I
CU
L
AR
G
AT
E
O
P
E
R
A
T
OR
HP
5
3
38
2
M
ODE
L
S
E
R
I
A
L
V
O
L
T
S
P
H
A
S
E
A
M
P
S
60
H
z
M
A
X
GA
TE
LO
A
D
D
o
o
r
K
i
n
g,
In
c
.
,
Ing
l
e
w
ood
,
C
A
Movi
ng G
ate Can Caus
e
Se
rious Injury or Deat
h
K
EE
P
CL
E
AR
!
Ga
t
e
m
ay
mo
v
e
a
t
an
y
t
im
e
wi
t
ho
u
t
prio
r
wa
rning
.
D
o
no
t
le
t
ch
ild
r
en
op
er
a
t
e
t
h
e
g
ate o
r
p
la
y
in
t
h
e
g
a
t
e
ar
ea
.
This
en
tr
a
nc
e
i
s
f
or
v
e
h
icle
s
o
nl
y
.
P
ed
e
s
t
rians
mu
s
t
us
e
s
e
pa
r
at
e
e
nt
r
an
ce
.
Correct UP Position
Note: If operator is
positioned on RIGHT side,
see next page.
Traffic Direction
Traffic Direction

1603-065-H-5-20
10
3.3 Test Spikes when Operator positioned on RIGHT side
Reverse Chain
When operator is mounted on the RIGHT side as shown,
the chain MUST be reversed (See below).
Use the master links to
disconnect the spike’s
drive chain and reverse it
so spikes will rotate in the
correct direction. The
spikes can also be
adjusted to the correct
position at this time (see
below)
Master
Links
Moving
G
ate Can Caus
e
Serious In
jur
y or Death
K
E
E
P
CL
E
A
R!
Ga
t
e
may
mov
e
at
an
y
t
im
e
wi
t
ho
u
t
prio
r
wa
rn
in
g
.
Do
no
t
le
t
c
h
il
d
re
n
o
p
er
a
t
e
t
h
e
g
at
e
o
r
p
la
y
in
t
h
e
g
a
te
ar
e
a.
Th
is
en
t
ra
nc
e
is
f
or
v
e
hi
c
le
s
o
nl
y
.
Pe
des
t
ria
ns
mu
s
t
us
e
s
epa
r
at
e
e
nt
r
a
nc
e
.
Spike Adjustment
Adjust spikes as shown.
Correct UP Position
DO NOT anchor the sections to the concrete until the spikes
have been tested and they operate smoothly. If spikes are not
in the correct UP and RETACTED positions during operation,
some adjustment will be required (See below).
RETRACTED Position
Traffic Direction
Traffic Direction

1603-065-H-5-20
11
3.4 Secure EACH Section to Concrete
Extreme force is exerted on the sections every time a vehicle drives over them. It is important that they have enough anchors in
them to keep them securely in place.
After you have tested the spikes and are satified with the way they perform, without moving the sections, secure EACH section
in place with sleeve anchors (8 sleeve anchors are located inside the spike sections. The ramps will need to be unbolted to gain
access to the mounting holes). After ALL sections have been secured to the concrete, mount the end cap in place.
Maintenance Tip: It is important
to check the sections every so
often to make sure all the sleeve
anchors have not loosened up.
The spikes will NOT function well
with loose sleeve anchors.
Cleaning the Spikes
The ramps will have to be unbolted and the tunnel will need to have the debris cleaned out every so often to keep the spikes in
good working condition. The sleeve anchors mounted inside the tunnel will also need to be checked for looseness and repaired
when necessary.
End
Cap
Tunnel
Note: Section illustrated without spike
rod and white plastic supports to better
show sleeve anchor mounting holes.
Cut off excess threads flush
with top of nut on the
sleeve anchors that will
come in contact with tires.
Secure sections and end cap to
concrete with 3/8” x 3” minimum
sleeve anchors (Not supplied).
3/8
Ramp
C
L
A
S
S
C
E
RT
I
F
I
E
D
T
O
C
A
N
/
CS
A
C
2
2
.
2
N
O
.
2
4
7
C
O
N
F
O
R
MS
T
O
A
N
S
I
/
U
L
-
3
2
5
V
EH
I
C
U
LA
R
G
A
T
E
O
P
ER
A
TO
R
H
P
5
3
3
8
2
M
O
D
E
L
S
E
R
I
A
L
V
O
L
T
S
PH
A
S
E
A
MP
S
6
0
H
z
M
A
X
G
AT
E
L
O
A
D
D
o
o
r
K
i
n
g
,
I
n
c
.
,
I
n
g
l
e
w
o
o
d
,
CA
Mo
v
i
ng G
a
te Can Caus
e
Se
r
i
ous
Inj
ur
y
or
De
ath
K
E
E
P
CL
E
A
R! Ga
te
may move
a
t an
y ti
m
e
witho
u
t
p
ri
or
w
a
rn
in
g
.
D
o
n
o
t le
t
child
re
n
o
p
e
ra
te
the
g
a
te
o
r
play
in
th
e
g
a
te
a
re
a
.
T
h
is e
n
tr
a
n
ce is
for veh
icle
s
on
ly.
P
e
d
e
stri
a
n
s
mu
st
u
se
s
e
pa
ra
te
e
n
tr
a
n
ce
.
Traffic Direction

1603-065-H-5-20
12
9409
4.1 Entry Lane Only
SECTION 4 - LOOP DETECTOR LANE SETUPS
Before attempting to connect any wiring to the operator, be sure that the circuit breaker in the electrical panel is in the OFF
position. Permanent wiring must be installed to the operator as required by local electrical codes. It is recommended that a
licensed electrical contractor perform this work.
Loop detector wiring shown is for DoorKing model 9409 Dual Channel and 9410 Single Channel plug-In loop detectors only.
If using other loop detectors refer to the separate Loop Information Manual for installation instructions, loops/preformed
loops and wiring diagrams. All inputs to the main terminal are NORMALLY OPEN.
Speed Bump
Dual Channel
REVERSE
SENSITIVITY
TIME
DELAY
SW 1
SW 2
POWER
1
ON
2 3 4 5 6 7 8 1
ON
2 3 4 5 6 7 8
NC NO
UP
LOOP
DOWN
LOOP
123456 7 8 9 1011121314
1601
Down Loop
Access
Control
Device
Com
NO
Com
NO
A
A
12 Ft.
Arming Loop
for Access
Control Device
(Optional)
If the arming loop is not used, then a single channel loop
detector can be used (9410) in the down loop port. Connect the
down loop to loop 1 on this detector. Connect the access control
device directly to main terminal 6 and 14.
Arming Loop Note: The arming loop only allows the access control
device to function when a vehicle is on the loop, otherwise it will not
function. This prevents pedestrians from gaining access through the
vehicular gate.
Timer Note: The timer can be used with a down loop. When timer is ON
with a down loop, it will start countdown when the arm has fully raised.
Activation of the down loop will cancel timer countdown. Useful when
an access control device has been activated but vehicle does not move
forward to activate the down loop. The arm will remain UP. Timer will
time out and lower the arm without the down loop being activated.
SW 1, switch 4 is ON.
SW 1, switch 7 is
OFF (Timer). The arm
will rotate down after
the vehicle clears the
down loop. See timer
note below.
Helps increase distance
and time between vehicles.
SW 1
1
ON
2 3 4 5 6 7 8
Main Terminal
1 Ft. Minimum Distance
Type of wiring to be used on ALL external devices:
A) Type CL2, CL2P, CL2R, or CL2X.
B) Other cable with equivalent or better electrical,
mechanical, and flammability ratings.

1603-065-H-5-20
13
9410
9410
4.2 Exit Lane Only
Speed Bump
Single Channel
Single Channel
REVERSE
SENSITIVITY
TIME
DELAY
POWER
1
ON
2 3 4 5 6 7 8 1
ON
2 3 4 5 6 7 8
NC NO
UP
LOOP
DOWN
LOOP
1234567891011121314
1601
Down Loop
SW 1, switch 4 is ON.
SW 1, switch 7 is OFF (Timer). The arm will rotate
down after the vehicle clears the down loop.
See note below.
SW 1
SW 2
A
A
Note: The timer can be used with a down loop. When timer is ON with a
down loop, it will start countdown when the arm has fully raised.
Activation of the down loop will cancel timer countdown. Useful when
the automatic exit loop has been activated but vehicle does not move
forward to activate the down loop. The arm will remain UP. Timer will
time out and lower the arm without the down loop being activated.
Helps increase distance
and time between vehicles.
SW 1
1
ON
2 3 4 5 6 7 8
1 Ft. Minimum Distance
1 Ft. Minimum Distance
Automatic
Exit Loop
(Free Exit)
Type of wiring to be used on ALL external devices:
A) Type CL2, CL2P, CL2R, or CL2X.
B) Other cable with equivalent or better electrical,
mechanical, and flammability ratings.

1603-065-H-5-20
14
9409
Dual Channel
9410
4.3 Two-Way Traffic Lane
Single Channel
REVERSE
SENSITIVITY
TIME
DELAY
POWER
1
ON
2 3 4 5 6 7 8 1
ON
2 3 4 5 6 7 8
NC NO
UP
LOOP
DOWN
LOOP
123456
Main Terminal
7 8 9 10 11 12 13 14
1601
SW 1, switch 4 is ON.
SW 1, switch 7 is OFF (Timer). The arm will rotate
down after the vehicle clears the down loops.
See timer note below.
Speed Bump
Speed Bump
Down Loop
Access
Control
Device
If the arming loop is not used, then a Single Channel Loop Detector can be
used (9410) in the down loop port. Connect the down loops to loop 1 on this
detector. Connect the access control device directly to main terminal 6 and 14.
Com
NO
Com
NO
SW 1
SW 2
A
A
4 Ft.
10 Ft. Min.
Down loops wired in series.
Arming Loop Note: The arming loop only allows the access control device to
function when a vehicle is on the loop, otherwise it will not function. This
prevents pedestrians from gaining access through the vehicular gate.
Timer Note: The timer can be used with down loops. When timer is ON with
a down loop, it will start countdown when the arm has fully raised. Activation
of the down loop will cancel timer countdown. Useful when the access
control device or automatic exit loop has been activated but vehicle does not
move forward to activate the down loop. The arm will remain UP. Timer will
time out and lower the arm without the down loop being activated.
Arming Loop
for Access
Control Device
(Optional)
Helps increase distance
and time between vehicles.
Interior Down Loop
Spacing between loops is critical
when using this configuration. Be
sure that the loops are spaced as
shown in the diagram.
Automatic
Exit Loop
(Free Exit)
When a vehicle enters, the down loop will be overridden by the automatic
exit loop which will continue to hold the arm up. When the interior down
loop has been cleared by the vehicle, the arm will lower.
When a vehicle exits, the automatic exit loop will raise arm and when the
down loop is cleared, the arm will lower. The interior down loop is
inoperative for exiting vehicles.
SW 1
1
ON
2 3 4 5 6 7 8
4 Ft.
1 Ft. Minimum Distance
Type of wiring to be used on ALL external devices:
A) Type CL2, CL2P, CL2R, or CL2X.
B) Other cable with equivalent or better electrical,
mechanical, and flammability ratings.
/