Page is loading ...

WARNING: SAFELY DISCARD ALL PACKING MATERIAL. KEEP PLASTIC BAGS AND SMALL PARTS AWAY FROM CHILDREN.
SAFETY GLASSES SHOULD BE WORN AT ALL TIME.
ADVERTENCIA: DESECHE DE FORMA SEGURA TODO EL MATERIAL DE EMPAQUE. MANTENGA LAS BOLSAS PLÁSTICAS
Y LAS PIEZAS PEQUEÑAS FUERA DEL ALCANCE DE LOS NIÑOS. DEBE UTILIZAR GAFAS DE SEGURIDAD EN TODO
MOMENTO.
SPECIFICATION
ESPECIFICACIÓNES
Model number
Nº del Modelo
Overall size
Tamaño General
Rough wall opening
Abertura aproximada en la pared
511290 16 inch x 20 inch x 4-1/2 inch 13-5/8 inch x 17-3/4 inch x 3 inch
511307 16 inch x 26 inch x 4-1/2 inch 13-5/8 inch x 23-3/4 inch x 3 inch
NOTE: ROUGH OPENING IS NOT AN EXACT MEASUREMENT. THE EXTRA ALLOWS MEDICINE CABINET TO BE INSERTED INTO THE OPENING.
ADD SHIMS TO LEVEL AND TIGHTEN SPACE IF NECESSARY. ADDITIONAL FRAMING MAY BE REQUIRED.
NOTA: LA ABERTURA APROXIMADA NO ES UNA MEDIDA EXACTA. EL ESPACIO ADICIONAL PERMITE QUE EL BOTIQUÍN PARA BAÑO
PUEDA SER INSERTADO EN LA ABERTURA. UTILICE CUÑAS PARA NIVELARLO Y AJUSTE EL ESPACIO A SU ALREDEDOR SI FUERA
NECESARIO. QUIZÁ SE NECESITEN MARCOS ADICIONALES.
SAVE THESE INSTALLATION INSTRUCTIONS FOR FUTURE REFERENCE. RECORD MODEL NUMBER FROM
THE PACKAGE LABEL;
CONSERVE ESTAS INSTRUCCIONES PARA FUTURAS CONSULTAS ANOTE EL NÚMERO DE MODELO QUE
APARECE EN LA ETIQUETA DEL EMPAQUE;

511290 & 511307
Kits hardware, including following parts
Kits de herrajes, incluyendo las siguientes piezas
Item
Art
í
culo
Description
Descripci
ó
n
Drawing
Dibujo
Quantity
Cantidad
1
Shelf clip
Ganchos para estantes
12
2
Shelf hole plug
Tapón para orificios de estantes
12
3
Bumper
Tapa a presión
2
4
Shelf glass
Protector de Borde
3
5
#8*1 1/2 inch Philips head screws
Tornillos Philips 1-1/2 inch, #8*
4
6
Wall anchors
Anclajes para pared
4
7
Shelf clip tape
Cinta para ganchos de estantes
12
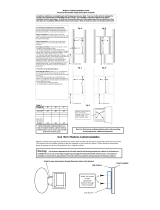
STEP 1
Before cutting rough opening, check for pipes, electrical, or heating ducts. Plumbing and electrical lines
that interfere must be removed or relocated.
If it is required to remove part of stud, make sure that the wall is not a load bearing wall. Make sure
that there is structural support on both sides of the opening to attach the cabinet box.
Prepare an opening in the wall for the cabinet box. Refer to the SPECIFICATINS for rough wall opening
dimensions.
BATH CABINET HEIGHT SHOULD BE A MINIMUM 1INCH ABOVE FAUCET.
IT’S RECOMMENDED TO ATTACH FOOTER BETWEEN TWO STUDS TO HELP SUPPORT WEIGHT OF BATH CABINET.
PASO 1
Antes de realizar la abertura en bruto, controle que no haya tuberias, cables electricos o conductos de
calefaccion. Las lineas de plomeria y electricidad que interfieran deberan retirarse o reubicarse.
Si es necesario retirar parte de la viga, asegurese de que la pared no sea una pared de apoyo. Asegurese
de que haya soporte structural en ambos lados de la abertura antes de colocar el Gabinete.
Prepare una abertura en la pared pare el Gabinete. Consulte las ESPECIFICACIONES par aver las dimensiones
de la abertura en bruto.
LA ALTURA MINIMA DEL GABINETE PARA BANO DEBERA SER DE 1INCH POR ENCIMA DEL GRIFO.
SE RECOMIENDAINSTAN BASE ENTRE DOS VIGAS PARA QUE AYUDE A SOPORTAR EL PESO DEL GABINETE PARA BANO.

STEP 2
Position the cabinet box in the rough wall opening. Make sure that the cabinet box flange covers the wall opening
uniformly. Fasten both sides of the cabinet box through 4 mounting holes from inside of the cabinet using 1-1/4
inch long screws.
DO NOT OVER TIGHTEN SCREWS.
PASO 2
Coloque el Gabinete en la abertura en bruto. Asegurese de que el reborde del Gabinete cubra la abertura de manera
uniforme. Sujete ambos lados del Gabinete mediante los 4 orificios de montaje desde el interior del Gabinete,
utilizando Tornillos Largos de 1-1/4 inch.
NO AJUSTE DEMASIADO LOS TORNILLOS.
6
5

STEP 3
1. Stick the tape on the shelf clip
2. Insert shelf clip into empty holes.
3. Carefully install shelf glass
PASO 3
1. Pegue las cintas a los ganchos para estantes.
2. Inserte los ganchos para estantes en los orificios correspondientes.
3. Con cuidado, instale el vidrio del gabinete.
STEP 4
1. Use the shelf hole plug to seal the empty hole.
PASO 4
1. Selle los orificios de los estantes con los tapones correspondientes.
7
1
4
2

STEP 5
1. Stick the bumpers on the surface of cabinet box, as below drawing.
PASO 5
1. Pegue los protectores de borde sobre la superficie del marco del botiquín. Como se muestra a continuación.
E N D
F I N
3
/