Page is loading ...

1/16
Patent applied for
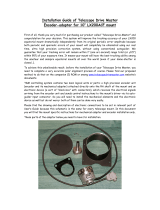
Telescope Drive Master
A Rigorous Supervisor for Telescope Gears
User’s Guide
V2.31
Telescope Drive Master (TDM in short form) has been developed for compensation of periodic and
non-periodic tracking errors of mass produced equatorial telescope mounts which type of errors
occurred on account of mechanical manufacturing and assembling inaccuracies.
This device consists of two main parts:
1. A high precision rotary encoder mounted subsequently onto the RA shaft directly without
any detachable clutch or gear, and
2. An electronic control box.
Principles of operation:
The electronic controller unit compares the signals incoming from the high precision rotary encoder
mounted onto the RA shaft with time signal of the internal quartz oscillator. If the angular velocity of
the RA shaft deviates from the prescribed (sidereal or average King-rate) velocity value, it accelerates
or delays telescope’s driving clock. In this way, a high precision, feedback regulated, real-time
rotational speed control has been created. Corrective action happens via auto-guider input port of
telescope’s driver unit of its own.
Advantages of using TDM
1. Eliminates telescope mounts’ tracking error down to negligibly small values. The followed object
(without large scale proper motion) deviates from its theoretical position on the CCD surface in
smaller degree than ±0.5” (or less than 1” p-v amplitude) during 5-10 minutes long observation
more than in 95% of duration of total exposure time. (The data above depends on the object
position observed in the sky, type of certain mount and accuracy of its polar alignment.)
2. It is not necessary to install auto-guider telescope or to use guider chip/camera.
3. It does not need to find bright guide star for tracking (the observation process can be automated
on much easier way).
4. TDM can speed up the high volume observation work on remarkable way since exposition can
be started immediately after the scope turned onto its target (and potential RA-gear backlash
worked off).
5. High density filters (e.g. H-alpha) do not have any influence to the performance of tracking.
6. TDM is very easy to use due to its self-test functions.
7. TDM compensates each element of tracking errors coming from the whole RA drive chain
(between motor shaft and RA shaft) since the rotational sensor has been mounted onto the RA
shaft directly. It means that TDM inspects very slow rotation of RA shaft continuously in real-
time and will correct it immediately if it is necessary.

2/16
8. TDM is a standalone application so it does not need any PC support or other external device for
using it.
9. Thanks for the built in, high stability and high precision quartz-oscillator based clock-signal the
tracking accuracy of the telescope’s drive system is not a relevant parameter.
10. The electronic module of TDM can be used for other mounts as well so you need to change the
mechanical adaptor only if you have several mounts or want to change the type of your
permanent mount.
11. Although TDM was developed as stand alone application up to 5-10 minutes exposure time,
TDM v2.0 and higher versions support Auto-guider controlled tracking for longer exposures as
well. It means you do not need to hunt for bright guide stars for your guider CCD chip and you
do not need to have extra sensitive autoguider CCD because TDM will keep the mount on the
right tracking speed with the highest practical accuracy between two auto-guider corrections. So
you can use 10 magnitudes or dimmer stars for guiding with 10, 20 30 seconds (or longer) CCD
integration time in the small size off-axis guider FOV: actually, you will be able to use ANY stars
in your FOV for guiding.
12. It is possible to create a high precision periodic error (PE) curve of your mount using the serial
(USART) port of TDM connected to your PC in your room without “in-situ” test under the night
sky. You just need to download and use the software (TDM Monitor.exe) from the companion
CD or from our website www.telescopedrivemaster.com.
TDM has been developed as “easy-to-use” device, so you can subsequently attach its mechanical
adopter onto the RA shaft of most popular mass-produced telescope mechanics easily, without
disassembling mount. This is a “Plug-and-Play” device so you do not need any special mechanical or
electronic study or background to install and use it.
Limitations of Stand-Alone Using TDM
Although Telescope Drive Master is really an extremely accurate system, it also has some limits of
course.
1. Using TDM you need to accomplish very accurate polar alignment.
2. There is no optical feedback from the certain part of the sky observed so your telescope needs
to have a sturdy and rigid mount which is not cheap. (This system is insensitive regarding flexure
of mechanical parts and weak quality RA bearings.)
3. TDM cannot follow objects in the sky having remarkable proper motions (e.g. comets and
asteroids close to their perihelia).
4. This version of TDM does not compensate air refraction; this is why the applicable length of
expositions can be varied depending on position observed in the sky.
At the same time, these limitations above do not decrease the practical usability of TDM
considerably because of the reasons below:
Ad 1. You can achieve extremely accurate (sub arc-minute) polar position within acceptable time
(in 2 or 3 hours) using the mixed Scheiner-King method (see detailed description on TDM
website: www.telescopedrivemaster.com).
Ad 2. It is not rational (and no cost-effective at all) to purchase TDM for low priced and weak
quality, shaky beginner mounts. At the same time, if you have a sturdy and rigid hi-quality or

3/16
semi-pro mount, the price of TDM is just on a gadget-price level. (The weakest mount which
can be rational to use with TDM is the level of e.g. Synta/SkyWatcher HEQ5.) This is why
there is no TDM encoder adaptor offered for very cheap and shaky mounts.)
Ad 3. The number of object in the sky having remarkable proper motion is fewness compared to
the rich other observing possibilities.
Ad 4. Refraction is annoying aberration mainly just too close to the horizon; so on 30-40 degrees
above horizon or on higher altitudes this feature does not cause bigger problem than
explained above. This version of TDM has been developed and optimized for 5 to 10 minutes
long exposures maximum, and for “photometric altitudes” above horizon and for using focus
lengths up to 2-3m maximum. At the same time, TDM 2.0 and higher versions using together
with long expo auto-guider completely eliminates this problem.
Who TDM can be recommendable to; who can use it advantageously?
1. TDM is firstly recommended for the observers who intend to take a lot number of shots per
night about different parts of the night sky quickly and easily. (E.g. supernova patrols, comet
and/or asteroid hunters, observers of cataclysmic variable stars, etc.)
2. Those amateurs who make compound images with extra long total exposure time superposing
dozens of short expo shots about the same object. (E.g. “artist” deep-sky photographers.)
3. For amateurs or professionals who have backyard or institutional observatory for permanent
telescope installations (with permanent and good polar alignment).
4. TDM can be an extremely advantageous application for robotic telescope owners who needed
to find bright enough guide stars within the field of view manually so far.
5. For “tourist amateurs” who do not want to drag an extra tube and CCD just for auto-guiding
purposes up to the peak of the mount escaping from light-polluted regions and have enough
time for accurate polar alignment.
6. If you want to use a narrow band filter (e.g. H-alpha) but you have a dual chip CCD or just an AO-
7/AO-8 adaptive optics as guiding equipment, your guiding chip will be in almost total
darkness… But TDM will help.
7. If you have just a tiny guiding chip at the bottom of a small aperture tube, you probably will not
always be able to find an appropriate guide star… TDM will help you again.
8. TDM together with AO-7/AO-8 adaptive optics is the best equipment that you can have!!! TDM
will eliminate the periodic error of your mount (independently of the magnitude of its
amplitude) and AO-X will eliminate the rest of the deviations like scintillation and/or refraction.
This is the ideal, ultimate set of serious astro-photographers or professionals!
9. Who is not satisfied with his/her mid-ranged telescope mount’s tracking ability but does not
want to spend another couple of thousands of euro/dollar for a top rated one (which has much
more PE then TDM…), those will appreciate this much cheaper solution.
Situations where TDM cannot substitute the auto-guider CCD or Webcam

4/16
1. If you need very long (10-60 minutes or even longer) exposure time as one shot. It can be
rational in a desert or on high topographic altitudes (above two or three thousand meters) or at
other locations with extremely dark and clear sky.
2. In case of celestial objects with relatively fast apparent proper motion (e.g. comets and
asteroids around their perihelia).
3. If you cannot achieve good polar alignment (or you do not have enough time to do that) or your
telescope’s imaging elements can move during exposure or your mount is not sturdy enough or,
maybe, overloaded.
But you need to know that, in any of the above described cases, TDM provides huge “external” help
for your auto-guider system due to the fact that TDM keeps your mount on target correctly (within 1
arc-sec) between two auto-guider corrective actions, even if it is rare in time.
Situations where TDM v2 cannot support auto-guider CCD or Webcam
Telescope Drive Master v2 (or higher) is able to support autoguider systems keeping your telescope
on target between two autoguider control signals even if autoguider CCD integration time is “too
long” (e.g. 10sec or longer). But there are two exceptions.
1. If you want to use SBIG ST-4 standard output of TDM (TDM Out 2), TDM will not transfer
autoguider pulses in declination but in RA direction only. LX200 standard output of TDM v2
(TDM Out 1) is fully compatible with autoguider controls only.
2. If your autoguider uses direct serial commands for controlling (e.g. webcam based PC guiding
systems) instead of dedicated auxiliary autoguider port of the telescope controller, TDM v2
will not be able to recognize these control signals. It means TDM v2 will compensate
autoguider corrections eliminating those corrections.
Finally, it is highly recommended to unplug the cable from TDM v2 autoguider input if you use TDM
v2 alone (without autoguider control) because different types of autoguider controller systems leave
their output in closed or opened status (not known) when switched off, which can prohibit TDM v2
output permanently.
Why is TDM better than PEC software?
1. Although, almost all of the better quality mounts have PEC (Periodic Error Correction) function
can be trained, this “self-training” procedure is complicated, long and uncomfortable process.
Moreover, the shape of PE curve of every mount may vary considerably by its loading, actual
position, ambient temperature, etc.
2. PEC, as its name indicates, can be used for decreasing of periodical tracking deviations only,
which are repetitive in time. At the same time, the movement of the scope during tracking
process has a lot of non-periodic element (e.g. dirt on the parts, small machining errors, etc.).
3. Due to the fact that PEC is not a feedback regulated system but just a normal time-controlled
correction, it cannot be able to manage periodic errors longer than the main period (worm
rotation period) itself. On the other hand, drive chain contains several different rotational

5/16
frequencies next to each other which generate new frequencies much longer than the base
period (this is so called “harmonic beating”). It means that there are no two identical PE curves
so the trained correction will not be effective enough after a few periods (except direct drive
systems).
Which types of mounts can be used with TDM?
At the moment (January, 2009), there are mechanical adaptors for the below-mentioned mounts:
1. Fornax 50, 51, 100, 150
2. Synta EQ6, EQ6 Pro, SkyWatcher EQ6, EQ6 Pro, Orion Atlas EQ-G
3. Synta HEQ5, SkyWatcher HEQ5, Orion Sirius EQ-G
4. Celestron CGE
5. Astro-Physics 1200
6. Losmandy G11
7. Meade LXD75
8. Meade LX200
9. Vixen GPDX
The number of supported mounts is growing continuously so please find new mounts supported by
TDM on this website: www.telescopedrivemaster.com
Is it possible to install TDM onto home-made mounts or other mass-produced mounts as well?
Yes but, obviously, it is necessary to make a mechanical adaptor for attaching the encoder onto the
RA shaft especially for that certain mount. At the same time, it is not a good idea to make this part
“in the kitchen” as a home-made product because incorrect design and/or manufacturing can have
negative impact on the accuracy of the system. Do not forget: one arc-second is an extremely tiny
angle and TDM is an extremely sensitive system. Please, send a mail to: info@mda-telescoop.com
What kind of drivers can be used with TDM?
Supported GoTo drivers (and tested so far):
1. FS2
2. SkyWatcher SynScan / SkyScan
3. Astro-Physics non-goto and goto
4. Pulsar
5. Koordinator 2000
6. MEADE Autostar II
7. Celstron Nexstar
8. Boxdoerfer MTS-3 SDI
9. Synta EQ6 non-goto hand-controller (after modification only!!!)
Can I use TDM with other type of controller as well?

6/16
Yes, if your controller has a standard LX200 or SBIG ST-4 auto-guider input but, obviously, a special
cable will be needed which has connectors with proper shape, pin-format and signal-level. Please,
send a mail to: info@mda-telescoop.com
Supported and tested auto-guider input formats (TDM output) at the moment (January, 2009):
1. SBIG ST-4 (SUB-D 15pin male)
2. Meade LX200 (RJ-12-6/6)
3. Koordinator 2000 (SUB-D 9pin male)
4. Astro-Physics 1200 (old non-goto version: SUB-D 9pin male, new GTO: RJ-12)
What do TDM’s self initialization and self training functions mean?
TDM does not need to be configured previously. As soon as you switch TDM on, it tries to measure
the rotation speed and rotational direction of RA shaft and to launch its self initialization process
immediately. If the telescope driver is not running yet, TDM repeats to launch initialization process
again and again. If the telescope driver runs, TDM will execute a self-test procedure during the first
few seconds. The field of view is moving a little bit but not more than 5-10”. Direction and speed of
RA tracking (N-S hemisphere observer location and sidereal tracking speed), corrective direction of
auto-guider port (E-W position of German equatorial mount) and correction speed (aggressivity of
control) will be detected and stored during this test. If you change the position of your telescope to
another target (slewing without E-W flip) or you switch telescope driver off and on, TDM will
remember these parameters above and will run a position-reset only.
But, if you change any of the directions above under observing (but E-W position flip of German
equatorial mount as usual) you will need to reboot TDM (just switch it off and on again).
TDM is able to recognize high speed movements of your hand controller or GoTo movements (as well
as auto-guider interactions, see below) and will interdict corrective actions of its own. As soon as the
magnitude of these movement becomes less than 2x tracking speed, TDM will run a position-reset
and starts corrections again.

7/16
Patent applied for this device.
Technical features
TDM controller unit: 16-bit RISC Microcontroller
RA rotary encoder system-res.: 0.125” (1/8 arc-second)
Rotary encoder connector: SUB-D15 pin female
Internal quartz timing reference: 32MHz ± 50ppm
Sample frequency: 120 Hz
Tracking speed: Sidereal or King Rate (selectable)
Correction frequency: 1 Hz or 5 Hz (selectable)
Correction hysteresis (dead zone): ± 0.5” or ± 1” (arc-second) (selectable)
Angular error-display resolution*: 0.125” or 1” (arc-second) (selectable)
Display: Constant total brightness, 2x20-digit (red-yellow) LED-line
+ 1pc of null (green) profile-LED
Display range in 1”/digit mode: ± 15” (± 15 digits + null)
Display range in 0,125”/digit mode: ± 2.25” (± 18 digits + null)
Power supply: EU standard 12Vdc stabilized 300mA max.
Power supply connector: EU standard 2,1mm DC
CCD auto-guider input connector: MEADE LX200 standard, RJ-12-6/6
TDM out port connector, type-1**: SBIG ST-4 standard, SUB-D15 pin, male
Control switches on type-1 port: long life DIL Reed relays (w/o ohmic contact)
TDM out port connector, type-2: MEADE LX200 standard, RJ-12-6/6
Control switches on type-2 port: CMOS optical solid-state-relays
Usable correction speed: 0.2x – 0.5x tracking speed;
maximum range: 0.1x-1x, but not preferred
(adjustable by telescope’s driver but not in TDM)
Serial port (USART) service plug: SUB-D9 pin female
USART protocol: 9600 baud N81, ASCii or hexadecimal
USART- PC interface cable: SUB-D9 male-female, 1:1 pin-to-pin connected
*: Angular error display shows the actual measured error (on 120Hz frequency). The real error is the mean
value of Gauss distribution calculated by incoming error values measured during certain unit time. So, some
LEDs over the prescribed limits can be switched on when the real deviation is close to these limits (mainly in
case of 1/8” high resolution display mode) but this situation does not mean that the real tracking error would
be over these prescribed borders. If the central green LED is on, the real tracking error will be within the
prescribed range, independently from red or yellow lights next to the green one.
**: cannot be used together with auto-guider CCD input (Dec. movements of auto-guider are not transferred.)
TDM has been produced within the EU using leadless CE quality ROHS technology.

8/16
Installation of Telescope Drive Master
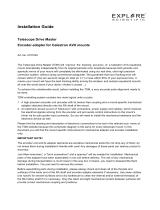
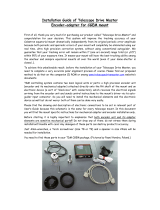
Content of TDM kit:
1. Rotary encoder (Heidenhain) with cable
2. Mechanical adaptor and screws with fixing elements for certain mounts
3. TDM electronics (black box)
4. 110-230VAC/12VDC stabilized power supply
5. Output cables (both for MEADE LX200 and SBIG ST-4 standard connectors)
6. Serial cable for USART port
7. User’s guide CD (including this paper)
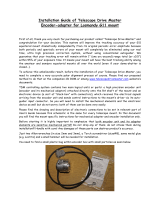
Electronic connections you need to install:

9/16
You can also use “TDM Out 2” port instead of “TDM Out 1” to attach control cable to TDM box if your
telescope controller has SBIG ST-4 standard auto-guider input but it is important to know that TDM’s
SBIG ST-4 standard output (TDM Out 2) does transmit RA signals only but does not transmit
declination control signals coming from auto-guider camera to telescope controller. So, “TDM Out 1”
is the preferred output for auto-guider supported operation.
You need a serial connection (using attached serial cable) between your PC and TDM box only if you
want to measure and/or to log the real-time correction values of TDM. This is a good possibility to
measure your mount’s tracking (periodic and aperiodic) errors in your room instead of open air tests
waiting for cloudless starry nights. In this case, please install “TDM Monitor” program (together with
its runtime environment) or “COM Port Toolkit” onto your PC which can be found on the attached
user’s guide CD. Please launch D:\TDM Monitor\Install TDM monitor\setup.exe where D: is the letter
of your CD driver slot. (See TDM Monitor Guide.txt on the above-mentioned CD ROM.)
Installation of TDM system means, beyond connecting cables and power supply as per above, just
mounting the encoder onto the end of the telescope mount’s RA shaft. Since the physical shape of
the mechanical adapter for fixing encoder onto the RA chunk highly depends on the mount’s shape,
so there are very different adapters for different mounts. But common sense of the mechanical
installation of the adapters onto any type of mount is to ensure extremely rigid fixing for encoder
shaft. It has to become an integral part of the RA shaft without any cone-rotation and/or eccentricity.
Also, the stator coupling of the encoder has to be rigid enough without the smallest flexibility.
Description of adapter installation can be found in another document on User’s Guide CD or on
www.telescopedrivemaster.com website.
If you yourself manufacture and use mechanical adaptor for your mount, MEADE excludes any
guaranty regarding errorless operation of TDM system!!!
How to Use TDM
You can find an array of LEDs within the black box which indicates the momentary measured tracking
error of RA shaft compared to the internal clock. The middle LED of this array is a green; whenever
this green LED is on (independently from any other lights) your tracking accuracy is better than the
prescribed value (±0.5” or ±1”, depending on the position of Jumper4 – see below). You will find two
times 20pcs LEDs (red and yellow; one LED means one digit) on both side of the green LED in this
array. The resolution of this array can be selected using Jumper2: 1” per digit or 1/8” per digit (or
0.125” per digit).
After switching the box on (connecting power supply), a reset function runs during the first second of
the operation. (This is the LED test function as well; you will see two light-bars symmetrically running
up to the ends of the LED array and backward. The total brightness of LED array is constant, so more
and more LEDs will shine on less and less brightness level.)

10/16
A self-test (self-initialization) will be started after the first reset automatically of which duration can
typically be 4-5 seconds. (The real length of this self-test depends on mechanical features of certain
mounts). You do not need to do anything during this self-test just wait a bit.
1. As the very first step of self initialization, TDM will recognize RA tracking direction. This
direction will be accepted by TDM as correct tracking direction; this is different on the
locations of Northern and Southern hemisphere observers. (Observer is responsible for
adjusting correct tracking direction on the telescope control box/software of course.) During
this test one marginal LED (red or yellow, depending on turning direction) will be lighting
continuously and you will see shaft rotation on the LED array in 1”/digit resolution. The test
has been done after the 10
th
LED is switched on. (If tracking is not activated or tracking speed
is out of ±20% tolerance of sidereal rate then TDM will repeat this step again. If RA backlash
is too large this test can be launched several times.
2. In the second step, TDM checks the corrective directions of the driver’s auto-guider input; it
switches the relay moving to East at first. During the test marginal two LEDs (red or yellow,
depending on turning direction) will be lighting continuously and you will see shaft rotation
on the LED array in 1”/digit resolution. The test has been done after the 5
th
LED is switched
on. If the result of this test is not satisfactory, TDM will make this test again but in the
opposite direction. TDM measures the auto-guider control-speed applied by telescope driver
which can be 5”/sec (0.33x sidereal speed) as optimum in most cases. If this correction speed
is out of tolerance (0.1x – 1x), TDM will step forward to the next phase but stores the
measured value (e.g. zero if the auto-guider cable has not been connected).
3. In this step, TDM reveals the other correction movements of the telescope controller’s auto-
guider port. During this test marginal three LEDs (red or yellow, depending on turning
direction) will be lighting continuously and you will see shaft rotation on the LED array in
1”/digit resolution. The test has been done after the 5
th
LED is switched on. The correction of
the rotation speed has to be in opposite direction compared to the previous test. If the result
of this test is not satisfactory, this is not interpretable error so the whole self-test will be
started again. TDM measures the auto-guider tracking speed applied by telescope driver
which can be 5”/sec (0.33x sidereal speed) in most cases. If this correction speed is out of
tolerance (0.1x – 1x), TDM will step forward to the next phase but stores the measured value
(e.g. zero if the auto-guider cable has not been connected). The other elements of this step
are the same as those can be found in the previous point.
4. The fourth step of the initialization process can run on two different ways, based on the
previous three steps:
a. PED-mode (Periodic Error Display mode): if neither the East nor the West auto-guider
relays do work then marginal 4 LEDs of the display (red or yellow, depending on
turning direction) will be switched on for a second indicating the false test result. In
this case, the most probable reason behind this test result is the unconnected auto-
guider cable. In spite of it, the self test will be completed and TDM displays the real
tracking error of the mount. (It is practical to select ±1”/digit display resolution (using
Jumper4) for this function unless you have a mount with less than ±2.5” original
periodic error…)

11/16
b. TDM mode (Telescope Drive Master controlling mode): if both of correction
movements are active and correction speed is acceptable, marginal 5pcs of LEDs in
the LED array (red or yellow, depending on turning direction) will light informing you
about successful self test. (The total length of the self-test is roughly 5 seconds
depending on the different mechanical features of telescope mounts.)
5. TDM-control: after finishing self test, TDM-control will be activated and the system will
increase or decrease the RA tracking speed if it is necessary.
There are four DIL (Dual in Line) switches (say Jumpers) for fine adjustment of TDM tracking
behavior. These jumpers will change their certain features immediately so you do not need to reboot
TDM. Please find front side of TDM below.
Jumper1: Tracking speed selector (off: King Rate – 1436.47 minutes/day; on: Sidereal – 1436.07
minutes/day). In this version, King Rate means “average King Rate” but not position-sensitive, real
King Rate.
Jumper2: it changes display resolution (off: 1/8” or 0.125”/digit; on: 1”/digit). The total error-range of
the display in high resolution mode is ±2.25” (±18 x 1/8”) which is recommended for TDM mode; or
±15” (±15 x 1”) which is recommended for PED mode. Please note: since TDM displays periodic error
immediately after finishing its self-initialization, the tracking error displayed (and exported on the
USART port) will not be symmetrical to zero level but will depend on initial phase.
Jumper3: adjusts the frequency of correcting actions (off: 1 Hz – one correction per second; on: 5 Hz
– 5 corrections per second). The recommended selection can depend on the dimensions and mass of
the OTA, stability of the mount or wind-speed. (See some tips below.)
Jumper4: hysteresis (dead zone) of controlling (off: ±1”; on: ±0.5”). TDM keeps the tracking error
within this range compared to the internal time base (it switches the correction relays on when the
tracking error exceeds these prescribed values). Its recommended position depends on practical
factors like mechanical behavior of the RA drive gear, stability of the mount or wind-speed. (See
some tips below.) Please note: the aggressivity of this controlling system (speed of correcting action)
can be adjusted by telescope controller device only, not on TDM.
TDM operation during Telescope’s GoTo movements

12/16
TDM has ±5 arc-seconds control-range during tracking. If the difference (tracking error) becomes
higher than this value (in spite of correction) within one second or shaft rotation is faster than 2x
sidereal (or average King-rate) speed (e.g. due to high speed Goto or manual movements), TDM will
be reset and will recheck RA rotational speed in every second. At the end of Goto movement, as soon
as the RA component of the Goto movement becomes lower than 2x of tracking speed again, TDM
will control the telescope driver. Certainly, it is not possible to move the scope on slower speed than
2x sidereal (or average King-rate) speed because TDM will compensate these small movements
believing them as mechanical tracking errors. (During high speed movement, the controller relays are
in prohibited mode so TDM does not cause any problem in the step-calculation based coordinate
measurement process of the telescope driver units.) After position reset, the self test (initialization)
will not be initiated; just the controlling process starts again from the certain position as zero
position error. Please note: self test and initialization process runs in case of switching TDM off and
on again only.
Using TDM together with an Auto-guider (TDM v2 or higher only)
Although TDM was originally developed for robotic telescopes as stand alone application up to 5-10
minutes exposure time, TDM v2.0 and higher versions support Auto-guider controlled tracking for
longer exposures as well. It means you do not need to hunt for bright guide stars for your guider
CCD chip and you do not need to have extra sensitive auto-guider CCD because TDM will keep the
mount on the right tracking speed with the highest practical accuracy between two autoguider
corrections. So you can use 10 magnitudes (or much dimmer) stars for guiding from the small size
off-axis guider FOV with 10, 20 30 seconds or longer (but minimum 2 seconds, see below) CCD
integration time: actually, you will be able to use ANY stars in your FOV for guiding.
You can find auto-guider input connector, together with encoder input, on the “input-side” of TDM,
next to the jumpers. TDM supports MEADE LX200 standard (RJ-12) auto-guider connector as input
plug and both MEADE LX200 and SBIG ST-4 standard connectors can be used on the output side,
between TDM output and auto-guider input of the telescope control box (see technical sheet).
But it is important to know that only LX200 standard output can work together with auto-guider
correctly!!! So you need to join TDM box in between your auto-guider and telescope controller using
LX200 plugs.
If the properly connected TDM is switched off, auto-guider control signals will be transmitted into
the telescope driver by TDM directly, without any modification. So you do not need to remove TDM
from this loop if you want to use auto-guider without TDM (but there is no reason behind not to use
TDM if you have…).
But please note: if you want to use TDM without your auto-guider, you have to unplug it from TDM
because the switched off auto-guider will (or can) provide static “L” controlling signal to TDM auto-
guider input and TDM will interdict the output of its own continuously believing auto-guider is
active.
There are two possibilities to initiate your connected system (if the telescope driver has already
been switched on):
1. Switch on your auto-guider at first and train it. As soon as the auto-guider starts active guiding,
you can also switch TDM on. Now, TDM will run the self-initialization process of its own. During
this period in time, auto-guider input will be attenuated completely by TDM of course. After
finishing these actions, the system will be ready to go.
2. You can switch TDM on at first as well. In this case, you will obviously need to wait for the end of
TDM self-initialization process and you can activate your auto-guider only as soon as TDM

13/16
works. TDM will help the self-initialization (or training) process of the auto-guider smoothing
tracking errors between test-steps in RA direction. (Please note: auto-guider control period has
to be longer than 2s, see below.)
So, the only rule is not to switch both devices on in the same time because two different control
algorithms would confuse to each other.
Important: TDM has a dead-time on auto-guider input following the end of the last auto-guider
correction period for as long as 2 seconds avoiding excitation and resonance problems of two
different control-loops. But it is not logical to use too short auto-guider interactions at all if you use
TDM…
Even more, it is absolutely rational to set auto-guider integration time to the maximum of its range
(e.g. 30 seconds or 1 minute) because, in this way, you can use the dimmest stars of the FOV for
guiding. TDM will keep your scope on target rigorously, do not worry. As soon as TDM senses auto-
guider control signal in RA direction arriving from the auto-guider input, interdicts the signal of its
own and transmits the incoming auto-guider control signal (together with declination control signal
of course – but using LX200 port only!) to the telescope driver and keeps this function up as far as
the auto-guider is active. Since auto-guider releases the telescope driver (and starts another “long”
CCD exposure), TDM runs a position-reset function and uses the last position as reference after
auto-guider correction has completed and works on.
Three red and three yellow LEDs around the green ‘zero deviation LED’ will be switched on during
auto-guider interactions indicating the external guiding control.
A few tips for using TDM on more efficient way
The mechanical features of certain telescope mounts (both their construction and manufacturing
quality), the correcting speed of tracking movement adjusted by the telescope controller, and TDM’s
jumpers of its own exercise remarkable influence on correct and smooth tracking process.
In general, it can be declared that elimination of the mechanical noise of toothed wheel (or
epicyclical) gears provide the highest challenge for TDM or for any other tracking control system (e.g.
auto-guider) because this type of errors produces short term elongations with quite large amplitudes
in the PE curve. The worm wheel error has larger amplitude but much longer period so TDM (or an
auto-guider) can suppress its moderated trend much easier. So, this means, it is logical to use faster
(5Hz) and/or higher (0.4x, 0.5x, maybe 1x) control speed (more aggressive) in these cases. At the
same time, mounts driven by timing belt on the worm shaft or having direct drive (motor on the
worm-shaft directly) cannot tolerate such an aggressive controlling parameters in many cases so 1Hz
frequency and slower modification speed (0.3x, 0.25x or maybe 0.15x) can be better. But the main
rule is: just test it and use the best configuration!
In case of weak mechanical quality mounts or too breeze weather it can be logical to increase the
dead zone of the controlling system from ±0.5” to ±1”. The accuracy of tracking operation will
slightly decrease in this way but not remarkably using shorter focus distances and expositions at
average seeing. At the same time, the controlled system will became much more stabile and
smoother.
If you use TDM with control cable unplugged, the actual tracking error will be seen and measured on
the display (like in PED mode).

14/16
The extremely accurate tracking ability provided by TDM obviously demands extremely strict
conditions against the instrument and observer. E.g. cables coming from the CCD, lens heating belts,
electronic focuser, etc. have to be fixed. The pier should be mechanically isolated from the observer’s
floor; you can test the efficiency of the vibration free pier isolation on TDM’s display as well if you
take a small jump next to the pier during controlled tracking by TDM.
Three of the most important enemies of TDM’s tracking accuracy are: incorrect polar alignment,
weak quality mounts with dirty bearings on RA shaft, and air mass refraction.
You can remarkably improve the accuracy of polar alignment using a webcam and image capture and
analyzing software (e.g. Drift Explorer module of K3CCDTool3). The recommended method to do it is
a kind of “mixed Scheiner-King method”. The horizontal adjustment (on the local meridian at the
celestial equator) is easy and extremely reliable using Scheiner (or declination drift) method; but it is
not true in case of altitude alignment (because of high refraction values on the Eastern or Western
horizon). For altitude adjustment of polar alignment, King method (altitude adjusting by taking
photographs of the refracted pole) is far better. See the detailed description of both adjustment
methodologies on our website: www.telescopedrivemaster.com. Additionally, it is highly
recommended to check the polar alignment from time to time because even the most rigid pier base
can move a little bit.
1” is an unbelievable tiny angle; you can see a 1Euro coin at this angle from roughly 5km distance!
This angle is 1/1,296,000 parts of the full circle. The smallest dust grain on the rolling surface of the
bearings can push the RA shaft away from its normal position and, although TDM keeps the shaft-
speed on proper value, the telescope’s optical axis will move away from its ideal position. So please
use TDM on rigid enough and clean mount. (You can find a few typical error curves on our website
(www.telescopedrivemaster.com)
Finally, we can reduce the negative impact of air refraction if we make observations on “photometric
altitudes” (within 40-50 degree zenith distances if it is possible). Additionally, we should use sidereal
rate around zenith and King rate around the mediocre altitudes of the local meridian (see Jumper1).
At the same time, we need to avoid Eastern or Western horizons. If you keep the proposals above,
the maximum duration of an exposition can be around 5-10 minutes (depending on the focus length
of your scope and polar alignment).
Service USART port:
If TDM connected to PC via Serial port, we can make a log-file of controlling period. TDM sends the
measured RA tracking error (in hexadecimal format) to the serial port in every second. 128dec =
80hex code represents zero deviation. USART always writes tracking error in 1/8” step resolution and
it is able to write 120 digits (±15”) deviations as maximum value.
You can find USART utility software (COM Port Tool Kit 3.9) on the web (http://www.compt.ru) which
saves the measured data into the file called „compt.dat”; these data can be presented as a curve in
Excel after error-range transformation.

15/16
Additionally, it is possible to create a high precision periodic error (PE) curve of your mount directly
using the serial (USART) port of TDM connected to your PC in your room without “in-situ” test under
the night sky. You just need to use the software (TDM Monitor.exe) from User’s Guide CD or
download it from our website www.telescopedrivemaster.com. Due to the fact that TDM’s control-
range is not wider than ±15” (see above) you can test mounts with better PE than half an arc-minute
p-v total in this way (if you can start error log recording in the middle of the total range) and your
controller has to be drift-free.
During its self-initialization, TDM also sends different messages to the PC about test-status via USART
which can be found in the next list. The very last message of the self test is 2pcs of FFhexa codes and
error logging starts after this code. 2pcs of FFhexa code will also be exported after reset again.
See USART codes applied on the next page.

16/16
USART codes:
0x hex = comment
Fx hex = FALSE (FAULT)
FF hex = Reset
00h selftest step1 start
01h track direction positive (North hemisphere), velocity good
02h track direction negative (South hemisphere), velocity good
F1h tracking too fast
F2h tracking too slow
03h track display start 1sec
04h selftest step2 start
05h East relay direction good
06h East relay direction wrong, East relay direction swapp and selftest step2 restart
F3h -
F4h East relay timeout (relay slow or not connected)
F5h -
F6h -
07h selftest step3 start
08h West relay direction good
F7h West relay direction wrong
(Impossible error! East and West relays moved same direction)
F8h West relay timeout (relay slow or not connected)
09h East relay return correction Start
0Ah East relay return correction End
F9h Weast relay timeout (relay slow or not connected)
0Bh -
0Ch -
0Dh -
0Eh PED mode ( Periodic Error Display ) Start
( East AND West relays wrong, probably NO guider port cable)
0Fh TDM mode, tracking control Start
FAh West relay wrong, East relay good (cable broken)
FBh West relay good, East relay wrong (cable broken)
FCh -
FDh -
FEh -
FFh TDM RESET happened
/