Page is loading ...

Owner’s Manual
960L.
Digital Effects System

Important Safety Instructions
Save these instructions for later use.
Follow all instructions and warnings marked on the unit.
Always use with the correct line voltage. Refer to the manufacturer's operating instructions for power requirements. Be
advised that different operating voltages may require the use of a different line cord and/or attachment plug.
Do no install the unit in an unventilated rack, or directly above heat producing equipment such as power amplifiers. Observe
the maximum ambient operating temperature listed in the product specification.
Slots and openings on the case are provided for ventilation; to ensure reliable operation and prevent it from overheating,
these openings must not be blocked or covered. Never push objects of any kind through any of the ventilation slots. Never
spill a liquid of any kind on the unit.
This product is equipped with a 3-wire grounding type plug. This is a safety feature and should not be defeated.
Never attach audio power amplifier outputs directly to any of the units connectors.
To prevent shock or fire hazard, do not expose the unit to rain or moisture, or operate it where it will be exposed to water.
Do not attempt to operate the unit if it has been dropped, damaged, exposed to liquid, or if it exhibits a distinct change in
performance indicating the need for service.
This unit should only be opened by qualified service personnel. Removing covers will expose you to hazardous voltages.
Notice
This equipment generates and uses radio frequency energy and if not installed and used properly, that is, in strict
accordance with the manufacturer's instructions, may cause interference to radio and television reception. It has been type
tested and found to comply with the limits for a Class A computing device in accordance with the specification in Part 15 of
FCC Rules, which are designated to provide reasonable protection against such interference in a residential installation.
However, there is no guarantee that interference will not occur in a particular installation. If this equipment does cause
interference to radio or television reception, which can be determined by turning the equipment OFF and ON, the user is
encouraged to try to correct the interference by one or more of the following measures:
Reorient the receiving antenna
Relocate the units with respect to the receiver
Move the units away from the receiver
Plug the unit into a different outlet so that the unit and receiver are on different branch circuits.
If necessary, the user should consult the dealer or an experienced radio/television technician for additional suggestions. The
user may find the following booklet prepared by the Federal Communications Commission helpful:
"How to identify and Resolve Radio/TV interference Problems"
This booklet is available from the U.S. Government Printing Office, Washington, DC 20402, Stock No. 004-000-00345-4.
CAUTION
RISK OF ELECTRIC SHOCK
DO NOT OPEN
This triangle alerts you to important
operating and maintenance
instructions in this
accompanying
literature
This triangle, which appears on your component,
alerts you to the presence of uninsulated,
dangerous voltage inside the enclosure;
voltage that may be sufficient to
constitute a risk of shock.
"Dolby", "Dolby Surround", "Pro Logic", and "Dolby Digital" are trademarks of Dolby Laboratories.
"Super Audio CD" and "SACD" are trademarks of Sony Electronics, Inc. "THX" and "Home THX Cinema"
are trademarks of Lucasfilm, Ltd.
"Logic7", "LexiconLogic", and "3DPM" are trademarks of Lexicon, Inc.
Lexicon Inc.
3 Oak Park
Bedford, MA 01730 USA
Telephone 781-280-0300
Fax 781-280-0490
Copyright © 2000
All Rights Reserved.
Lexicon Part No. 070-14353

Chapter 1
DESCRIPTION 1-1
About the 960L 1-1
Unpacking the 960L 1-1
THE REAR PANEL 1-1
I/O Clock Card 1-2
Option Plates 1-2
Analog Input Card 1-2
Analog Output Card 1-2
AES I/O Card 1-2
Mains Power Switch. 1-2
Mains Voltage Selector 1-2
IEC Power Connector 1-2
THE FRONT PANEL 1-3
Floppy Drive 1-3
Thumbscrews 1-3
Standby Switch and Indicator 1-3
BEHIND THE FRONT PANEL 1-4
DSP-Card Slots 1-4
CPU Card 1-4
INSTALLATION 1-5
Mounting 1-5
Ventilation 1-5
Location 1-5
IEC Power Connector 1-5
Mains Voltage Selector 1-5
Analog Audio Connections 1-5
Digital Audio Connections 1-6
MIDI Connections 1-6
WordClock Connections 1-6
Chapter 2
THE LARC2 2-1
About the LARC2 2-1
Unpacking The LARC2 2-1
LARC2 CONTROL SURFACE 2-2
GETTING WHAT YOU WANT 2-3
LARC2 CONNECTIONS 2-3
Control Port 2-3
Aux Port 2-3
External-Power Connector 2-3
NAVIGATING TYPICAL DISPLAY SCREENS 2-4
ABOUT THE FADERS AND JOYSTICK 2-5
AUDIO INDICATORS 2-6
FINE ADJUST 2-6
THE LEXICON BUTTON 2-6
Chapter 3
AN OVERVIEW OF THE CONTROLS 3-1
A QUICK GUIDE TO OPERATION 3-2
(1) Setup (Control Mode) 3-2
(2) Machine Selection 3-5
(3) Program Loading 3-5
(4) Editing a Program or Register 3-6
(5) Storing Your Edits 3-6
Chapter 4
LOADING PROGRAMS AND REGISTERS 4-1
Loading Programs 4-1
Loading Registers 4-2
CONTROL MODE: CLOCKS, CONFIGURATION,
AND SYSTEM SCREENS 4-3
Wordclock 4-3
Input, Output, and Machine Configuration 4-4
System Screen 4-8
EDITING 4-9
Editing Algorithms 4-9
Editing With the Faders 4-9
Fine Adjust 4-9
Editing with the Joystick 4-10
Quick Comparisons via the Lexicon Button 4-10
Editing Inputs and Outputs 4-11
Input Panning 4-11
Output Panning 4-12
The 960L Surround Panning Rules 4-13
Setting Levels 4-13
Avoiding Overload 4-13
Assigning New Parameters
to Faders or the Joystick 4-13
The V-Page and Parameter Reassignment 4-14
Using the Edit Algorithm Screen 4-14
STORING AND LABELING YOUR EDITS 4-16
Storing 4-16
Naming and Annotating 4-16
ORGANIZING YOUR REGISTERS 4-17
Edit Tools for Registers 4-18
Using the Floppy Drive 4-18
THE CD-ROM 4-18
MACHINE MODE 4-18
960L Owner’s Maunal Table Of Contents
Table Of Contents

Chapter 5
REVERBERATION AND REALITY 5-1
SOUND IN SPACE: A SHORT HISTORY
OF STEREO AND SURROUND 5-5
ALGORITHMS 5-6
Random Hall 5-6
Surround Hall 5-7
Chamber 5-7
Plate & Surround Plate 5-7
Ambience & Surround Ambience 5-7
Ambient Chamber 5-8
Reverse & Surround Reverse 5-8
Inverse 5-8
PARAMETERS USED
IN THE 960L ALGORITHMS 5-9
Chapter 6
MIDI 6-1
Nomenclature 6-1
MIDI Channel Allocation 6-1
Program Loading 6-2
Bank and Program Mapping 6-2
Card Configuration 6-2
Continuous Controllers 6-2
MIDI SYSEX 6-3
MIDI IMPLEMENTATION CHART 6-4
SPECIFICATION
Mainframe
LARC2
APPENDIX
Table Of Contents Lexicon
Table Of Contents,continued

Title of Section
960L Owner’s Maunal Introduction
The Model 960L is a multi-channel reverb processor for
audio professionals.It brings to surround all the virtues
and facilities of the Model 480L— and then some. Like
the 480L, it is a multiple-machine system — hardware
and software expandable. The 960L’s DSP card can
support up to four stereo reverbs or two multi-channel
surround reverbs at 48 Hz, or two stereo reverbs at 96
kHz. The 960L provides eight balanced inputs and
outputs, eight channels of AES/EBU digital input and
output, external word clock in/out, and MIDI
In/Out/Thru.
The 960L is controlled by a new, dedicated remote, the
LARC2. Its user interface is fashioned after the original
LARC controller, so 480L users can get up to speed
quickly, but it was also designed for fast, intuitive
operation by those who have never used the 480L.
Extensive visual feedback and a wide variety of input
devices (hard and soft buttons, motorized faders, and a
joystick) provide access to everything you need to
control.
The 960L and LARC2 were designed for maximum
flexibility and control. The 960L’s reverberation
algorithms, based on Lexicon’s 3DPM™ (for 3-
Dimensional Perceptual Modeling) technology, embody
the accumulated knowledge of more than 20 years of
research and study into how humans perceive spaces.
With the 960L, engineers working in surround can
create convincing 5.1-channel spaces — even spaces
that sound better than real ones — from a reverb
designed for the purpose, rather than an unconvincing
assemblage of multiple stereo and mono reverbs. The
3DPM™ algorithms Lexicon developed for the 960L
take the principles of physics and psycho-acoustics
into account.
Introduction

1
The Mainframe
DESCRIPTION............................................................1-1
About the 960L ....................................................1-1
Unpacking the 960L..............................................1-1
THE REAR PANEL......................................................1-1
I/O Clock Card......................................................1-2
Option Plates ........................................................1-2
Analog Input Card ................................................1-2
Analog Output Card..............................................1-2
AES I/O Card........................................................1-2
Mains Power Switch. ............................................1-2
Mains Voltage Selector ........................................1-2
IEC Power Connector ..........................................1-2
THE FRONT PANEL ..................................................1-3
Floppy Drive..........................................................1-3
Thumbscrews........................................................1-3
Standby Switch and Indicator ..............................1-3
BEHIND THE FRONT PANEL ....................................1-4
DSP-Card Slots ....................................................1-4
CPU Card..............................................................1-4
INSTALLATION............................................................1-5
Mounting ..............................................................1-5
Ventilation ............................................................1-5
Location ................................................................1-5
IEC Power Connector ..........................................1-5
Mains Voltage Selector ........................................1-5
Analog Audio Connections....................................1-5
Digital Audio Connections ....................................1-6
MIDI Connections ................................................1-6
WordClock Connections ......................................1-6

960L Owner’s Maunal The Mainframe
1-1
About the 960L
The 960L system consists of two components: a rack-
mounted Mainframe designed for remote mounting in
machine rooms or elsewhere, and a dedicated
controller, the LARC2.
Unpacking the 960L
The 960L system is shipped in two cartons, one
containing the 960L mainframe, the other containing
the LARC 2 dedicated controller. After unpacking, save
all packing materials in case you ever need to ship the
unit. Thoroughly inspect the 960L system and packing
materials for signs of damage. Report any shipment
damage to the carrier at once. The following
accessories are packed with the 960L Mainframe (for
the LARC2 carton, see Chapter 2):
• Lexicon 960L Mainframe, with cards installed
• IEC power cord
• CD-ROM, 960L Software
• This User Guide
• Warranty and Registration Cards
• CE compliance certificate
• License Agreement
• Bumper feet (4)
Description
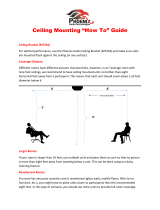
Figure 1-1 — 960L Rear Panel
Mains
voltage
selector
Mains
power
switch
Remotes
(Connect LARC2
to port 1)
Wordclock
(input loop,
out)
MIDI
(in, out, thru)
I/O Option plate
Analog in
(balanced XLR)
Analog out
(balanced XLR)
AES in
(XLR, channel pairs)
AES out
(XLR, channel pairs)
Option plate IEC power
connector
The 960L mainframe’s rear panel holds four I/O cards,
together with power connections, the mains power
switch, mains voltage selector switch and option plates.
The I/O cards can be removed for service and/or
upgrades without removing the chassis from the rack.
The proper ordering (top to bottom) of the cards is I/O
Clock Card, I/O Option Plate, AES I/O Card, Analog In
Card and Analog Out Card. Cards should be kept in
this order.
The Rear Panel

The Mainframe Lexicon, Inc.
I/O Clock Card
MIDI Connectors (Five-pin DIN female)
• MIDI In
Accepts MIDI data from other MIDI-equipped
devices.
• MIDI Thru
Retransmits, unchanged, MIDI data received
at the MIDI In connector.
• Midi Out
Transmits MIDI data generated or modified
by the 960L.
TTL WordClock (BNC)
• Input Loop
Allows the 960L to be synchronized to other
studio equipment.
• Output.
Allows studio equipment to be synchronized to
the 960L.
Note: The 960L can also derive wordclock from
AES input 1-2, or generate it internally.
Remote-Control Connectors
The LARC2 must be connected to the Remote 1 9-pin
D-connector. The 960L Remote connectors are for use
only with the LARC2 controller.
Option Plates
Reserved for future use.
Analog Input Card
The 960L’s analog audio input card has eight female
XLR connectors, all electronically balanced. For
impedances and signal levels, see the Specifications
Section near the end of this manual.
Analog Output Card
The 960L’s analog audio output card has eight male
XLR connectors, all electronically balanced. For
impedances and signal levels, see the Specifications
Section near the end of this manual.
AES I/O Card
The 960L’s digital audio inputs and outputs are
combined on one card holding four XLR two-channel
female connectors for AES input and four XLR two-
channel male connectors for AES output.
Mains Power Switch
This switch turns the power in the 960L completely
off or on.
Mains Voltage Selector
Before connecting the 960L Mainframe to power mains,
make sure the setting matches your local mains voltage.
Refer to the Installation section of this chapter for more
information.
IEC Power Connector
Accepts IEC power cords with mains plugs specific to
your country.
The Rear Panel, continued
1-2
Important:
Never connect either Mainframe remote port to
anything other than LARC2. Doing so may damage
your equipment.

960L Owner’s Maunal The Mainframe
Standby Switch and Indicator
This switches the 960L between on and standby; the
indicator LED lights when the unit is on.
When your 960L is in standby, the power to most
circuitry is removed. To completely disconnect power
from the 960L, either turn off the power by using the
switch located on the rear panel of the 960L or unplug
the power cable from the wall outlets.
1-3
960L DIGITAL EFFECTS SYSTEM
Figure 1-2 — Front panel, closed.
Floppy Drive
This is a 3.5", High Density, IBM Format compatible,
floppy drive. This is primarily used for saving user
Registers.
Thumbscrews
To gain access into the front section of the chassis,
unscrew both thumbscrews and lower the hinged panel.
The Front Panel

The Mainframe Lexicon, Inc.
DSP-Card Slots
Top slot occupied, others reserved for future Lexicon cards.
CPU Card
NLX-type montherboard.
Behind the Front Panel
1-4
Figure 1-3 — Front Panel, Open
Card slots for DSP cards.The cards can be
removed for service, when instructed by Lexicon
Customer Service.
Floppy drive for
saving registers
Standby switch
Important:
Do not plug any cards into these slots except those
made by Lexicon for the 960L.
Caution:
The motherboard has a lithium battery. Lithium is a
hazardous substance. The battery should be
replaced only by qualified service personnel, and
disposed of properly.
CD-ROM drive for
software upgrades
Reset Switch

960L Owner’s Maunal The Mainframe
1-5
Installation
Mounting
The 960L mounts in stationary racks with four screws.
Make sure the 960L Mainframe is securely screwed into
the rack. For moving and in roadcases, be sure that
support is provided for the rear of the chassis to avoid
possible damage.
Ventilation
Provide adequate ventilation if the 960L is mounted in a
closed rack with heat-producing equipment such as
synthesizer modules, effects units, or power amplifiers.
Avoid mounting the 960L Mainframe directly above
power amplifiers.
Location
It may be desirable to place the 960L Mainframe in a
location remote from the listening environment. The
mainframe can be located up to 1,000 feet from the
LARC2 controller with a remote power pack. See
Chapter 2 for more information.
IEC Power Connector
The 960L is equipped with a 3-pin IEC power connector
and detachable cord, providing chassis grounding to
the AC mains line. Plug the female end of the power
cord into the 960L mainframe and the male end into a
wall outlet.
Mains Voltage Selector
Before connecting the 960L Mainframe to power
mains, make sure the setting matches your local
mains voltage.
Use a flat screwdriver to move the switch to the desired
voltage.
Analog Audio Connections
For best results, the 960L should be connected to your
console’s Aux sends/returns, with wet/dry mixing and
most input settings performed at the console. However,
controls are provided within the 960L for situations
where this is not possible or convenient.
For optimal performance, maintain balanced
connections, and use high-quality, low-capacitance,
shielded, twisted-pair cables, such as Belden 8412
(microphone cable with braided shield) or Belden 9461
(foil shield).
All connections should be Pin 2 high. For unbalanced
operation, Pins 1 and 3 should be grounded. For mono
inputs in a stereo configuration, connect the left and
right input channels in parallel.Be careful to keep inputs
and outputs of all channels wired consistently. Out-of-
phase wiring can produce audible effects.
For I/O panning and level control, see Chapter 4,
Operations in Detail. All signals sent to the analog
outputs are also sent to the digital outputs.
Important:
Analog I/O connectors must be wired consistently
(we recommend Pin 2 high), or channels will be out
of phase.
Figure 1-5— Setting for 220-240 V AC
Figure 1-4 — Setting for 100-120 V AC
230
115

1-6
960L Owner’s Maunal The Mainframe
Digital Audio Connections
The AES interface requires balanced connections,
using high-quality, low-loss, controlled-impedance,
shielded, twisted-pair cables designed for data
communications, such as Belden 9860 (braided shield)
or Belden 9271 (foil shield). The use of ordinary
microphone cable can cause digital interfaces to
work unreliably. Remember that the maximum
recommended length for AES cabling is 100 feet (30
meters).
Following AES conventions, the odd-numbered
channels are on the left channel of each AES stereo
pair, the even-numbered channels on the right. The
word length is 24 bits, at sample rates of 44.1, 48, 88.2,
or 96 kHz. To use the digital inputs, the 960L can be
synchronized to AES input 1-2 or to the TTL Wordclock
input. Note that all digital inputs must be synchronized
to the same master clock for operation without artifacts.
For routing and panning, see Chapter 4, Operations in
Detail. All signals sent to the digital outputs are also
sent to the analog outputs.
MIDI Connections
Use standard, 5-pin DIN MIDI cable assemblies,
available from your local dealer. Chapter 6, MIDI
describes the 960L MIDI functionality.
Wordclock Connections
Use standard, 75 ohm BNC cables, available from your
local dealer. The self-terminating loop-thru TTL input
facilitates daisy-chained clock distribution. The 960L
will refer its internal wordclock to the falling edge of the
input square wave. The 960L output is a TTL-
compatible square wave with the falling edge aligned
with the start of the 960L sample period.
Installation, continued
2 High
3 Low
1 Ground
1 Ground
3 Low
2 High

2
The LARC2 Remote
THE LARC2 ................................................................2-1
About the LARC2 ..................................................2-1
Unpacking The LARC2 ..........................................2-1
LARC2 CONTROL SURFACE ....................................2-2
GETTING WHAT YOU WANT......................................2-3
LARC2 CONNECTIONS..............................................2-3
Control Port............................................................2-3
Aux Port ................................................................2-3
External-Power Connector ....................................2-3
NAVIGATING TYPICAL DISPLAY SCREENS ............2-4
ABOUT THE FADERS AND JOYSTICK......................2-5
AUDIO INDICATORS ..................................................2-6
FINE ADJUST..............................................................2-6
THE LEXICON BUTTON ............................................2-6

960L Owner’s Maunal The LARC2 Remote
2-1
About the LARC2
The 960L is controlled from the LARC2. While the
LARC2 is a completely new remote, its operation will
seem familiar to users of the LARC remote used with
the Lexicon 224XL and 480L. Like the original LARC,
the LARC2 is compact enough to rest on or near the
center of the console, while keeping the 960L
Mainframe out of the way -- hundreds of feet away in
the machine room, if necessary.
The 960L’s user interface and the LARC2 were
designed to be helpful to new users and fast for
experienced 480L users. The LARC2’s joystick and
eight touch-sensitive motorized faders are always
connected to and controlling audio parameters. The
assignment of audio parameters to each of these
controls has been individually optimized for each of the
more than 200 factory Programs that ship with the
960L. Further, you can easily customize these
assignments to put the parameters you use the most at
your fingertips.
System status (input levels, machine configuration,
clock source and lock status, mute state, etc.) is always
visible on LARC2 through an LED meter bridge and a
dedicated region of the color LCD display. Dedicated
function keys, a numeric keypad, screen navigation
arrows and eight soft buttons allow easy and quick
navigation through the rest of the user interface.
Each screen has space for explanatory notes. Some of
these notes are help messages, while others can be
customized by the user, using either the LARC2’s own text
entry interface or a user-supplied PS/2 computer keyboard.
Unpacking the LARC
The 960L system is shipped in two cartons, one
containing the 960L Mainframe, the other containing
the LARC2 dedicated controller. After unpacking, save
all packing materials in case you ever need to ship the
unit. Thoroughly inspect the 960L system and packing
materials for signs of damage. Report any shipment
damage to the carrier at once. The following
accessories are packed with the LARC2 (for the 960L
mainframe carton, see Chapter 1):
• LARC2 remote console
• 50-foot cable for connection to 960L Mainframe
• Warranty & registration cards
• CE compliance certificates
The LARC2 Remote
Note: You will find the LARC2 to be a robust and
reliable product.It does contain complex electronic and
electro-mechanical assemblies. We suggest handling it
with the same care you would apply to the use of a
laptop or notebook computer.
CONTRAST
AUX
HOST
EXT. POWER
RESET
LEXICON, INC.
SERIAL NO.
LARC2
Contrast Knob
For adjusting
LCD contrast.
Aux Port
For user-supplied PS/2 Keyboard.
Note: “Hot plugging" the keyboard is
not recommended. The keyboard
should be connected before power is
applied to the 960L.
Host Port
For connection to
960L Mainframe.
External Power Connector
For use when cable run to 960L
mainframe exceeds 100 feet.
Reset Button
LARC2 hard reset switch.
It is recessed to avoid
accidental activation.
Strain Relief
For the External Power
Supply cable, if used.
Figure 2-1 — LARC 2 rear panel
Important:
• Never connect a LARC2 to anything but the
960L Mainframe.
• Never connect either Mainframe Remote Port to
anything but the LARC2.Doing so may damage your
equiptment.

960L Owner’s Manual The LARC2 Remote
2-2
LARC2 Control Surface
Figure 2-2 — The LARC2 Control Surface
Signal present, -6dB
and overload
indicators
Soft buttons
Numeric keypad
Mode keys
Mute Machine
Mute All
Touch-sensitive
motorized faders
Color LCD
Display
Joystick
Increment/
decrement
buttons (+/- key)
Joystick key
Fine adjust key
“Lexicon” key
(compare)
Navigation arrows

960L Owner’s Maunal The LARC2 Remote
2-3
In general, the LARC2’s faders and joystick are used to
control audio parameters of your choice, while all other
buttons select operations and parameters. That means
you have several fast ways to operate the 960L.
• Mode Buttons give you direct access to the most
frequently used control actions.These buttons are:
PROGRAM, REGISTER, BANK, STORE, EDIT,
CONTROL, and MACHINE. The functions of some
buttons are implied by their names, and all are
explained below. When selected, each button
glows red.
• ENTER is used to complete an action.
• The Numeric Keypad lets you quickly select any
numbered option on the display.
• Navigation Arrows let you move up, down, or
sideways within the display to select the action you
want.
• Increment and Decrement (+/-) Buttons can be
used to select items from lists or to make fine
adjustments to parameters.
• Soft Buttons are context sensitive. Their labels
therefore change dynamically and appear at the
bottom of the LCD display, just above each button.
Additional LARC2 controls include:
• Joystick, primarily for input and output panning, but
assignable to any desired parameters.
• JOYSTICK Button activates and deactivates
the joystick.
• FINE ADJ Button toggles faders to and from
fine-adjustment mode.
• Lexicon Button temporarily returns operation to the
most recently loaded Program or Register for quick
sonic comparison.
• Faders are touch-sensitive and motorized. Their
positions are automatically updated (auto-nulling)
to reflect the current values of their assigned
parameters. The parameters controlled by each
fader and their current settings are shown on the
display, just above the soft-button labels. Touching
any fader highlights its parameter and setting on
the display.
• MUTE MACH and MUTE ALL buttons (flanking the
numeric keypad’s "0") mute the output
of the currently selected machine or the outputs of
all machines.
Host Port
This port connects LARC2 to the 960L Mainframe. For
distances of 100 feet or less, use Lexicon No. 022-
14400 50-foot cables. One 50-foot cable is supplied
with LARC2. For longer distances (up to 1,000 feet) use
computer-grade cable with shielded twisted-pairs, for
example Belden 9860 or 9271. Do not use microphone
or other audio cable. The cable pin assignment is
shown in figure 2.3. For distances over 100 feet,
LARC2 requires an external power supply, as described
below.
Aux Port
You can connect a standard PS/2 computer keyboard to
LARC2 via this port. This will allow faster text entry in
NAME and INFO fields (see Chapter 4, Operations in
Detail). "Hot plugging" the keyboard is not
recommended. The keyboard should be connected
before power is applied to the 960L.
External Power Connector
The LARC2 must be powered by an external power
supply when located greater than 100 feet from the
960L. The power supply should deliver 12VDC at 2 A
and should have a 5.5 mm O.D., 2.5 mm I.D. concentric
(female barrel) connector, with the positive voltage on
the inner contact. See the Lexicon web page
(www.lexicon.com) for a current list of external power
supplies and vendors.
12VDC, 2A
Getting What You Want LARC2 Connections
Figure 2-3 — LARC2-connector Pin Assignments
* Not connected if external power supply is used.
Pin Assignment
6. Receive Common
7. Receive Data
8. Transmit Data
9. Power Supply
Ground*
Pin Assignment
1. Chassis/Shield Ground
2. Receive Data
3. Transmit Data
4. Transmit Common
5. Power Supply (+)*
5
4
3
9
8
7 6
2
1

960L Owner’s Manual The LARC2 Remote
2-4
Navigating Typical Display Screens
The use and navigation of the display will be illustrated
with the screen shown in Figure 2-4, from Algorithm
Edit Mode. Bring up this screen by pressing the EDIT
and then ALGORITHM buttons. Note that the
parameters currently assigned to the faders, and their
current settings, are shown on the Scribble Strip, just
above the Soft Button Labels.
The Action Display, which occupies the left half of the
display’s top line, will show the current operating mode
when you first enter that mode. When you touch a
fader, it will show the name of the attached parameter
and its current setting, and will continue to show that
information until you touch another fader. The action
indications are “sticky,” in that they remain on the
display until another action indication is displayed. In
Figure 2-4, the Action Display shows "Edit Mode"
because pressing the EDIT button was the most recent
action.
The Effect Display, which occupies the right half of the
top line, identifies the Program or Register loaded in the
active machine. Here, it shows that the 960L is using
"Large Hall +", which is Register 1 in Bank 1.
The Main Operating Display, which changes from mode
to mode, always occupies the same area shown, i.e. the
center and left of the screen. In this screen, used for
editing algorithms, it shows four algorithm pages, each
consisting of parameters and their settings.The currently
selected page has its page number highlighted, with a
red outline.
Parameters in the rows not highlighted are not assigned
to the faders and are set to the values shown.
Touching any fader will select the parameter controlled
by that fader. At that point, the selected parameter and
its setting will be highlighted on the Scribble Strip and
also on any page of settings visible in this display. It will
also be displayed in larger type on the Action Display.
You can also scroll to any desired parameter, whether
on the current page or not, with the Navigation Arrows.
If you scroll up or down to a different page, that page
and all its parameters will be "connected" to the faders.
Note that you can also select a page by pressing its
number on the Numeric Keypad. Once a new page is
selected, the faders automatically position to the
appropriate value (auto-nulled).
You can move as many faders at a time as you like. All
the connected parameters will be affected. If you touch
several faders, the last fader you release will then be
displayed as the "selected" parameter. In this mode
(Algorithm Edit) you can use the +/- Buttons to make
fine adjustments on the selected parameter.
The Paging Arrow along the right side of the Main
Operating Display shows that more items are available
than will fit the current listing. The total number of
pages, 8 in Figure 2-4, is listed in the lower right corner
of the Main Operating Display. This arrow is greyed out
at the top, indicating that no further items are available
in that direction. The rows wrap. After you key down to
the last row, the next press of the Down Arrow will bring
up the first row, and vice versa if you use the Up Arrow.
Figure 2-4 — A typical display screen
Action Display
Main Operatng
Display
Effect Display
System Status
Display
Joystick Status
Display
Soft Button
Labels
Scribble Strip

960L Owner’s Maunal The LARC2 Remote
2-5
About the Faders and Joystick
The faders and joystick always control some
aspect of the audio, no matter what mode the
960L is in. It is the active control mode that
determines which audio parameters are
controlled. This table shows the mapping.
MODE FADERS JOYSTICK
Program V-Page V-Page
Register V-Page V-Page
Machine V-Page V-Page
Control V-Page V-Page
Edit -- Algorithm Algorithm Parameters V-Page
Edit -- Inputs Input Levels Input Panner
Edit -- Outputs Output Levels Output Panner
Edit -- V-Page V-Page V-Page
Soft-Button Labels identify the currently available soft
buttons.The currently active button is highlighted with a
red outline. Buttons with grey backgrounds will cause a
context change; those with yellow backgrounds cause
an immediate action. Buttons with blank legends do
nothing.
The System Status Display is present in all screens. In
Figure 2-4, it shows that the current sample rate is
48kHz, that the wordclock source is internally
generated, and that the 960L is locked to that clock
source. On the line below, we see that the 960L is
configured as two machines, and that Machine 1 is
currently selected for editing. If a machine is muted, the
machine number is overlaid with a red flashing "M". If
all available machines are muted, the machine bar is
overlaid with a red flashing "ALL MUTED" message. If
the word clock was external (via either the AES input
1-2 or the BNC Wordclock input), the padlock symbol
would show the state of wordclock lock. If lock was lost,
the padlock box would flash red and the 960L outputs
would automatically mute.
The Joystick Status Display is also present in all
screens. In Figure 2-4, it gives the joystick position and
the resulting Shape and Spread values. The
parameters currently assigned to the joystick and their
settings are listed in two boxes to the left of the Joystick
Map. The small colored dot at the center of the map
shows those parameter settings graphically. The dot is
red if the joystick is not active and green if it is. The
cursor shows the Joystick’s current position. Pressing
the JOYSTICK Button on the LARC2 control surface
sets the parameters to the joystick’s current position
and activates the joystick.
The V-Page legend in the Joystick Status Display
indicates that the joystick is set to a V-page, or virtual
page, a Program- or Register-specific collection of
parameters and settings assigned to the faders and
joystick. (See Chapter 3, Basic Operation and Chapter
4, Operations in Detail.)
Fader labels are in the Scribble Strip just above the Soft
Button Labels. These display the parameters currently
assigned to each fader, and their settings.When a fader
is touched, the associated parameter is highlighted in
yellow.
Navigating Typical Display Screens,
Continued
Shortcut: Any numbered item available in the
current mode, visible or not, can be brought up by
entering its number with the Numeric Keypad on the
LARC2 control surface.

The LARC2 Remote Lexicon, Inc.
A simple meter bridge above the display holds three
LEDs per channel. The lowest LED indicates that a
signal is present, defined as a level of –60 dBFS or
more. When levels exceed –6 dBFS, the middle LED
lights as a warning of reduced headroom. Above –0.5
dBFS, the top LED lights to indicate imminent overload.
If all eight overload LEDs are illuminated, an overflow
has occurred in the DSP accumulator.This can happen
even with modest signal levels if the delay/reverb
feedback coefficients (which are set by the algorithm
parameters) combine to create some path with a gain
greater than unity. Generally, you should mute the
outputs (MUTE MACH or MUTE ALL), and then find
and correct the offending parameter settings. This
should not occur with factory Programs, unless they
have been edited.
The Lexicon Button
The Lexicon button is used for quick A/B comparisons
between the current version of a Program or Register,
including your edits, and the effect as originally loaded.
When the button is held down, the original, stored
Program or Register will be loaded and the display will
show a red banner that says "LISTENING TO
ORIGINAL PRESET". When the button is released,
your last Edit state will be reloaded and the red banner
will disappear.
It is difficult to set parameters with large value ranges to
precise values with the faders. For example, the fader
range for some delays must allow for the fact that
delays of 1,000 milliseconds are not uncommon, yet the
value often needs to be set within a few milliseconds or
even samples.
To make such fine adjustments, set the faders to the
approximate values you want, then press the FINE ADJ
Button.When this button is pressed, the faders all move
to the center of their travel, but their settings do not
change.The faders then operate in a vernier mode, with
a limited adjustment range and far fewer steps per inch
of travel. This makes it easy to set the parameter to the
exact value you want.
Pressing FINE ADJ a second time returns the system
to normal operation and the faders return to their
appropriate full-range positions. The display warns
when the system is in fine adjust mode, but the
centering of all faders is a more obvious tip-off.
For fine adjustments of a single parameter while in Edit
Algorithm mode, simply touch the appropriate fader,
then use the Increment/Decrement (+/-) Buttons to get
the setting you want. Each press of these buttons
changes the parameter by its smallest possible
increment.
2-6
Audio Indicators Fine Adjust

3
Basic Operation
AN OVERVIEW OF THE CONTROLS ........................3-1
A QUICK GUIDE TO OPERATION..............................3-2
(1) Setup (Control Mode) ......................................3-2
(2) Machine Selection............................................3-5
(3) Program Loading..............................................3-5
(4) Editing a Program or Register..........................3-6
(5) Storing Your Edits ............................................3-6
/