
INSTRUCTION MANUAL
© B62-1981-00 (K, M)
09 08 07 06 05 04 03 02 01 00
144 MHz FM TRANSCEIVER
TH-255A

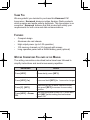
Thank You
We are grateful you decided to purchase this
Kenwood
FM
transceiver.
Kenwood
always provides Amateur Radio products
which surprise and excite serious hobbyists. This transceiver is no
exception.
Kenwood
believes that this product will satisfy your
requirements for both voice and data communications.
FeaTures
• Compact design
• Aluminum die-cast chassis
• High output power (up to 5 W operation)
• 100 memory channels or 50 channels with names
• Long operation period with a Ni-MH battery pack (optional)
WriTing ConvenTions FolloWed in This Manual
The writing conventions described below have been followed to
simplify instructions and avoid unnecessary repetition.
Instruction Action
Press
[KEY]
. Momentarily press
[KEY]
.
Press
[KEY] (1s)
. Press and hold
[KEY]
for 1 second or longer.
Press
[F]
,
[KEY]
.
Press the
[F]
key to enter Function mode,
then press
[KEY]
to access its secondary
function.
Press
[KEY]
+
Power
ON
.
With the transceiver power OFF, press and
hold
[KEY]
while turning the transceiver
power ON.

i
Notices to the User
◆
Government law prohibits the operation of unlicensed radio
transmitters within the territories under government control.
◆
Illegal operation is punishable by fine and/or imprisonment.
◆
Refer service to qualified technicians only.
Safety:
It is important that the operator is aware of, and
understands, hazards common to the operation of any
transceiver.
PrecaUtioNs
• Do not charge the transceiver and battery pack when they are wet.
• Ensure that there are no metallic items located between the
transceiver and the battery pack.
• Do not use options not specified by
Kenwood
.
• If the die-cast chassis or other transceiver part is damaged, do not
touch the damaged parts.
• If a headset or headphone is connected to the transceiver, reduce
the transceiver volume. Pay attention to the volume level when
turning the squelch off.
• Do not place the microphone cable around your neck while near
machinery that may catch the cable.
• Do not place the transceiver on unstable surfaces.
• Ensure that the end of the antenna does not touch your eyes.
• When the transceiver is used for transmission for many hours, the
radiator and chassis will become hot. Do not touch these locations
when replacing the battery pack.
• Do not immerse the transceiver in water.
• Always switch the transceiver power off before installing optional
accessories.

ii
Turn the transceiver power off in the following locations:
• In explosive atmospheres (inflammable gas, dust particles,
metallic powders, grain powders, etc.).
• While taking on fuel or while parked at gasoline service stations.
• Near explosives or blasting sites.
• In aircrafts. (Any use of the transceiver must follow the
instructions and regulations provided by the airline crew.)
• Where restrictions or warnings are posted regarding the use of
radio devices, including but not limited to medical facilities.
• Near persons using pacemakers.
• Do not disassemble or modify the transceiver for any reason.
• Do not place the transceiver on or near airbag equipment while
the vehicle is running. When the airbag inflates, the transceiver
may be ejected and strike the driver or passengers.
• Do not transmit while touching the antenna terminal or if
any metallic parts are exposed from the antenna covering.
Transmitting at such a time may result in a high-frequency burn.
• If an abnormal odor or smoke is detected coming from the
transceiver, switch the transceiver power off immediately,
remove the battery pack from the transceiver, and contact your
Kenwood
dealer.
• Use of the transceiver while you are driving may be against
traffic laws. Please check and observe the vehicle regulations
in your area.
• Do not expose the transceiver to extremely hot or cold
conditions.
• Do not carry the battery pack (or battery case) with metal
objects, as they may short the battery terminals.
• When operating the transceiver in areas where the air is dry, it
is easy to build up an electric charge (static electricity). When
using a earphone accessory in such conditions, it is possible for
the transceiver to send an electric shock through the earphone
and to your ear. We recommend you use only a speaker/
microphone in these conditions, to avoid electric shocks.

iii
One or more of the following statements may be
applicable:
FCC WARNING
This equipment generates or uses radio frequency energy. Changes
or modifications to this equipment may cause harmful interference
unless the modifications are expressly approved in the instruction
manual. The user could lose the authority to operate this equipment
if an unauthorized change or modification is made.
INFORMATION TO THE DIGITAL DEVICE USER REQUIRED BY
THE FCC
This equipment has been tested and found to comply with the limits
for a Class B digital device, pursuant to Part 15 of the FCC Rules.
These limits are designed to provide reasonable protection against
harmful interference in a residential installation.
This equipment generates, uses and can generate radio frequency
energy and, if not installed and used in accordance with the
instructions, may cause harmful interference to radio communications.
However, there is no guarantee that the interference will not occur
in a particular installation. If this equipment does cause harmful
interference to radio or television reception, which can be determined
by turning the equipment off and on, the user is encouraged to try to
correct the interference by one or more of the following measures:
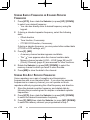
•
Reorient or relocate the receiving antenna.
•
Increase the separation between the equipment and receiver.
•
Connect the equipment to an outlet on a circuit different from that
to which the receiver is connected.
•
Consult the dealer for technical assistance.
FCC REGULATIONS REGARDING THE USE OF THE
EMERGENCY CHANNEL
The communications must be for the purpose of soliciting or
rendering assistance to a traveler, or for communicating in an
emergency pertaining to the immediate safety of life or the immediate
protection of property.

iv
CONTENTS
PREPARATION ..............................................................1
S
upplied AcceSSorieS ....................................................1
i
nStAlling the optionAl pB-43n ni-Mh BAttery pAck ...............2
i
nStAlling AlkAline BAtterieS ...........................................3
i
nStAlling the AntennA ..................................................4
i
nStAlling the Belt clip .................................................4
GETTING ACQUAINTED
...................................................5
k
eyS And controlS ......................................................5
d
iSplAy ...................................................................8
BASIC OPERATION
....................................................... 10
S
witching the power on/oFF ........................................ 10
A
djuSting the VoluMe ................................................. 10
V
oluMe AdjuStMent operAtion Selection ............................ 10
A
djuSting the Squelch leVel ......................................... 11
S
electing A Frequency ................................................. 12
d
irect Frequency entry ............................................... 13
t
rAnSMitting ........................................................... 14
S
electing An output power ........................................... 14
MENU SETUP
.............................................................. 15
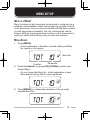
w
hAt iS A Menu?....................................................... 15
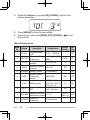
M
enu AcceSS ........................................................... 15
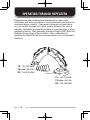
OPERATING THROUGH REPEATERS
.................................. 18
r
epeAter AcceSS ....................................................... 19
A
ctiVAting the tone Function ......................................... 20
S
electing A tone Frequency ........................................... 21
t
one Frequency id ScAn .............................................. 22
A
utoMAtic repeAter oFFSet (k type only) ........................... 23
r
eVerSe Function ...................................................... 24
A
utoMAtic SiMplex checker (ASc) ................................... 24
MEMORY CHANNELS
.................................................... 26
n
uMBer oF MeMory chAnnelS ......................................... 26
S
iMplex & repeAter or odd-Split MeMory chAnnel? .............. 27

v
Storing SiMplex FrequencieS or StAndArd repeAter FrequencieS .. 28
S
toring odd-Split repeAter FrequencieS ............................ 28
c
ontinuouSly Storing in SiMplex or Split chAnnelS ................ 29
r
ecAlling A MeMory chAnnel ......................................... 30
c
leAring A MeMory chAnnel .......................................... 31
n
AMing A MeMory chAnnel ............................................ 32
M
eMory -to- VFo trAnSFer ........................................... 33
c
All chAnnel .......................................................... 34
r
ecAlling the cAll chAnnel .......................................... 34
r
eprogrAMMing the cAll chAnnel .................................... 34
c
hAnnel diSplAy Mode ................................................ 35
SCAN ....................................................................... 36
S
electing A ScAn reSuMe Method .................................... 37
B
And ScAn .............................................................. 37
p
rogrAM ScAn ......................................................... 38
M
eMory ScAn .......................................................... 39
c
All ScAn .............................................................. 40
p
riority ScAn .......................................................... 40
M
eMory chAnnel lockout ............................................. 42
SELECTIVE CALL
......................................................... 43
c
ontinuouS tone coded Squelch SySteM (ctcSS) ................. 43
d
igitAl coded Squelch (dcS) ........................................ 46
DTMF FUNCTIONS
....................................................... 49
M
AnuAl diAling ........................................................ 49
dtMF tx h
old ........................................................ 50
A
utoMAtic diAler ...................................................... 50
A
djuSting the dtMF tone trAnSMiSSion Speed...................... 52
A
djuSting the pAuSe durAtion ........................................ 52
dtMF l
ock ............................................................ 53
AUXILIARY FUNCTIONS
................................................ 54
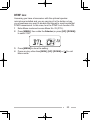
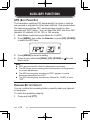
Apo (A
uto power oFF) ............................................... 54
r
eMAining BAttery cApAcity .......................................... 54
B
Attery SAVer ......................................................... 55
B
eAt ShiFt .............................................................. 56

vi
Beep Function .......................................................... 57
B
uSy chAnnel lockout ................................................ 57
F
requency Step Size ................................................... 58
B
Ack light ............................................................. 58
l
ock Function .......................................................... 59
S
elector unlock ....................................................... 59
M
icrophone key lock ................................................. 60
M
icrophone pF keyS (optionAl) ...................................... 60
M
onitor ................................................................ 62
p
ower on MeSSAge .................................................... 62
p
rogrAMMABle VFo ................................................... 63
t
iMe-out tiMer ........................................................ 64
tx i
nhiBit .............................................................. 64
e
Mergency Siren ....................................................... 65
M
iniMuM/ MAxiMuM VoluMe ........................................... 66
S
peAker AttenuAtion .................................................. 67
p
ower on pASSword..................................................... 67
OPTIONAL ACCESSORIES
.............................................. 69
MAINTENANCE ........................................................... 70
g
enerAl inForMAtion .................................................. 70
S
erVice ................................................................. 70
c
leAning ................................................................ 71
M
icroproceSSor reSet ................................................ 71
o
perAtion noticeS ..................................................... 73
r
eceiVing SignAlS in citieS ............................................ 73
t
rAnSMiSSion ........................................................... 73
i
nternAl BeAtS ......................................................... 73
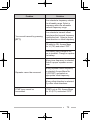
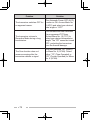
TROUBLESHOOTING ..................................................... 74
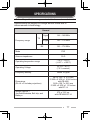
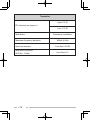
SPECIFICATIONS ......................................................... 77

1
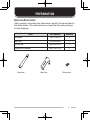
PREPARATION
Supplied AcceSSorieS
After carefully unpacking the transceiver, identify the items listed in
the table below. We recommend you keep the box and packings
for the shipping.
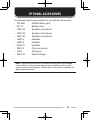
Item Part Number Quantity
Antenna T90-1018-XX 1
Belt clip J29-0623-XX 1
Screw set N99-2066-XX 1
Instruction manual B62-1981-XX 1
Antenna Belt clip Screw set

2
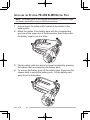
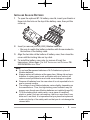
inStAlling the optionAl pB-43n ni-Mh BAttery pAck
Note:
The battery pack is not charged at the factory, you must charge
the battery pack before using it with the transceiver.
1
Unlock (open) the safety catch located at the bottom of the
battery pack.
2
Match the guides of the battery pack with the corresponding
grooves on the upper rear of the transceiver, then firmly press
the battery case to lock it in place.
3
Flip the safety catch into place to prevent accidentally pressing
the release latch and removing the battery pack.
4
To remove the battery pack, lift the safety catch, then press the
release latch to unlock the battery pack. Lift the battery pack
away from the transceiver.

3
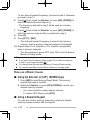
inStAlling AlkAline BAtterieS
1
To open the optional BT-14 battery case lid, insert your thumb or
finger into the hole on the top of the battery case, then pull the
cover up.
2
Insert (or remove) six AA (LR6) Alkaline batteries.
• Be sure to match the battery polarities with those marked in
the bottom of the battery case.
3
Align the two tabs at the bottom of battery case, then close the
cover until the locking tabs on top click.
4
To install the battery case onto (or remove it from) the
transceiver, follow steps 1 to 3 of “I
nstallIng the OptIOnal pB-
43n n
I-Mh Battery pack”.
Note:
◆
Do not use Manganese batteries or Ni-Cd batteries in place of
Alkaline batteries.
◆
Always replace all batteries at the same time. Mixing old and new
batteries or mixing types (such as Alkaline with zinc carbon) will
reduce overall performance and could cause leakage or rupture.
◆
Remove all batteries from the case when it is not expected to be in
use for several months.
◆
The voltage of new Alkaline batteries varies slightly, depending on
the manufacturer. Thus, the high battery power indicator may not
appear even though new Alkaline batteries are installed {page 54}.
◆
To lift the battery pack safety catch, use a piece of hardened
plastic or metal, such as a screwdriver, that is no more than 6 mm
wide and 1 mm thick. It is imperative that you place the implement
under only the lip of the safety catch so that you do not damage the
release latch.

4
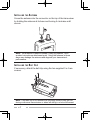
inStAlling the AntennA
Screw the antenna into the connector on the top of the transceiver
by holding the antenna at its base and turning it clockwise until
secure.
Note:
The antenna is neither a handle, a key ring retainer, nor a
speaker/ microphone attachment point. Using the antenna in these
ways may damage the antenna and degrade your transceiver’s
performance.
inStAlling the Belt clip
If necessary, attach the belt clip using the two supplied 3 x 4 mm
screws.
Note:
If the belt clip is not installed, its mounting location may get hot
during continuous transmission or when left sitting in a hot environment.

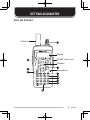
5
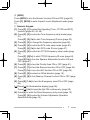
keyS And controlS
GETTING ACQUAINTED
SP/MIC jack cover
Antenna
Speaker
Microphone
Display

6
q
[PTT]
Press and hold
[PTT]
to transmit.
Press
[F]
,
[PTT]
to toggle the transmit output power between High
and Low {page 14}.
w
[MENU]
Press
[MEMU]
to enter Menu mode {page 15}.
Press
[F]
,
[MEMU]
to turn the transceiver key lock function ON or
OFF {page 59}
e
[UP]( )/ [DOWN]( )
Press
[UP]
/
[DOWN]
to adjust the Volume Level {page 10}.
r
Selector
Rotate the Selector to select an operating frequency or Memory
channel, change the scan direction, select a Menu, etc.
t
[CALL]
Press
[CALL]
to select the Call channel {page 34}.
Press
[CALL] (1s)
to start Call scan {page 40}.
Press
[F]
,
[CALL]
to store the current operating frequency to the
Call channel {page 34}.
y
[ ]
Press
[ ]
(POWER) to turn the transceiver power ON and OFF.
u
[F]
Press
[F]
to enter MHz mode {page 12}.
i
[VFO]
Press
[VFO]
to enter VFO mode {page 12}.
Press
[VFO] (1s)
to start Band scan {page 37}.
Press
[F],
[VFO]
to copy the current Memory channel or Call
channel to the VFO (memory shift) {page 33}.
o
[MR]
Press
[MR]
to enter Memory Channel mode {page 30}.
Press
[MR] (1s)
to start Memory scan {page 39}.
Press
[F]
,
[MR]
to store the current operating frequency in the
Memory channel {page 28}.

7
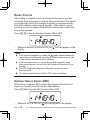
!0
[MON]
Press
[MON
] to turn the Monitor function ON and OFF {page 62}.
Press
[F]
,
[MON]
to enter Squelch Level Adjustment mode {page
11}.
!1
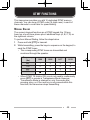
Numeric Keypad
[1]
Press
[F]
,
[1]
to select the Signaling (Tone, CTCSS and DCS)
function {pages 20, 43, 46}.
[2]
Press
[F]
,
[2]
to enter the Tone frequency setup mode {page
21}.
Press
[F]
,
[2] (1s)
to start Tone frequency ID scan {page 22}.
[3]
Press
[F]
,
[3]
to change the Frequency step size {page 58}.
[4]
Press
[F]
,
[4]
to enter the DCS code setup mode {page 46}.
Press
[F]
,
[4] (1s)
to start DCS code ID scan {page 47}.
[5]
Press
[F]
,
[5]
to enter the CTCSS frequency setup mode {page
44}.
Press
[F]
,
[5](1s)
to start CTCSS frequency ID scan {page 44}.
Press
[5](1s)
to turn the Speaker Attenuation function ON and
OFF {page 67}.
[6]
Press
[F]
,
[6]
to turn the Priority Scan ON or OFF {page 41}.
[7]
Press
[F]
,
[7]
to turn the Reverse function ON or OFF {page 24}.
Press
[7] (1s)
to turn the ASC function ON or OFF {page 24}.
[8]
Press
[F]
,
[8]
to select an Offset direction {page 19}.
[9]
Press
[F]
,
[9]
to turn Memory Channel Lockout ON or OFF {page
42}.
[0]
Press
[0] (1.5s)
to turn the Emergency siren ON or OFF {page
65}.
[ ]
Press
[ ]
to illuminate the display {page 58}.
Press
[ ] (1s)
to keep the light ON continuously. {page 58}.
[#]
Press
[#]
to enter the Direct frequency entry mode {page 13}.
Press
[F]
,
[#]
to enter the Volume Adjustment Operation
Selection mode {page 10}.

8
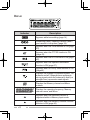
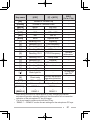
diSplAy
Indicator Description
Appears while transmitting {page 14}.
Remaining battery capacity indicator (when
you transmit in low power) {page 54}.
Appears when the Tone function is ON {page
20}.
Appears when the CTCSS function is ON
{page 43}.
Appears when the DCS function is ON {page
46}.
Appears when the Speaker Attenuation
function is ON {page 67}.
Appears when a Priority Scan function is ON
{page40}.
Displays the strength of received signals. An
antenna and all 3 strength bars represents
strong signals while the antenna by itself (no
strength bars) represents weak signals.
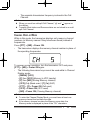
Displays the Memory channel and Menu
number.
Displays the operating frequency, Memory
channel name, and Menu.
Appears when the selected channel is
registered while in Memory Input mode.
Appears when the Memory Channel Lockout
function is ON {page 42}.

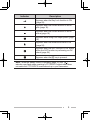
9
Indicator Description
Appears when the Key Lock function is ON
{page 59}
.
Appears when the Offset direction is set to
plus {page 19}.
Appears when the Offset direction is set to
minus {page 19}.
Appears while using Low output power {page
14}.
Appears when the Reverse function is ON
{page 24}.
Appears when the ASC function is ON. Blinks
when the ASC function is performing an OK
check {page 24}.
Appears when the [F] key is pressed.
Note:
While the Battery Saver is operating {page 55}, the “ ”
indicator may flash when receiving a CTCSS/DCS signal which does
not match the CTCSS/DCS tone/code set up in your transceiver.

10
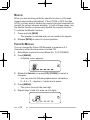
Switching the power on/oFF
1
Press
[ ]
(POWER) to switch the transceiver ON.
• The power on message momentarily appears on the display.
• If the transceiver power on password has been activated
{page 67}, you must first enter your password before you can
operate the transceiver.
2
To switch the transceiver OFF, press
[ ]
(POWER) again.
AdjuSting the VoluMe
Press
[UP]
to increase the audio output level and press
[DOWN]
to
decrease the output level.
• If you are not receiving a signal, press and hold
[MON]
to
unmute the speaker, then adjust the volume control to a
comfortable audio output level.
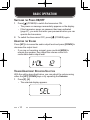
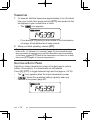
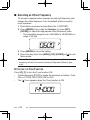
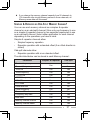
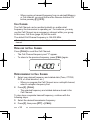
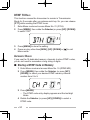
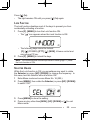
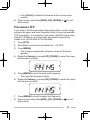
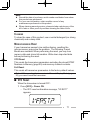
VoluMe AdjuStMent operAtion Selection
With the setting described below, you can adjust the volume using
either the
[UP]
/
[DOWN]
keys or by operating the
Selector
.
1
Press
[F]
,
[#]
.
• The selected display appears.
BASIC OPERATION

11
2
Press
[F]
,
[#]
to toggle the setting between “SEL” and “UP/DN”.
SEL:
Adjust the volume using the
Selector
. To change the
channel number or frequency, use
[UP]
/
[DOWN]
keys.
UP/DN:
Adjust the volume using
[UP]
/
[DOWN]
keys. To
change the channel number or frequency, use the
Selector
.
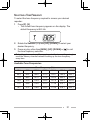
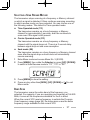
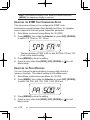
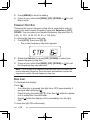
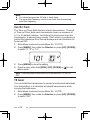
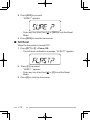
AdjuSting the Squelch leVel
The purpose of Squelch is to mute the speaker when no signals
are present. With the squelch level correctly set, you will hear
sound only while actually receiving signals. The higher the
selected squelch level, the stronger the signals must be to receive.
The appropriate squelch level depends on the ambient RF noise
conditions.
1
Press
[F]
,
[MON]
.
• The current squelch level appears.
2
Rotate the
Selector
(or press
[UP]
/
[DOWN]
) to adjust the level.
• Select the level at which the background noise is just
eliminated when no signal is present.
• The higher the level, the stronger the signals must be to
receive.
• 6 different levels can be set. 0: Minimum ~ 5: Maximum; 2 is
the default value.
3
Press any key other than
[MON], [UP]
/
[DOWN]
or
[ ]
to store
the new setting and exit the squelch adjustment.

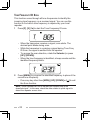
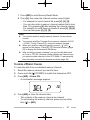
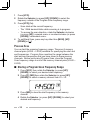
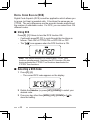
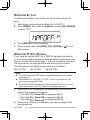
12
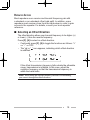
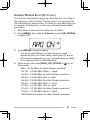
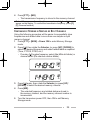
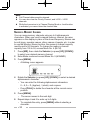
Selecting A Frequency
■
VFO Mode
This is the basic mode for changing the operating frequency.
Rotate the
Selector
clockwise (or press
[UP]
) to increase the
frequency and counterclockwise (or press
[DOWN]
) to decrease
the frequency.
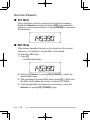
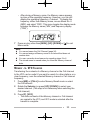
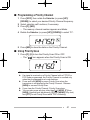
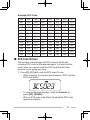
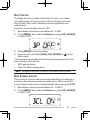
■
MHz Mode
If the desired operating frequency is far away from the current
frequency, it is quicker to use the MHz Tuning Mode.
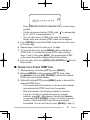
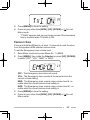
To adjust the MHz digit:
1
Press
[F]
.
• The MHz digit blinks.
2
Rotate the
Selector
(or press
[UP]
/
[DOWN]
) to select the
desired MHz value.
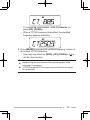
3
After selecting the desired MHz value, press
[F]
or
[0]
to exit
the MHz Tuning Mode and return to normal VFO Mode.
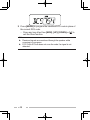
4
Continue adjusting the frequency as necessary, using the
Selector
(or press
[UP]
/
[DOWN]
) keys).
Page is loading ...
Page is loading ...
Page is loading ...
Page is loading ...
Page is loading ...
Page is loading ...
Page is loading ...
Page is loading ...
Page is loading ...
Page is loading ...
Page is loading ...
Page is loading ...
Page is loading ...
Page is loading ...
Page is loading ...
Page is loading ...
Page is loading ...
Page is loading ...
Page is loading ...
Page is loading ...
Page is loading ...
Page is loading ...
Page is loading ...
Page is loading ...
Page is loading ...
Page is loading ...
Page is loading ...
Page is loading ...
Page is loading ...
Page is loading ...
Page is loading ...
Page is loading ...
Page is loading ...
Page is loading ...
Page is loading ...
Page is loading ...
Page is loading ...
Page is loading ...
Page is loading ...
Page is loading ...
Page is loading ...
Page is loading ...
Page is loading ...
Page is loading ...
Page is loading ...
Page is loading ...
Page is loading ...
Page is loading ...
Page is loading ...
Page is loading ...
Page is loading ...
Page is loading ...
Page is loading ...
Page is loading ...
Page is loading ...
Page is loading ...
Page is loading ...
Page is loading ...
Page is loading ...
Page is loading ...
Page is loading ...
Page is loading ...
Page is loading ...
Page is loading ...
Page is loading ...
Page is loading ...
Page is loading ...
Page is loading ...
-
 1
1
-
 2
2
-
 3
3
-
 4
4
-
 5
5
-
 6
6
-
 7
7
-
 8
8
-
 9
9
-
 10
10
-
 11
11
-
 12
12
-
 13
13
-
 14
14
-
 15
15
-
 16
16
-
 17
17
-
 18
18
-
 19
19
-
 20
20
-
 21
21
-
 22
22
-
 23
23
-
 24
24
-
 25
25
-
 26
26
-
 27
27
-
 28
28
-
 29
29
-
 30
30
-
 31
31
-
 32
32
-
 33
33
-
 34
34
-
 35
35
-
 36
36
-
 37
37
-
 38
38
-
 39
39
-
 40
40
-
 41
41
-
 42
42
-
 43
43
-
 44
44
-
 45
45
-
 46
46
-
 47
47
-
 48
48
-
 49
49
-
 50
50
-
 51
51
-
 52
52
-
 53
53
-
 54
54
-
 55
55
-
 56
56
-
 57
57
-
 58
58
-
 59
59
-
 60
60
-
 61
61
-
 62
62
-
 63
63
-
 64
64
-
 65
65
-
 66
66
-
 67
67
-
 68
68
-
 69
69
-
 70
70
-
 71
71
-
 72
72
-
 73
73
-
 74
74
-
 75
75
-
 76
76
-
 77
77
-
 78
78
-
 79
79
-
 80
80
-
 81
81
-
 82
82
-
 83
83
-
 84
84
-
 85
85
-
 86
86
-
 87
87
-
 88
88


Ask a question and I''ll find the answer in the document
Finding information in a document is now easier with AI
Related papers
-
Kenwood TH-D74A User manual
-
Kenwood TS-B2000 User manual
-
-
Kenwood Home Theater Server TS-2000 User manual
-
-
-
-
-
-
Other documents
-
 FDC FD-150A User manual
-
 Radioddity GA-5S User manual
-
Baofeng UV-82HP User manual
-
 BaoFeng Tech BF-F8HP User manual
-
-
-
-
Baofeng UV-82 Specification
-
YAESU VX-8DR Owner's manual
-
 BTECH GMRS-V1 HT User manual


