Linksys NULL WUSB11 User manual
- Category
- Networking cards
- Type
- User manual
This manual is also suitable for

Instant Wireless
TM
Series
Wireless USB
Network Adapter
Use this guide to install: WUSB11 ver. 2.6
User Guide

COPYRIGHT & TRADEMARKS
Copyright © 2002 Linksys, All Rights Reserved. Microsoft, Windows, and the Windows logo are
registered trademarks of Microsoft Corporation. All other trademarks and brand names are the
property of their respective proprietors.
LIMITED WARRANTY
Linksys guarantees that every Instant Wireless™ USB Network Adapter will be free from phys-
ical defects in material and workmanship under normal use for one year from the date of pur-
chase, when used within the limits set forth in the Specifications chapter of this User Guide. If
these products prove defective during this warranty period, call Linksys Technical Support in
order to obtain a Return Authorization Number. BE SURE TO HAVE YOUR PROOF OF PUR-
CHASE AND A BARCODE FROM THE PRODUCT'S PACKAGING ON HAND WHEN CALLING.
RETURN REQUESTS CANNOT BE PROCESSED WITHOUT PROOF OF PURCHASE. When
returning a product, mark the Return Authorization Number clearly on the outside of the pack-
age and include a copy of your original proof of purchase. All customers located outside of the
United States of America and Canada shall be held responsible for shipping and handling
charges.
IN NO EVENT SHALL LINKSYS’S LIABILITY EXCEED THE PRICE PAID FOR THE PRODUCT
FROM DIRECT, INDIRECT, SPECIAL, INCIDENTAL, OR CONSEQUENTIAL DAMAGES
RESULTING FROM THE USE OF THE PRODUCT, ITS ACCOMPANYING SOFTWARE, OR ITS
DOCUMENTATION. LINKSYS DOES NOT OFFER REFUNDS FOR ANY PRODUCT. Linksys
makes no warranty or representation, expressed, implied, or statutory, with respect to its prod-
ucts or the contents or use of this documentation and all accompanying software, and specif-
ically disclaims its quality, performance, merchantability, or fitness for any particular purpose.
Linksys reserves the right to revise or update its products, software, or documentation without
obligation to notify any individual or entity. Please direct all inquiries to:
Linksys P.O. Box 18558, Irvine, CA 92623.
FCC STATEMENT
This Instant Wireless™ USB Network Adapter has been tested and complies with the specifica-
tions for a Class B digital device, pursuant to Part 15 of the FCC Rules. These limits are designed
to provide reasonable protection against harmful interference in a residential installation. This
equipment generates, uses, and can radiate radio frequency energy and, if not installed and
used according to the instructions, may cause harmful interference to radio communications.
However, there is no guarantee that interference will not occur in a particular installation. If this
equipment does cause harmful interference to radio or television reception, which is found by
turning the equipment off and on, the user is encouraged to try to correct the interference by one
or more of the following measures:
• Reorient or relocate the receiving antenna
• Increase the separation between the equipment or devices
• Connect the equipment to an outlet other than the receiver’s
• Consult a dealer or an experienced radio/TV technician for assistance
FCC Caution: Any changes or modifications nor expressly approved by the party responsible
for compliance could void the user's authority to operate this equipment.
This device complies with Part 15 of the FCC Rules. Operation is subject to the following two
conditions: (1) This device may not cause harmful interference, and (2) This device must
accept any interference received, including interference that may cause undesired operation.
FCC RF Radiation Exposure Statement
This device and its antenna(s) must operate with a separation distance of at least 20 cm from
all persons and must not be co-located or operating in conjunction with any other antenna or
transmitter. End-users must be provided with specific operations for satisfying RF exposure
compliance.
UG-WUSB11 ver. 2.6-032002 BW

Table of Contents
Chapter 1: Introduction 1
The Instant Wireless
TM
USB Network Adapter 1
Features 1
Package Contents 2
System Requirements 2
Chapter 2: Planning Your Wireless Network 3
Network Topology 3
Roaming 3
Chapter 3: Getting To Know the Wireless USB
Network Adapter 4
The Wireless USB Network Adapter’s Port and LEDs 4
Chapter 4: Installation and Configuration of the
USB Adapter for Windows 98SE, Me, and 2000 6
Software and Driver Installation for Windows 98SE, Me, and 2000 7
Chapter 5: Connecting Your Wireless USB
Network Adapter 12
The USB Icon 12
USB Cabling 12
Removing the USB Adapter 13
Using the Wireless USB Network Adapter’s Wall Mount 13
Hardware Detection for Windows 98SE, Me, and 2000 15
Chapter 6: Installation of the USB Adapter for
Windows XP 16
Windows XP Wireless Zero Configuration 18
Chapter 7: Installing Network Protocols 21
Installing the Network Protocols for Windows 98SE and Me 21
Chapter 8: Configuring the Wireless USB
Network Adapter 23
Instant Wireless
TM
Series
Appendix A: Troubleshooting 29
Common Problems and Solutions 29
Frequently Asked Questions 29
Appendix B: Glossary 33
Appendix C: Specifications 38
Appendix D: Environmental 39
Appendix E: Warranty Information 40
Appendix F: Contact Information 41
Wireless USB Network Adapter

• One Wireless USB Network Adapter
• One USB Cable
• One Wall Mount
• One Setup CD-ROM with User Guide
• One Quick Installation
• One Registration Card
• Pentium-Class 200MHz or Faster Processor
• 64MB RAM Recommended
• Available USB Port
• CD-ROM Drive
• Windows 98SE, Me, 2000, XP
2
Wireless USB Network Adapter
Chapter 1: Introduction
Put the “mobile” back into mobile computing with the Linksys Instant
Wireless™ USB Network Adapter! The Linksys Instant Wireless™ USB
Network Adapter operates in the ISM band, using Direct Sequence Spread
Spectrum (DSSS) transmission to implement the 802.11b standard. Users can
now move easily between Access Points without the hassle of reconfiguring
their connection.
The Instant Wireless™ USB Network Adapter also gives you the freedom to
work your way, from where you want, letting you take full advantage of your
PC and providing you with access to all your networked resources from beyond
your desktop, and a high-powered built-in antenna with LEDs indicates power
and linkage. Compatible with Windows 98SE, 2000, Me, and XP, the Instant
Wireless™ USB Network Adapter from Linksys is a true necessity for all your
wireless PC applications.
• Up to 11 Mbps High-Speed Data Transfer Rate
• Integrated Equalizer Recovers Weak Signals and Enhances Sensitivity
• Movable External Antenna Improves Signal Quality
• USB Port Powers Your Adapter—No Power Supply Needed!
• Compatible with Windows 98SE, Me, 2000, and XP
• User-Friendly Setup Software Provides Hassle-Free Configuration
• Plug-and-Play Operation Provides Easy Setup
• Works with All Standard Internet Applications
• Interoperable with 802.11b (DSSS) 2.4GHz-Compliant Equipment
• Capable of up to 128-Bit WEP Encryption
• Free Software Driver Upgrades
• Toll-Free Technical Support—24 Hours a Day, 7 Days a Week for U.S. Only
• 1-Year Limited Warranty
The Instant Wireless
TM
USB Network Adapter
Features
System Requirements
Package Contents
Figure 1-1
Instant Wireless
TM
Series
1

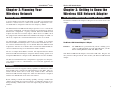
Chapter 3: Getting to Know the
Wireless USB Network Adapter
The Wireless USB Network Adapter’s USB port is located on the back of the
Adapter.
The Wireless USB Network Adapter’s USB port
USB Port The USB Port is a port installed in your PC, enabling you to
connect to USB peripherals. To work with USB ports, your PC
must be running Windows 98SE, Me, 2000, or XP.
Your Wireless USB Network Adapter comes with a USB cable. Plug one end
into your PC’s USB port and the other end into your Wireless USB Network
Adapter.
The Wireless USB Network Adapter’s Port and LEDs
Figure 3-1
Instant Wireless
TM
Series
3
Wireless USB Network Adapter
Chapter 2: Planning Your
Wireless Network
Network Topology
A wireless LAN is exactly like a regular LAN, except that each computer in the
LAN uses a wireless device to connect to the network. Computers in a wire-
less LAN must be configured to share the same frequency channel.
The Instant Wireless™ USB Network Adapter provides access to a wired LAN
for wireless workstations. An integrated wireless and wired LAN is called an
Infrastructure configuration. A group of Instant Wireless™ USB Network
Adapter users and an Access Point compose a Basic Service Set (BSS). Each
PC equipped with an Instant Wireless™ USB Network Adapter in a BSS can
talk to any computer in a wired LAN infrastructure via the Access Point.
An infrastructure configuration extends the accessibility of an Instant
Wireless™ USB Network Adapter PC to a wired LAN, and doubles the effec-
tive wireless transmission range for two Instant Wireless™ USB Network
Adapter PCs. Since the Access Point is able to forward data within its BSS, the
effective transmission range in an infrastructure LAN is doubled.
The use of a unique ID in a BSS is essential. All computers that have Instant
Wireless™ USB Network Adapter configured without roaming options in an
independent BSS must be configured with a BSS ID (that is used in the BSS).
The Wireless LAN Infrastructure configuration is appropriate for enterprise-
scale wireless access to a central database, or as a wireless application for
mobile users.
Infrastructure mode also supports roaming capabilities for mobile users. More
than one BSS can be configured as an Extended Service Set (ESS). This con-
tinuous network allows users to roam freely within an ESS. All Instant
Wireless™ USB Network Adapter PCs within one ESS must be configured
with the same ESS ID and use the same radio channel.
Before enabling a network with roaming capability, selecting a feasible radio
channel and optimum Access Point position is recommended. Proper Access
Point positioning combined with a clear radio signal will greatly enhance per-
formance.
Roaming
4

Chapter 4: Installation and
Configuration of the USB
Adapter for Windows 98SE, Me,
and 2000
This Wireless USB Network Adapter Setup Wizard will guide you through the
Install and Uninstall Procedures for Windows 98SE, Me, and 2000.
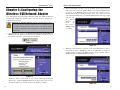
Insert the Setup Wizard CD into your CD-ROM Drive. The Setup Wizard
should run automatically and Figure 4-1 should appear. If it does not, click the
Start button and choose Run. In the box that appears, enter D:\setup.exe
(where “D” is the letter of your CD-ROM drive).
Note to Windows 98, Me, and 2000 users: You must install this
software before installation of the hardware.
Figure 4-1
Important for Windows XP users: Do NOT run the Wireless
Network Adapter Setup Wizard. Proceed directly to Chapter 5:
Connecting Your Wireless USB Network Adapter.
6
The LED Indicators
Power Green. The Power LED lights up when the Wireless USB
Network Adapter is powered on.
Link Green. The Link LED lights up when the Adapter has an
active connection. If the LED is not on, the Adapter is not
interfacing with the network.
Wireless USB Network Adapter
Note: Windows 95 and NT do not support the USB Adapter.
Figure 3-2
5
Instant Wireless
TM
Series

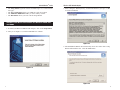
3. After reading the Warranty Policy, click the Ye s button if you agree, or No
to end the installation.
4. The InstallShield Wizard will automatically choose the folder where Setup
Wizard will install the files. Click the Next button.
Wireless USB Network Adapter
8
Figure 4-3
• The Setup button begins the software installation process, as shown on the
next page.
• The User Guide button shows you a PDF file of the User Guide.
• The LINKSYS WEB button links you to the Linksys website.
• The Exit button allows you to the exit the Setup Wizard.
1. To install your Wireless USB Network Adapter, click on the Setup button.
2. After you see Figure 4-2, click the Next button to continue.
Software and Driver Installation for Windows 98SE, Me,
and 2000
Figure 4-2
Figure 4-4
7
Instant Wireless
TM
Series

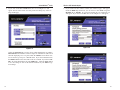
7. Enter in the name of your SSID (Service Set Identifier) for your Ad-Hoc or
Infrastructure setting. The SSID must be identical for all points in the net-
work. The default setting is linksys (all lowercase). Click the Next button.
8. The Wizard will ask you to review your settings before starting to copy files.
Select Back to review or change any settings, or select Next if you are satis-
fied with your settings.
Wireless USB Network Adapter
10
Figure 4-7
5. The InstallShield Wizard will ask you to choose a wireless mode. Choose
the mode that applies to your network. Ad-Hoc Mode is used for simple
peer-to-peer networking or the sharing of local resources between wireless
Networked PCs, and Infrastructure Mode allows a wireless network to be
integrated into an existing, wired network through an access point, permit-
ting roaming between access points while maintaining a connection to all
network resources. Then, click the Next button.
6. If you chose Infrastructure Mode, go on to Step 7 now. If you chose Ad-
Hoc Mode, choose the correct operating channel that applies to your network.
The channel you choose should be the same as the other points in your wire-
less network. The default channel is set to Channel 6. Click Next.
Instant Wireless
TM
Series
9
Figure 4-5
Figure 4-6
Figure 4-8

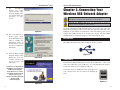
Chapter 5: Connecting Your
Wireless USB Network Adapter
To install your Wireless USB Network Adapter, first connect one end of the
USB cable to the Adapter. Then, connect the other end of the USB cable to the
USB port on your desktop or notebook PC. Since the Adapter gets its power
from the PC’s USB port, there is no external power adapter. The Power LED
should light up green when the Adapter is attached and the PC is on.
The USB icon shown below marks a USB port on a PC or device.
The Wireless USB Network Adapter comes with one USB cable. Connect one
end of the USB cable to the USB device on your USB Network Adapter.
Connect the other end to a computer’s USB port.
The picture shows two USB ports as they might appear on
your computer. Note the two USB icons marking the
ports.
Important for Windows 98SE, Me, and 2000 users: You must install
the Adapter’s software before installation of the hardware.
Important for Windows XP users: You must install the Adapter’s
hardware before installation of the software.
9. The InstallShield
Wizard will begin
copying the files. The
bar in the middle of the
screen below shows the
percentage of files
copied.
10. The screen in Figure 4-
10 may appear. Click
on the Yes button if you
want to continue the
installation. Click on
the No button if you do
not want to continue the
installation.
11. After the Wireless USB
Network Adapter Setup
Wizard has been suc-
cessfully installed, the
screen in Figure 4-10
will appear.
You have now completed the
installation of your Wireless
USB Network Adapter
Setup Wizard. To connect
the Wireless USB Network
Adapter, please go to
Chapter 5: Connecting Your
Wireless USB
Network Adapter.
Instant Wireless
TM
Series
11
Figure 4-9
Figure 4-10
Figure 4-11
The USB Icon
Figure 5-1
USB Cabling
Figure 5-2
12
Wireless USB Network Adapter

Instant Wireless
TM
Series
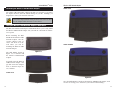
STEP TWO
STEP THREE
Once the Wall Mount is attached to the Wireless USB Network Adapter, stick
it to the velcro strip you’ve attached to your wall for wall mounting.
The adapter is Hot Swappable, which means that you can remove or reconnect
the adapter whenever you want without turning off your PC. Although, you
might need to renew your network connection
The Wireless USB Network Adapter’s Wall Mount allows you to easily install
the Wireless USB Network Adapter onto your wall for convenient use and bet-
ter reception.
Before installing the Wall
Mount into the Wireless USB
Network Adapter, take the
separate adhesive strip of
velcro and attach it to the
wall where you will be
mounting the Wireless USB
Network Adapter.
The Wall Mount, shown in
Figure 5-3, is included with
the Wireless USB Network
Adapter.
To install it into the Wireless
USB Network Adapter, sim-
ply slide it into the Adapter’s
back, as shown in steps one,
two, and three.
STEP ONE
Removing the Wireless USB Network Adapter
Using the Wireless USB Network Adapter’s Wall Mount
Wireless USB Network Adapter
14
Note: If you have multiple USB ports on your PC, make sure to
reconnect the adapter into the same port that it was removed; other-
wise, the adapter will be detected as a new device.
13
Figure 5-3
Figure 5-4
Figure 5-5
Figure 5-6

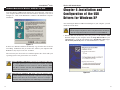
Chapter 6: Installation and
Configuration of the USB
Drivers for Windows XP
After attaching the Wireless USB Network Adapter to your computer, you will
install the network driver.
1. Windows XP will automatically detect the presence of the Wireless USB
Network Adapter in your computer. Insert the Setup Wizard CD into your
CD-ROM Drive. Click the radio button next to Install from a list or spe-
cific location (Advanced). Then click the Next button to continue.
Important for Windows XP users: Do NOT run the Wireless
Network Adapter Setup Wizard. If the Setup Wizard runs automatical-
ly after the Setup Wizard CD has been inserted, click the Exit tab.
After the Wireless USB Network Adapter has been physically connected to
your computer, Windows will detect the new hardware. You may see the screen
in Figure 5-7. Click on the Ye s button to continue or the No button to stop the
installation.
In most cases, Windows will then automatically copy all of the files needed for
networking. If Windows asks you for the files, and D is your computer’s CD-
ROM drive, they may be located at: D:\Drives
These files may also be located at C:\windows\options\cabs. Check with your
operating system’s user guide for the exact location.
16
Wireless USB Network Adapter
Hardware Detection for Windows 98SE, Me, and 2000
Note to Windows 2000 Users: You may be prompted at this time
that a digital signature has not been found; this is normal. See Figure
5-7. The WUSB11 has been verified to run on Windows 2000.
Click Ye s to continue, and then click the Finish button to end the
hardware detection process.
Important for Windows XP users: After the Wireless USB
Network Adapter has been physically connected to your computer,
Windows will detect the new hardware. Proceed to Chapter 6:
Installation and Configuration of the USB Adapter for Windows XP.
Figure 6-1
15
Instant Wireless
TM
Series
Figure 5-7

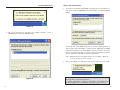
4. Windows will tell you when it has finished installing the new driver. Click
the Finish button.
You have now completed the installation of the drivers for
the Wireless USB Network Adapter.
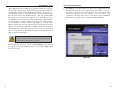
1. After installing the Adapter, the Windows XP Wireless Zero Configuration
icon will appear on your system tray. See Figure 6-5. Double-click the icon
of the two monitors and Figure 6-6 will appear.
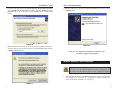
2. Click the radio button next to Search for the best driver in these locations.
Select Include this location in the search:, and enter D:\Drivers in the
location field (if “D” is the letter of your CD-ROM drive). Click the Next
button.
3. Windows will notify you that the driver has not passed Windows Logo test-
ing. Since this product has been tested to work with Windows XP, click the
Continue Anyway button.
Figure 6-3
Figure 6-4
17 18
Instant Wireless
TM
Series
Wireless USB Network Adapter
Figure 6-2
Windows XP Wireless Zero Configuration
Important for Windows XP users: Windows XP has built-in config-
uration tools. Use the Windows XP Wireless Zero Configuration, (in
the system tray at the bottom of your screen) to configure the Adapter.

Instant Broadband Series
2. The screen that appears will show any available Network. Select a
Network, then click on the connect button.
3. If your Access Point has enabled WEP encryption, the screen in Figure 6-7
will appear. Enter the WEP key in the Network Key. Click the Connect
button.
In order to find out the WEP encryption set by other wireless products in
your network, such as the WAP11, you may run the USB utility or SNMP
configuration program to check the WEP encryption tab for the correct key
entries. If you are using other access points, please check their user guides
for more information on WEP encryption configuration.
Note: Windows XP does not support the use of a passphrase. Enter the
exact key used on your access point.
4. The screen in Figure 6-8 will appear next if your connection is successful.
19
Wireless USB Network Adapter
Figure 6-7
Figure 6-8
Figure 6-5
Figure 6-6
For more information about WEP, refer to the Router’s User Guide or the
KnowledgeBase on the Linksys Website.
For further information on Wireless Networking with Windows XP,
search the Windows XP Search Engine using the keyword: “wireless.”
20

2. From the Configuration tab,
select Instant Wireless USB
Network Adapter ver. 2.6
from the list, and click the Add
button.
3. Select Protocol, and click the
Add button.
4. Select Microsoft from the
list of “Manufacturers” and
TCP/IP from the list of
“Network Protocols.” Click
the OK button to close the
Network window.
Windows may start copy-
ing some files or ask you
for your Windows installa-
tion files at this time. After
the files are copied,
Windows may ask you to
restart. Click Ye s to restart
and complete the installation
process.
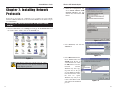
Chapter 7: Installing Network
Protocols
Protocols are necessary for computers to be recognized on your network.
Windows 2000 and XP users need to check their Windows User Guides for pro-
tocol installation.
1. From the Start Menu, select Settings and bring up the Control Panel. From
the Control Panel, double-click on the Network icon.
22
Wireless USB Network Adapter
Figure 7-2
Figure 7-3
Figure 7-4
21
Instant Wireless
TM
Series
Note: Before adding any network protocols, verify
that the protocol is not already installed. Never
install duplicate protocols.
Installing the Network Protocols for Windows 98SE
and Me
Figure 7-1

Wireless USB Network Adapter
2. The screen in Figure 8-3 shows you any available wireless device for net-
work connection. Select the wireless device, and click the Connect button
to connect or the Refresh button to search for more wireless devices.
Attempt Auto-Connect to ANY network in range will connect you to the
closest network within range. Click the X (Close) button in the upper right
corner to close
the WLAN
Monitor or
click the
Profile
Setting button
to continue.
3. When the screen in Figure 8-4 appears, click on the New button to create a
new profile or select a profile and click on the edit button to change an
existing profile or Click on the Delete button to delete a profile. Select a
profile and click the Connect button to connect.
24
Figure 8-3
Figure 8-4
Chapter 8: Configuring the
Wireless USB Network Adapter
After installing the Network Adapter, Windows 98SE, Me, 2000, and XP will
automatically identify the Adapter. Next, you may need to configure the
Adapter’s driver software.
1. After installing the Adapter, the Wireless USB Network Adapter WLAN
Monitor icon will appear on your system tray. Double-click on the icon of
the monitor in Figure 8-1, and Figure 8-2 will appear:
Figure 8-2 shows you the status of your current connection on the Link
Status page. Click the X (Close) button in the upper right corner to close
the WLAN Monitor or click the Connections button to continue.
Instant Wireless
TM
Series
23
Figure 8-1
Figure 8-2
Important for Windows XP users: Windows XP has built-in config-
uration tools. Use the Windows XP Wireless Zero Configuration, (in
the system tray at the bottom of your screen) to configure the Adapter
See Chapter 6: Installation and Configuration of the USB Drivers for
Windows XP.

5. If you clicked on the Advance button, the Advanced page will appear.
Under the WEP drop-down box, you can choose to have WEP encryption
Disabled, 64, or 128 Bits. If you choose 64 Bits, the screen in Figure 8-6
will appear. If you choose 128 Bits, the screen in Figure 8-7 will appear.
Wireless USB Network Adapter
26
4. If you click on the New or Edit button, the screen in Figure 8-5 will
appear. You can enter a name for a new profile and change any of the set-
tings on this page.
Under the Network Type, you may choose either Infrastructure or Ad-Hoc.
Infrastructure mode allows a wireless adapter to communicate with a wired
network employing an access point, while the Ad-Hoc mode allows wire-
less-to-wireless, peer-to-peer communication. If you choose Infrastructure,
the SSID should have the same name as the Access Point. If you choose Ad-
Hoc, all clients should share the same SSID name. Click the Apply button
to save the settings or click on the Advanced button for your WEP encryp-
tion settings.
Instant Wireless
TM
Series
25
Figure 8-6
Figure 8-5
Figure 8-7

6. The About tab, as shown in Figure 8-8, shows you copyright and version
information about the driver, the application, and the firmware. The ver-
sion number of the driver may vary from this screen, depending on which
version was shipped with your Adapter. You can always visit
www.linksys.com for the latest version of the driver. Click the X (Close)
button in the upper right corner to complete the WLAN Monitor.
28
Wireless USB Network Adapter
Wired Equivalent Privacy (WEP) is an encryption scheme used to protect
wireless data communication. The Disabled setting prevents the sharing of
data with other computers on the WEP network. There are two ways to cre-
ate WEP Encryption keys. The first method is by typing a Passphrase into
that field and clicking the Generate button. This will generate WEP
Encryption keys based upon that passphrase. A second method is to type
the WEP Encryption keys in the available fields manually. When manual-
ly typing the keys, you must use Hexadecimal characters, which are the let-
ters “A” through “F” and the numbers “0” through “9”. To find out the
WEP encryption set by other wireless products in your network, such as the
WAP11, you may run the USB utility or SNMP configuration program to
check the WEP encryption tab for the correct key entries. If you are using
other access points, please check their user guides for more information on
WEP encryption configuration.
In the bottom drop-down box , choose which Default Key will be used for
the encryption. By default, Key 1 will be used. Click the Apply button
when you are done.
27
Instant Wireless
TM
Series
Figure 8-8
Important: This hexadecimal number must match the Key
on all other devices on the wireless network, or this device
will be unable to transmit or receive data.

Can I play computer games with other members of the wireless network?
Yes, as long as the game supports multiple players over a LAN (local area net-
work). Refer to the game’s user guide for more information.
What is the IEEE 802.11b standard?
The IEEE 802.11b Wireless LAN standards subcommittee, which is formulat-
ing a standard for the industry. The objective is to enable wireless LAN hard-
ware from different manufacturers to communicate.
What IEEE 802.11 features are supported?
The product supports the following IEEE 802.11b functions:
• CSMA/CA plus Acknowledge protocol
• Multi-Channel Roaming
• Automatic Rate Selection
• RTS/CTS feature
• Fragmentation
• Power Management
What is Ad-hoc?
An Ad-hoc wireless LAN is a group of computers, each with a WLAN adapter,
connected as an independent wireless LAN. Ad-hoc wireless LAN is applica-
ble at a departmental scale for a branch or SOHO operation.
What is Infrastructure?
An integrated wireless and wired LAN is called an Infrastructure configura-
tion. Infrastructure is applicable to enterprise scale for wireless access to a cen-
tral database, or wireless application for mobile workers.
What is Roaming?
Roaming is the ability of a portable computer user to communicate continu-
ously while moving freely throughout an area greater than that covered by a sin-
gle Access Point. Before using the roaming function, the workstation must
make sure that it is the same channel number with the Access Point of dedicat-
ed coverage area.
To achieve true seamless connectivity, the wireless LAN must incorporate a
number of different functions. Each node and Access Point, for example, must
always acknowledge receipt of each message. Each node must maintain contact
with the wireless network even when not actually transmitting data. Achieving
these functions simultaneously requires a dynamic RF networking technology
that links Access Points and nodes. In such a system, the user’s end node under-
takes a search for the best possible access to the system. First, it evaluates such
30
Wireless USB Network Adapter
29
Instant Wireless
TM
Series
Appendix A: Troubleshooting
This chapter provides solutions to problems usually occurring during the instal-
lation and operation of the USB Network Adapter. Read the description below
to solve your problems. If you can’t find an answer here, check the Linksys
website at www.linksys.com.
1. My computer does not recognize the Wireless USB Network Adapter.
• Make sure that the Wireless USB Network Adapter is properly inserted into
the USB port.
• Also, make sure that the USB Controller is enabled in the BIOS. Check with
your motherboard User Guide for more information.
2. The Wireless USB Network Adapter does not work properly.
• Reinsert the Wireless USB Network Adapter into the notebook or desktop’s
USB port.
• For Windows 98SE or Me, right-click on My Computer, and select
Properties. Select the Device Manager tab, and click on the Network
Adapter. You will find the Wireless USB Network Adapter if it is installed
successfully. If you see a yellow exclamation mark, the resources may be
conflicting and you must follow the steps below:
• Uninstall the driver software from your PC.
• Restart your PC and repeat the hardware and software installation as
specified in this User Guide.
3. I cannot communicate with the other computers linked via Ethernet in the
Infrastructure configuration.
• Make sure that the notebook or desktop is powered on.
• Make sure that your Wireless USB Network Adapter is configured on the
same channel, SSID, and WEP as the other computers in the Infrastructure
configuration.
Can I run an application from a remote computer over the wireless network?
This will depend on whether or not the application is designed to be used over
a network. Consult the application's user guide to determine if it supports oper-
ation over a network.
Common Problems and Solutions
Frequently Asked Questions

noise. There are two main alternatives, Direct Sequence Spread Spectrum
(DSSS) and Frequency Hopping Spread Spectrum (FHSS).
What is DSSS? What is FHSS? And what are their differences?
Frequency-Hopping Spread-Spectrum (FHSS) uses a narrowband carrier that
changes frequency in a pattern that is known to both transmitter and receiver.
Properly synchronized, the net effect is to maintain a single logical channel. To
an unintended receiver, FHSS appears to be short-duration impulse noise.
Direct-Sequence Spread-Spectrum (DSSS) generates a redundant bit pattern
for each bit to be transmitted. This bit pattern is called a chip (or chipping
code). The longer the chip, the greater the probability that the original data can
be recovered. Even if one or more bits in the chip are damaged during trans-
mission, statistical techniques embedded in the radio can recover the original
data without the need for retransmission. To an unintended receiver, DSSS
appears as low power wideband noise and is rejected (ignored) by most nar-
rowband receivers.
Would the information be intercepted while transmitting on air?
WLAN features two-fold protection in security. On the hardware side, as with
Direct Sequence Spread Spectrum technology, it has the inherent security fea-
ture of scrambling. On the software side, WLAN offers the encryption function
(WEP) to enhance security and Access Control.
Can Instant Wireless™ products support printer sharing?
Instant Wireless™ products perform the same function as LAN products.
Therefore, Instant Wireless™ products can work with NetWare, Windows
NT/2000, or other network operating systems to support printer or file sharing.
What is WEP?
WEP is Wired Equivalent Privacy, a data privacy mechanism based on a 40 bit
shared key algorithm, as described in the IEEE 802.11b standard.
32
Wireless USB Network Adapter
31
Instant Wireless
TM
Series
factors as signal strength and quality, as well as the message load currently
being carried by each Access Point and the distance of each Access Point to the
wired backbone. Based on that information, the node next selects the right
Access Point and registers its address. Communications between end node and
host computer can then be transmitted up and down the backbone.
As the user moves on, the end node’s RF transmitter regularly checks the sys-
tem to determine whether it is in touch with the original Access Point or
whether it should seek a new one. When a node no longer receives acknowl-
edgment from its original Access Point, it undertakes a new search. Upon find-
ing a new Access Point, it then reregisters, and the communication process con-
tinues.
What is BSS ID?
A specific Ad hoc LAN is called a Basic Service Set (BSS). Computers in a
BSS must be configured with the same BSS ID.
What is ESS ID?
An Infrastructure configuration could also support roaming capability for
mobile workers. More than one BSS can be configured as an Extended Service
Set (ESS). Users within an ESS could roam freely between BSSs while served
as a continuous connection to the network wireless stations, and Access Points
within an ESS must be configured with the same ESS ID and the same radio
channel.
What is ISM band?
The FCC and their counterparts outside of the U.S. have set aside bandwidth
for unlicensed use in the ISM (Industrial, Scientific and Medical) band.
Spectrum in the vicinity of 2.4 GHz, in particular, is being made available
worldwide. This presents a truly revolutionary opportunity to place convenient
high-speed wireless capabilities in the hands of users around the globe.
What is Spread Spectrum?
Spread Spectrum technology is a wideband radio frequency technique devel-
oped by the military for use in reliable, secure, mission-critical communica-
tions systems. It is designed to trade off bandwidth efficiency for reliability,
integrity, and security. In other words, more bandwidth is consumed than in the
case of narrowband transmission, but the trade-off produces a signal that is, in
effect, louder and thus easier to detect, provided that the receiver knows the
parameters of the spread-spectrum signal being broadcast. If a receiver is not
tuned to the right frequency, a spread-spectrum signal looks like background

Firmware - Code that is written onto read-only memory (ROM) or program-
mable read-only memory (PROM). Once firmware has been written onto the
ROM or PROM, it is retained even when the device is turned off.
Hot Swap - The ability to replace a card or other hardware part in a hardware
device without turning it off or losing functionality.
IEEE - The Institute of Electrical and Electronics Engineers. The IEEE
describes itself as “the world’s largest technical professional society—promot-
ing the development and application of electrotechnology and allied sciences
for the benefit of humanity, the advancement of the profession, and the well-
being of our members.”
The IEEE fosters the development of standards that often become national and
international standards. The organization publishes a number of journals, has
many local chapters, and several large societies in special areas, such as the
IEEE Computer Society.
Infrastructure - An infrastructure network is a wireless network or other small
network in which the wireless network devices are made a part of the network
through the Access Point which connects them to the rest of the network.
IP Address - In the most widely installed level of the Internet Protocol (IP)
today, an IP address is a 32-binary digit number that identifies each sender or
receiver of information that is sent in packet across the Internet. When you
request an HTML page or send e-mail, the Internet Protocol part of TCP/IP
includes your IP address in the message (actually, in each of the packets if more
than one is required) and sends it to the IP address that is obtained by looking
up the domain name in the Uniform Resource Locator you requested or in the
e-mail address you're sending a note to. At the other end, the recipient can see
the IP address of the Web page requester or the e-mail sender and can respond
by sending another message using the IP address it received.
IPCONFIG - A utility that provides for querying, defining and managing IP
addresses within a network. A commonly used utility, under Windows NT and
2000, for configuring networks with static IP addresses.
34
Wireless USB Network Adapter
Appendix B: Glossary
Ad-hoc Network - A simple peer-to-peer network or the sharing of local
resources between wireless networked PCs.
Default Gateway - The router used to forward all traffic that is not addressed
to a station within the local subnet.
DHCP (Dynamic Host Configuration Protocol) - A protocol that lets network
administrators manage centrally and automate the assignment of Internet
Protocol (IP) addresses in an organization’s network. Using the Internet’s set of
protocol (TCP/IP), each machine that can connect to the Internet needs a
unique IP address. When an organization sets up its computer users with a con-
nection to the Internet, an IP address must be assigned to each machine.
Without DHCP, the IP address must be entered manually at each computer and,
if computers move to another location in another part of the network, a new IP
address must be entered. DHCP lets a network administrator supervise and dis-
tribute IP addresses from a central point and automatically sends a new IP
address when a computer is plugged into a different place in the network.
DHCP uses the concept of a “lease” or amount of time that a given IP address
will be valid for a computer. The lease time can vary depending on how long a
user is likely to require the Internet connection at a particular location. It’s espe-
cially useful in education and other environments where users change fre-
quently. Using very short leases, DHCP can dynamically reconfigure networks
in which there are more computers than there are available IP addresses.
DHCP supports static addresses for computers containing Web servers that
need a permanent IP address.
DNS - The domain name system (DNS) is the way that Internet domain name
are located and translated into Internet Protocol (IP) addresses. A domain name
is a meaningful and easy-to-remember “handle” for an Internet address.
Dynamic IP Address - An IP address that is automatically assigned to a client
station in a TCP/IP network, typically by a DHCP server. Network devices that
serve multiple users, such as servers and printers, are usually assigned static IP
addresses.
ESS - More than one BSS in a network.
33
Instant Wireless
TM
Series
Page is loading ...
Page is loading ...
Page is loading ...
Page is loading ...
Page is loading ...
-
 1
1
-
 2
2
-
 3
3
-
 4
4
-
 5
5
-
 6
6
-
 7
7
-
 8
8
-
 9
9
-
 10
10
-
 11
11
-
 12
12
-
 13
13
-
 14
14
-
 15
15
-
 16
16
-
 17
17
-
 18
18
-
 19
19
-
 20
20
-
 21
21
-
 22
22
-
 23
23
-
 24
24
-
 25
25


Linksys NULL WUSB11 User manual
- Category
- Networking cards
- Type
- User manual
- This manual is also suitable for
Ask a question and I''ll find the answer in the document
Finding information in a document is now easier with AI
Related papers
-
Linksys Wireless USB Network Adapter User manual
-
Network Computing Devices WUSB11 User manual
-
-
Linksys WPC54A - Wireless 802.11a PC Card User manual
-
Cisco-Linksys PKW-WUSB12 User manual
-
-
Linksys WUSB54G User manual
-
-
-
Other documents
-
X-Micro XWL-11BUZX User manual
-
Digitus DN-7054 Quick start guide
-
Philips CPWUA001 User manual
-
Abocom Systems MQ4WUE1K5 User manual
-
Edimax Wireless B Mini USB Adapter User manual
-
Uniden PCW100 Owner's manual
-
AmbiCom WL1100B-AP User manual
-
Hawking Network Card H-WU300 User manual
-
HP hn210w User manual
-
10Gtek -4503AC Wireless Adapter Installation guide