
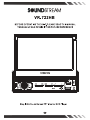
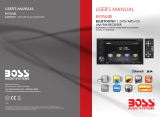
SeUNDSTREAM
VR-722HB
BEFORE OPERATING THE UNIT. PLEASE READ THIS MANUAL
THROUGHLYAND RETAIN IT FOR FUTURE REFERENCE
SeUNDSTREAM
H
RPT
ROM
INT
,-
-
..-"-:1
1=----------=-=2:....:.,1
.=1
3=----------=:4=.1
lr=--::s--.::....,e
I
IRO
MICO 0
AVIN
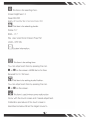
Single Din Touch Screen TFT Monitor DVD Player
•

Contents
NOTES ON INSTALLATION
PRECAUTIONS
PANEL
REMOTE
CONTROL
REMOVE BATTERY
WIRING DIAGRAM
MAIN MENU
• RADIO
• MOBILE
LINK
• BLUETOOTH
• DISC
• USB
•
AVIN
•
SETTING
OTHER
FUNCTIONS
INSTALLATION
ACCESSORIES
SPECIFICATION
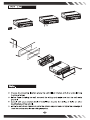
Notes on installation
The unit is designed for 12V DC, negative ground operation
system only. Before installing the unit, make sure your vehicle is
connected to 12V
DC
negative grounded electrical system.
The negative battery terminal must be disconnected before
making connections, which can reduce damaging to the unit due to
short circuit.
Be
sure to connect the speaker (-) leads to the speaker (-)
terminal. Never connect the left and right channel speaker cables
each other
or
to the vehicle body. Do not block vents
or
radiator
panels. Blocking the will cause heat to build up inside and may
result in ftre.
After the completion
of
the installation and begin to operate the
unit (including replacing the battery), please press the reset button
on the front panel with pointed objects (such as ball pen) to set the
unit to initial status.

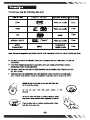
Precautions
The unit can play the following disc only
Type
of
Disc
Label On The Disc
Recorded Material Size
of
disc
DVD
DVD
..
'ii·IJ·_.
Video and Audio 12cm
VCD
~
ill][§~
Video and Audio
12cm
VIDEO
CD
lr~~IIII&~Ii!lial
CD
ruo~rn
Audio
12cm
lliliSillt~
6YIZIZI
MPEG4/DIVX
1W1PEG4
:::11·11·~
DIVX'
Video and Audio
12cm
MP3/
Compressed
12cm
WMA/JPEG
MP3
Digital Audio
Note:
The
unit is compatible with DVD,DVD+/-R,
VCD
1.0/2.013.0, SVCD,
CD,
CD-R,
CD-RW
and
JPEG
0
DO
NOT
ATTEMPT
TO
MODIFY
THE
UNIT,
MODIFYING
THE
UNIT
MAY
CAUSE
AN
ACCIDENT.
0
STOP
THE
VEHICLE
BEFORE
CARRYING
OUT
ANY
OPERATION
THAT
COULD
INTERFERE
WITH
YOUR
DRIVING.
0
DO
NOT
TURN
ON
THE
UNIT
IF
THE
TEMPERATURE
INSIDE
THE
VEIDCLE
IS
OUT
OF
-20C
TO
60C.
0
TillS
PRODUCT
IS
DESIGNED
FOR
ONE
SINGLE
VIDEO OUTPUT,
PLEASE
USE
A
SPLITTER
IF
YOU
WOULD
LIKE
TO
CONNECT
FOR
MULTIPLE
VIDEO
OUTPUT.
Handle
the
disc
by
its edge
to
keep
the
disc clean, and
do
not
touch
the
surface.
Do
not
use
your
CDs
with
paste residue
or
ink
attached.
Do
not
use
CDs
with labels
or
stickers attached,
which
may
leave a sticky residue while beginning to peel off.
Clean
the
discs with
an
optional cleaning cloth.
Wipe
each
disc from center out.

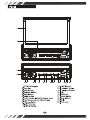
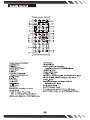
Panel
1.TFT-LCD Display
2.Disc
Slot
3.Eject Button
4.Release Button
5.Mute Button
6.Mode Button
7.Fast Forward Button/Previous Track
8.Fast Reverse Button/Next Track
9.1/Pause Button
1 0.2/RPT Button
11.3/RDM Button
12.4/INT Button
13.5
Answer
Button
14.6 Hang up Button
15.MIC
16.1R
Sensor
17. Power Button
18.0pen
Button
19.AV
IN
20.USB
Jack

Remote Control
l.Power
Button(TFf
ON/OFF)
2.MODE Button
3.~11Button
4.MUTE /EJECT Button
5.BAND Button
6.+Button
7.TITLE(in
DVD
playing)
1
2
5
6
9
10
13
14
17
18
21
22
25
26
29
30
PBC(in VCD playing) Button
S.Sub-T Button
9
.•
Button
10.0K
Button
11. • Button
12.Setup Button
13.
•t')
Button
14."t'Button
15.Angle (long press)/EQ (short press)
16.0pen
Button
17 .AMS (in radio
& TV searching)
RPT (in DVD/CDIMP3 repeated) Button
18.ST (in radio)/PROG (in DVD/CDIMP3) Button
4
3
8
7
12
11
16
15
20
19
24
23
28
27
32
31
19.VOL+Button
20.ZOOM Button
21.LOC
(a
remote
in
radio)IRDM
(a random broadcast
in
DVD/CDIMP3)Button
22.SEEK
/I.,. Button
23.SEL
I LOUD Button
24.SEEK/
..
I Button
25.CLK (for time switching)
,.,....
(for answering in BT) Button
26. OSD (in DVD)
I~
(for cutting
off
in BT) Button
27. VOL- Button
28.AUDIO (for channel switching
in
DVD/CD/
Mp3)/DEL(in BT) Button
29.1-9 Number Button
30.0
/SWf
Number Button
31.10+(the selection key for DVD)/*
(in BT) Button
32.GOTO (the selection
key
for DVD)/#(in BT) Button
..................................
~
~
~
~

Remove Battery
Note:
• The distance may
va
ry
according to the brigh
tn
ess of amb
ie
nt light
• If the
re
mote is not used for an ex
te
nded period of tim
e,
remove
th
e
ba
ttery to prevent
possible damage from
ba
ttery leakage and corrosion.
•
Do
not place any objects between the remote control
un
it and the sensor on t
he
un
it
•
Do
not drop the remote control onto the
fl
oor; it will damage it beyond repair
•
Do
not use the remote control u
ni
t,
while simultaneously ope
ra
ti
ng
th
e remote
con
trol unit
of any other
eq
uipmen
t;
they may inte
rfe
re
re
sulting in
im
proper operation.
• The
ba
ttery normally last for about one year although d
ep
end
in
g h
ow
oft
en
the remote
control is used. If the remote control
un
it isn't working even when it is operated near the unit,
replace the battery with a n
ew
battery of the same make and use only a lithium cell battery
type: CR20
25
(3V)
• Dispose empty batte
rie
s in
acc
ordance with your l
oca
l governmental regula
ti
ons
•
Do
not short-circuit, disassemble, heat
or
dispose of
fi
re or
fl
ames the battery
• Keep t
he
battery out of
re
ach
of
child
re
n, should the battery be swallo
we
d, immediately
consult a doctor
Wiring Diagram

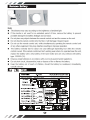
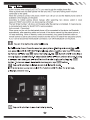
Main Menu
Ti
le
best way to discover the program is to ex
pl
ore each screen in deta
il
, and to
fi
nd out how to
move from one to another. Read this chapter for a gu
id
ed
tour.
Un
it starts by displaying the Main menu.
This is the
ro
ot of t
he
screen
t1iem
rc
hy,
an
d you can simply access all f
ea
tu
re
s by tapping
on
the touch screen buttons.
T
ap
the ic
on
s to enter a desir
ed
mode.
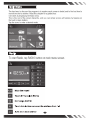
Radio
To start R
ad
io, t
np
RA
DIO
b
utto
n on mnin 1
11
en
u s
creen
.
• Mute the sound
Touch ST to select Stereo
• ExchangeAM/FM
• Touch this button can scan the stations from 1-6
• Auto store each station

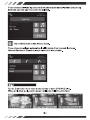
MOBILE LINK
To
start mobile
link
,control head unit through
your
smart phone and enjoy
mobile features on
car
unit
with a simple connection. Mobile link works
for
both
iPHONE and MHL software system.
-
•
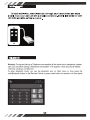
Bluetooth
W
arning
: Driving and having a Telephone conversation at the same time is dangerous, please
park your car before having a telephone conversation. The supplier waves any and all liability
when
th
is warning is not follow
ed
.
To enter Bluetooth mode, you can tap Bluetooth ic
on on
Main menu or long press the
mute/
Bi
uetooth button
on
the
Re
mote Control
or
press mode button on remote or
on
front panel.

Pairing Mode
At the 1st time when using BLUETOO
TH
, you need to pair the mobile
ph
one first.
When a phone have not been
pa
ired with the unit, the BT icon and
Pa
iri
ng
mark will blink
continually on the panel.
When the
un
it have connect wi
th
phone, the BT icon will turn on and the Mobile phone name (if
available) wi
ll
be display on the pane
l.
According to mobile pairi
ng
device manua
l,
after searching new device, select it, input
password "0000" and confirm ok, device paring is finished.
The text 'Enter Number' w
ill
shows on the panel after the pairi
ng
is completed. It means device
is
connected
an
d ready for BLUET
OO
TH
communication.
Auto-connect - Disconnect
When power on the unit, the last paired phone wi
ll
be connected to
th
e device via Bluetooth
automatically, after searching about one minute, if the device cannot find the paired phone, it
will stop searching. When
in
standby mode (
un
connected), long press Bluetooth button on
remote control to active auto-connect function and the device wi
ll
search the last paired phone.
If you want to disconnect the Bluetooth connection, turn off the
Bl
uetooth on the phone.
liJ Tap on this button to enter call mode
In Call mode,the
unit
can be used as your phone. Making and receiving calls
are possible with BLUETOOTH.Simply tap phone number and tap • button
to
make a call,and tap • button
to
hang up.Tap
II
button shorly to delete a
wrong
digit,or
press
it
for
3-4 seconds to delete all the numbers
at
once. During
a call,you can change a ell from Bluetooth mode
to
phone
by
tapping
IDJ
button.
To
have a call in Bluetooth mode again, tap IDJ button.
riJ
Tap on this button to listen music in Bluetooth mode.
In this main menu,you can select the function with the key
for
previous,
plsay/pause and next.
DJ
Tap on this button to see the history mode.

The unit can downloading the data from phone automatically when the pairing
between a phone and the
unit
be completed.
B Tap on this button to see history mode.
The unit can download automatically all the data from the mobile phone.
Missed/Received/ Dialed calls are saved in history mode.
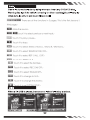
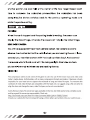
Disc
Tap on Disc button from main menu screen to start DVD/VCD play.
When a file
disc
is played,the screen will show following interface:

Note:
Disc will automatically start playing when you insert any DVD/VCD disc.
Warning displays
if
the vehicle is moving for driver's safety. Disc will not play
video,but also picture and music files as well.
third
page
.
+~
lEI~
,
Mute
the
sound.
+~
l
lm
Touch
it
to
select previous
or
next
track.
+~
~Touch
it
to
play
I
pause.
+~
Touch it
to
stop
.
+~
.....
Touch
it
to
select Stereo I
Mono
L I
Mono
R I
Mix
Mono.
+~
-.....-]Touch
it
to
select RANDOM
ON/
OFF
.
+~
..,.
..
. Touch
it
to
se
l
ect
REP
l I
ALL
I
OFF.
+~
...
:. _ Touch it
to
REPEAT
A
-
B
.
+~
,
...
~
~
Touch it
to
select file
Number.
+~
1
1
iN
Touch it
to
select
PBC
ON/
OFF.
+~
Touch
it
to
se
l
ect
INVALID
KEY.
+~
Touch
it
to
change
the
ZOOM.
+~
Touch
it
to
set
SYSTEM
SETUP.
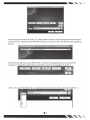
+~
When a file USB is played,the screen will show following interface:

J1iWT
h
ere
are
a
ll
the functions in 2 pages.
This
is the
first
/second
page
.
.,
EaJ
Mute
the sound .
.,
IteM]
'"*
Touch it
to
se
l
ect
previous or next track .
.,
~
Touch it
to
play
I pause .
.,
Touch it
to
stop .
.,
Touch it
to
se
l
ect
RANDOM
ON/
OFf
.
.,
I
. Touch it
to
se
l
ec
t REP 1 I
ALL
I
OF
f .
.,
' . Touch it
to
REPE
AT
A-B .
.,
Touch it
to
set
SYST
EM
SETUP
.
.,
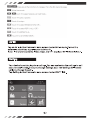
AVIN
Tap on AV In button from main menu screen to start AV In mode.Connet the
external audio/video signal source to this unit.
Note:
If
there is no external video input ,the TFT displays
11
AV
IN
NO
SIGNAL".
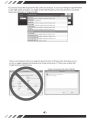
Setting
Your device has default system settings.You can customize the settings to suit
your personal needs. Once you change settings, your new settings will remain
until you change
it
again.
Tap Setting button from main menu screen to start SETTING.

I]
This
item
is
for selecting
Com.
Screen brightness:
1-2
Deep
:ON/OFF
Brighty off time:
ON/
30s/ 1
min/
5min/15min/
OFF
liD
This
item
is
for selecting Audio.
Treble:
-7
I 7
BASS:
-7
I 7
EQ:
User/
Jaz:z/
Rock/ Classic/
Pop/
Flat
LOUD: OFF/ ON
a
\
System information.
a;)
This
item
is
for setting
time
.
You
can
adjust
each
item
by
pressing
the
icon
r:J
or a
on
the
screen. MODE
item
is
for
time
Requied for
12
I 24 hours.
['i]
This
item
is
for setting
Audio
Position.
You
can
adjust
each
item
by
pressing
the
icon
1::1
or a
on
the
screen.
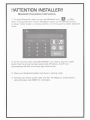
!!
This
item
is
useful
when
some
malfunction
Occur
with
the
touch
screen
and
it
needs adjustment.
Calibration
procedure
of
the
touch
screen
is
described
as
below:When
the
target
moves
to

another position,tap and hold
at
the center
of
the
new
target.Repeat
each
time
to
complete the calibration process. When the calibration has been
completed,the device switches
back
to
the previous operating
mode
and
retain the previous setting.
Other Functions
PACKING
When the
car
is
stopped
and
the parking brake
is
working, the screen
can
display the video image, otherwise the screen
can't
display the video image.
REAR
VIEW
CAMERA
This
unit
is
equipped with rear view camera output.
The
camera
is
used
to
observe the situation behind the vehicle when you are backing the car. Please
connect your rear view camera with the
back
car
video input .And connect
the reverse wire for
back
a
corwith
the rear
gear
light.
Rear
view camera
picture will
be
enabled when you are backing the car.
VIDEO
FILE
Fi
le
compress
i
on
seems
to
be
name
of
the
game
to
see
w
ho
can
fit
the
most
music
and
vi
deo
onto
toda
y's
med
ia deices.
Unfortunate
ly
wi
th
so
man
y
compress
i
on
formats
and
codecs, it
becomes
vi
rtua
lly
i
mposs
ib
ly
for
y
our
head
unit
to
support
the
mu
lti
tude
of
song
and
video fi
le
types. To ov
ercome
the
confusion
of
w
hat
vi
deo
formats
are
compat
ible with
th
is
head
unit, we suggest using a fi
le
conv
erter
to
al
ign
the
stars
and
change
the
man
y
vi
deo
fi
le ty
pes
y
ou
have
to
one
standard.
Sure
ly
there
are
man
y
fi
le conv
ers
i
on
apps
available on
the
li
ne,
but
CNet
seems
to
be a
re
li
ab
le
source
and
has a good
fi
le conv
ers
ion
app
ava
il
ab
le. Check
out
:
h
ttp
:
//
do
wn
lo
ad .cn
et
.co
m/
Fr
ee-
AVI
-
Vi
de
o-Conv
erte
r
/3
000-2
194
4-7568
52
73. h
tm
l
Drop by
our
w
ebs
i
te
for
the
link
instead
of
typing a m
ill
ion
letters
and
sy
mbo
ls into y
our
w
eb
bro
w
ser
....

After
the
app
do
wnloads and installs/
it
1
s
prett
y simple
to
conv
ert
y
our
fi
l
es
.
Se
l
ect
the
Add
Fi
le
button
and
bro
w
se
y
our
computer
to
find
the
alien file type you need
to
convert. The file
info
should
appear
at
the
top
:
Free
AVI
Video Converte"
v.
5.0.31
build
1125
There are some
optiona
l choices
after
the
file
is
selected/ like changing
the
name
to
protect
the
innocent/
or
change
the
l
ocation
the
conv
erted
file
is saved. If y
ou
fee
ling
fr
isky
go
for
it:
Other
wise/ choose
the
file
format
you w
ant
to
conv
ert
y
our
mov
ie
to
.
Ma
y we recommend
the
A VI. ..
...
:
"10

Y
ou
can also
choose
the
resol
ut
i
on
for
the
screen size
and
type. If y
ou
'
re
con
v
erting
an
or
iginal f
il
e
that
is
super
high
qua
l
it
y resol
ut
i
on
, y
ou
mi
ght
consi
der
the
HD
options
,
but
most
commonl
y y
ou
shou
ld
choose
Norma
l Qual· · inal
Qua
li
There are some fantastic
opt
ions
to
change
the
standard codec, bit & frame rates, blood types, and so
on
,
but
we suggest keeping every
th
ing pres
et
as
the
app recommend
s.
It's
the
se cr
az
y variables
that
brought you here in
the
f
ir
st place.
Finally click conve
rt
and wait
for
the
bell·
....
Completed
-
L1I..J
I§]
(480P
MV]2NE1..Qn't
Nobody
.fi"Cl4
~
Process
IS
COrfl)
!!ted
e.
Oose
--

Installation
Note:
-¢-
Choose the mounting location
where
the unit will
not
interfere with
the
normal driving
function
of
driver.
-¢-
Before finally installing
the
unit
,connect
the
wiring
and
make
sure
that
the unit works
properly.
-¢-
Consult with
your
nearest
dealer
if installation requires the drilling
of
holes
or
other
modifications
of
the vehicle.
-¢-
Install the unit
where
it does
not
get
in the driver's
way
and
can
not
injure the passenger
if
there
is
a sudden stop,like an
emergency
stop.

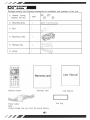
ACCESSORIES
p k t .
th
f II
f . t II .
ac aqe con ams e o owmq accessones or 1
ns
a
at1on
an
d
f
th
r opera
10n
o
't
e
un1.
(1) Washer, Spring
1 each
@
@
Washer, M5 Nut
~
©)
(2.)
Mounting Strap 1
(c=:::>
o o
e=>
o o o)
(3)
Bolt 1
&')
-
"
'
(·
1) Mounting Collar
1
~
"'
....
(5)
Release Key 2
~
~
(6)
Screw 1
~rxtrur~~
Warranty card
Use
r
Manual
Remote Control Warranty card
User Manual
If
·~
Power Cable
Tri
m
ri
ng
Note:
Product image may vary from the act
ual
delivery.

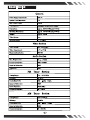
Specification
General
Power Supply Requirement:
12VDC
Speaker Load Impedance:
4n
Max. Power Output:
4x35W
Tone Controls:
lOdB(Bass lOOHz,Treble 10KHz)
Dimensions:
~pprox.
188x58x180nnnQDxWxH)
Mounting Dimensions:
Approx. 178x5Qx165nnnQDxWxH)
Weight:
Approx. 2395G
Video System: Auto
Mounting Angle:
0-30
degree
Video Section
Video System:
16:9 Wide Screen
Video Ou1put Level:
1.0Vpp/75
n
Horizontal Resolution:
8()()x480
Audio Section
Max. Ou1put Level:
2Vnns (+3dB)
Frequency Response:
20Hz-20KHz
Signal
to
Noise ratio: 60dB
Separation:
60dB
FM
Tuner Section:
Tuning Range:
87.5-
107.9 MHz
IF
Range:
10.7MHz
Usable Sensitivity:
(FM -30dB)
12d.Bu
Signal
to
Noise ratio: 60dB
Stereo Separation: 30dB(1KHz)
Frequency Response:
30-15KHz
AM
Tuner Section:
Tuning Range:
530-
1710KHz
IF
Range:
450KHz
Usable Sensitivity:
(AM
-20dB)
37d.Bu
Signal
to
Noise ratio: 50dB
Frequency Response:
10-2000Hz
................................
~
~
~
~
~

Page is loading ...
Page is loading ...
Page is loading ...
Page is loading ...
-
 1
1
-
 2
2
-
 3
3
-
 4
4
-
 5
5
-
 6
6
-
 7
7
-
 8
8
-
 9
9
-
 10
10
-
 11
11
-
 12
12
-
 13
13
-
 14
14
-
 15
15
-
 16
16
-
 17
17
-
 18
18
-
 19
19
-
 20
20
-
 21
21
-
 22
22
-
 23
23
-
 24
24


Ask a question and I''ll find the answer in the document
Finding information in a document is now easier with AI
Related papers
-
Soundstream DVD Entertainment System User manual
-
-
-
-
-
-
Soundstream VR-345T Owner's manual
-
-
-
Other documents
-
Power Acoustik PUB-8L User manual
-
Pyle PLDD75BG Owner's manual
-
Power Acoustik PUB-10L User manual
-
-
Power Acoustik PD-344BT Owner's manual
-
-
 Boss Audio Systems BV9362BI Owner's manual
-
Voyager AOM40MR Owner's manual
-
Boss Audio Systems BV9364B User manual
-
R&TTE WS-3500 User manual
