
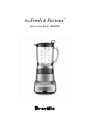
the Fresh & Furious
™
Instruction Book - BBL620

2
BREVILLE
RECOMMENDS
SAFETY FIRST
At Breville we are very safety
conscious. We design and
manufacture consumer
products with the safety of you,
our valued customer, foremost
in mind. In addition we ask
that you exercise a degree of
care when using any electrical
appliance and adhere to the
following precautions.
IMPORTANT
SAFEGUARDS
READ ALL INSTRUCTIONS
BEFORE USE AND SAVE
FOR FUTURE REFERENCE
• Remove and discard all
packaging materials and
stickers before first use.
• To avoid choking hazard for
young children, remove and
safely dispose the protective
cover fitted on the power plug.
• This appliance is for household
use only. Do not use it in
moving vehicles or boats, do
not use it outdoors, and do not
use it for anything other than
its intended use. Misuse can
cause injury.
• Keep the appliance and its cord
out of reach of children.
• This appliance shall not be
used by children.
• Appliances can be used by
persons with reduced physical,
sensory or mental capabilities
or lack of experience and
knowledge if they have
been given supervision or
instruction concerning use
of the appliance in a safe way
and if they understand the
hazards involved. Cleaning
and user maintenance shall not
be made by children without
supervision.
• Children shall not play with the
appliance.
• Do not use the appliance near
the edge of a countertop or
table. Ensure the surface is
level, clean and free of water
and other substances. Please be
aware that vibration during use
may cause the appliance
to move.

3
• Do not use the appliance on (or
close to) a hot gas or electric
burner, or where it could touch
a heated oven or surface.
• Do not allow the cord to hang
over the edge of a countertop,
or to become knotted.
• To avoid electric shock, do not
immerse the cord, plug
or motor base in water (or other
liquids).
• Installation of a residual
current device (a standard
safety switch on your wall
socket) is recommended to
provide additional safety
protection when using
appliances. It is advisable
that a safety switch (with
a rated residual operating
current not more than 30mA)
be installed in the electrical
circuit supplying the appliance.
Contact your electrician for
further professional advice.
• In order to avoid the possible
hazard of the blender starting
by itself due to inadvertent
resetting of the overload
protector on the motor, do not
attach an external switching
device (such as a timer) or
connect the blender to a circuit
that can regularly switch the
blender on and off.
• Do not operate appliance with
a damaged cord or plug, or
after appliance malfunctions, or
if dropped or damaged in any
way. Stop use immediately and
contact Breville by phone or
email for replacement or repair.
• Do not use blender while
OVERLOAD PROTECTION is
flashing on the LCD.
If your blender stops operating
and the "OVERLOAD
PROTECTION" is flashing,
unplug the blender and wait for
30 minutes until the motor has
cooled off. Once cooled, you
will be able to use the blender
as usual again.
• All maintenance (other than
cleaning) is to be done by
an authorised Breville
Service Centre.
• Authorised Breville Service
Centres can be found on our
website www.Breville.com.au
Alternatively, you can contact
the Breville Customer Care
Centre by phone on
1300 273 845 or email
AskUs@breville.com.au

4
SAFEGUARDS
FOR YOUR
BLENDER
• Wash the blender jug with
warm soapy water before
first use.
• Use only the blender jug
and lid that is supplied with
this blender. The use of
attachments or accessories not
manufactured or specified by
Breville may cause the risk of
fire, electrical shock, or injury.
• Always ensure the blender is
assembled properly before
using. Lid must be firmly
secured to the jug before
operation to ensure internal
contents do not escape, spray
or overflow.
• Under heavy load the blender
should not be operated for
more than 1 minute. Heavy
load for this blender was
defined defined as per the
appliance safety standard
specified load (6 ice cubes
(120g), 3 frozen bananas
halves (250g) , 180g frozen
raspberries, 500ml milk,
3 scoops vanilla ice cream
(140g). Any load equivalent
to this or heavier should not
be operated for more than 1
minute.
• Do not leave the blender
unattended when in use.
• Keep hands, fingers, hair
and clothing away from the
blender during use. Always
turn blender off and unplug at
the wall before reaching inside.
Avoid touching moving parts.
• Be careful when handling the
blender jug as the blades are
very sharp. Be careful when
emptying the jug and during
cleaning. Mishandling of the
blades may cause injury.
• Do not remove the jug from
the motor base while blender
is in use.
• The blender is intended for
food or drinks preparation.
Do not use for anything
other than food or drinks.
Do not operate without any
ingredients in the blender jug.
• Never attempt to operate
with damaged blades, or with
utensils, or any foreign objects
inside the blender jug.
• To reduce the risk of severe
injury to persons or damage
to the blender, keep hands and
utensils out of the jug while
blending.

5
• Never blend hot liquids.
Allow ingredients and liquids
to drop to room temperature
before putting into the jug
for blending.
• Do not put the blender jug in
extremes of heat or cold, for
example placing a cold jug into
hot water, or vice versa.
• Before moving the blender,
cleaning or putting it away for
storage, always turn blender off
and unplug at the wall.
• Always disconnect the
appliance from the supply if it
is left unattended and before
assembling, disassembling
or cleaning.
IMPORTANT
SAFEGUARDS
FOR ALL
ELECTRICAL
APPLIANCES
• Fully unwind the cord before
use.
• To protect against electric
shock, do not immerse the cord,
plug or motor base in water or
any other liquid.
• Do not allow the cord to hang
over the edge of a table or
bench, touch hot surfaces or
become knotted.
• Appliances can be used by
persons with reduced physical,
sensory or mental capabilities
or lack of experience and
knowledge if they have
been given supervision or
instruction concerning use of
the appliance in a safe way and
if they understand the hazards
involved.
• This appliance shall not be
used by children. Keep the
appliance and its cord out of
reach of children.
• Cleaning and user
maintenance shall not be
made by children without
supervision.
• Always disconnect the
appliance from the supply if it
is left unattended and before
assembling, disassembling or
cleaning.
• Children should be supervised
to ensure that they do not play
with the appliance.
• It is recommended to regularly
inspect the appliance. Do not
use the appliance if the power
supply cord, plug or appliance
becomes damaged in any way.
Return the entire appliance to
the nearest authorised Breville
Service Centre for examination
and/or repair.

6
FOR HOUSEHOLD USE ONLY
SAVE THESE INSTRUCTIONS
• Any maintenance other than
cleaning should be performed
at an authorised Breville
Service Centre.
• This appliance is for household
use only. Do not use in moving
vehicles or boats. Do not use
outdoors. Do not use this
appliance for anything other
than its intended use. Misuse
may cause injury.
• The installation of a residual
current device (safety switch)
is recommended to provide
additional safety protection
when using electrical
appliances. It is advisable that
a safety switch with a rated
residual operating current
not exceeding 30mA be
installed in the electrical circuit
supplying the appliance.
See your electrician for
professional advice.
BREVILLE ASSIST™ PLUG
Your Breville appliance comes
with a unique Breville Assist™
Plug, conveniently designed
with a finger hole to easy
removal from the wall outlet.

7
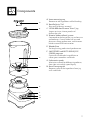
Components
A. Inner measuring cup
Remove to add ingredients while blending.
B. Breville Assist™ lid
Ring pull lid for easy removal.
C. 1.5 litre BPA-free Eastman Tritan™ jug
Impact resistant, shatter proof, and
dishwasher safe.
D. Kinetix
‰
blade and bowl system
Contoured to the base of the jug so there are
no food traps. Central blades are serrated
for extra cutting performance, and the outer
blades create the Kinetix motion.
E. Blender Base
For long lasting, professional performance.
F. SMOOTHIES and AUTO PULSE/ICE
CRUSH programs
Optimises the blender's capabilities to
create great smoothies and drinks.
G. 5 electronic speeds
Maximises control for different ingredients,
from slow mix to high speed liquify.
H. Auto Clean program
Removes most of the ingredients from jug
walls and blade.
A
B
D
E
F
G
H
C

8
Functions
BEFORE FIRST USE
Before using your Breville Blender for the first
time, remove any packaging material and
promotional labels.
Wash the lid, inner lid, blender jug (refer to
"Care & Cleaning) in warm, soapy water
with a soft cloth. Rinse and dry thoroughly.
Do not place parts in the dishwasher (with the
exception of the blender jug).
The blender jug may be washed in the
dishwasher. Ensure the lid has been removed
from the blender jug before placing into the
dishwasher. The motor base can be wiped with
a damp cloth. Dry thoroughly.
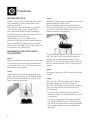
ASSEMBLING AND ATTACHING
THE BLENDER
Step 1
Place the motor base on a flat, dry surface such
as a counter-top. Ensure that the motor base
is turned off at the ON | OFF button and the
power cord is unplugged.
Step 2
With the blender jug in the upright position
place it on the motor base. The handle of the
blender can be positioned to the left or right
hand side of the appliance.
Step 3
Add food or liquid into the blender jug ensuring
not to exceed the ‘MAX’ mark.
Place the blender lid firmly into position on
the top of the blender jug. Insert the clear inner
measuring lid into the blender lid and turn
clockwise to lock into position.
Your Breville Blender features a Breville Assist™
Lid. This allows the lid to fit tightly onto the
blender jug, avoiding displacement during
operation. The ring pull design allows the user
to easily remove the lid with a simple leverage
action.
Step 4
Plug power cord into a 240V power outlet and
turn on.
Step 5
Press the ON | OFF button on the far left of
the control panel to turn the blender on.
The ON | OFF button will illuminate and flash.
The LCD timer screen will illuminate with
‘00’ displayed.
• Flashing light indicates ready to operate.
Avoid any contact with moveable parts while
in operation.
• Do not fill the blender jug above the ‘MAX’
line. When the blender jug is filled at or near
the ‘MAX’ line place one hand on the blender
lid to avoid displacement of the lid during
operation.

9
MANUAL SPEED SELECTION
ON | OFF
The ON | OFF button powers the unit into
READY mode.
ELECTRONIC SPEED CONTROL
There are 5 electronic speed buttons from MIX
through to LIQUIFY.
MIX combines more delicate foods with a
folding motion, and is good for combining wet
and dry ingredients.
LIQUIFY is the fastest setting, and is ideal for
breaking down ingredients to make cocktails
and other finely blended mixtures.
Select the required speed (1 to 5) by pressing
the corresponding speed button. The blender
will start to operate and the selected speed
button will illuminate. The ON | OFF button
will illuminate and cease to flash.
The LCD timer screen will start counting up
in one second increments until 120 seconds is
reached.
NOTE
Operate the blender only for the appropriate
amount of time required – do not over blend.
When 120 seconds is reached, the blender will
automatically stop blending and the selected
speed button illumination will go out.
The ON | OFF button will illuminate and flash.
After a few seconds the LCD timer screen will
revert to ‘00’.
• The Breville Blender will automatically stop
blending after 120 seconds. This is a safety
feature and restricts wear on the motor.
• The speed can be changed at any time during
the blending process. Each time a new speed
is selected its button will illuminate and the
previous speed button illumination will go
out. The number of seconds on the LCD
timer screen will continue to count upwards
to 120 seconds unless interrupted.
Count-up timer
The blender timer counts up in seconds as it
blends on one of the 5 electronic speeds from
MIX to LIQUIFY. When using the timer this
way, the blender will stop after 2 minutes.
PRESET PROGRAMS
Your Breville Blender features three additional
functions, ‘AUTO PULSE/ICE CRUSH’,
‘GREEN SMOOTHIE’ and ‘SMOOTHIE’.
These three pre-programmed cycles
automatically adjust the blending time and
speeds to optimise blending results. The
maximum amount of ice cubes the blender can
blend at any one time is 1 standard ice tray or
250g. Select the required function by pressing
the corresponding function button. The
blender will start to operate and the selected
function button will illuminate. The ON | OFF
button will illuminate and stop flashing. The
LCD timer screen will start counting down in
one second increments until ‘00’ is displayed.

10
GREEN SMOOTHIE (60 SECONDS)
Optimised to break down whole hard
ingredients like fruits, leafy greens and seeds,
and allows them to blend together with other
soft and liquid ingredients.
SMOOTHIE (60 SECONDS)
This program has been optimised to combine
and aerate frozen and liquid ingredients
together. The SMOOTHIE function has a
unique processing technique that blends
the denser ingredients at lower speed, then
increases in speed as ingredients thicken.
This will happen several times while blending
smoothies. The programming also circulates
the ingredients for maximum aeration and
creamy texture.
Pressing the button will activate the program –
press again to deactivate.
AUTO PULSE/ ICE CRUSH (60 seconds)
Optimised to crush ice, and also ideal for
processing other foods that need sudden
bursts of power. It also encourages ingredients
to move around the jug. This program has an
intelligent sensor to stop the motor when the
ice is done.
Count-down timer
The blender timer counts down in seconds as it
blends in the pre-set programs.
AUTO CLEAN
Use to remove most of the ingredients off the
blender walls and blades. Add 2 cups warm
soapy water, and press the clean button.
For harder to clean, sticky or thick ingredients,
add ½ teaspoon of dish liquid detergent for
extra cleaning power. For best results, clean the
blender jug this way immediately after use.
NOTE
If the blender is running and a different button
is pressed, the speed will automatically switch
to that program without stopping.
WARNING
Never place anything other than food and
liquids in the blender while the motor is
running.
NOTE
Use the PULSE button when the
food that is being processed is too thick or
coarse to circulate within the blender jug.
At the end of use, always ensure the blender
is turned off by pressing the ON | OFF button
on the control panel. Then unplug the cord.
Ensure the motor and blades have completely
stopped before attempting to move the
appliance, or when the Breville Blender is not
in use and before disassembling, cleaning and
storing.

11
Hints & Tips
• If the volume (while blending) is below the
maximum line, the inner measuring cap can
be removed and oils/liquids can be added
while blender is in use.
• Run the blender only for the appropriate
amount of time required – do not over
blend ingredients.
• Use the AUTO PULSE button when food
is too thick or coarse to circulate within the
blender jug.
• Do not exceed the maximum mark when
adding foods and liquids into the blender.
• Ingredients may stick to the sides of the
blender jug. To push food back onto the
blades, turn the blender off and unplug at the
wall. Use a plastic spatula to scrape down the
sides of the jug, and continue blending.
• If any moisture or liquid appears on top of
the motor base during blending, turn the
blender off and unplug at the wall. Remove
the blender jug, and wipe motor base
immediately with a dry cloth or paper towel.
• When the blender has been running for
120 seconds, it will automatically turn off.
This is a safety feature to protect the motor.
• A speed or function can be selected at any
time, even while the blender is running.
Press the new speed or program, and the
blender will change operation immediately.
The motor will still automatically turn off at
120 seconds total time running time.
• The maximum amount of ice cubes that
the blender can process is 250g (approx.
1 standard ice tray).
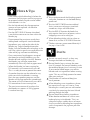
Do's
Use a combination of the blending speeds
and pulse function to suit the foods being
processed.
Use the SMOOTHIE function to blend
fruits, ice cream and yogurts into thick
smoothies, whips and milkshakes.
Use the PULSE function for foods that
only require short bursts of power, such as
chopping nuts and crushing ice.
When blending drinks with ice cubes or
frozen fruit, use the ICE CRUSH function.
Thicker mixtures puree more efficiently if
the jug is ¼ to ½ full.
Don’ts
Do not use metal utensils, as they may
damage the blades or blender jug.
Do not blend a heavy mixture for more
than 10 seconds. For normal blending tasks,
do not blend longer than 1 minute at a time.
If you need to blend longer, turn off the
blender and stir ingredients before starting
again. This rest will help protect the motor
from wear and tear.
The blender will not knead dough, or
mash potatoes.
When blending warm ingredients, do not
put more than 2 cups at a time in. Once
blending has started, you can add another
cup slowly by removing the inner lid and
pouring through the hole.
Do not blend hot or boiling ingredients.
Allow food to cool down to a warm state
before placing in the blender. This is to
safeguard against sudden bursts of steam
that are caused by blending hot ingredients,
and it also protects the jug from possible
damage.

12
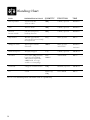
Blending Chart
FOOD PREPARATION & USAGE
QUANTITY FUNCTIONS TIME
Raw vegetables Peel and cut into
1.5–2cm cubes.
200g CHOP | Speed 2 10–30 sec
Nuts Remove shells. 200g CHOP | Speed 2 10–30 sec
Bread or
biscuit crumbs
Cut into 2cm pieces,
break up biscuits.
100g CHOP | Speed 2 10–30 sec
Mayonnaise Mix the egg yolk and
vinegar, then add oil slowly
through the lid
125g MIX | Speed 1 60 sec
Whipped cream Add sugar or vanilla
if desired.
300ml MIX | Speed 1
and PULSE
10–20 sec
3–6 times
Herbs and spices Roughly chopped 1 cup CHOP | Speed 2 20–30 sec
Smoothie 4 ice cubes (70g), 2 frozen
bananas halves (150g) ,
120g frozen raspberries,
300ml milk, 2 scoops
vanilla ice cream (85g)
Max
1100ml
SMOOTHIE 60 sec
Fresh fruit Chopped or whole berries 250g BLEND | Speed 3 20–30 sec
Ice Crush Max 1 tray/
250g
ICE CRUSH 60 sec
NOTE: This blending chart should be used as a guide only.

13
Troubleshooting
PROBLEM EASY SOLUTION
Motor doesn’t start or
blade doesn’t rotate
•
Check the blender jug and lid are securely in place.
•
Check the ON | OFF button and selected function button is illuminated.
•
Check that the power plug is properly inserted into the power outlet.
Food is unevenly
chopped
•
This can happen when too much food is being blended at one time.
Try a smaller amount, and work in batches if necessary.
•
The ingredients may be too large. Try cutting into smaller pieces. For best
results, ingredients should be in pieces no larger than 2cm.
Food is chopped too fine
or is watery
•
Try blending for shorter period of time. Use the PULSE function for
better control.
Food sticks to blade
and jug
•
The mixture may be too thick. Try adding more liquid and/or using a slower
speed for blending.
Blender overloaded
(all lights flashing)
•
This blender has overload protection to prevent damage to the motor.
OVERLOAD PROTECTION will flash on the LCD. Unplug and allow the
blender to cool down for 30 minutes. Once cooled, you will be able to use the
blender as usual again.
•
We recommend blending in smaller batches, or cutting ingredients into
smaller batches.

14
Care & Cleaning
Jug and lid
In order to keep your Jug clean and avoid food
drying on the blades and jug, follow the below
steps as soon as possible after use
• Rinse most of the ingredients off the jug
and lid.
• Add 500ml of warm water and press the
AUTO CLEAN button. If thick or sticky
ingredients require extra cleaning power add
a few drops of dish liquid detergent.
• Rinse the jug and lid again and/or wash
separately in warm soapy water with a soft
cloth or bottle brush.
• It is most effective to clean the jug
immediately after use.
WARNING
Oils in citrus rind can damage the material
of your jug if being exposed to it for a longer
period. Always clean your blender jug
immediately after processing citrus rind.
Motor base
To clean the motor base, wipe with a soft, damp
cloth then dry thoroughly. Wipe any excess
food particles from the power cord.
Cleaning agents
Do not use abrasive scouring pads or cleaners
on either the motor base or the jug, as they may
scratch the surface. Use only warm soapy water
with a soft cloth.
Dishwasher
The blender jug and lid can be washed in the
dishwasher on a standard wash cycle. The jug
can be placed on the bottom shelf, however the
lid and inner measuring cap should be washed
on the top shelf only. Be aware that washing
parts on a regular base in the dishwasher can
shorten the life of them due to prolonged
exposure to harsh detergents, hot water and
pressure.
Stubborn food stains and odours
Strong smelling foods such as garlic, fish and
some vegetables such as carrots may leave an
odour or stain on the blender jug and lid. To
remove, soak blender jug and lid for 5 minutes
in warm soapy water. Then wash with a mild
detergent and warm water, rinse well and dry
thoroughly. Store jug with the lid off.
Storage
Store your blender upright with the blender
jug assembled on the motor base, or beside it.
Do not place anything on top. To allow air to
circulate, keep the lid off.

15

Web: www.breville.co.nzWeb: www.breville.com.au
Breville is a registered trademark of Breville Pty. Ltd. A.B.N. 98 000 092 928.
Copyright Breville Pty. Ltd. 2018.
Due to continued product improvement, the products illustrated/photographed
in this brochure may vary slightly from the actual product.
BBL620 ANZ – B18
Australian Customers
Mail: Locked Bag 2000
Botany NSW 1455
AUSTRALIA
Phone: 1300 139 798
Fax: (02) 9700 1342
Email:
Customer Service:
as[email protected]om.au
New Zealand Customers
Mail: Private Bag 94411
Botany Manukau 2163
Auckland NEW ZEALAND
Phone:
0800 273 845
Fax: 0800 288 513
Email:
Customer Service:
as[email protected]o.nz
Breville Customer Service Centre
-
 1
1
-
 2
2
-
 3
3
-
 4
4
-
 5
5
-
 6
6
-
 7
7
-
 8
8
-
 9
9
-
 10
10
-
 11
11
-
 12
12
-
 13
13
-
 14
14
-
 15
15
-
 16
16


Ask a question and I''ll find the answer in the document
Finding information in a document is now easier with AI
Related papers
-
Breville the Hemisphere Control User manual
-
-
-
-
-
-
Breville BBL800 User manual
-
-
-