Page is loading ...

INSTALLATION:
Caution: Be sure to turn o hot and cold water supplies
before installing or servicing faucet.
1. Push valve bodies through holes in sink from underneath. Make
sure ange nuts and mounting washers are on underside of sink.
Valve with red striped hose (hot) is on the le and blue (cold) is on
the right. Put gasket (LN-129) over valve body. read escutcheon
(LN-128) onto valve body. e top of the valve spindle should
measure 1-7/8” from mounting surface (See rough in drawing).
2. read collar (LN-112 or LN-111) on to valve body until it reaches the
escutcheon (LN-128).
3. Standard or LWG handle installation: Place bushing (LN-115) on
valve spindle. Turn valves to o position (CR style: turn clockwise;
LWG, LCF, LPO, LAM, and standard style: turn hot clockwise,
turn cold counterclockwise). Place handle (LN-131) on bushing.
read screw (LN-146 or LN-121) into valve and push plug button
(T-33R and T-33B) into top of handle. CR, LCF, LPO and LAM
handle installation: Place handle on valve spindle and thread screw
(LN-121 or LN-134) into valve.
4. Tighten ange nuts and mounting washers from underneath sink and
secure with mounting screws if necessary.
5. Swivel spout option: Place spout assembly (LN-200) in centerbody
(LN-197). read nut (LN-199) onto centerbody (LN-197).
Rigid spout option: read screw (LN-205) into the bottom of the
spout assembly (LN-200). Place spout assembly (LN-200) in center
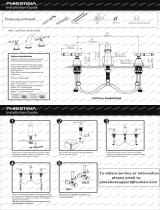
7/8" (22mm) min
1-3/8" (35mm) max
hole size
1-1/16" (27mm) min
1-7/16" (37mm) max
hole size
Escutcheon
S-254-CR handle
S-254
standard
handle shown
S-254-LAM
S-254-LPO
S-254-LCF
S-254-LTM
2-7/16
(61 mm)
Dimensions Origins, S-254, S-254-CR, S-254-LAM, S-254-LPO, S-254-LCF, S-254-LTM
Note: Dimensions subject to
change without notice.
body (LN-197). read nut (LN-199) onto center body (LN-197).
6. Drop assembled center body and spout through center hole of deck.
Secure assembly to sink using nut (SPF-108) and washer (LN-138).
7. read tee (LN-189) onto the end of the center body (LN-197).
read ex hose adapters into tee using pipe sealant on the threads.
Attach ex hoses to ex hose adapters.
8. Connect hot supply to le tube and cold supply to right tube using
appropriate connectors.
9. It is very important to thoroughly ush the supply lines to prevent
foreign matter, i.e. copper chips, sand, stones, etc. from damaging
the sealing surfaces of cartridge. Remove aerator and open hot and
cold to full open then open both supplies. Let water run through
hot and cold long enough to ush supply lines thoroughly. Shut o
faucet and replace aerator. Check for leaks.
Cartridge Replacement (KN-113 or KN-114):
1. Remove plug button (T-33, T-33R or T-33B), loosen Philip head
screw (LN-121) and remove handle, (LN-131 or LN 152).
2. Remove collars (LN-112) by turning counter clockwise, do not use
wrench as this may damage the surface nish.
3. Place wrench on cartridge hex nut (KN-113, KN-114). Turn
wrench counter clockwise until cartridge is removed.
4. Install new cartridge. Turn cartridge with wrench until cartridge
does not turn easily then turn 1/4 to 1/2 turn further. Reassemble
handle in reverse fashion.
Lavatory Faucet S-254 Series
Installation and Service Instructions
Origins
®
For California Residents
WARNING: This product contains chemicals known to the State of California to cause cancer, birth defects, or other reproductive harm.

DF-30 Finial, lever, handle (2)
KN-113 Valve cartridge, cold
KN-114 Valve cartridge, hot
KN-120 O-ring (2)
L-5 Aerator
L-5VP Aerator (vandal-resistant)
LN-111 Lock ring (2)
LN-112 Collar (lever handle) (2)
LN-115 Bushing (2)
LN-121 Philips pan head screw (2)
LN-128 Escutcheon, valve (2)
LN-129 Gasket, escutcheon (2)
LN-131 ADA handle (2)
LN-133A Temperature indicator (red)
LN-133B Temperature indicator (blue)
LN-134 Oval Philips head screw (2)
LN-138 Washer
LN-140 Lever handle (2)
LN-149 Clear, Lever, Handle (2)
LN-150 O-ring
LN-152 Lever, Handle (2)
LN-153A White, Lever, Handle (2)
LN-153B Chrome, Lever, Handle (2)
LN-177 Cross handle (2)
LN-189 Tee
LN-197 Center body
LN-199 Nut
LN-200 Spout
LN-205 Anti-rotation pin
LN-218 O-ring
P-26 Grid drain assembly (complete)
SPF-108 Nut, Hex
T-33B Plug Button, Blue
T-33R Plug Button, Hot
P-26
KN-114
LN-200
LN-199
LN-218
KN-120
LN-197
L-5
L-5VP
LN-150
LN-138
SPF-108
LN-134
T-33
T-33B, T-33R
LN-121
LN-131
LN-111
LN-115
LN-112
LN-152
LN-128
LN-129
KN-113
LN-189
Handle option: LPO, LAM, LCF
Handle option: LWG
T-33
T-33B, T-33R
LN-121
DF-30
LN-133A, LN-133B
LN-153A, LN-153B
LN-149
LN-112
LN-177
LN-128
Handle option: CR
LN-205
T-33
T-33B
T-33R
LN-121
LN-140
LN-111
LN-115
LN-128
LN-129
Mounting washer
Flange nut
Mounting screws
Valve body
Flex hose adapter
Flex hose
KN-114
Cartridge used for both
hot and cold handles
NOTE: Two LN-142 Valve bodies are
used in conjunction with this handle.
Part Number
Standard Vandal Resistant
Aerator with removal tool
Removal tool part number, LL-60K
Aerator
(ow regulator)
Ordering replacement parts:
Call Symmons customer service at (800) 796-6667,
M-F 7:30 am - 7:00 pm EST or check our website
at www.symmons.com for a list of Symmons
distributors.
2.2 gpm (8.3L/min) SWA-17FR SWA-17VP
1.5 gpm (5.7L/min) FLR-111-1.5 ----
1.0 gpm (3.8L/min) FLR-111-1.0 ----
.5 gpm (1.9L/min) ---- LL-60B
Parts Assembly Origins Widespread Lavatory Faucet, S-254 Series
(red stripe on hot hose)
(blue stripe on cold hose)
Symmons Industries, Inc. ■ 31 Brooks Drive ■ Braintree, MA 02184
Phone: (800) 796-6667
■ Fax: (800) 961-9621
Website: symmons.com
■ Email: [email protected]
Copyright © 2017 Symmons Industries, Inc.
■ ZV-418 REV D ■ 020217
/