Page is loading ...

I
I
N
N
S
S
T
T
R
R
U
U
C
C
T
T
I
I
O
O
N
N
M
M
A
A
N
N
U
U
A
A
L
L

2
INTRODUCTION...........................................................................................................................................................................................4
W
W
A
A
R
R
N
N
I
I
N
N
G
G
......................................................................................................................................................................................................4
ASSEMBLY.....................................................................................................................................................................................................6
ASSEMBLING THE CPC..................................................................................................................................................................................6
Setting up the Tripod...............................................................................................................................................................................6
Adjusting the Tripod Height ....................................................................................................................................................................7
Attaching the CPC to the Tripod .............................................................................................................................................................7
Adjusting the Clutches.............................................................................................................................................................................8
The Star Diagonal ...................................................................................................................................................................................8
The Eyepiece............................................................................................................................................................................................9
The Finderscope......................................................................................................................................................................................9
Finderscope Installation.............................................................................................................................................................................................. 9
Aligning the Finderscope.......................................................................................................................................................................................... 10
Attaching the hand Control....................................................................................................................................................................................... 10
Powering the CPC.................................................................................................................................................................................................... 11
HAND CONTROL........................................................................................................................................................................................12
Hand Control Operation .......................................................................................................................................................................13
Alignment Procedures ...........................................................................................................................................................................13
Sky Align ................................................................................................................................................................................................................. 13
Auto Two-Star Align................................................................................................................................................................................................ 15
Two Star Alignment................................................................................................................................................................................................. 15
One-Star Align ......................................................................................................................................................................................................... 16
Solar System Align................................................................................................................................................................................................... 16
EQ North / EQ South Alignment.............................................................................................................................................................................. 17
CPC Re-Alignment................................................................................................................................................................................................... 18
Selecting an Object................................................................................................................................................................................18
Slewing to an Object..............................................................................................................................................................................19
Finding Planets .....................................................................................................................................................................................19
Tour Mode.............................................................................................................................................................................................19
Constellation Tour.................................................................................................................................................................................19
Direction Buttons...................................................................................................................................................................................19
Rate Button............................................................................................................................................................................................20
Setup Procedures...................................................................................................................................................................................20
Tracking Mode.........................................................................................................................................................................................................20
Tracking Rate........................................................................................................................................................................................................... 20
View Time-Site........................................................................................................................................................................................................ 21
User Defined Objects ............................................................................................................................................................................................... 21
Get RA/DEC ............................................................................................................................................................................................................ 21
Goto R.A/Dec........................................................................................................................................................................................................... 21
Identify..................................................................................................................................................................................................................... 21
Precise GoTo............................................................................................................................................................................................................ 22
Scope Setup Features ............................................................................................................................................................................22
Steup Time-Site........................................................................................................................................................................................................ 22
Anti-backlash ........................................................................................................................................................................................................... 22
Slew Limits .............................................................................................................................................................................................................. 23
Filter Limits.............................................................................................................................................................................................................. 23
Direction Buttons ..................................................................................................................................................................................................... 23
Goto Approach.........................................................................................................................................................................................................23
Autoguide Rates.......................................................................................................................................................................................................23
Cordwrap.................................................................................................................................................................................................................. 23
Utility Features......................................................................................................................................................................................23
GPS On/Off.............................................................................................................................................................................................................. 23
Light Control............................................................................................................................................................................................................ 23
Factory Settings........................................................................................................................................................................................................ 24
Version..................................................................................................................................................................................................................... 24
Get Alt-Az................................................................................................................................................................................................................ 24
Goto Alt-Az.............................................................................................................................................................................................................. 24
Hibernate.................................................................................................................................................................................................................. 24
Sun Menu................................................................................................................................................................................................................. 24
Scrolling Menu.........................................................................................................................................................................................................24
Calibrate GOTO.......................................................................................................................................................................................................24
Set Mount Position................................................................................................................................................................................................... 24
Periodic Error Correction ......................................................................................................................................................................................... 24
TELESCOPE BASICS .................................................................................................................................................................................26
Image Orientation .................................................................................................................................................................................26

Focusing................................................................................................................................................................................................26
Calculating Magnification.....................................................................................................................................................................27
Determining Field of View ....................................................................................................................................................................27
General Observing Hints.......................................................................................................................................................................27
ASTRONOMY BASICS...............................................................................................................................................................................28
The Celestial Coordinate System...........................................................................................................................................................28
Motion of the Stars ................................................................................................................................................................................29
Polar Alignment (with optional Wedge)................................................................................................................................................30
All-Star Polar Alignment.......................................................................................................................................................................30
All-Star Polar Alignment.......................................................................................................................................................................................... 30
Finding the North Celestial Pole...........................................................................................................................................................31
Declination Drift Method of Polar Alignment.......................................................................................................................................................... 32
CELESTIAL OBSERVING.........................................................................................................................................................................33
Observing the Moon..............................................................................................................................................................................33
Lunar Observing Hints............................................................................................................................................................................................. 33
Observing the Planets............................................................................................................................................................................33
Planetary Observing Hints........................................................................................................................................................................................ 33
Observing the Sun..................................................................................................................................................................................34
Solar Observing Hints.............................................................................................................................................................................................. 34
Observing Deep Sky Objects .................................................................................................................................................................34
Seeing Conditions..................................................................................................................................................................................34
Transparency.........................................................................................................................................................................................34
Sky Illumination.....................................................................................................................................................................................34
Seeing....................................................................................................................................................................................................34
CELESTIAL PHOTOGRAPHY .................................................................................................................................................................36
Short Exposure Prime Focus Photography ...........................................................................................................................................36
Eyepiece Projection...............................................................................................................................................................................37
Long Exposure Prime Focus Photography............................................................................................................................................38
Periodic Error Correction (PEC)..........................................................................................................................................................39
Using Periodic Error Correction...............................................................................................................................................................................39
Terrestrial Photography........................................................................................................................................................................40
Metering................................................................................................................................................................................................................... 40
Reducing Vibration .................................................................................................................................................................................................. 40
F/6.3 with Reducer/Corrector................................................................................................................................................................................... 41
Auto Guiding............................................................................................................................................................................................................ 41
TELESCOPE MAINTENANCE .................................................................................................................................................................42
Care and Cleaning of the Optics ...........................................................................................................................................................42
Collimation............................................................................................................................................................................................42
OPTIONAL ACCESSORIES.....................................................................................................................................................................44
APPENDIX A - TECHNICAL SPECIFICATIONS ..................................................................................................................................46
APPENDIX B - GLOSSARY OF TERMS..................................................................................................................................................47
APPENDIX C – RS-232 CONNECTION (FOR COMPUTERIZED HAND CONTROL).....................................................................50
Communication Protocol:......................................................................................................................................................................................... 50
APPENDIX F – TIME ZONE MAP............................................................................................................................................................51
APPENDIX F – MAPS OF TIME ZONES.................................................................................................................................................51
SKY MAPS....................................................................................................................................................................................................53
OBSERVATIONAL DATA SHEET ...........................................................................................................................................................59

Congratulations on your purchase of the Celestron CPC telescope! The CPC GPS ushers in the next generation of computer automated
telescopes. The CPC series uses GPS (Global Positioning System) technology to take the guesswork and effort out of aligning and finding
celestial objects in the sky. Simple and easy to use, the CPC with its on-board GPS, is up and running after locating just three celestial
objects. It’s so advanced that once you turn it on, the integrated GPS automatically pinpoints your exact coordinates. No need to enter the
date, time, longitude and latitude or even know the name of a single star in the sky.
If you are new to astronomy, you may wish to start off by using the CPC's built-in Sky Tour feature, which commands the CPC to find the
most interesting objects in the sky and automatically slews to each one. Or if you are more experienced, you will appreciate the
comprehensive database of over 40,000 objects, including customized lists of all the best deep-sky objects, planets and bright double stars.
No matter at what level you are starting out, the CPC will unfold for you and your friends all the wonders of the Universe.
Some of the many standard features of the CPC include:
• Integrated Global Positioning System for easy alignment.
• Fully enclosed optical encoders for position location.
• Ergonomically designed hand controller – built into the side of the fork arm.
• Database filter limits for creating custom object lists.
• Storage for programmable user defined objects; and
Many other high performance features!
The CPC’s deluxe features combined with Celestron’s legendary Schmidt-Cassegrain optical systems give amateur astronomers the most
sophisticated and easy to use telescopes available on the market today.
Take time to read through this manual before embarking on your journey through the Universe. It may take a few observing sessions to
become familiar with your CPC, so you should keep this manual handy until you have fully mastered your telescope’s operation. The CPC
hand control has built-in instructions to guide you through all the alignment procedures needed to have the telescope up and running in
minutes. Use this manual in conjunction with the on-screen instructions provided by the hand control. The manual gives detailed
information regarding each step as well as needed reference material and helpful hints guaranteed to make your observing experience as
simple and pleasurable as possible.
Your
CPC telescope is designed to give you years of fun and rewarding observations. However, there are a few things to consider before
using your telescope that will ensure your safety and protect your equipment.
W
W
a
a
r
r
n
n
i
i
n
n
g
g
Never look directly at the sun with the naked eye or with a telescope (unless you have the proper solar
filter). Permanent and irreversible eye damage may result.
Never use your telescope to project an image of the sun onto any surface. Internal heat build-up can damage the telescope and any
accessories attached to it.
Never use an eyepiece solar filter or a Herschel wedge. Internal heat build-up inside the telescope can cause these devices to crack or
break, allowing unfiltered sunlight to pass through to the eye.
Never leave the telescope unsupervised, either when children are present or adults who may not be familiar with the correct operating
procedures of your telescope
.

5
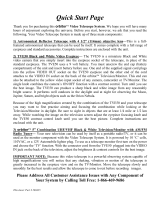
1 Control Panel (see below) 8 Optical Tube
2 Focus Knob 9 Schmidt Corrector Lens
3 Star Diagonal 10 Fork Arm
4 Hand Control 11 Carrying Handle
5 Eyepiece 12 Right Ascension Locking Knob
6 Finderscope 13 Tripod
7 Finderscope Quick Release Bracket 14 Accessory Tray / Center Support Bracket
A Hand Control Port D Auto Guider Port
B Auxiliary Port s E On/Off Switch
C PC Interface Port F 12v Input Jack
7
6
4
2
1
11
12
9
3
8
13
14
5
10
A
B
C
D
E
F
Figure 2
–
The CPC Series

6
The CPC telescope comes completely pre-assembled and can be operational in a matter of minutes. The CPC and its accessories are
conveniently packaged in one reusable shipping carton while the tripod comes in its own box. Included with your telescope are the
following:
40mm Eyepiece – 1¼"
1¼" Star Diagonal
50mm Finderscope and Quick Release Mounting Bracket
1¼" Visual Back
Car Battery Adapter
Heavy Duty Tripod
NexRemote Telescope Control Software w/ RS-232 cable
Assembling the CPC
Start by removing the telescope and tripod from their shipping cartons and set the telescopes round base on a sturdy flat surface. Always
carry the telescope by holding it from the lower portion of the fork arm on the hand control side and from the handle on the opposite
side. Remove all of the accessories from their individual boxes. Remember to save all of the containers so that they can be used to
transport the telescope. Before attaching the visual accessories, the telescope should be mounted on the tripod and the tube should be
positioned horizontal to the ground.
S
S
e
e
t
t
t
t
i
i
n
n
g
g
u
u
p
p
t
t
h
h
e
e
T
T
r
r
i
i
p
p
o
o
d
d
For maximum rigidity, the Celestron heavy duty tripod has a leg support bracket/accessory tray. This bracket fits snugly against the
tripod legs, increasing stability while reducing vibration and flexure. However, the tripod must be shipped with the leg support bracket
detached so the tripod legs can collapse. To set up the tripod:
1. Hold the tripod with the head up and the legs pointed toward the ground.
2. Pull the legs away from the central column until they will not separate any further. The top of each tripod leg presses against the
tripod head to indicate maximum separation.
3. Remove the tension knob, located on the central column. See figure 3-1.
4. Place the leg support bracket over the central rod so that the cups on the end of each bracket are directly underneath each leg.
5. Rotate the tension knob until the bracket is secure against the tripod legs. Do not over tighten.
The tripod will now stand by itself. Once the telescope is attached to the tripod, readjust the tension knob to ensure that the leg support
bracket is snug. Once again, do not over tighten!

7
A
A
d
d
j
j
u
u
s
s
t
t
i
i
n
n
g
g
t
t
h
h
e
e
T
T
r
r
i
i
p
p
o
o
d
d
H
H
e
e
i
i
g
g
h
h
t
t
The tripod that comes with your CPC telescope is adjustable. To adjust the height at which the tripod stands:
1. Loosen the extension clamp on one of the tripod legs (see figure 3-1).
2. Extend the leg to the desired height.
3. Tighten the extension clamp to hold the leg in place.
4. Repeat this process for each of the remaining legs making sure that the tripod is level when complete.
You can do this while the tripod legs are still folded together.
Remember that the higher the tripod legs are extended, the less stable it is. For casual observing, this may not pose a problem.
However, if you plan on doing photography, the tripod should be set low to ensure stability. A recommended height is to set the tripod
in such a manner that you can look directly into the eyepiece on
the telescope with a diagonal while seated.
A
A
t
t
t
t
a
a
c
c
h
h
i
i
n
n
g
g
t
t
h
h
e
e
C
C
P
P
C
C
t
t
o
o
t
t
h
h
e
e
T
T
r
r
i
i
p
p
o
o
d
d
After the tripod is set up, you are now ready to attach the
telescope. The bottom of the CPC base has three threaded holes
that mount to the tripod head and one hole in the center that goes
over the positioning pin on the tripod head.
1. Place the center hole in the bottom of the telescope base over the
positioning pin in the center of the tripod head.
Figure 3
-
1
Central Column
Tripod Head
Tension Knob
Extension Leg
Clamp
Center Support
Bracket /
Accessory tray
Figure 3
-
1
Figure 3-2 Mounting the Telescope
Positioning
Pin
Mounting
Bolts

8
2. Rotate the telescope base on the tripod head until the three feet on the bottom of the base fall into the feet recesses on the top of the
tripod head.
3. Thread the three attached mounting bolts from underneath the tripod head into the bottom of the telescope base. Tighten all three bolts.
You are now ready to attach the visual accessories onto the telescope optical tube.
A
A
d
d
j
j
u
u
s
s
t
t
i
i
n
n
g
g
t
t
h
h
e
e
C
C
l
l
u
u
t
t
c
c
h
h
e
e
s
s
The CPC has a dual axis clutch system. This allows you to move the telescope manually even when the telescope is not powered on.
However, both clutches need to be tightened down for the telescope to be aligned for "goto" use.
Any manual movement of the
telescope will invalidate your telescope's alignment.
Before attaching your visual accessories, first loosen the altitude locking knob while holding the telescope tube by the rear cell handle.
Rotate the tube upwards until it is level with the ground and tighten the locking knob.
Note: When transporting your telescope, make sure that both clutches are somewhat loose; this will diminish the load placed on
the worm gear assemblies and protect them from damage.
T
T
h
h
e
e
S
S
t
t
a
a
r
r
D
D
i
i
a
a
g
g
o
o
n
n
a
a
l
l
The star diagonal diverts the light at a right angle from the light path of the telescope. For astronomical observing, this allows you to
observe in positions that are more comfortable than if you were to look straight through. To attach the star diagonal:
1. Turn the thumbscrew on the visual back until its tip no longer
extends into (i.e., obstructs) the inner diameter of the visual back.
2. Slide the chrome portion of the star diagonal into the visual back.
3. Tighten the thumbscrew on the visual back to hold the star
diagonal in place.
If you wish to change the orientation of the star diagonal, loosen
the thumbscrew on the visual back until the star diagonal rotates
freely. Rotate the diagonal to the desired position and tighten the
thumbscrew.
Eyepiece
Figure 3-4 - The CPC has an altitude locking knobs (right) located on the fork arm and an azimuth
locking knob (left) located on the top of the base.
Altitude
Locking
Knob
Azimuth
Locking Knob
Figure 3-5 - The Visual Accessories
Eyepiece
Star
Diagonal
Visual Back
Finderscope
Mounting
Bracket

9
T
T
h
h
e
e
E
E
y
y
e
e
p
p
i
i
e
e
c
c
e
e
The eyepiece, is the optical element that magnifies the image focused by the telescope. The eyepiece fits into either the visual back
directly or the star diagonal. To install the eyepiece:
1. Loosen the thumbscrew on the star diagonal so it does not obstruct the inner diameter of the eyepiece end of the diagonal.
2. Slide the chrome portion of the eyepiece into the star diagonal.
3. Tighten the thumbscrew to hold the eyepiece in place.
To remove the eyepiece, loosen the thumbscrew on the star diagonal and slide the eyepiece out.
Eyepieces are commonly referred to by focal length and barrel diameter. The focal length of each eyepiece is printed on the eyepiece
barrel. The longer the focal length (i.e., the larger the number) the lower the eyepiece power or magnification; and the shorter the focal
length (i.e., the smaller the number) the higher the magnification. Generally, you will use low-to-moderate power when viewing. For
more information on how to determine power, see the section on “Calculating Magnification.”
Barrel diameter is the diameter of the barrel that slides into the star diagonal or visual back. The CPC uses eyepieces with a standard 1-
1/4" barrel diameter.
T
T
h
h
e
e
F
F
i
i
n
n
d
d
e
e
r
r
s
s
c
c
o
o
p
p
e
e
The CPC telescope comes with an 8x50 finderscope. The specifications for a finderscope stand for the magnification and the aperture, in
millimeters, of the scope. So, an 8x50 finder magnifies objects eight times and has a 50mm objective lens.
Finderscope Installation
The finderscope must first be mounted in the included quick-release bracket then attached to the rear cell of the telescope. To install the
finderscope:
1. Locate the finderscope mounting bracket attached to the bottom portion of the finder bracket. Loosen the two thumb screws to
slide the mounting bracket from the finderscope bracket.
2. Find the two holes in the rear cell of the telescope on the top left, when looking from the back of the tube.
3. Place the mounting bracket over the two holes of the rear cell as shown in the figure 3-7.
4. Insert the screws through the bracket and into the rear cell.
WARNING: If you remove the mounting bracket, do not completely thread the screws back into the rear cell of the telescope. The
screws may be long enough to obstruct the movement of, and possibly damage the primary mirror.
Figure 3-7
The finderscope bracket comes in two pieces; the mounting bracket (left) and the finder bracket (right)
Figure 3
-
6

10
With the bracket firmly attached to the telescope, you are ready to attach the finder to the bracket.
1. Slide the O-Ring over the back of the finderscope and position it on
the tube toward the objective end of the finderscope.
2. Slide the eyepiece end of the finderscope into the front ring of the
bracket (the front ring is the one without the adjustment screws),
then through the back ring. It may be necessary to push down the
spring loaded pivot screw so that the finder will pass through the
back ring (see figure 3-8)
3. Push the finder back until the O-Ring is snug inside the front ring of
the finder bracket.
4. Hand tighten the two adjustment thumb screws until they make
contact with the findersocpe.
Aligning the Finderscope
The finderscope is adjusted using two adjustment screws, located on the top and on the right (when looking though the finder) of the
finder bracket and a spring loaded pivot screw (located on the left side of the bracket). This allows you to turn the top adjustment screw
to move the finderscope up and down, and turn the right adjustment screw to move the finderscope right to left. The spring loaded pivot
screw puts constant pressure on the finder so that the adjustment screws are always making contact with the finder.
To make the alignment process a little easier, you should perform this task in the daytime when it is easier to locate objects in the
telescope without the finder. To align the finder:
1. Choose a conspicuous object that is in excess of one mile away. This will eliminate any possible parallax effect between the telescope
and the finder.
2. Point your telescope at the object you selected and center it in the main optics of the telescope.
3. Lock the azimuth and altitude clamps to hold the telescope in place.
4. Check the finder to see where the object is located in the field of view.
5. Adjust the thumb screws on the finder bracket, until the cross hairs are centered on the target.
Remember that the image orientation through the finder is inverted (i.e., upside down and reversed from left-to-right). Because of this, it
may take a few minutes to familiarize yourself with the directional change each screw has on the finder
Attaching the hand Control
In order to protect your CPC telescope during shipping, the hand control unit has
been packaged along with the other telescope accessories and will need to be
plugged in to the drive base of your telescope. The hand control cable has a phone
jack style connector that will plug into the designated jack outlet located on the top
of the drive base (see figure 3-10). Your telescope also comes with a hand control
holder that must be attached to the fork arm. To connect the hand control to the
fork arm:
• Locate the hand control holder and slide it down into the slot located on the
fork arm (see figure 3-9)
• Push the connector into the jack until it clicks into place.
The hand control can now rest in the holder on the fork arm of the telescope.
Alignment Screws
Pivot
Screw
Quick release
Screws
Figure 3-8

11
Powering the CPC
The CPC can be powered by the supplied 12v car battery adapter or optional power supply (see Optional Accessories section in the
back of this manual).
1. To power the CPC with the car battery adapter, simply plug the round post into the designated 12v power outlet located on the
drive base.
2. Turn on the power to the CPC by flipping the switch, located next to the 12v outlet, to the "On" position.

12
The CPC is controlled by Celestron’s NexStar hand controller designed to give you instant access to all the functions the CPC has to
offer. With automatic slewing to over 40,000 objects, and common sense menu descriptions, even a beginner can master its variety of
features in just a few observing sessions. Below is a brief description of the individual components of the CPC’s NexStar hand
controller:
1.
Liquid Crystal Display (LCD) Window: Has a dual-line, 16 character display screen that is backlit for comfortable viewing of
telescope information and scrolling text.
2.
Align: Instructs the CPC to use a selected star or object as an alignment position.
3. Direction Keys: Allows complete control of the CPC in any direction. Use the direction keys to move the telescope to the initial
alignment stars or for centering objects in the eyepiece.
4.
Catalog Keys: The NexStar hand control has keys to allow direct access to each of the catalogs in its database. The hand control
contains the following catalogs in its database:
Messier– Complete list of all Messier objects.
NGC – Complete list of all the deep-sky objects in the Revised New General Catalog.
Caldwell – A combination of the best NGC and IC objects.
Planets - All 8 planets in our Solar System plus the Moon and the Sun.
Stars – A compiled list of the brightest stars from the SAO catalog.
6
11
9
1
2
3
4
5
7
8
12
10
Figure 4-1
The NexStar Hand Control

13
List – For quick access, all of the best and most popular objects in the NexStar database have been broken down into lists based on their
type and/or common name:
Named Stars
Common name listing of the brightest stars in the sky.
Named Objects
Alphabetical listing of over 50 of the most popular deep
sky objects.
Double Stars
Numeric-alphabetical listing of the most visually stunning
double, triple and quadruple stars in the sky.
Variable Stars
Select list of the brightest variable stars with the shortest
period of changing magnitude.
Asterisms
A unique list of some of the most recognizable star
patterns in the sky.
CCD Objects
A custom list of many interesting galaxy pairs, trios and
clusters that are well suited for CCD imaging with the
CPC telescope.
IC Objects
A complete list of all the Index Catalog deep-sky objects.
Abell Objects
A complete list of all the Abell Catalog deep-sky objects.
5.
Info: Displays coordinates and useful information about objects selected from the NexStar database.
6. Tour: Activates the tour mode, which seeks out all the best objects for the current date and time, and automatically slews the
CPC to those objects.
7.
Enter: Pressing Enter allows you to select any of the CPC functions and accept entered parameters.
8.
Undo: Undo will take you out of the current menu and display the previous level of the menu path. Press Undo repeatedly to get
back to a main menu or use it to erase data entered by mistake.
9.
Menu: Displays the many setup and utilities functions such as tracking rate and user defined objects and many others.
10.
Scroll Keys: Used to scroll up and down within any of the menu lists. A double-arrow will appear on the right side of the LCD
when there are sub-menus below the displayed menu. Using these keys will scroll through those sub-menus.
11. Rate: Instantly changes the rate of speed of the motors when the direction buttons are pressed.
12.
RS-232 Jack: Allows you to interface with a computer and control the CPC remotely.
H
H
a
a
n
n
d
d
C
C
o
o
n
n
t
t
r
r
o
o
l
l
O
O
p
p
e
e
r
r
a
a
t
t
i
i
o
o
n
n
This section describes the basic hand control procedures needed to operate the CPC. These procedures are grouped into three categories:
Alignment, Setup and Utilities. The alignment section deals with the initial telescope alignment as well as finding objects in the sky; the
setup section discusses changing parameters such as tracking mode, tracking rate and setting filter and slew limits; finally, the last
section reviews all of the utilities functions such as PEC, polar alignment and hibernating the telescope.
A
A
l
l
i
i
g
g
n
n
m
m
e
e
n
n
t
t
P
P
r
r
o
o
c
c
e
e
d
d
u
u
r
r
e
e
s
s
In order for the CPC to accurately point to objects in the sky, it must first be aligned to known positions (stars) in the sky. With this
information, the telescope can create a model of the sky, which it uses to locate any object with known coordinates. There are many
ways to align the CPC with the sky depending on what information the user is able to provide:
SkyAlign use the internal GPS receiver to
acquire all the necessary time/site information needed for the CPC to create an accurate model of the sky. Then the user can simply point
the telescope to any three bright celestial objects to accurately align the telescope with the sky.
Auto Two-Star Align will ask the user
to choose and center the first alignment star, then the CPC will automatically select and slew to a second star for alignment. Two-Star
Alignment
requires the user to identify and manually slew the telescope to the two alignment stars. One-Star Align is the same as Two-
Star Align however only requires you to align to one known star. Although not as accurate as the other alignment methods, One-Star
Align is the quickest way to find and track bright planets and objects in Altazimuth mode.
Solar System Align will display a list of
visible daytime objects (planets and the moon) available to align the telescope. Finally, EQ North and EQ South alignments are
designed to assist you in aligning the CPC when polar aligned using an equatorial wedge. Each alignment method is discussed in detail
below.
"Altazimuth" or "Alt-Az" refers to a type of mounting that allows a telescope to move in both altitude (up and down) and
azimuth (left and right) with respect to the ground. This is the simplest form of mounting in which the telescope is attached
directly to a tripod without the use of an equatorial wedge.
Sky Align
Sky Align must be used with the telescope mounted in altazimuth. With Sky Align, the GPS receiver links with and acquires information
from 3 of the orbiting GPS satellites. With this information, the built-in GPS system calculates the scope’s location on Earth with an
accuracy of a few meters and calculates universal time down to the second. After quickly making all these calculations and automatically
entering the information for you, the user simply needs to aim the telescope to any three bright celestial objects in the sky. Since Sky
Definition

14
Align requires no knowledge of the night sky it is not necessary to know the name of the stars that you are aiming. You may even select
a planet or the moon. The CPC is then ready to start finding and tracking any of the objects in its 40,000+ object database. Before the
telescope is ready to be aligned, it should be set up in an outside location with all accessories (eyepiece, diagonal and finderscope)
attached and lens cover removed as described in the Assembly section of the manual. To begin Sky Align:
1. Power on the CPC by flipping the switch located on the control panel of
the drive base, to the "on" position. Once turned on the hand control
display will say
CPC Ready. Press ENTER to choose Sky Align or use
the UP/Down scroll keys (10) to select a different method of alignment.
Pressing the ALIGN key will bypass the other alignment options and the
scrolling text and automatically begins
Sky Align.
2. Once Sky Align has been selected, the hand control will display “Enter if
OK”, “Undo to edit” and “GPS Linking”. The bottom line of the LCD
will display either the current time or the time when you last used the
telescope. The GPS will quickly link up and display the current date,
time and location. Additionally you have the option of pressing UNDO
and manually updating the time/site information. Press ENTER to
accept the time/site information downloaded the GPS.
3. The hand control will display a message reminding you to level the
tripod if you already haven’t done so. Press ENTER to continue.
4. Use the arrow buttons on the hand control to slew (move) the telescope
towards any bright celestial object in the sky. Center the object in the
crosshairs of the finderscope and press ENTER.
5. If the finderscope has been properly aligned with the telescope tube, the
alignment star should now be visible inside the field of view of the
eyepiece. The CPC will ask that you center the bright alignment star in
the center of the eyepiece and press the ALIGN button. This will accept
the star as the first alignment position. (There is no need to adjust the
slewing rate of the motors after each alignment step. The CPC
automatically selects the best slewing rate for aligning objects in both
the finderscope and the eyepiece).
6. For the second alignment object, choose a bright star or planet as far as
possible from the first alignment object. Once again use the arrow
button to center the object in the finderscope and press ENTER. Then
once centered in the eyepiece press the ALIGN button.
7. Repeat the process for the third alignment star. When the telescope has
been aligned to the final stars, the display will read "
Match
Confirmed". Press UNDO to display the names of the three bright
objects you aligned to, or press ENTER to accept these three objects for
alignment. You are now ready to find your first object.
Tips for Using Sky Align
Remember the following alignment guidelines to make using Sky Align
as simple and accurate as possible.
• Be sure to level the tripod before you begin alignment. The time/site information along with a level tripod will help the telescope
better predict the available bright stars and planets that are above the horizon.
• Remember SkyAlign does not care where the optical tube is pointed at the beginning of the alignment. So to make the alignment
process even faster it is acceptable to move the telescope to the first alignment star manually by loosening both clutches.
However the following alignment stars still need to found and centered using the hand control.
• Remember to select alignment stars that are as far apart in the sky as possible. For best results make sure that the third alignment
star does not lie in a straight line between the first two stars. This may result in a failed alignment.
• Don’t worry about confusing planets for stars when selecting alignment objects. SkyAlign works with the four brightest planets
(Venus, Jupiter, Saturn and Mars) as well as the Moon. In addition to the planets, the hand control has over 80 bright alignment
stars to choose from (down to 2.5 magnitude).
A Few Words on GPS:
The CPC uses an on-board GPS to take the
guesswork out of aligning your telescope with the
sky. Once an alignment method is selected, the
CPC automatically initiates the internal GPS
module. However, there are a few things you
should be aware of in order to get full use of its
many capabilities:
GPS alignment will only work when the
telescope is set-up outdoors with an
unobstructed view of the sky. If the CPC
is set-up in a location that has a limited
horizon in any direction it may take
longer for the telescope to find and link
with the needed satellites.
When using the GPS for the first time, it
may take 3-5 minutes for the CPC to
link-up with its satellites. Once the
telescope is successfully linked, leave the
telescope powered on for at least 20
minutes. During this time the CPC will
download the complete almanac of
orbital elements (called the ephemeris)
for the orbiting GPS satellites. Once this
information is received it will be stored
for future alignments.
If your CPC is transported over a long
distance (say from the northern to the
southern hemisphere) it may take as long
as one hour to establish a satellite link
from its new location. Observers wishing
to travel long distances with their
telescope are advised to turn on their
telescope in advance to allow the GPS to
acquire the necessary data.

15
• Rarely SkyAlign will not be able to determine what three alignment objects were centered. This sometime happens when a
bright planet or the Moon passes near one of the brighter stars. In situations like these it is best to try to avoid aligning to either
object if possible.
• For the best possible pointing accuracy, always center the alignment stars using the same final movements as the direction of the
GoTo Approach (by default this will be using the up arrow button and the right arrow button). Approaching the star from this
direction when looking through the eyepiece will eliminate much of the backlash between the gears and assure the most accurate
alignment possible.
Auto Two-Star Align
As with Sky Align, Auto Two-Star Align downloads all the necessary time/site information from orbiting GPS satellites. Once this
information is received, CPC will prompt you to slew the telescope and point at one known star in the sky. The CPC now has all the
information it needs to automatically choose a second star that will assure the best possible alignment. Once selected the telescope will
automatically slew to that second alignment star to complete the alignment. With the CPC set up outside with all accessories attached
and the tripod leveled, follow the steps below to align the telescope:
1. Once the CPC is powered on , Press ENTER to begin alignment.
2. Use the Up and Down scroll keys (10) to select
Auto Two-Star Align and press ENTER.
3. The hand control will display the last time and location information that was entered or downloaded from the GPS. Use the Up
and Down buttons to scroll through the information. Press ENTER to accept the downloaded information or press UNDO to
manually edit the information.
4. The display will now prompt you to select a bright star from the displayed list on the hand control. Use Up and Down buttons (6
and 9 on the keypad) to scroll to the desired star and then press ENTER.
5. Use the arrow buttons to slew the telescope to the star you selected. Center the star in the crosshairs of the finderscope and press
ENTER. Finally, center the star in the eyepiece and press ALIGN.
6. Based on this information, the CPC will automatically display the most suitable second alignment star that is above the horizon.
Press ENTER to automatically slew the telescope to the displayed star. If for some reason you do not wish to select this star
(perhaps it is behind a tree or building), you can either:
Press the UNDO button to display the next most suitable star for alignment.
Use the UP and DOWN scroll buttons to manually select any star you wish from the entire list of available stars.
Once the desired star is displayed press ENTER to automatically slew the telescope to the displayed star. When finished slewing, the
display will ask you to use the arrow buttons to align the selected star with the cross hairs in the center of the finderscope. Once
centered in the finder, press ENTER. The display will then instruct you to center the star in the field of view of the eyepiece. When the
star is centered, press ALIGN to accept this star as your second alignment star. When the telescope has been aligned to both stars the
display will read
Alignment Success, and you are now ready to find your first object.
Two Star Alignment
With the two-star alignment method, the CPC requires the user to know the positions of two bright stars in order to accurately align the
telescope with the sky and begin finding objects. Here is an overview of the two-star alignment procedure:
1. Once the CPC is powered on, use the Up and Down scroll keys (10) to select Two-Star Align, and press ENTER.
2. Press ENTER to accept the time/site information displayed on the display, or wait until the telescope has downloaded the
information from the GPS satellites.
3. The SELECT STAR 1 message will appear in the top row of the display. Use the Up and Down scroll keys (10) to select the
star you wish to use for the first alignment star. Press ENTER.
4. CPC then asks you to center in the eyepiece the alignment star you selected. Use the direction arrow buttons to slew the
telescope to the alignment star and carefully center the star in the finderscope. Press ENTER when centered.
5. Then, center the star in the eyepiece and press ALIGN
In order to accurately center the alignment star in the eyepiece, you may wish to decrease the slew rate of the motors for fine
centering. This is done by pressing the RATE key (11) on the hand controller then selecting the number that corresponds to the
speed you desire. (9 = fastest , 1 = slowest).
Helpful
Hint

16
6. CPC will then ask you to select and center a second alignment star and press the ALIGN key. It is best to choose alignment
stars that are a good distance away from one another. Stars that are at least 40º to 60º apart from each other will give you a
more accurate alignment than stars that are close to each other.
Once the second star alignment is completed properly, the display will read
Alignment Successful, and you should hear the
tracking motors turn-on and begin to track.
One-Star Align
One-Star Align allows you to download all the same information as you would for the Two-Star Align procedure. However, instead of
slewing to two alignment stars for centering and alignment, the CPC uses only one star to model the sky based on the information given.
This will allow you to roughly slew to the coordinates of bright objects like the moon and planets and gives the CPC the information
needed to track objects in altazimuth in any part of the sky.
To use One-Star Align:
1. Select One-Star Align from the alignment options.
2. Press ENTER to accept the time/site information displayed on the display, or wait until the telescope has downloaded the
information from the GPS satellites.
3. The SELECT STAR 1 message will appear in the top row of the display. Use the Up and Down scroll keys (10) to select the
star you wish to use for the first alignment star. Press ENTER.
4. CPC then asks you to center in the eyepiece the alignment star you selected. Use the direction arrow buttons to slew the
telescope to the alignment star and carefully center the star in the finderscope. Press ENTER when centered.
5. Then, center the star in the eyepiece and press ALIGN
6. Once in position, the CPC will model the sky based on this information and display Alignment Successful.
Note: Once a One-Star Alignment has been done, you can use the Re-alignment feature (later in this section ) to improve your telescope’s
pointing accuracy.
Solar System Align
Solar System Align is available in alt-az mode (scope mounted directly on the tripod) and equatorial mode (scope mounted on a wedge).
Solar System Align is designed to provide excellent tracking and GoTo performance by using solar system objects (Sun, Moon and
planets) to align the telescope with the sky. Solar System Align is a great way to align your telescope for daytime viewing as well as a
quick way to align the telescope for night time observing.
Never look directly at the sun with the naked eye or with a telescope (unless you have the proper solar filter).
Permanent and irreversible eye damage may result.
1. Select Solar System Align from the alignment options.
2. Press ENTER to accept the time/site information displayed on the display, or wait until the telescope has downloaded the information
from the GPS satellites.
3. The SELECT OBJECT message will appear in the top row of the display. Use the Up and Down scroll keys (10) to select the daytime
object (planet, moon or sun) you wish to align. Press ENTER.
4. CPC then asks you to center in the eyepiece the alignment object you selected. Use the direction arrow buttons to slew the telescope
to the alignment object and carefully center it in the finderscope. Press ENTER when centered.
5. Then, center the object in the eyepiece and press ALIGN.
Once in position, the CPC will model the sky based on this information and display
Alignment Successful.
Tips for Using Solar System Align
For safety purposes, the Sun will not be displayed in any of the hand control’s customer object lists unless it is enabled from the Utilities
Menu. To allow the Sun to be displayed on the hand control, do the following:
1. Press the UNDO button until the display reads “CPC Ready”
2. Press the MENU button and use the Up and Down keys to select the Utilities menu. Press ENTER.
3. Use the UP and Down keys to select Sun Menu and press ENTER.
4. Press ENTER again to allow the Sun to appear on the hand control display.
The Sun can be removed from the display by using the same procedure as above.
To improve the telescope pointing accuracy, you can use the Re-Align feature as described below.

17
EQ North / EQ South Alignment
EQ North and EQ South Alignments assist the user in aligning the telescope when polar aligned on an optional equatorial wedge.
Similar to the Altazimuth alignments described earlier, the EQ alignments gives you the choice of performing an AutoAlign, Two-Star
alignment, One-Star alignment or Solar System alignment.
EQ AutoAlign
The EQ AutoAlign uses all the same time/site information as the Alt-Az alignments, however it also requires you to position the tube so
that the altitude index markers are aligned (see figure 4-2), and then rotate the telescope base until the tube is pointed towards the
Meridian (see figure 4-3). Based on this information the CPC will automatically slew to two selected alignment stars to be centered and
aligned. To use EQ Auto-Align:
1. Select EQ North or South Align from the alignment options and press ENTER
2. Press ENTER to accept the time/site information displayed on the display, or wait until the telescope has downloaded the
information from the GPS satellites.
3. Select EQ AutoAlign method and press ENTER
4. Use the up and down arrow buttons to move the telescope tube upwards until the altitude index markers are aligned. The altitude
index markers are located at the top of the fork arm. See figure 4-2.
5. Use the left and right arrow buttons to move the telescope base until the fork arms are horizontally parallel and the tube is pointing
towards the Meridian.
6. Based on this information, the CPC will automatically display the most suitable alignment stars that are above the horizon. Press
ENTER to automatically slew the telescope to the displayed star. If for some reason you do not wish to select one of these stars
(perhaps it is behind a tree or building), you can either:
Press the UNDO button to display the next most suitable star for alignment.
Use the UP and DOWN scroll buttons to manually select any star you wish from the entire
list of available stars.
7. CPC then asks you to center in the eyepiece the alignment object you selected. Use
the direction arrow buttons to slew the telescope to the alignment object and
carefully center it in the finderscope. Press ENTER when centered.
8. Then, center the object in the eyepiece and press ALIGN.
9. Once you press the ALIGN button the telescope will automatically slew to a second
alignment star. Repeat steps 6 and 7 to complete alignment.
EQ Two-Star Align
The EQ Two-Star Align follows most of the same steps as the Alt-Az Two-Star Align. This alignment method does not require the user
to align the altitude index markers or point towards the Meridian, but it does require the user to locate and align the telescope on two
bright stars. When selecting alignment stars it is best to choose stars that, a) have a large separation in azimuth and b) both are either
positive or negative in declination. Following these two guidelines will result in a more accurate EQ Two-Star alignment.
EQ One-Star Align
EQ One-Star Align operates much the same way as EQ Two-Star Align however it only relies on the alignment of one star to align the
telescope. To use EQ One-Star Align follow steps 1 through 7 under the EQ Two-Star Align section.
EQ Solar System Align
This alignment method allows you use only one solar system object to equatorially align the telescope for daytime use. To align your
telescope using a solar system object follow steps 1 through 7 under the EQ Two-Star Align section.
Figure 4-2 - Altitude Index Markers

18
CPC Re-Alignment
The CPC has a re-alignment feature which allows you to replace either of the original alignment stars with a new star or celestial object.
This can be useful in several situations:
• If you are observing over a period of a few hours, you may notice that your
original alignment stars have drifted towards the west considerably. (Remember
that the stars are moving at a rate of 15º every hour). Aligning on a new star
that is in the eastern part of the sky will improve your pointing accuracy,
especially on objects in that part of the sky.
• If you have aligned your telescope using the One-Star or Solar System
alignment method, you can use
re-align to align to additional objects in the sky.
This will improve the pointing accuracy of your telescope without having to re-
enter addition information.
To replace an existing alignment star with a new alignment star:
1. Select the desired star (or object) from the database and slew to it.
2. Carefully center the object in the eyepiece.
3. Once centered, press the UNDO button until you are at the main menu.
4. With
CPC Ready displayed, press the ALIGN key on the hand control.
5. The display will then ask you which alignment star you want to replace. Use
the UP and Down scroll keys to select the alignment star to be replaced. It
is usually best to replace the star closest to the new object. This will space
out your alignment stars across the sky. If you have used one of the single
object alignment methods then it is always best to replace the object that is
“unassigned” with an actual object.
6. Press ALIGN to make the change.
S
S
e
e
l
l
e
e
c
c
t
t
i
i
n
n
g
g
a
a
n
n
O
O
b
b
j
j
e
e
c
c
t
t
Now that the telescope is properly aligned, you can choose an object from any of the catalogs in the CPC's extensive database. The hand
control has a key (4) designated for each of the catalogs in its database. There are two ways to select objects from the database: scrolling
through the named object lists and entering object numbers.
Pressing the LIST key on the hand control will access all objects in the database that have common names or types. Each list is broken
down into the following categories: Named Stars, Named Object, Double Stars, Variable Stars, Asterisms and CCD Objects. Selecting
any one of these catalogs will display a numeric-alphabetical listing of the objects under that list. Pressing the Up and Down keys (10)
allows you to scroll through the catalog to the desired object.
When scrolling through a long list of objects, holding down either the Up or Down key will allow you to scroll through the catalog at a
rapid speed
.
Pressing any of the other catalog keys (M, CALD, NGC, or STAR) will display a blinking cursor below the name of the catalog chosen.
Use the numeric key pad to enter the number of any object within these standardized catalogs. For example, to find the Orion Nebula,
press the "M" key and enter "042".
When entering the number for a SAO star, you are only required to enter the first four digits of the objects six digit SAO number. Once
the first four digits are entered, the hand control will automatically list all the available SAO objects beginning with those numbers. This
allows you to scroll through only the SAO stars in the database. For example, in searching for the SAO star 40186 (Capella), the first
four digits would be "0401". Entering this number will display the closest match from the SAO stars available in the database. From
there you can scroll down the list and select the desired object.
Helpful
Hint
Figure 4
-
3
The Meridian is an imaginary line in the sky that
starts at the North celestial pole and ends at
the South celestial pole and passes through the
zenith. If you are facing South, the meridian
starts from your Southern horizon and passes
directly overhead to the North celestial pole.

19
S
S
l
l
e
e
w
w
i
i
n
n
g
g
t
t
o
o
a
a
n
n
O
O
b
b
j
j
e
e
c
c
t
t
Once the desired object is displayed on the hand control screen, choose from the following options:
•
Press the INFO Key. This will give you useful information about the selected object such as R.A. and declination, magnitude size and
text information for many of the most popular objects.
•
Press the ENTER Key. This will automatically slew the telescope to the coordinates of the object.
Caution: Never slew the telescope when someone is looking into the eyepiece. The telescope can move at fast slew speeds and may hit an
observer in the eye.
If you manually enter an object that is below the horizon, CPC will notify you by displaying a message reminding you that you have
selected an object outside of your slew limits (see Slew Limits in the Scope Setup section of the manual). Press UNDO to go back and
select a new object. Press ENTER to ignore the message and continue the slew.
Object information can be obtained without having to do a star alignment. After the telescope is powered on, pressing any of the catalog
keys allows you to scroll through object lists or enter catalog numbers and view the information about the object as described above.
F
F
i
i
n
n
d
d
i
i
n
n
g
g
P
P
l
l
a
a
n
n
e
e
t
t
s
s
The CPC can located all 8 of our solar systems planets plus the Sun and Moon. However, the hand control will only display the solar
system objects that are above the horizon (or within its filter limits). To locate the planets, press the PLANET key on the hand control.
The hand control will display all solar system objects that are above the horizon:
• Use the
Up and Down keys to select the planet that you wish to observe.
• Press
INFO to access information on the displayed planet.
• Press
ENTER to slew to the displayed planet.
To allow the Sun to be displayed as an option in the database, see Sun Menu in the Utilities section of the manual.
T
T
o
o
u
u
r
r
M
M
o
o
d
d
e
e
The CPC includes a tour feature which automatically allows the user to choose from a list of interesting objects based on the date and
time in which you are observing. The automatic tour will display only those objects that are within your set filter limits (see
Filter Limits
in the Setup Procedures section of the manual). To activate the Tour mode, press the TOUR key (6) on the hand control. The CPC will
display the best objects to observe that are currently in the sky.
• To see information and data about the displayed object, press the INFO key.
• To slew to the object displayed, press ENTER.
• To see the next tour object, press the Up key.
C
C
o
o
n
n
s
s
t
t
e
e
l
l
l
l
a
a
t
t
i
i
o
o
n
n
T
T
o
o
u
u
r
r
In addition to the Tour Mode, the CPC telescope has a Constellation Tour that allows the user to take a tour of all the best objects within
a particular constellation. Selecting Constellation from the LIST menu will display all the constellation names that are above the user
defined horizon (filter limits). Once a constellation is selected, you can choose from any of the database object catalogs to produce a list
of all the available objects in that constellation.
• To see information and data about the displayed object, press the INFO key.
• To slew to the object displayed, press ENTER.
• To see the next tour object, press the Up key.
D
D
i
i
r
r
e
e
c
c
t
t
i
i
o
o
n
n
B
B
u
u
t
t
t
t
o
o
n
n
s
s
The CPC has four direction buttons (3) in the center of the hand control which control the telescope's motion in altitude (up and down)
and azimuth (left and right). The telescope can be controlled at nine different speed rates.

20
R
R
a
a
t
t
e
e
B
B
u
u
t
t
t
t
o
o
n
n
Pressing the RATE key (11) allows you to instantly change the speed rate of the motors from high speed slew rate to precise guiding rate
or anywhere in between. Each rate corresponds to a number on the hand controller key pad. The number 9 is the fastest rate (3º per
second, depending on power source) and is used for slewing between objects and locating alignment stars. The number 1 on the hand
control is the slowest rate (.5x sidereal) and can be used for accurate centering of objects in the eyepiece and photographic guiding. To
change the speed rate of the motors:
• Press the RATE key on the hand control. The LCD will display the current speed rate.
• Press the number on the hand control that corresponds to the desired speed. The number will appear in the upper-right corner of the
LCD display to indicate that the rate has been changed.
The hand control has a "double button" feature that allows you to instantly speed up the motors without having to choose a speed rate.
To use this feature, simply press the arrow button that corresponds to the direction that you want to move the telescope. While holding
that button down, press the opposite directional button. This will increase the slew rate to the maximum slew rate.
When pressing the Up and Down arrow buttons in the slower slew rates (6 and lower) the motors will move the telescope in the opposite
direction than the faster slew rates (7 thru 9). This is done so that an object will move in the appropriate direction when looking into the
eyepiece (i.e. pressing the Up arrow button will move the star up in the field of view of the eyepiece). However, if any of the slower
slew rates (rate 6 and below) are used to center an object in the finderscope, you may need to press the opposite directional button to
make the telescope move in the correct direction.
1 = .5x* 6 = 64x
2 = 1x (sidereal)* 7 = .5º / sec
3 = 4x 8 = 2º / sec
4 = 8x 9 = 3º / sec
5 = 16x
*Rate 1 and 2 are photographic guide rates and are meant to be used when the telescope is set up on a wedge in equatorial mode. These
rates can be used while set up in altazimuth, however the actual speed rate may differ slightly.
S
S
e
e
t
t
u
u
p
p
P
P
r
r
o
o
c
c
e
e
d
d
u
u
r
r
e
e
s
s
The CPC contains many user defined setup functions designed to give the user control over the telescope's many advanced features.
All of the setup and utility features can be accessed by pressing the MENU key and scrolling through the options:
Tracking Mode This allows you to change the way the telescope tracks depending on the type of mount being used to support the
telescope. The CPC has three different tracking modes:
Alt AZ
This is the default tracking rate and is used when the telescope is placed on a
flat surface or tripod without the use of an equato
rial wedge. The telescope
must be aligned with two stars before it can track in altazimuth (Alt
-Az).
EQ North
Used
to track the sky when the telescope is polar aligned using an equatorial
wedge in the Northern Hemisphere.
EQ South
Used to track the sky when the telescope is polar aligned using an equatorial
wedge in the Southern Hemisphere.
OFF
When using the telescope for terrestrial (land) observation, the tracking can
be turned off so that the telescope never moves.
Tracking Rate In addition to being able to move the telescope with the hand control buttons, the CPC will continually track a
celestial object as it moves across the night sky. The tracking rate can be changed depending on what type of
object is being observed:
Nine available slew speeds
/