Design Innovations 61718 Installation guide
- Type
- Installation guide

ACCLIMATION REQUIREMENTS
In order to minimize the expansion and
contraction of your planks you must take the
following steps prior to installation:
Open all packages and place the planks at with
spacers in between the planks to allow air to
circulate around each plank. Allow 36 hours for the
planks to adjust to the humidity and temperature
of the room in which they are being installed. Do
not attempt to acclimate your planks in a damp
unheated area which would not be representative
of the true year round temperature of the room.
IMPORTANT: In rooms that are below grade,
apply a vapor barrier between the studs and
the planking. In rooms that have unusually
high moisture conditions such as, bathrooms
or laundry rooms, acclimation is necessary and
paint must be applied. Expansion and contraction
are inherent characteristics of all wood products
due to changes in humidity within the room.
The manufacturer cannot be held liable for any
movement in the planks.
WALL PREPARATION
If your walls are in good condition you may
glue and nail the planking directly onto drywall,
plywood or existing paneling. On uneven, cracked
or very rough walls, repair and smooth out the
wall so planking will lay at against a sturdy wall.
GENERAL
Nail planks to the wall only where necessary to
hold the plank rm to the wall until the adhesive
sets. Angle all nails for greater holding power. If
hammering nails in, hammer nails to within 1/8”
of face, then nish with a nail set. Glue each
plank to the wall with a quality panel adhesive or
double sided tape and follow the manufacturer’s
instructions. From time to time, check for plumb/
level and if necessary, slightly angle the plank to
make it level. Do not butt planks too tightly together
to allow for normal expansion and contraction.
CHECK FOR PLUMB OR LEVEL
The rst row of planking installed is key to a
successful and easy installation. Using a level,
make sure the rst plank is absolutely straight.
Where necessary, scribe and then plane or cut the
long edge to assure a level t.
APPLY PLANKING with 1” nish nails, 18ga brad
or 23ga pin nails, panel adhesive or double sided
carpet tape.
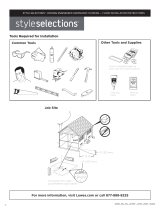
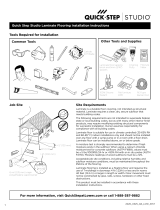
TOOLS REQUIRED: Fine tooth saw, miter
box, hammer, ruler, level, carpenter’s
combination square.
Primed MDF Beadboard or Ship-Lap Reversible Planking #61718
PROJECT PLANNING
The planking in this carton is reversible, one side is a Beadboard prole
and the other is ush Ship-Lap. Please read through all the installation
instructions before starting your project.
PROJECT PLANNING: Make sure to allow about 10% more planking for waste cuts.
Apply planking with 1” finish nails, 18ga brad or 23ga pin nails, panel adhesive
or double sided carpet tape.
TOOLS REQUIRED:
fine tooth saw, miter box, hammer, ruler, level, carpenter’s combination square.
INSTALLATION INSTRUCTIONS
PAGE 1 of 2

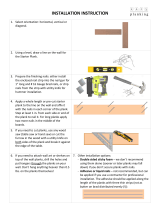
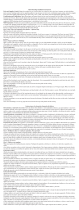
METHODS OF INSTALLATION
The ship-lap planks can be installed
three dierent ways:
Option #1) SHIP-LAP FLUSH:
Planks are ush against the wall
and joints are closed to show an
eased edge between each plank.
Option #2) SHIP-LAP CHANNEL GROOVE:
Top row of planks is ush to the
top of the wall and then temporary
spacers are placed between the
rows to show a channel groove in
between the plank lengths. The
gap can be up to 3/8”.
Option #3) SHIP-LAP OVERLAY:
Planks are set against the wall at
the top edges and overlap the plank
below. This results in the ship-lap
siding eect.
HORIZONTAL SHIP-LAP APPLICATION
Install the rst plank with the lap
groove edge down and 1/4” o the
oor. Make sure the bottom row of
planking is level. As you install up
the wall be sure to keep the plank
ship lapped ends staggered. When
installing the top plank, leave 1/4” between the
ceiling and the planks.
VERTICAL APPLICATION
Leave 1/4” space at the corner,
top and bottom and begin at
an inside corner and work left
to right if you are right handed
work right to left if you are left
handed. Keep the lap edge toward
the starting corner and the at edges toward your
work direction. Nail through the visible face of
the plank only when necessary to hold the plank
until the glue sets. Measure and t the next planks
carefully checking for plumb as you work across
the wall. The last plank may have to be trimmed to
t into a corner.
DIAGONAL APPLICATION
Start the planking at an inside
oor corner location. Cut and t
a triangular shaped piece at a 45°
angle to the corner keeping the lap
edge toward the starting corner
and the at edge toward the work
direction. Nail and glue the triangular piece into the
corner. Proceed by marking, cutting and installing
the remainder of the planks using the same as the
above procedures.
CEILING APPLICATION
Install the same as vertical or
horizontal application.
IMPORTANT: Be sure, the planking
is nailed and glued securely to a
solid surface.
FINISHING
The surface of the planking is primed and ready to
be painted in the color of your choice.
Global Product Sourcing, LLC
7 Mary Way, Hainesport NJ 08036
www.GPSincusa.com
Primed MDF Beadboard or Ship-Lap Reversible Planking #61718 PAGE 2 of 2
-
 1
1
-
 2
2


Design Innovations 61718 Installation guide
- Type
- Installation guide
Ask a question and I''ll find the answer in the document
Finding information in a document is now easier with AI
Related papers


Other documents
-
 Easy Planking 11232 Installation guide
-
 Vintage Timber 2102 Operating instructions
-
 Easy Planking E-107 Installation guide
-
Arrow 843631130810 User manual
-
 Style Selections LWCSS352 Installation guide
-
Pergo LWCPS185 Installation guide
-
-
 QuickStep QS907 Installation guide
-
 QuickStep QS902 Installation guide
-
 C&C Wood Products 888-4842 Installation guide


