Page is loading ...

072018 Rev. 2Luxier
1
Freestanding Bathtub Installation and Care Guide
Model Numbers:
FSB-01, FSB-02, FSB-03, FSB-04, FSB-05, FSB-06, FSB-07, FSB-08
Features:
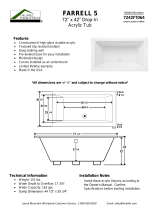
- Contemporary Freestanding Design
- Integrated Overow System
- Adjustable Feet for Easy Installation
Materials:
- Acrylic / Fiberglass Composite
Luxier
1-877-711-8828

072018 Rev. 2Luxier
2
IMPORTANT:
• Read and understand this installation guide completely before installation. It will increase the
chance of a successful installation.
• This product should be installed by professional installers.
• Observe all local plumbing and building codes.
• Prepare the oor with sucient support and waterproong the oor before installing this bathtub.
The nished oor must be leveled.
• Make sure there is adequate space around the bathtub for bath faucet and future maintenance.
• Unpack and inspect the bathtub from the package for shipping damage and make sure all parts
are included with the bathtub.
• Keep the bathtub and its accessories in the original package until installation.
• Rough in the drain with enough clearance before installation.
• Make sure the installation site is clean and free of dust and debris.
CAUTION:
• Riskofpersonalinjury!Thisbathtubisheavy,obtainhelpwhenmovingandinstalling
thisbathtub.
NOTICE:
• This installation guide is subject to change without notice, please contact us to request the most
updated version of this installation guide.
• Product drawings in this installation guide are for illustration purpose only. Actual product may
vary depends on model.
• This product is for residential use ONLY.
• Keep this installation guide for your records.
1. Freestanding Bathtub
2. Drain Assembly and Flexible Pipe
3. Installation Guide
Tape Measure Adjustable Wrench
Pencil / Marker Silicon Sealant
Safety Glasses and Safety Shoes Gloves
PTFE Tape Level
Drop Cloth Plumbers Putty
BeforeYouBegin
Tools
Parts
Thank you for purchasing Luxier products. Please read the information below and keep this
installation guide for future reference. If you require assistance, please contact our customer service
department at 1-877-711-8828, Monday - Friday 9 AM - 5 PM Pacic Time. Or by email at

072018 Rev. 2Luxier
3
RiskofPersonalInjury!Bathtubmaybecomeslipperywhenwet.Exercise
cautionwhenenteringandexitingthebathtub.Donotoverllthebathtub
beforeentering.Overllingwillcauseoverowandslipperyconditions.
RiskofDrowning!Donotleavechildrenunattendedwhenusingthe
bathtub.Supervisesmallchildrenatalltimewhenusingthisbathtub.
RiskofPersonalInjury!Accidentalfallsmayoccur.Handrailsandother
handicapaccessoriesarerecommendedforseniorsorpersonswith
disabilities.
RiskofElectricShock!Donotuseanyelectricalappliancesinornearthe
bathtubwhenbathtubcontainingwater.
Peopleusingmedicationsand/orhavingadversemedicalconditionsshould
consultaphysicianbeforeusingthisproduct.
Ifyouareorthinkyouarepregnant,consultyourdoctorbeforeusingthis
product.
ImportantSafetyInstructions

072018 Rev. 2Luxier
4
Installation-SitePreparation
Installation-DrainAssembly
• Provide sucient oor support. Check the oor at the installation site and make repairs as
needed.
• Waterproof the oor is highly recommended. Finished oor must be level.
• Provide adequate clearance on all sides of the bathtub.
• Minimum of 2 inch waste drain pipe is required.
NOTICE:Itisrecommendedtodrytthepartsbeforeinstallation.
1. Place a large drop cloth on the oor to protect the bathtub.
2. With help, lift the bathtub and place it on its side. Secure the bathtub to prevent it from moving.
3. Assemble the elbow connector as shown in gure 1. Wrap PTFE tape to the thread on the drain
body and thread on the elbow connector (#07)
4. Upright the bathtub and carefully move it to the nal installation position. (NOTICE: Do not drag
the bathtub on the oor as it will damage the bathtub.)
5. Connect the exible drain pipe (#08) to the elbow connector and connect the other end to the
waste pipe.
Drain Body (01)
Flange Gasket (02)
Overow (05)
Overow Channel (06)
Flexible Drain Pipe (08)
Elbow Connector (07)
Drain Gasket (03)
Locking Nut (04)
Fig. 1

072018 Rev. 2Luxier
5
Installation-Bathtub
CareandCleaning
RepairandMaintenance
CAUTION:RiskofPersonalInjury.Get extra help when moving the bathtub into its nal position.
1. Use a level to make sure the bathtub is level in all direction. (Fig. 2)
2. Adjust the feet under the tub as needed.
3. It is recommended to leave a 1/16” to 1/8” gap all around the base of the bathtub.
4. Close the drain and remove any debris or plastic lms from the tub. Wipe the surface clean with a
piece of soft cloth.
5. Fill the tub with some water and test the drainage to make sure the water drains freely. Also
check for any leaks around the drain and pipe. (NOTE: Due to surface tension, it is normal for a
small amount of water to pool around the drain)
6. Apply a continuous bead of clear or color matching silicon sealant around the base of the bathtub
to complete the installation. (Fig. 3) (NOTE: let silicon sealant cure for at least 12 hours before
using the tub.)
Fig. 3Fig. 2
• Most dirt will wash o with mild soap and warm water.
• For tough spots, use liquid dish washing soap or non-chlorine bleach.
• Do not use abrasive material such steel wool or scouring pads to clean the acrylic surface.
• Always test the cleaning solution on a small area before using it on the entire surface.
• Do not allow cleaning to soak on the acrylic surface.
• Rinse thoroughly with water immediately and wipe dry with soft cloth.
• Use liquid polish compound such as Gel-Gloss Kitchen and Bath Polish
(TM)
to keep the original
shine of acrylic surface.
• Light scratches can be removed with polishing compound for automobiles.
• For deeper scratches use wet sandpaper (1500 grit or higher). Always add water when sanding
and lightly sand the area larger than the scratch in a circular motion to remove the scratches.
Repeat until the scratch is removed. Use soft cloth and small amount of polishing compound to
restore shine. Repeat as needed until surface shine is restored.

072018 Rev. 2Luxier
6
Thank you for purchasing Luxier products. Please read the information below and keep this
installation guide for future reference. If you require assistance, please contact our customer service
department at 1-877-711-8828, Monday - Friday 9 AM - 5 PM Pacic Time. Or by email at
LimitedOneYear(1)Warranty(ForUSAOnly)
The manufacturer warrants this product to be free of manufacture defects during daily normal
household use for a period of one (1) year to the original purchaser of this product. Please keep a
copy of the original invoice as proof of purchase.
Should a malfunction occur within the warranty period, Luxier USA will, as its option, (1)
repair or replace the defective part(s) or product(s) at no charge; (2) issue a refund of the original
purchase price of the product(s) (Valid within 30 days from the date of purchase); or (3) issue a
credit to be applied toward the purchase of a new Décor Star product. Shipping/delivery charges
may apply and are in Luxier USA’s sole discretion.
This limited warranty shall not apply to goods which have been subject to accident, negligence,
improper installation, product abuse, product misuse, or use of cleaners containing abrasives, alcohol
or other organic solvents, whether performed by a contractor, service company, or yourself, are
excluded from this warranty.
Our responsibility under this limited warranty is limited to only to replacement parts and no other
costs. Luxier USA will not be responsible for labor charges and/or damage incurred by installation,
repair or replacement, nor for any indirect incidental or consequential damages, losses, injury or
costs of any nature relating to this product. Except as provided by law, this limited warranty
is in lieu of and excludes all other warranties, conditions, and guarantees, whether expressed or
implied, statutory or otherwise, including without restriction those merchantability of tness for use.
This limited warranty is non-transferable. This limited warranty only applies to products purchased
and installed in the United States. This limited warranty covers the original consumer purchase only
and does not include business, commercial or industrial use of this product. To obtain service under
the Limited Warranty, please contact Luxier USA at [email protected] or 1-877-711-8828. The
Luxier USA Customer Care Department will determine whether to repair or replace your product,
issue a refund, or issue a credit.
Warranty
/