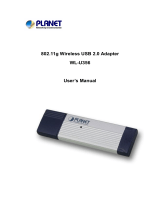
Planet WL-U356A User manual
- Category
- WLAN access points
- Type
- User manual

802.11g Wireless LAN USB Adapter w/SMA connector
WL-U356A
User Manual

2
Copyright
Copyright ã 2004 by PLANET Technology Corp. All rights reserved. No part of this publication may be
reproduced, transmitted, transcribed, stored in a retrieval system, or translated into any language or computer
language, in any form or by any means, electronic, mechanical, magnetic, optical, chemical, manual or
otherwise, without the prior written permission of PLANET.
PLANET makes no representations or warranties, either expressed or implied, with respect to the contents
hereof and specifically disclaims any warranties, merchantability or fitness for any particular purpose. Any
software described in this manual is sold or licensed "as is". Should the programs prove defective following their
purchase, the buyer (and not PLANET, its distributor, or its dealer) assumes the entire cost of all necessary
servicing, repair, and any incidental or consequential damages resulting from any defect in the software. Further,
PLANET reserves the right to revise this publication and to make changes from time to time in the contents
hereof without obligation to notify any person of such revision or changes.
All brand and product names mentioned in this manual are trademarks and/or registered trademarks of their
respective holders.
Federal Communication Commission Interference Statement
This equipment has been tested and found to comply with the limits for a Class B digital device, pursuant to Part
15 of FCC Rules. These limits are designed to provide reasonable protection against harmful interference in a
residential installation. This equipment generates, uses, and can radiate radio frequency energy and, if not
installed and used in accordance with the instructions, may cause harmful interference to radio communications.
However, there is no guarantee that interference will not occur in a particular installation. If this equipment does
cause harmful interference to radio or television reception, which can be determined by turning the equipment off
and on, the user is encouraged to try to correct the interference by one or more of the following measures:
1. Reorient or relocate the receiving antenna.
2. Increase the separation between the equipment and receiver.
3. Connect the equipment into an outlet on a circuit different from that to which the receiver is connected.
4. Consult the dealer or an experienced radio technician for help.
FCC Caution
To assure continued compliance. (example-use only shielded interface cables when connecting to computer or
peripheral devices). Any changes or modifications not expressly approved by the party responsible for
compliance could void the user’s authority to operate the equipment.
This device complies with Part 15 of the FCC Rules. Operation is subject to the Following two conditions: ( 1 )
This device may not cause harmful interference, and ( 2 ) this Device must accept any interference received,
including interference that may cause undesired operation.
Federal Communication Commission (FCC) Radiation Exposure Statement
This equipment complies with FCC radiation exposure set forth for an uncontrolled environment. In order to
avoid the possibility of exceeding the FCC radio frequency exposure limits, human proximity to the antenna shall
not be less than 20 cm (8 inches) during normal operation.
R&TTE Compliance Statement
This equipment complies with all the requirements of DIRECTIVE 1999/5/CE OF THE EUROPEAN
PARLIAMENT AND THE COUNCIL OF 9 March 1999 on radio equipment and telecommunication terminal
Equipment and the mutual recognition of their conformity (R&TTE)
The R&TTE Directive repeals and replaces in the directive 98/13/EEC (Telecommunications Terminal Equipment
and Satellite Earth Station Equipment) As of April 8,2000.
Safety
This equipment is designed with the utmost care for the safety of those who install and use it. However, special
attention must be paid to the dangers of electric shock and static electricity when working with electrical
equipment. All guidelines of this and of the computer manufacture must therefore be allowed at all times to
ensure the safe use of the equipment.
EU Countries Not Intended for Use
The ETSI version of this device is intended for home and office use in Austria Belgium, Denmark, Finland,
France (with Frequency channel restrictions). Germany, Greece, Ireland, Italy, Luxembourg .The Netherlands,
Portugal, Spain, Sweden and United Kingdom.
The ETSI version of this device is also authorized for use in EFTA member states Iceland, Liechtenstein, Norway
and Switzerland.

3
Potential restrictive use
France: Only channels 10,11,12 and 13
Revision
User’s Manual for PLANET 802.11g Wireless LAN USB Adapter
Model: WL-U356A
Rev: 1.0 (October, 2004)
Part No. EM-WLU356A

4
Table of Contents
CHAPTER 1 INTRODUCTION 1
1.1 FEATURES 1
1.2 PACKAGE CONTENTS 1
CHAPTER 2 INSTALLATION PROCEDURES 2
2.1 INSTALL UTILITY SOFTWARE 2
2.2 INSTALL DRIVER 4
CHAPTER 3 WIRELESS CLIENT MODE CONFIGURATION 7
3.1 WIRELESS CONNECTION STATUS 8
3.2 CONFIGURING GENERAL SETTINGS 10
3.3 CONFIGURING ENCRYPTION SECURITY 11
3.3.1 WEP Configuration 11
3.3.2 WPA-PSK Configuration 13
3.3.3 WPA Configuration 14
3.4 CONFIGURING PROFILE 16
3.5 ADVANCED SETTINGS 17
3.6 INFORMATION 19
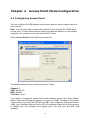
CHAPTER 4 ACCESS POINT MODE CONFIGURATION 20
4.1 CONFIGURING ACCESS POINT 20
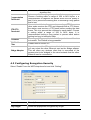
4.2 CONFIGURING ENCRYPTION SECURITY 22
4.3 CONFIGURING MAC ADDRESS FILTER 23
SPECIFICATION 24
APPENDIX 25
GLOSSARY 27

1
Chapter 1 Introduction
The PLANET 802.11g Wireless USB 2.0 Adapter, WL-U356A, is a high-efficiency
wireless adapter for wireless networking at home, in office, or in public places. This
USB adapter connects directly to any USB-ready desktop/notebook computers, so
that you can share files, printers, and high-speed access to the Internet over your
existing wireless network easily, without disassembling your computer.
The WL-U356A has support data rate up to 54Mbps, and can auto-negotiate to be
compatible with any IEEE 802.11b/g device. Support of 64, 128 and 256bit WEP
encryption plus WPA (Wi-Fi Protected Access) high-level encryption prevents your
wireless communications from unauthorized access and ensures secure data
transfer.
The WL-U356A can operate in either Ad-Hoc mode (Point to Point/Point to
Multipoint without Access Point) or Infrastructure mode (Point to Point/Point
to Multipoint with Access Point). It also supports Software AP function to provide
the convenience for users to establish their wireless connection. With the provided
external antenna connector, users can change the antenna freely to increase wireless
performance.
1.1 Features
l Compliant with the IEEE 802.11g 2.4GHz (OFDM) standard
l High data transfer rate - up to 54Mbps
l Supports WEP 64/128/256 bits, WPA protection
l Supports Infrastructure and Ad-Hoc mode
l Software AP function support
l Data rate automatic fallback increases reliability
l Supports the most popular operating systems: Windows 98SE/Me/2000/XP
l Detachable antenna design
l USB 2.0 interface
1.2 Package Contents
Before you begin the installation, please check the items of your package. The
package should include the following items:
1 x WL-U356A
1 x Driver and User's manual CD
1 x Quick Installation Guide
1 x External Antenna
1 x Wall-mount Accessory pack
If any of the above items is missing, contact your supplier as soon as possible.

2
Chapter 2 Installation Procedures
2.1 Install Utility Software
Before installing the utility software, DO NOT insert WL-U356A
into your PC.
If the WL-U356A is inserted already, Windows will detect the WL-U356A
and
request for a driver. Click Cancel
to quit the wizard and remove the adapter
from your PC.
If you have installed the WL-U356A or other wireless card driver & utility
already, please uninstall them firstly.
Step 1: Insert the provided Drivers and User’s Manual CD into your CD drive to initiate
the autorun program. Once completed a menu screen will appear.
Step 2: Click on “Configuration Utility” hyper link in WL-U356A field to initiate the
installation. If the menu screen is not shown, you can click “Start” button and
choose “Run”. When the dialog box appears, enter “E:\Utility\setup.exe”
(Suppose “E” is your CD-ROM drive) and click “OK” to continue.
Step 3: When the welcome screen appears, click “Next”.

3
Step 4: Click “Next” to accept the default destination folder for the software or click
“Browse” to manually select a destination folder.
Step 5: For Windows XP, click “Continue Anyway” at the Windows Logo Compatibility
screen.

4
For Windows 2000, click “Yes” at the Digital Signature screen.
Step 6: Remove the Driver & Utility CD from your CD drive and then restart your PC.
2.2 Install Driver
In most cases, Windows will automatically install the driver
after the PC is
restarted. If the Found New Hardware Wizard appears, follow the
instructions below. The Found New Hardware Wizard will look different
depending on your operating system. Follow the on-
screen instructions to
complete the installation. For Wi
ndows 98SE and Me users, you may be
prompted to insert the Windows 98SE or Me CD during the driver
installation. Be sure to have your Windows 98SE or Me CD ready.
Step 1: After the PC restart, insert WL-U356A into the USB port of the PC.
Step 2: Select “Install the software automatically” and click “Next”.

5
Step 3: For Windows XP, click “Continue Anyway” at the Windows Logo
Compatibility screen.
For Windows 2000, click “Yes” at the Digital Signature screen.

6
For Windows 98SE or Me, insert the Windows 98SE or Me CD if prompted to do so and
click “OK”.
Step 4: Click “Finish”. Restart the PC if you are prompted to do so.

7
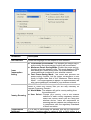
Chapter 3 Wireless Client Mode
Configuration
The USB adapter can be set to either Station or Access Point Mode from the Mode
drop-down menu. Station mode is the default selection and should be selected if you
want to connect to a wireless router/access point or conduct peer-to-peer networking.
The configuration utility will be initiated automatically after PC restarts. It is a powerful
application that helps you to configure the WL-U356A and monitor the status of the
communication process. By double click the icon on the system tray, you can see
the configuration utility appear. If configuration utility doesn’t start automatically,
please go to Start => Programs =>PLANET WL-U356A=>PLANET WL-U356A
Utility to run the configure utility.
Windows XP system has a built-in wireless configuration
interface.
You may use this interface to configure your WL-
U356A. You
cannot use WL-U356A utility to configure your WL-
U356A unless
you disable the windows built-
in utility first. For disabling windows
built-in utility, please clear the checkbox of “
Use Windows to
configure my wireless settings”
in the screen below. Then you can
use WL-U356A utility to configure

8
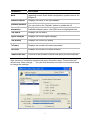
3.1 Wireless Connection Status
When the configuration utility is activated, it will scan all channels to locate available
access points. This screen displays all information of current wireless connection.

9
Parameters Description
Mode
Select from “Station” or “Access Point”. For more information
regarding Access Point Mode configuration
, please refer to the
Chapter 4.
Network Adapter Displays the name of the USB adapter.
Available Network
Lists all the available wirel
ess router/access point in your area.
You can click on the “Refresh” button to update the list.
Current Network
Information
Displays the selected wireless device information of
the
Available Network option. (An SSID must be highlighted first).
Link Status Displays the link status.
Signal Strength Displays the current signal strength.
Link Quality Displays the current link quality.
Tx Frame Displays the number of frames transmitted.
Rx Frame Displays the number of frames received.
Connect this site Connect to the wireless router/access point you have selected.
After connect to a wireless router/access point, the button name “Connect this site”
will become “More settings…”. You can click this button and refer to the section below
to change the settings.

10
3.2 Configuring General Settings
Click “Change” to configure the adapter’s General Connection Setting.
Parameters Description
Channel This setting is for Access Point Mode only.
Tx Rate
Select the desired transmission rate, or leave the defaul
t setting
of “Auto” to allow the adapter to automatically select the
optimum rate.
When WL-U356A connects to an USB1.1
port, Tx Rate will be
fixed to 802.11b standard. The Max. transfer rate will be
11Mbps.
SSID You can enter the SSID of the wireless ro
uter/access point you
wish to connect to.
Any
Check this box to a
llow you connect to any available wireless
router/access point.
(Check this box if you’re trying to connect
to a public hot spot and don’t know the SSID).
Network Type
Choose from “Infrastr
ucture” (for connecting to a wireless
router/access point) or “Ad-Hoc” (for computer-to-
computer
networking, bypassing the wireless router/access point).
Encryption
Choose from “Disable” or “Enable”. When “Enable”
selected,
you should refer to next sectio
n to configure encryption
settings.,
Authentication
Mode
Choose from “Auto” (recommended), “Open System”, or
“Shared Key”.
Open System:
With the same WEP key between the stations,
the stations don’
t need to be authenticated. This is the default
option.

11
Shared Key:
With the same WEP key between the stations in
this Authentication algorithm, this type will
use packets with
encryption by transferring a challenge text
which will be
acknowledge by both side of the stations
. In order to choose
which authenticati
on algorithm will be used, you must know
which one the station supports this algorithm first.
Apply After click “Change”
button, the button name will turn into
“Apply”. Please click “Apply” to save the configuration.
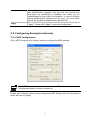
3.3 Configuring Encryption Security
3.3.1 WEP Configuration
Click “WEP Encryption Key Setting” button to configure the WEP settings.
The WEP Key settings must be identical to the WEP settings of the wireless
router/access point you wish to connect to.
Please click “Change” button to start configure the WEP Setting. After click, the button
name will turn into “Apply’.

12
Parameters Description
Key Length Select the appropriate encryption key length.
Default Key ID Select which of the four Key Values you want to use.
Key Format Select either Hexadecimal (0-9, A-
F) or ASCII (any number or
letter).
Key Value
Enter the applicable key values. Up to four key values may be
entered. Note the following rules when entering Key values:
• 64-bit key length requires 10 Hexadecimal characters (0-
9,
A-F) or 5 ASCII characters (any number or letter).
• 128-bit key length requires 26 Hexadecimal characters (0-
9,
A-F) or 13 ASCII characters (any number or letter).
• 256-bit key length requires 58 Hexadecimal characters (0-
9,
A-F) or 19 ASCII characters (any number of letter).
Apply Save settings.
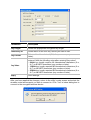
After you have applied the changes, return to the utility’s main screen and select the
wireless router/access point you wish to connect to. Click “Yes” in below dialog box to
connect to the encrypted wireless device.

13
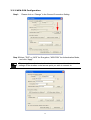
3.3.2 WPA-PSK Configuration
Step1: Please click on “Change” in the General Connection Setting.
Step 2:Select “TKIP” or “AES” for Encryption, “WPA PSK” for Authentication Mode,
and click “Apply”.
The encryption method and authentication mode
must be identical to the
settings of the wireless router/access point you wish to connect to.

14
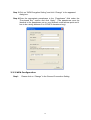
Step 3: Click on “WPA Encryption Setting” and click “Change” in the appeared
dialog box.
Step 4: Enter the appropriate passphrase in the “Passphrase” field under the
“Pre-shared Key” section and click “Apply”. (The passphrase must be
identical to the passphrase set on your wireless router/access point and it
has to be a string between 8 to 63 ASCII characters long).
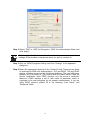
3.3.3 WPA Configuration
Step1: Please click on “Change” in the General Connection Setting.

15
Step 2: Select “TKIP” or “AES” for Encryption, “WPA” for Authentication Mode, and
click “Apply”.
The encryption method and authentication mode
must be identical to the
settings of the wireless router/access point you wish to connect to.
Step 3: Click on “WPA Encryption Setting” and click “Change” in the appeared
dialog box.
Step 4: Select the appropriate protocol in the “Protocol” field. There are two kinds
of protocols for WPA user authentication- TLS and PEAP. TLS and PEAP
require a Radius server and the Certificate Authority. The main difference
between the 2 protocols is TLS requires both the radius server’s and the
client’s certificates, while PEAP requires only the server’s certificate.
Moreover, PEAP requires a set of user name of password, which is
supposed to be pre-configured by the network administrator. If you are
using PEAP protocol, please fill in the following “User Name” and
“Password” fields.

16
Step 5: All available certificates for TLS or PEAP will be displayed in the
“Certificate” drop-down list. Please select a proper one for user or server
authentication.
Step 6:Click “Apply” to finish the configuration.
3.4 Configuring Profile
Page is loading ...
Page is loading ...
Page is loading ...
Page is loading ...
Page is loading ...
Page is loading ...
Page is loading ...
Page is loading ...
Page is loading ...
Page is loading ...
Page is loading ...
Page is loading ...
Page is loading ...
Page is loading ...
-
 1
1
-
 2
2
-
 3
3
-
 4
4
-
 5
5
-
 6
6
-
 7
7
-
 8
8
-
 9
9
-
 10
10
-
 11
11
-
 12
12
-
 13
13
-
 14
14
-
 15
15
-
 16
16
-
 17
17
-
 18
18
-
 19
19
-
 20
20
-
 21
21
-
 22
22
-
 23
23
-
 24
24
-
 25
25
-
 26
26
-
 27
27
-
 28
28
-
 29
29
-
 30
30
-
 31
31
-
 32
32
-
 33
33
-
 34
34


Planet WL-U356A User manual
- Category
- WLAN access points
- Type
- User manual
Ask a question and I''ll find the answer in the document
Finding information in a document is now easier with AI
Related papers
Other documents
-
Edimax 802.11b-g-n User manual
-
 Planet Technology WL-U356 User manual
-
ZyXEL G-360 V2 User manual
-
Emtec WI200 User manual
-
Allied Telesis AT-WCU200G User manual
-
 ZyXEL Communications AG-200 User manual
-
Hawking Technology Network Card HWU54G User manual
-
ZyXEL NWD-211AN User guide
-
-
Abocom EEE 802.11b/g Wireless USB 2.0 Adapter User manual

