Page is loading ...

Befestigen Sie das Fassa-
denelement an der Wand!
Nehmen Sie den äußeren
Putzschutzdeckel des
Rundkanals DA 160 ab.
Tragen Sie auf der Rück-
seite des Fassadenelemen-
tes Klebe- und Armierungs-
mörtel des bauaufsichtlich
zugelassenen WDVS auf!
Stecken Sie das Fassaden-
element auf den Überstand
des Rundkanal auf!
Einbauanleitung für das Fassadenelement
Typ LUNOtherm-S Bestell-Nr.: 41154
Versandeinheit
Montage
?
Kürzen Sie (wenn nötig) mit der
Bausäge das Fassadenelement.
Sie können das Unterteil beidsei-
tig kürzen, die maximale Kürzbar-
keit entnehmen Sie bitte dem
Maßbild am Anfang dieser Anlei-
tung.
Beachten Sie dabei folgendes:
Entnehmen Sie den Putzrahmen
um diesen wieder in das gekürzte
Element einzuschieben!
Berücksichtigen Sie beim Kürzen
die Dicke der unteren Abschluss-
platte der Armierung, des Armie-
rungsmörtels und des Putzes!
A) Ziehen Sie den Putzrahmen entsprechend der Dicke von Armierung, Armierungsmörtel und Putz aus dem Fassadenelement heraus
(der Putzrahmen ist putzbündig zu positionieren). Dichten Sie Unterkante, Oberseite und Seitenflächen mit Gewebeeckwinkeln ab
(verkleben!). Führen Sie Armierung und Putz entsprechend der bauaufsichtlichen Zulassung des jeweiligen WDVS aus! Für den Putz-
rahmen ist die Armierung auszuschneiden!
B) Entfernen Sie nach Fertigstellung des Putzes den Putzschutzdeckel.
C) Setzen Sie das Insektenschutzgitter auf.
Zubehör:
Insektenschutzgitter
Bestellnr.: 41 155 anthrazit
Bestellnr.: 41 156 weiß
Überprüfen Sie die Lieferung auf Vollständigkeit und einwandfreien Zustand!
Die Montage des Fassadenelementes erfolgt innerhalb des jeweiligen WDVS. Die Einbauvorschriften der zugehörigen bauaufsichtli-
chen Zulassung des verwendeten WDVS sind zu beachten.
ES IST DARAUF ZU ACHTEN, DASS DIE VORGABEN DES DIBT BZW. DER LANDESBAUORDNUNG BZW. DES JEWEILS GÜLTIGEN
BAURECHTS EINGEHALTEN WERDEN.GGF. SIND WEITERFÜHRENDE MASSNAHMEN ZUM BAULICHEN BRANDSCHUTZ
(BRANDRIEGEL, EINKAPSELUNG USW.) NOTWENDIG.
DAS LUNOTHERM-S BESTEHT IM WESENTLICHEN AUS EPP, BITTE BEACHTEN SIE DIES BEI DER AUSWAHL DES KLEBSTOFFES!
Wichtig: Überprüfen Sie den Überstand des Rundkanals DA 160! Kürzen Sie gegebenenfalls!
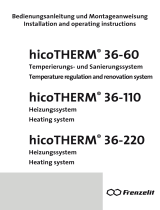
Montage in dünnschichtigen Putzsystemen Montage in dickschichtigen Putzsystemen
Positionierung des Putzrahmens (mit Darstellung des Fassadenelements bei Montage in der Dämmung)
a) Putz; b) Putzabschlussprofil; c) Armierung und Armierungskleber und g) Dämmung - eines bauaufsichtlich zugelassenen Wärme-
dämmverbundsystems (WDVS), e) Putzrahmen; f) Insektenschutzgitter
LUNOS Deutschland
LUNOS Lüftungstechnik GmbH & Co. KG
für Raumluftsysteme
Wilhelmstr. 31
13593 Berlin · Germany
Tel. +49 30 362 001-0
Fax +49 30 362 001-89
www.lunos.de
Maßbild
Setzen Sie das Oberteil entsprechend der
gewählten Einbaulage auf das Unterteil auf
und verbinden Sie beide Teile umlaufend
mit dem beigefügten Dichtungsklebeband.
Putzrahmen
Reinigung und Wartung
Übergeben Sie das LUNOtherm-S nur in sauberem und gereinigtem Zustand dem Nutzer!
Das Gerät muss regelmäßig gereinigt werden! Die Reinigung darf nicht von Kindern oder Personen durchgeführt werden, die aufgrund ihrer
physischen, sensorischen oder geistigen Fähigkeiten oder ihrer Unerfahrenheit nicht dazu in der Lage sind, diese durchzuführen.
Bei den zusammen mit dem LUNOtherm-S montierten Lüftungsgeräten beachten Sie bitte die jeweiligen Wartungshinweise!
Kondensat
Im LUNOtherm-S kann während der Heizperiode Kondensat auftreten und aus der Laibungsöffnung herausfließen. Achten Sie bitte im Winter
darauf, dass es zu keiner Eisbildung auf dem Gehweg kommt oder sich Eiszapfen bilden, die zur Gefahr für Passanten werden können!
Wichtiger Hinweis:
Überprüfen Sie vor der Montage den
Überstand des Rundkanals DA 160.
Bei zu großem Überstand Funktions-
verlust des Fassadenelements!
Kürzen Sie den Rundkanal gegebe-
nenfalls!
außen innen
5mm
Ab hier
kürzen!
Bis hierher
maximal kürz-
bar!
Oberteil
Unterteil
ab hier
kürzen!
Unterteil
Maße in mm
700 bis minimal 400
350
175
100
320
350
60
40
700 bis minimal 400 230
930 bis minimal 630
Einbaubeispiele
Die Montage des LUNOtherm-S
sollte wie abgebildet neben dem
Fenster erfolgen. Das Oberteil
kann um 180 Grad gedreht auf
das Unterteil gesteckt werden,
dadurch ist eine spiegelbildliche
Montage möglich. Eine Montage
mit unten befindlichem Rundka-
nal ist nicht zulässig, da die
Gefahr des Eindringens von
Regenwasser besteht.
Auf Anfrage informieren wir Sie
gern über weitere mögliche
Einbaupositionen.
Richtig Falsch
Fenster
f
Rundkanal
Fenster
Rundkanal
Fenster
Wand Wand
a a
b
g g
c c
e
e
f
Dämmung
Montage mit Überdämmung:
Montage mit Unterdämmung:
Fenster
Rundkanal
Wand
Fenster
Dämmung
Rundkanal
Wand
Fassadenelement
Oberteil
(Material EPP, bei
Klebstoffwahl
beachten)
Unterteil
(Material EPP, bei
Klebstoffwahl beachten)
+ Dichtungsklebeband
Putzrahmen
Putzschutz-
deckel
345
Putzschutzdeckel
A) B) C)
mit Gewebeeckwinkel
abdichten
Insekten-
schutzgitter
Wichtig!
Bei Unterdämmung erhöht sich der Rohrüberstand
von 5mm um die Dicke der Unterdämmung!
Putzrah-
men
maximal
40 mm
heraus-
ziehbar
Rohwand ohne Putz
Wichtig!
Bei Unterdämmung erhöht sich der
Rohrüberstand von 5mm um die
Dicke der Unterdämmung!

Attach the façade element
to the wall!
Remove the outer plaster
protection cap of the wall-
tube DA 160.
Apply adhesive and reinfor-
cing mortar of the ETICS
approved by the building
authorities to the back of
the façade element ! Plug
the façade element onto
the excess length of the
wall-tube!
Installation Manual for the Façade Element
Type LUNOtherm-S Order no.: 41154
Shipping unit
Installation
?
Shorten the façade element (if
necessary) using a construction
saw. You can shorten the lower
part on both sides, for the maxi-
mum shortenability please refer
to the dimension drawing at the
beginning of this manual.
Please note the following:
Remove the plaster frame in
order to push it back into the
shortened element!
When shortening, consider the
thickness of the lower end plate
of the reinforcement, the reinfor-
cing mortar and the plaster!
A) Pull the plaster frame out of the façade element according to the thickness of reinforcement, reinforcing mortar and plaster (the plaster
frame must be positioned flush with the plaster). Seal the lower edge, upper side and side surfaces with fabric corner angles (glue!).
Carry out reinforcement and plastering in accordance with the technical approval of the relevant ETICS! For the plaster frame, the
reinforcement must be cut out!
B) After finishing the plaster, remove the plaster protection cap.
C) Put on the insect screen.
E333 02.22
Accessories:
Insect screen
Order No..: 41 155 anthracite
Order No.: 41 156 white
Please check the delivery for completeness and mint condition!
The installation of the façade element is carried out within the respective ETICS. The installation regulations of the relevant technical
approval of the ETICS used must be observed.
CARE MUST BE TAKEN TO ENSURE THAT THE SPECIFICATIONS OF THE DIBT OR THE STATE BUILDING REGULATIONS OR THE
APPLICABLE BUILDING LAW ARE COMPLIED WITH.ADDITIONAL MEASURES FOR STRUCTURAL FIRE PROTECTION (FIRE BARS,
ENCAPSULATION, ETC.) MAY BE NECESSARY.
THE LUNOTHERM-S CONSITS ESSENTIALLY OF EPP, PLEASE NOTE WHEN CHOOSING ADHESIVE!
Important: Check the excess length of the wall-tube DA 160! Shorten if necessary!
Installation in thin-layer plaster systems Installation in thick-layer plaster systems
Positioning of the plaster frame (with illustration of the façade element when installed in the insulation)
a) plaster; b) plaster end profile; c) reinforcement and reinforcement adhesive and g) insulation - of a thermal insulation composite sys-
tem (ETICS) approved by the building authorities, e) plaster frame; f) insect screen
LUNOS Deutschland
LUNOS Lüftungstechnik GmbH & Co. KG
für Raumluftsysteme
Wilhelmstr. 31
13593 Berlin · Germany
Phone +49 30 362 001-0
Fax +49 30 362 001-89
www.lunos.de
Dimension drawing
Place the upper part on the lower part ac-
cording to the selected installation position
and connect both parts circumferentially
using the enclosed adhesive sealing tape.
Plaster frame
Cleaning and maintenance
Hand over the LUNOtherm-S to the user only when it is in clean condition!
The device must be cleaned regularly! The cleaning must not be carried out by children or persons who are unable to do so due to their physi-
cal, sensory or mental abilities or inexperience.
Please observe the respective maintenance instructions for the ventilation units installed together with the LUNOtherm-S!
Condensate
In the LUNOtherm-S, condensate can occur during the heating period and flow out of the reveal opening. In winter, please make sure that
there is no ice formation on the sidewalk or that no icicles form which can become a hazard for passers-by!
Important note:
Before installing, check the excess
length of the wall-tube DA 160.
If the excess length is too big, the
façade element will not function pro-
perly!
Shorten the wall-tube if necessary!
outside inside
5mm
Shorten
from here!
Up to here
maximum shor-
tenable!
Upper part
Shorten
lower part
from here!
Lower part
Dimensions in mm
700 to minimum 400
350
175
100
320
350
60
40
700 to minimum 400 230
930 to minimum 630
Installation examples
The LUNOtherm-S should be
installed as shown next to the
window. The upper part can be
turned by 180 degrees when
plugged onto the lower part,
thus enabling mirror-inverted
installation. Installation with a
wall-tube at the bottom is not
permitted, as there is a risk of
rain water ingress.
We will be pleased to inform you
on request about further possib-
le installation positions.
Right Wrong
Window
f
Wall-tube
Window
Wall-tube
Window
Wall Wall
a a
b
g g
c c
e
e
f
Insulation
Installation with over-insulation:
Window
Installation with under-insulation
Wall-tube
Wall
Window
Insulation
Wall-tube
Wall
Façade element
Upper part
(Material EPP,
note when choo-
sing adhesive)
Lower part
(Material EPP, note when
choosing adhesive)
+ Adhesive sealing tape
Plaster frame
Plaster pro-
tection cap
345
Plaster protection cap
A) B) C)
Seal with fabric corner
angle
Insect screen
Important!
In the case of under-insulation, the 5 mm excess length
of the tube increases by the thickness of the under-
insulation!
Plaster
frame can
be pulled
out by a
maximum
of 40 mm
Raw wall without plaster
Important!
In the case of under-insulation, the 5 mm
excess length of the pipe increases by
the thickness of the under-insulation!
/