Page is loading ...

④
Measurement Range of 025mm ・・・・・ 0.000
Measurement Range of 2550mm ・・・・・ 25.000
0 5
ON/OFF
SET
ABS/INC
INC SetABS
0
45
40
5
20
25
30
15
20
25
30
15
100U・150U 300U
SR5
SR5
Profile Profile
Profile
Profile
Profile
Profile
Profile
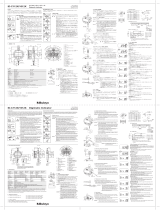
DIGITAL MICROMETER
Thank you for purchasing the Niigata Seiki Digital Micrometer.
For proper operation, please read this manual thoroughly and follow the procedures described.
INSTRUCTION MANUAL
PARTS IDENTIFICATION
Model:MCD**-** <combined>
Clamp
Spindle
Insulating
Cover
Frame
0Point Adj. Hole
【Rear】
【Accessories】
[SET] Button
[ON/OFF] Button
[ABS/INC] Button
LCD Display
Scale
Measuring
Surfaces
Model MCD230-25SA shown
Anvil (Stationary)
Sleeve Thimble Ratchet Stop
※For 2550mm Gauge only
● Spanner
●SSR44 (Silver Oxide
Batt.)
●Calibration Standard
※ For test
ERROR CORRECTIVE ACTION
Battery
Cover
① Rotate the Battery Cover
on rear using coin or
similar tool.
② Insert battery with(+)
side up.
③ Replace Battery Cover.
CAUTION
Only use SR44 type battery.
Open Measured value is
wrong.
LCD does not display.
Displayed value is
unstable.
Display is not clear.
Cycle power by removing and
replacing battery.
Replace battery with new one.
※
※
If problem persists, or if you have any questions, please contact distributor
or place of purchase.
Please note, manufacturer is unable to respond to inquires or provide
service directly. Please contact distributor or place of purchase.
※
Setting the origin used for normal measurements.
Once set, even when power is off the origin is saved and does not have to be reset with each use.
When battery is replaced, origin will go to default setting. Please reset.
① Remove any grease or dust from the measuring surfaces using a clean cloth, such as a lens cleaning cloth. Make sure no
foreign matter is adhered to the measuring surfaces.
②
③
With Spindle Clamp loose, turn until measuring surfaces touch. Turn until Ratchet Stop clicks 1 3 times.
For 2050mm range models, please insert the supplied Calibration Standard between measuring surfaces.
Check to Scale to see if it reads "0" and follow the procedure below if necessary.
To align the Thimble Scale 0Point reference lines.
1. Tighten Spindle Clamp to lock Spindle.
2. Insert the spanner into 0point Adjustment Hole on rear of Thimble.
3. Use spanner to rotate Sleeve to align the 0Point lines.
Press the [SET] Button for more than two seconds.
LCD will display "SET" for 0.5 seconds, and then the display will read as shown below:
The gauge is now ready to take measurements.
① Remove any grease or dust from the measuring surfaces using a clean cloth, such as lens cleaning cloth.
Make sure no foreign objects are adhered to the measuring surfaces.
② Place object to be measured between the Anvil and Spindle.
③ With the Thimble Clamp loose, turn the Ratchet Stop to capture the measured object between the measuring surfaces.
Stop after 1 3 Clicks from the Ratchet Stop.
④ The measured value is displayed on the LCD display.
※ Measurement can also be read off Thimble and Sleeve as with a standard micrometer.
For comparative measurements, the display reading can be zeroed at any position by pressing the [ABS/INC] Button.
In this mode, the zero point is retained in memory. Press the [ABS/INC] Button again to return to absolute mode.
Press [ON/OFF] Button to turn power ON; measurement will display on the LCD. Press a second time to turn power OFF.
Always clean measuring surfaces with soft cloth before use.
This is a precision instrument, handle with care. Do not drop or subject to excessive forces.
Keep away form high voltage and strong magnetic fields. Instrument damage may result.
Do not turn spindle more than 3mm above upper measurement range.
Keep instrument away from direct sunlight or high temperatures such as in a car, or near a heat source.
Do not expose to water or oils.
Do not disassemble or modify.
After use, wipe with a soft cloth to remove any dirt or grime, and apply a rust preventative
oil before storage. Keep out of reach of children.
Please do not use organic solvents to clean the body of the instrument.
When not being used for long period of time, please remove battery.
Only use as directed. Improper use may cause accident or injury.
MCD233-100U
APPLICATIONS・FEATURES・SPECIFICATIONS
POWER
INSERTING BATTERY TROUBLESHOOTING
SETTING THE ZERO-POINT
OPERATION
INC MODE
CAUTION
0-25 0.001 6
6
8
0.001
0.001
0-25
0-25
Range
mm
Resolution
mm
Accuracy
µm
Flatφ6.5mm
Flatφ6.5mm
φ2× 5mm
φ3×10mm
φ20mm
φ20mm
6×0.75mm
6×0.75mm
6×0.4mm
6×0.4mm
Flat / Round
φ6.5mm
Model No.
MCD233-150U
MCD233-300U
DIGITAL DEEP THROAT MICROMETER
For measuring thickness of
steel plate.
Carbide tip・Ratchet stop・
Insulating cover
●
MCD230-25SA
DIGITAL SMALL MEASURING FACE MICROMETER
0-25 0.001 4
40.0010-25
Range
mm
Resolution
mm
Accuracy
µm
Model No.
MCD230-25SB
Narrow measuring surfaces for measuring
diameter of splined shafts.
Carbide tipped measuring surfaces.
Ratchet stop・Insulating cover
●
●
●
MCD235-25BA
DIGITAL BLADE MICROMETER
0-25 0.001 4
40.00125-50
Range
mm
Resolution
mm
Accuracy
µm
Model No.
MCD235-50BA
MCD235-25BAU
0-25 0.001 4
40.00125-50
MCD235-50BAU
Blade shaped measuring surfaces for
measuring diameter of grooves.
Ratchet Stop・Insulating cover
●
●
●
●
MCD230-25D 0-25 0.001 4
40.00125-50
Range
mm
Resolution
mm
Accuracy
µm
Model No.
MCD230-50D
DIGITAL GEAR TOOTH MICROMETER
For measuring tooth span for spur and
helical gears.
Measures gears of module 0.5 to 6.
Ratchet stop・Insulating cover
MCD236-25T 0-25 0.001 4
Range
mm
Resolution
mm
Accuracy
µm
Model No.
DIGITAL TUBE MICROMETER
For measuring pipe wall thickness.
Carbide tip ・Ratchet stop・Insulating cover
MCD232-25P 0-25 0.001 4
Range
mm
Resolution
mm
Accuracy
µm
~15°
Measuring
Surface Profile
Model No.
DIGITAL POINT MICROMETER
●For measuring narrow groove OD, such as
drill web thickness.
Carbide tip ・Ratchet stop・Insulating
cover
Taper angle
Accuracy specification does not include quantization error (±1 count)
Niigata Seiki Co., Ltd.
5-3-14, Tsukanome, Sanjo, Niigata, Japan, 955-0055
Tel. : +81-256-33-5522 Fax. : +81-256-33-5518
MAIL [email protected]
URL http://www.niigataseiki.co.jp
Measuring
Surface Profile
Measuring
Surface Profile
Measuring
Surface Profile
Measuring
Surface Profile
Measuring
Surface Profile
●
●
●
●
●
●
●
●
●
●
●
●
●
Clean measuring surfaces with
cloth.
Confirm 0Point and rezero with
long press of [SET] Button (> 2 s.)
●
Battery Cover
●
●
●
●
●
●
Flat / Round
φ6.5mm
●
●
●
●
●
●
●

0 5
ON/OFF
SET
ABS/INC
INC SetABS
0
45
40
5
20
25
30
15
20
25
30
15
100U 150U 300U
SR5
SR5
MCD **-**
ON/OFF
SET
ABS/INC
LCD
MCD230-25SA
25-50
SR44
SR44
0SET
2
LCD
OFF
13
25-50mm
.
.
.
SET2
LCDSet0.5
0-25mm0.000
25-50mm25.000
13
LCD
ABS/INC
ABS/INC
ON/OFFONLCDOFF
3mm
MCD233-100U
INC
0-25 0.001 6
6
8
0.001
0.001
0-25
0-25
mm mm µm
φ6.5mm
φ6.5mm
φ2 5mm
φ3 10mm
φ20mm
φ20mm
6 0.75mm
6 0.75mm
6 0.4mm
6 0.4mm
φ6.5mm
φ6.5mm
MCD233-150U
MCD233-300U
MCD230-25SA
0-25 0.001 4
40.0010-25
mm mm µm
MCD230-25SB
MCD235-25BA
0-25 0.001 4
40.00125-50
mm mm µm
MCD235-50BA
MCD235-25BAU
0-25 0.001 4
40.00125-50
MCD235-50BAU
MCD230-25D 0-25 0.001 4
40.00125-50
mm mm µm
MCD230-50D
0.5 6
MCD236-25T 0-25 0.001 4
mm mm µm
MCD232-25P 0-25 0.001 4
mm mm µm
15
I96-K3 2101
URL http://www.niigataseiki.co.jp
/


