
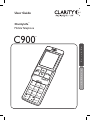
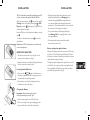
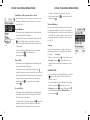
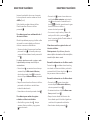
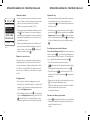
User Guide
ClarityLife
TM
Mobile Telephone
C900
TM
OK
1
2
3
5
8
0
+
9
7
4
6
*
#
a
b
c
d
e
f
g
h
i
p
q
r
s
w
x
y
z
a
/
/
A
1
j
k
l
t
u
v
m
n
o
C900
E
S
P
A
ñ
O
L
E
N
G
L
I
S
H

TABLE OF CONTENTSTABLE OF CONTENTS
Introduction .......................................................................................................... 4
Important Safety Instructions/Warnings ................................................... 5
Parts Checklist ....................................................................................................11
Quick Reference Guide ....................................................................................12
C900 Keys/Functions .........................................................................................13
Installation
Inserting the SIM Card .......................................................................................15
Inserting the Battery ..........................................................................................16
Inserting Standard Batteries ..............................................................................16
Charging the Battery ..........................................................................................16
Battery and Strength Indication ........................................................................17
Basic Telephone Operation
Turning the phone on and off ............................................................................18
Setting Date and Time .......................................................................................18
Making and Ending a Call ...................................................................................18
Accepting an Incoming Call................................................................................19
Last Number Redial ...........................................................................................19
Phonebook
Dialing from the Phonebook ............................................................................ 20
Changing Phonebook Entries ............................................................................21
Searching Phonebook Entries ............................................................................21
Managing the Top 10 ......................................................................................... 22
Phonebook settings ........................................................................................... 22
Saving numbers from caller lists to Phonebook .............................................. 22
Saving numbers to Phonebook via Text (SMS) ............................................... 23
Emergency Calls ................................................................................................ 24
Saving the Emergency Numbers ...................................................................... 24
In Need of Assistance Right Away ................................................................... 25
What Happens after you press the Help Button............................................ 25
Deactivating the Emergency Button ................................................................ 25
Other Telephone Operations
Small Menu ......................................................................................................... 26
Dialed Numbers ................................................................................................ 26
Missed Calls ....................................................................................................... 26
Received Calls .................................................................................................... 26
Voicemail ............................................................................................................ 27
Settings ............................................................................................................... 27
Alarm Clock ....................................................................................................... 28
Manual Key and Auto Key Lock ....................................................................... 29
My Menu ............................................................................................................ 30
Reminders .......................................................................................................... 30
SMS (Text) Messaging
SMS On and Off .................................................................................................31
Writing an SMS ...................................................................................................31
Sending your written SMS ................................................................................ 33
Answering a received SMS ............................................................................... 33
Creating and Inserting Templates .................................................................... 34
Overview of Menus ........................................................................................... 36
Troubleshooting ................................................................................................. 40
Technical Specifications .................................................................................. 42
FCC Requirements and Regulations .......................................................... 44
Warranty and Service ..................................................................................... 46

4 5
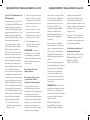
INTRODUCTION IMPORTANT SAFETY INSTRUCTIONS
Dear mobile phone users,
Congratulations on having purchased your ClarityLife mobile
phone! This booklet will provide you with the most essential
information needed for quick familiarization with your new
mobile phone. You can use the following pages of this user guide
to decide on just how much time you want to invest in getting to
know the most important functions of your mobile phone.
We hope you will enjoy using your ClarityLife phone.
Please read the following safety instructions before using your ClarityLife C900 Dual Band
Mobile Phone and accessories. Please keep these instructions for your reference. When
using this product, these safety precautions and warnings should be followed to reduce the
risk of fire, electric shock, injury to persons and damage to property. Additional warnings
may be present on the product, packaging, or in the user instructions.
WARNINGS
Emergency Call Feature
When the emergency button is pressed the emergency numbers saved in the phone’s
address book will be called in the order you have selected until a party is reached. Up
to five emergency numbers may be saved in the address book. The numbers and the
order they will be called must be entered into the phone in order to ensure the desired
numbers are dialed when the emergency button is pressed. After you have entered
your five emergency numbers, you should test the phone’s emergency call feature by
pressing the emergency button to ensure that you have correctly entered the numbers
into the phone.
Since the phone service must be purchased in advance through monthly pre-paid
credits, you must ensure that you have made your pre-payment in order for the phone
service to remain activated. If you do not make your monthly pre-payment or if you do
not make a full monthly payment, you will lose your phone service, and the phone and
the emergency call feature will not be available.
You must also ensure that the phone’s battery is fully-charged at all times and that the
phone is in good working condition in order for the emergency call feature to work.
If the phone is outside of a coverage area, if network service is temporarily suspended
by the network carrier, or if there is network or phone interference, the emergency call
feature may not be available during those times.
This phone is not equipped with a global positioning service or other means to locate
the physical location of the phone. Consequently, if an emergency situation arises but
you are unable to provide your location to an emergency contact person in your ad-
dress book, neither they nor an emergency response service may be able to locate you.
The SIM card must be installed and activated before you will receive any phone service.
If the SIM card is damaged or replaced, the emergency contact numbers you entered
into the phone will be lost. In that case you must re-enter your five emergency contact
numbers into the phone’s address book in order to restore the emergency call feature.

6 7
After you have re-entered your five emergency numbers, you should test the
phone’s emergency call feature by pressing the emergency button to ensure that you
have correctly entered the numbers into the phone.
RADIO FREQUENCY INTERFERENCE
Pacemakers
The Health Industry Manufacturers Association recommends that a minimum sepa-
ration of 6 inches be maintained between a handheld wireless phone and a pace-
maker to avoid potential interference with the pacemaker. Persons with pacemakers:
•Shouldalwayskeepthephonemorethan6inchesfromtheirpacemakerwhen
the phone is turned on;
•Shouldnotcarrythephoneinabreastpocket;
•Shouldusetheearoppositethepacemakertominimizethepotentialfor
interference; and
If you have any reason to suspect that interference is taking place, turn
the phone off immediately.
Hearing Aids
The phone may interfere with some hearing aids. If it does, consult the hearing aid
manufacturer or your physician for alternatives or remedies.
Other Medical Devices
If you use any other personal medical device, consult the device manufacturer or
your physician to determine if it is adequately shielded from external RF energy.
COMPLIANCE WITH MOBILE PHONE USE RESTRICTIONS
Air Travel
Mobile phone use may be prohibited during air travel.
Posted Signs
Obey posted signs or notices prohibiting mobile phone use in certain locations,
including but not limited to blasting areas, health care facilities and aircraft.
Health Care Facilities
Turn the phone off in health care facilities when any regulations posted in these areas
instruct you to do so. Hospitals and health care facilities may use equipment that is
sensitive to external RF energy.
Driving Safely
Use of a mobile phone with or without a headset while driving cars or other motor-
ized vehicles is not recommended and is against the law in some areas. Check and
follow local laws and regulations regarding use of a mobile phone while driving.
If you decide to use a mobile phone while driving a vehicle, give your full attention to
driving safely and keep the following Driving Tips in mind
*
:
•Gettoknowyourphoneanditsfeaturessuchasspeeddialandredial.
•Positionyourphonewithineasyreach.
•Dialsensiblyandassessthetrafc;placecallswhenyouarenotmoving.
•Letthepersonyouarespeakingwithknowyouaredriving;ifnecessarysuspend
the call in heavy traffic or hazardous weather conditions.
•Donottakenotesorlookupphonenumberswhiledriving.
•Useaheadphonesorheadsetsforconvenienceandcomfort.
•Donotengageinstressfuloremotionalconversationsthatmightdivertyour
attention from the road.
•Dial911orotherlocalemergencynumberstoreportseriousemergencies–it’s
free from your phone
•Useyourphonetohelpothersinemergencies.
*
Driving Tips used with permission from CTIA-The Wireless Association
®
For Vehicles Equipped with an Air Bag
An air bag inflates with great force. Do not store the phone or any of its accessories
in the area over the air bag or in the air bag deployment area.
IMPORTANT SAFETY INSTRUCTIONS IMPORTANT SAFETY INSTRUCTIONS

8 9
MAINTENANCE AND CARE
Handling the Phone
Do not drop, disassemble, open, crush, bend, deform, puncture, shred, microwave,
incinerate, paint, or insert foreign objects into the phone.
If the phone has been submerged in water, punctured, or subjected to a severe fall,
do not use it until you take it to an authorized service provider. For service informa-
tion, contact Clarity at 1-800-426-3738.
Discontinue use of your phone and contact Clarity at 1-800-426-3738 if
the product overheats, has a damaged cord or plug or if the product has
been damaged.
Removable Battery
This phone contains removable battery cells. Change the battery cells only as
directed in the user manual.
Connecting Accessories
Do not force connectors into ports. In case of experiencing unreasonable resistance
when attempting to insert a connector in a port, check for compatibility, obstruc-
tion in the port, or a disfigured connector.
Do not insert anything into the phone other than as directed in the user manual
because this may cause damage to the internal components or cause injury to you.
Not Customer Serviceable
This phone is not customer serviceable. Do not attempt to repair or modify the
phone. Doing so may result in injury or void your warranty.
Product Cleaning
Use only a slightly damp lint-free cloth to clean the phone. Use of household clean-
ers, alcohol, or other chemicals may damage your mobile phone.
USE ENVIRONMENT
Avoiding Water and Wet Locations
Do not use the phone in rain, or near washbasins or other wet locations. Take care
not to spill any food or liquid on the phone. In case the phone gets wet, unplug all
cables, turn off the phone before cleaning, and allow it to dry thoroughly before
turning it on again. Do not attempt to dry the phone with an external heat source,
such as a microwave oven or hair dryer.
Choking Hazard
Never allow children to play with the phone or accessories—small parts may be a
choking hazard.
Explosive Atmosphere Warning
Do not use or charge the phone in areas with potentially explosive atmospheres
such as (but not limited to): fueling areas, blasting areas, in vehicles transporting
flammable fluids, etc. Obey all posted signs.
LISTENING LEVEL WARNING
Exposure to high volume sound levels may damage your hearing. Although there
is no single volume setting that is appropriate for everyone, you should always use
your headset or headphones with the volume set at moderate levels and avoid
prolonged exposure to high volume sound levels. The louder the volume, the less
time is required before your hearing could be affected. You may experience different
sound levels when using your headset or headphones with different devices. The
device you use and its settings affect the level of sound you hear. If you experience
hearing discomfort, you should stop listening to the device through your headset or
headphones. To protect your hearing, some hearing experts suggest that you:
1. Set the volume control in a low position before putting the headset or head
phones on your ears.
2. Limit the amount of time you use headsets or headphones at high volume.
IMPORTANT SAFETY INSTRUCTIONSIMPORTANT SAFETY INSTRUCTIONS

10 11
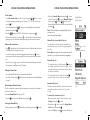
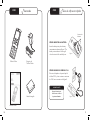
AC AdapterC900 Phone
UserGuide
Rechargeable Battery
OK
1
2
3
5
8
0
+
9
7
4
6
*
#
a
b
c
d
e
f
g
h
i
p
q
r
s
w
x
y
z
a
/
/
A
1
j
k
l
t
u
v
m
n
o
C900
Rechargeable Battery
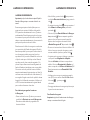
C900
Parts Checklist
3. Avoid turning up the volume to block out noisy surroundings.
4. Turn the volume down if the sound from the headset or headphones prevents
you from hearing people speaking near you. See www.plantronics.com/
healthandsafety for more information on headsets and hearing.
Exposure to Electromagnetic Energy in the Radio Frequency Band
When turned on, this device transmits and receives electromagnetic radiation in
the radio frequency (RF) bandwidth through its antenna. By international scientific
agreement, the unit of measurement of RF energy is the “specific absorption rate”,
or SAR. In the United States, the applicable SAR limit for the C900, set by the FCC
is 1.60 mW/g (millionths of watts per gram of mass), or 1.60 W/Kg (watts per
kilogram of mass). The maximum SAR exposure measured for the C900 was 0.738
W/Kg when the phone was turned on but not in use (body position), and 0.264 W/
Kg when the phone was in use (cheek position). In all cases, the phone was passed
by an independent testing facility.
Disposal and Recycling
Check and follow local laws regarding disposal and recycling of your phone.
IMPORTANT SAFETY INSTRUCTIONS

12 13
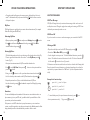
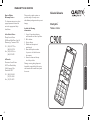
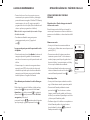
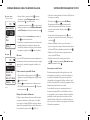
C900
Quick Reference
INSERTING THE BATTERY
Insert the battery into phone battery
compartment as shown in Figure 1. The
battery contacts have to face the gold
colored contacts of the mobile phone.
Battery contacts
Charge the battery for 4 hours
before making your first call.
IMPORTANT
Figure 1
Figure 2
CHARGING THE C900
Connect the Power Adapter into the
bottom of the C900 and the other end in
to a 120V wall outlet as shown in Figure 2.
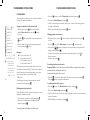
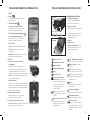
C900 KEYS/FUNCTIONS
1
2
5
6
7
8
9
10
11
4
3
1 Display Screen
2 Arrow keys
For scrolling through the phone book and menu
3 Answer/OK Key
Press to Answer a Call
Press to select option shown on the screen above this key
4 End call/Clear/Back Key
Press to End a Call
Press to select option shown on the screen above this key
5 Alert lights
Green: Blinks during incoming calls
Red: Blinks when the battery needs to be recharged
Orange: Blinks during charging and remains on
when the battery is full
6 Microphone
7 Port for Battery Charger
8 Help Button
Program 5 emergency contacts from the C900’s phone
book. When the Help Button is pressed, these numbers
will automatically dial in the sequence they are programmed.
Note: We do not recommend programming 911 as an
emergency contact.
9 Volume Control
Press (+) or (-) to change the volume during a call. When
the phone is ringing: press to turn off the ring tone (the ring
tone will automatically be on for the next call).
10 Battery Compartment
High-performance Li-ion battery or 3 AAA
Alkaline Batteries
11 Lanyard Ring
InsertLanyard–Thisallowstheusertowearphone
around the neck.

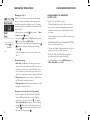
14 15
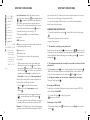
C900 KEYS/FUNCTIONS
Push to Open
the SLIDER
Flashlight
On/Off Alarm clock Key lock
Battery Status
Call forward active
Alarm on
Ring tone off
Clock
Signal strength
Roaming:
There is no additional
charge for roaming if you are on
the ClarityLife Service Plan.
Top 10: the most important numbers
will be at the beginning of the phone
book.
Last Number Redial: Press and
hold for three seconds to redial
last number dialed.
Key: Press and hold: most recent
10 numbers dialed
Text messages: special characters
Key: Press and hold to call your
voicemail service
Key: Shift between capital and lower-
case letters and numbers when writ-
ing text messages
Flashlight
Press and hold: flashlight is on
On/Off Button
Press and hold for 3 seconds
Alarm Clock Button
Activate/deactivate the alarm clock
Key lock
Prevents accidental pressing of keys
(press for 3 seconds to activate/deac-
tivate the key lock)
C900 KEYS/FUNCTIONS
1 Flashlight
2 On/Off Button
Press and hold for three seconds to
turn phone On or Off.
3 Alarm Clock
4 Key Lock
Press to prevent accidental pressing
of keys. Press button for three seconds
to activate or deactivate.
5 To make a Call: slide the phone open
and dial the desired number on
the keypad.
1
3
2 4
5
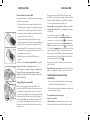
Inserting the SIM Card
To make calls with the phone, you require a SIM card. This
is how it is inserted:
Turn the closed mobile phone around, so its front is facing •
downwards. Hold it with both hands and use your thumbs
to slide the battery cover out applying light pressure (Fig.1)
Remove the battery (if it is already in the phone) by lifting •
it at its lower right corner. (Fig.2)
Pull out the SIM card holder using your fingernail or a •
sharp object. The SIM card holder is on the right side
underneath the emergency button. (Fig.3)
Insert the SIM card into its holder with the gold colored •
contacts facing down and the missing corner of the card
on the bottom right. (Fig.4a)
Slide the SIM card holder back into its slot.•
Error message • Insert SIM card on the display.
Note: Some SIM cards are thinner than others.
If this error message appears although you have already inserted
the SIM card, please insert a thick piece of paper between the
SIM card and the top side of the SIM card holder. (Fig.4b)
PIN Codes for the SIM Card
When first using a new SIM card, a 4-digit PIN code must
be entered. The PIN code is provided in the documentation
you received from your network operator. Other people
cannot turn on your phone without knowing your PIN
(Personal Identification Number). Your PIN is however not
required when your phone is turned on, which would allow
people to use it should it be lost or stolen.
To enter the PIN code, slide open the mobile phone and
enter the PIN using the keypad. Confirm the PIN code with
(possible entry errors when entering the numbers can
be deleted with ).
Paper
Fig. 1
Fig. 2
Fig. 3
Fig. 4a
Fig. 4b
INSTALLATION

16 17
INSTALLATION
Tip: To avoid problems caused by forgetting/losing your PIN
code, we recommend that you deactivate the PIN code.
Open the phone and press the until you have reached
Settings. Next scroll down by pressing the
to PIN
Request, press the . At this point, a 4-digit PIN code
will be requested once again.
Enter the PIN code via the keypad and confirm your entry
with
.
To return to the standby mode, press or close the
mobile phone.
Please note: A PIN code deactivation is not possible with
some network providers.
INSERTING THE BATTERY
The battery contacts have to face the gold colored
•
contacts of the mobile phone. (Fig.5)
Replace the battery cover back by sliding it with the two •
hooks in front onto the mobile phone.
Inserting Standard Batteries
Please note the •
AAA
symbols at the bottom of
the battery compartment. When inserting ensure the
ends match the corresponding symbols.
Put the battery cover back by sliding it with its two •
hooks first onto the mobile phone.
Charging the Battery
Important: Charge the battery for at least 4
hours before making your first call. (Fig. 7)
Insert the power plug into the 120V wall outlet.•
Connect the charger to the phone by plugging it into •
the port at the bottom end of the mobile phone.
Fig. 5
Fig. 6
Fig. 7
During the charging phase, the mobile phone screen •
displays the battery symbol and Charging. At the
same time, the signal light flashes orange when there
is a connection between the charging device and the
mobile phone. (This will start about ten (10) seconds after
the connection of the charger to the phone).
As soon as the battery is fully charged, the display •
shows Battery Full, the orange light will be on and
have stopped flashing.
Now separate the charger from both the mobile •
phone and the power socket.
Battery and signal strength indication
One bar of the battery status icon corresponds to 25% capac-
ity (4 bars = 100%). If the battery level falls under 25% and
the alert at the bottom of the mobile phone blinks red, please
charge the battery using the charger.
The signal strength is displayed on the right of the screen. If it
is below 25%, the reception and the acoustic quality of calls
are strongly affected. If that is the case, please try to find a
place where the signal is better. (Fig. 8)
Fig. 8
INSTALLATION

18 19
BASIC TELEPHONE OPERATION
Turning the phone On and Off
Press down
on the upper side of the phone for 3 seconds. This function allows you
to turn the phone on and off.
SETTING THE TIME AND DATE
Time
Open the phone, press the • button until you have reached Settings, and then
press the to select.
Next press the • button and scroll to Time & Date and select by pressing .
Then select • Set Time by pressing .
Use the keypad or •
buttons to enter desired time. Double digits must be
entered for hour and
minutes (for example “09” and “00” for 9:00). •
After you enter the hour press the button to set minutes. After the desired
time is set press
to save. The display screen will show Time set!
Date
Press the •
button to Set Date then press
the button.
Use the keypad or • to enter Month, Day and Year (MM/DD/YYYY). After
entering the Year press the
button to Save setting.
Making a call
Slide open the mobile phone and dial the phone number using the keypad. Next •
call the number by pressing the button.
To end a call press • button. If the person you are talking to ends the call before
you do, you do not need to press .
Note: You can dial numbers from the phonebook without sliding open your phone,
please see phonebook section
on page 20.
Accepting an incoming call
When your phone is being called, it rings and vibrates. The green alert light and the
torch blinks: the number or name (if stored in the phone book) of the caller is dis-
played on the screen.
Accept a call with
•
or by opening the slider. You
can speak on the phone with the slider both open
or closed.
Press • to end the call.
Please note! Closing the open slider does NOT end the phone call!
To reject a call, press •
when the phone is ringing.
If you do not want to reject a call, but you do not want the phone to keep ringing •
either (e.g. if you are sitting in a waiting room), press the
key of the volume control,
and the ring tone will be switched off for this call.
LAST NUMBER REDIAL
Open the slider, and press the • for three seconds.
Press•
to call the last number dialed.
BASIC TELEPHONE OPERATION

20 21
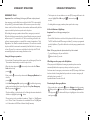
PHONE BOOK
The phone book enables you to save, change and search
for up to 200 names and numbers.
Saving new numbers in the phone book
Open the phone, press
•
button until you have
reached Phone book, then press the
button
to select.
Press the • and scroll to Add contact, then press the
button.
Enter the name of your contact using the keypad and •
save by pressing the
button.
Example:
abc Press once to enter “A”
2 Press twice to enter “B”
Press 3 times to enter “C”
Press 4 times to enter “2”
All characters and functions, which can be selected, are
listed in the sidebar table (Fig. 9). Every button stands for
several characters of functions depending on how often
the respective button is pressed when in the
“ABC mode”.
Use the keypad to enter the phone number. Save the
phonebook entry by pressing .
Dialing from the phonebook
When the slider is closed, contacts in the phone book are
displayed in alphabetical order.
Select the name you wish to call by pressing the•
button to the desired name and number. Call the
number by pressing .
Searching for name and number when slider is open:
PHONEBOOK OPERATIONS PHONEBOOK OPERATIONS
Press the • button to scroll to Phone book and select by pressing .
Next, select • Search Name by pressing .
Search for the phonebook contact by pressing one or more of the starting letter of •
the name on the keypad.
Call the selected number by pressing the•
button.
Changing phone book entries
Open your phone, press the •
button until you reach Phonebook, then press
to select.
Press the •
and scroll to
Edit contact, then press the
button to select.
Next, use the •
buttons or keypad to select the phonebook entry you wish to
change, select by pressing
.
If necessary, correct the name and number by using the keypad or press •
to
delete characters.
Continue, by pressing .
Searching for phone book entries
Important Note: You are able to search and call tele-phone numbers from the phone-
book with the slider both opened and closed.
Searching while the phone slider is closed:
Press the • to scroll to the desired phone book entry and select by pressing .
Press the button once again to dial number.
Searching with the slider opened
Press the • and scroll to Phonebook and select by pressing .
Next, select • Search name by pressing .
Search for the phonebook contact by using the keypad to enter one or more starting •
letters of the name.
Call the number you selected by pressing • .
D . , ! ? ‚ „ @ : 1
D a b c 2 ä à
D d e f 3 è
D g h i 4
D j k l 5
D m n o 6 ö
D p q r s 7 ß
D t u v 8 ü
D w x y z 9
D space; 0
D . , ? ! ‚ „ : ; ( ) @ -
+ $ € £ ¥ # % * & ~ = ¤
D You are able to
change between
lower and upper
case letters, as well
as selecting num-
bers only (“Abc”
“ABC” “abc” “123”)
Fig. 9

22 23
PHONEBOOK OPERATIONS
Managing the Top 10
With the Top 10 function you can list the most frequently
used or most important numbers at the beginning of your
phone book independent of alphabetical order. This means
you can quickly access and call these contacts when the slider
is closed. (Fig. 10)
Open your phone, press the • until you reach Phone-
book, then press
to select.
Next press the • and scroll to Top 10, select by pressing
. Proceed by selecting Add Top No. 1.
Your phone book entries will now be displayed. Use the
buttons to scroll to the desired entry and select by
pressing .
To add more numbers to your Top 10, repeat the steps •
above.
Phonebook settings
Save entry:• specifies where you save new phone book
entries. If you save new contacts to the SIM card, you can
transfer your phone book to other mobile phones. If you
save new entries to the phone memory, the phone book
stays on your mobile phone even if you change the SIM card.
Memory in use:• allows you to search for contacts from
the SIM card and or the phone memory.
Memory status:• this shows how much memory is used on
the SIM card or in the phone book.
Saving numbers from caller lists to phonebook
If you are viewing a caller list (Missed calls, Dialed Calls, •
Received Calls) and wish to save one of the telephone
numbers into the phone book, use the to scroll to
Save to phonebooks at the bottom of the list. Select by
pressing . Next, scroll to the number you wish to save
and press to select. Proceed by entering the name of
the contact and save by pressing .
PHONEBOOK OPERATIONS
SAVING NUMBERS TO PHONEBOOK
VIA TEXT (SMS)
See page 29 for other SMS text options
This function makes it very easy to add new contacts to •
your phonebook and the best thing about it is your family
and friends do the job for you! Simply follow the instruc-
tions below:
Someone will need to send a Text (SMS) message using the •
following format:
#Name#Number# (Example: #Tommy#18004263738#) •
Be sure to include the area code.
The name and number are then automatically stored in the •
phonebook once the text (SMS) is received.
Please note: When your Text (SMS) memory is full, no •
phonebook entries can be received via an SMS.
To block this feature, go to menu • SMS Messages then
SMS in PHoneBk and select Off.
Scroll with to the
Small Menu.
Fig. 10

24 25
EMERGENCY OPERATIONS
EMERGENCY CALLS
Important: Please read Warnings for Emergency Call Feature in front of manual.
In an emergency, press the Help button on the back of the C900 to automatically
dial up to five (5) predetermined numbers. When someone presses the red help
button on the back of the mobile phone, these numbers will automatically dial in the
sequence in which they have been preselected on the phone.
When dialing the emergency number there will be an emergency tone emitted.
When the called party answers the phone, they will hear the emergency tone and
will have to press “0” to activate the call. This is to avoid being connected to the
call party’s answering machine or voicemail. If the contact is designated as a “Help
Organization,” the call will be activated when answered. If a contact is not reached,
the phone will dial the next number automatically. It will dial the list of contacts up
to three (3) times. If no contacts are reached after the third cycle, the C900 will
automatically pick up the next incoming call within one hour.
Saving the Emergency numbers
First select five (5) numbers and their sequence for your Emergency Contact list.
•
These numbers must already be stored in the phone book.
Open the phone and press the • button until you have reached the Phone-
book, then select by
pressing .
Next, press the • button until you have reached Emergency Numbers, then
select by
pressing .
Select • Save Emergency No option by pressing . You will then begin saving
numbers under the five allotted spaces. Begin by selecting Save Emergency
No. 1 by pressing the button.
The phone will then go to the phonebook. Scroll through the entries and when the
•
desired one is highlighted, press the button.
The next option is to choose whether the number is “Private” or a “Help Organiza-•
tion.” Choose “Private” if the number is for an individual. Choose “Help Organiza-
tion” if the number is a Call Center of Assisted Living Community.
EMERGENCY OPERATIONS
The last option is to choose whether or not a text (SMS) message will be sent to the •
contacts. Highlight Yes or No using the
buttons and press
to select.
For adding further emergency numbers please repeat the above steps. •
In Need of Assistance Right Away
Important: Please see Emergency warnings in front
of guide.
Press the Red Heart button on the back of the phone and hold for three seconds. •
The C900 will call and send SMS messages to the five (5) contacts you programmed
into the Help Button. (They will be called in the order they are programmed into the
phone)
Note: The Emergency button also functions when the key lock is activated.
To stop the Emergency call, press and hold the •
button for three (3) seconds.
What Happens after you press the Help Button
When you press the Help Button, the emergency numbers you have saved are
automatically dialed in the sequence you have pre-selected on your phone.
At the same time, the emergency contacts receive a text (SMS) message, if this feature
has been selected, informing them that they are about to receive an emergency call
and that they have to press the “0”
key within the first 60 seconds of the call.
Deactivating the Emergency Button
Slide open the phone, and press the • button to Settings and select by pressing
. Next, press the button until you have reached Emergency Button and
select by pressing . The buttons will allow you to highlight your choice and then
save by pressing .

26 27
OTHER TELEPHONE OPERATIONS
Small Menu – When phone slider is closed
When the slider is closed, contacts in the phone book are •
displayed in alphabetical order in the form of an easy-to-
read list. (Fig. 11)
Dialed Numbers
If this menu option is highlighted with a black background, •
the last number dialed is displayed.
To display a list of most recently dialed numbers press the •
button. All the numbers or names (if stored in the
phone book) will be displayed with the date and time the
call was made.
To make a call from a dialed number, select the desired •
number with the
buttons and start
the call by pressing .
Missed Calls
If this menu option is highlighted with a black background, •
the last number dialed is displayed.
To display the most recently missed calls press the •
button. All numbers or names (if stored in the phone book)
will be displayed with the date and time the call was missed.
To make a call from the missed calls, select the desired •
number with the
buttons and start the call by
pressing .
Received Calls
If this menu option is highlighted with a black background, •
the number or name (if stored in the phonebook) of the
last call is shown on the display.
To display the list of received calls press the • button. All
numbers or names (if stored in the phone book) will be
displayed with the date and time the call was received.
To make a call from the received calls, select the
•
desired number with the
buttons and start the
call by pressing .
Voicemail Number
If you press and hold the 0 button for three (3) seconds
you will automatically be connected to your voicemail.
Should this number not be stored on your mobile phone
or your SIM card, you will be asked to enter it. If you do
not know the number, please call your network opera-
tor. (Fig. 12)
Settings
In order to change settings (e.g. alarm clock, ring tone
volume, display contrast…) you will perform this func-
tion under Settings.
Open your phone, press the •
button until you reach
Settings, then press to select. Next, browse
through the menu and follow the instructions on the
display.
ALARM CLOCK
For a quick entry into the Alarm Clock menu, press the
•
button on the top side of the mobile phone for
three (3) seconds.
To enter through the menu, follow these steps: Open •
the phone, press the button until you reach
Settings, then press to select. Next, press the
button until you have reached Alarm Clock and
select by pressing .
OTHER TELEPHONE OPERATIONS
Fig. 11
Fig. 12

28 29
Set the Alarm
To
• set the alarm clock enter the hour by pressing the
buttons or press
the keypad by entering double digits (for example, “07” for 7 a.m.) and save by
pressing .
To set the minutes press the •
buttons or press the keypad by entering double
digits and save by pressing .
Press the •
to choose AM, PM or 24 hour format, save by pressing .
After the time alarm time is set, press the • or close the slider to return the phone in
standby position. An alarm clock symbol will now appear in the header of the menu.
Alarm and Snooze function
Press • to end the alarm. Should the alarm function not be fully deactivated, the alarm
clock will go off at the same time every day.
In order to be woken up or reminded again five (5) minutes later, press • for the
snooze function while the alarm is ringing. This can be repeated as often as you would
like.
If you do not press the • button to end the alarm, the alarm will ring again every three
(3) minutes for a maximum of ninety (90) minutes.
Editing the Alarm Time
Access the Alarm Clock Menu (see section under Alarm Clock)•
Select New Time by pressing • . Next follow the same instructions under Set the Alarm
on page 25 .
Deactivating the Alarm Function
If you do not want the set alarm to ring at the same time on the next day, you will want to
deactivate the alarm clock.
Enter the • Alarm Clock Menu (see page 25)
Press the • button to scroll to Off and select by pressing .
Setting the Alarm Melody
Open your phone, press the • button until you reach Settings, then press to select.
OTHER TELEPHONE OPERATIONS
Next select• Sound & Alerts by pressing the button
to select. Then use the to scroll to Alarm Melody and
select by pressing . Use the
buttons to scroll
through the different melodies and save the desired melody
by pressing .
Note: Select a melody that is significantly different from
your ring tone, in
order not to get the two confused.
Manual Key Lock and Auto Key Lock
To ensure that no calls can be made accidentally (e.g.
when the phone is in a pocket or a bag) the keypad can
be locked.
Please Note: Incoming calls can be accepted as usual. If
you wish to reject a call you must unlock the keypad first.
Manual Key Lock
To activate the key lock, hold down the•
button on
the top left of the phone for three (3) seconds. A large
key symbol will appear on the menu screen to display
the key lock is activated.
To deactivate the key lock press and hold the •
button for three seconds or slide open the phone.
Automatic Key Lock
This feature will automatically lock your phone when it is
closed and has not been used for ten (10) seconds
or more.
To activate the automatic key lock:
Open your phone, press the button until you reach •
Settings, then press to select.
Next press the • button to scroll to Keypad Auto
Lock and select by pressing .
Last, select • On by pressing to activate this function.
OTHER TELEPHONE OPERATIONS
Standby Mode
(Slider closed)
Fig. 13

30 31
A large key symbol will appear on the menu screen to display the key lock is acti-
•
vated. To deactivate the key lock press and hold the button for three seconds or
slide open the phone.
My Menu
My Menu allows you to quickly select your most often used menu items. (For example
Alarm Clock, Ring tone On/Off, etc.)
Activating My Menu
Open your phone, press the • button until you reach Settings, then press to select.
Press •
to scroll down to My Menu and select by pressing . Select ON to
activate this function by pressing .
Entering My Menu
The black background needs to be over the picture of the phonebook in order for My •
Menu to appear at the bottom left of the screen. To select My Menu press the
button. (Fig. 13)
Select your favorite menu items for My Menu and their desired order•
Press • to select My Menu. Next press the button to select options and then
press the button.
Next, go to the • button to scroll to your desired menu item and select it with .
Scroll to select the position number in the My Menu list and save by pressing • .
Repeat the previous three (3) steps to add additional items to My Menu.•
Save the selection by pressing • and confirm the request Save Change? by pressing
the button.
Reminders
You can save Birthdays and set reminders. If the name is a contact that is stored in our
phone memory (not on your SIM card), you will be asked if you would like to call the
person after you have been reminded.
If the person is on the SIM card and not in your phone memory, or is not saved as a
contact, you will be required to enter the person‘s name for the Birthday reminder. After
being reminded you will not be asked whether you wish to call the contact.
OTHER TELEPHONE OPERATIONS
SMS/TEXT MESSAGES
SMS/Text Messages
SMS (Short Message Service) is a written short message, which can be sent to all
mobile phone users. Charges do apply when sending and receiving an SMS. Please
check with your network provider on cost.
SMS On or Off
If you do not wish to receive or send text messages, you can switch off the SMS
menu.
Writing an SMS
Open the mobile phone and select SMS Messages by pressing
• .
Next select • Write New SMS by pressing .
Use the keypad to write your text. To delete individual characters, press the •
button. This deletes the entered character to the left. To delete all entered text,
hold down the button for three (3) seconds.
All characters and functions, which can be selected, are listed in the following table.
Every key stands for several characters or functions depending on how often the
respective key is pressed when in the “ABC mode” (see the explanation after the
table).
Examples for function keys:
press 1x = j press 1x = Space
press 2x = k press 2x = 0
press 3x = l press 4x = 5
To insert blank spaces (the spaces between characters), press • once.
Insert punctuation marks (. , ! ?) by pressing • repeatedly.
SMS/TEXT OPERATIONS
jkl

32 33
Special characters: Enter the selection menu for
special characters by pressing
. By repeatedly pressing
or , you can move from left to right. By pressing
the 2 button, you can move up in the table, with 4 to
the left, with 6 to the right and with 8 down. If you have
reached the desired character, press the button to
insert the character into your text. (Fig. 14)
When pressing the # key, you can switch between
for options:
ABC: upper case
Abc: mixed case (lower case letters with capital letters
at the beginning of the sentence)
Abc: lower case
123: numbers only
The selected mode is shown on the display next to
the ¢ symbol.
While entering text you can also insert numbers by •
following these steps: Press the button for Next,
then press the button to scroll to Insert numbers,
select by pressing . You can then enter a number by
using the keypad or Search for a number from the
Phonebook or from the list of Unsaved numbers.
Contacts from the phonebook (name and number) can
be inserted into the SMS text as follows:
Press the •
button for Next, then press the
button to scroll to Insert name, select by
pressing .
Select names in the phone book using the keypad or •
and insert them into the SMS by pressing .
In the upper right hand corner of the display, you can see
how many characters you have left to enter in the SMS.
Example: 1/135 shows that you are in the first text mes-
sage and you have 135 characters remaining in this SMS. If
SMS/TEXT OPERATIONS
you enter more than 160 characters, the text is sent two messages. As soon as you
roll over into a second message, the display will read 2/….
You can send a maximum of 480 characters at once (this will automatically be
divided in up to three messages).
SENDING YOUR WRITTEN SMS
To send the completed text, press the
• button. Next, select Send by pressing
.
There are three (3) ways to choose or enter the
recipient of your message:
1. The number is already in your phone book.
Select Phonebook by pressing the button twice. Use the
buttons to scroll
to the name or enter the first letter of the name with the keypad. When the desired
contact is highlighted with a black background, confirm by pressing . To send the
message press .
2. The telephone number has recently been used but is not stored in the
phonebook:
Select Search by pressing , scroll to Unsaved numbers and select by pressing
. With the list of telephone numbers now displayed (dialed, received, missed calls),
scroll to the desired number and select by pressing . Press to send text.
3. A telephone number can also be entered manually on the keypad.
Then send Text by pressing .
Receiving an SMS (text)
A short alert tone and vibration informs you that you have received an SMS. The
screen will display New SMS.
To read the SMS, press • . If text is long, press the
button to scroll down.
Answering a received SMS
After reading a text press the • button until you reached Reply, then select by
pressing .
SMS/TEXT OPERATIONS
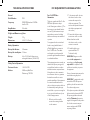
D . , ! ? ‚ „ @ : 1
D a b c 2 ä à
D d e f 3 è
D g h i 4
D j k l 5
D m n o 6 ö
D p q r s 7 ß
D t u v 8 ü
D w x y z 9
D space; 0
D . , ? ! ‚ „ : ; ( ) @ -
+ $ € £ ¥ # % * & ~ = ¤
D You are able to
change between
lower and upper
case letters, as well
as selecting num-
bers only (“Abc”
“ABC” “abc” “123”)
Fig. 14

34 35
Now you have the choice between four (4) options:
1. Empty Screen (enter your own text using the keypad)
2. Original Text (this will copy the text of the received SMS into your answer)
3. Templates
4. Prewritten short answers (for example, Yes, No, Everything OK)
Scroll to desired option and select by pressing
.
Next, press to send message.
Deleting SMS
Since you cannot receive further text messages when the SMS memory is full, you
need to delete messages to create memory space from time to time.
Open the phone and select • SMS Messages by
pressing .
Next press the • button to scroll to Delete SMS and press to select. You
can delete all saved messages by selecting All SMS.
You can also delete specific folders, for example, all received messages. Press the •
button to scroll to Received SMS and press to select. You are then asked
Delete all received SMS, confirm by pressing.
CREATING AND INSERTING TEMPLATES
Templates are prewritten messages, such as Call me, Coming later or I love you. Se-
lections of templates are already stored on your phone, and you can also create your
own. They are useful for saving time when sending short messages. All templates can
be changed before you send them.
CREATING NEW TEMPLATES
Slide open the mobile phone and select
• SMS
messages by pressing .
Press the • button to scroll to Templates and
select by pressing .
Next press • to select New Template.
SMS/TEXT OPERATIONS
Write your own text with the keypad.•
Press • to save as a template.
Changing already existing templates:
Slide open the mobile phone and select • SMS
Messages by pressing .
Scroll the • button to scroll to Templates and select by pressing .
Gotothetemplateyouwishtochangeandpressthe•
button to select.
To edit the template, scroll to • Edit/Send Template and press to select.
Edit the text by using the keypad. Delete characters by pressing the • button.
Next, press • to go into the sub-menu. Press again to send the changed
template.
SMS/TEXT OPERATIONS

36 37
Slider closed.
Headline shows
Time & symbols.
Slider open:
Main Menu
SMS Messages
Select Back
Delete SMS
Select Back
All SMS
Received SMS
Sent SMS
Unsent SMS
Templates
Write new SMS
Received SMS
Sent SMS
Unsent SMS
Templates
Delete SMS
Service Centre No. for SMS
Send PhoneBk contact by SMS
SMS in PhoneBk (On/
Off/PhoneBk only)
Call Info
Select Back
Missed calls
Dialed numbers
Received calls
Delete all calls
Call duration
Phone Book
Select Back
Top10
Select Back
Add Top10
Change sequence
Edit Top10
Delete Top10
Emerg. Numbers
Select Back
Select Back
Search name
Add contact
Edit contact
Delete contact
Send PhoneBk contact by SMS
Copy contact
Top10
Emergency numbers
Mailbox number
PhoneBk settings
SMS in PhoneBk
Add Emerg. No.
Change sequence
Exchange Emerg. No.
Delete Emerg. No.
Save entry on (SIM Card/Phone)
Memory in use (Phone & SIM Card/SIM Card/
Phone)
Memory status
Call Duration
Select Back
Last Call
All calls
Dialed numbers
Received calls
Clear timers
PhoneBk Settings
OVERVIEW OF MENUSOVERVIEW OF MENUS

38 39
OVERVIEW OF MENUS OVERVIEW OF MENUS
Settings Sound & alert
Select Back
Time & date
Select Back
Birthday
reminder
Select Back
Set time
Time format (24h/AM/PM)
Set date
Date format
Show clock
New birthday
Edit birthday
Delete birthday
Sound & alert
Handset volume (1-5)
Display contrast (-5 to +5)
Text size (Small/Large)
Text size SMS (Small/Large)
Language
Time & date
Alarm clock
Calculator
Keypad auto lock (On/Off)
My Menu (On/Off)
Network selection (Auto/Manual/Preferred)
Headline shows (Operator/Time & symbol)
Call waiting (Activate/Cancel/Check status)
Call forward
Withhold number (Yes/No)
Save energy
PIN request (On/Off/ change PIN)
Help Text (On/Off)
Backup with SMS
SMS in PhoneBk (On/Off/PhoneBk only)
PhoneBk settings
Top10
Emergency button (On/Off)
Emergency numbers
Birthday reminder
Mailbox number
Service Centre No. for SMS
SMS menu (On/Off)
0000 to enter Settings (On/Off)
Master Reset (Reset settings/Reset all)
Ring tone (1-5)
Alarm melody (1-5)
Ringer volume (0-5)
Silent mode (On/Off)
Increasing ring (On/Off)
Vibrating alert (On/Off)
Key tones (click/tone/silent)
SMS Message alert (On/Off)
Handset volume (1-5)
Select Back
Page is loading ...
Page is loading ...
Page is loading ...
Page is loading ...
Page is loading ...
Page is loading ...
Page is loading ...
Page is loading ...
Page is loading ...
Page is loading ...
Page is loading ...
Page is loading ...
Page is loading ...
Page is loading ...
Page is loading ...
Page is loading ...
Page is loading ...
Page is loading ...
Page is loading ...
Page is loading ...
Page is loading ...
Page is loading ...
Page is loading ...
Page is loading ...
Page is loading ...
Page is loading ...
Page is loading ...
Page is loading ...
Page is loading ...
Page is loading ...
Page is loading ...
-
 1
1
-
 2
2
-
 3
3
-
 4
4
-
 5
5
-
 6
6
-
 7
7
-
 8
8
-
 9
9
-
 10
10
-
 11
11
-
 12
12
-
 13
13
-
 14
14
-
 15
15
-
 16
16
-
 17
17
-
 18
18
-
 19
19
-
 20
20
-
 21
21
-
 22
22
-
 23
23
-
 24
24
-
 25
25
-
 26
26
-
 27
27
-
 28
28
-
 29
29
-
 30
30
-
 31
31
-
 32
32
-
 33
33
-
 34
34
-
 35
35
-
 36
36
-
 37
37
-
 38
38
-
 39
39
-
 40
40
-
 41
41
-
 42
42
-
 43
43
-
 44
44
-
 45
45
-
 46
46
-
 47
47
-
 48
48
-
 49
49
-
 50
50
-
 51
51


Ask a question and I''ll find the answer in the document
Finding information in a document is now easier with AI
in other languages
- español: Clarity C900 Manual de usuario