Fisher and Paykel OB60SC5CEX2 User guide

Type
User guide
USER GUIDE
NZ AU GB IE HK SG
BUILT-IN OVEN
OB60
Single & Compact
models
1
CONTENTS
Safety and warnings 2
Introduction 11
First Use 12
The Control Panel 13
Setting the clock 14
Using the Timer 16
Cooking guide 18
Oven functions 20
Cooking charts 24
Automatic cooking 30
Care and cleaning 34
Trouble shooting 48
Warranty and service 50
Energy guidelines (GB IE only) 52
IMPORTANT!
SAVE THESE INSTRUCTIONS
The models shown in this user guide may not be available in all markets and are subject
to change at any time. For current details about model and specification availability in
your country, please go to our website www.fisherpaykel.com or contact your local
Fisher & Paykel dealer.
2
Your oven has been carefully designed to operate safely during normal cooking
procedures. Please keep the following safety instructions in mind when you are using it:
SAFETY AND WARNINGS
WARNING!
Electrical Shock Hazard
Turn the oven off at the wall
before replacing the oven lamp.
Failure to follow this advice
may result in electrical shock or
death.
!
3
SAFETY AND WARNINGS
WARNING!
Fire Hazard
Do not place aluminium foil,
dishes, trays, water or ice on
the oven floor during cooking,
as doing so will irreversibly
damage the enamel; lining the
oven with aluminium foil may
even cause fire.
Never use your appliance for
warming or heating the room.
Persons could be burned or
injured or a fire could start.
Storage in or on appliance:
flammable materials should not
be stored in an oven or near its
surface.
Failure to follow this advice may
result in overheating, burning,
and injury.
!
4
SAFETY AND WARNINGS
WARNING!
Hot Surface Hazard
Accessible parts may become
hot when in use.
To avoid burns and scalds, keep
children away.
Use oven mitts or other
protection when handling hot
surfaces such as oven shelves or
dishes.
Use care when opening the oven
door.
Let hot air or steam escape
before removing or replacing
food.
Do not touch heating elements
or interior surfaces of the oven.
Heating elements may be hot
even though they are dark in
colour. Interior surfaces
of an oven become hot enough
to cause burns. During and after
use, do not touch, or let clothing
or other flammable materials
contact heating elements or
interior surfaces of the oven
until they have had sufficient
time to cool.
Other surfaces of the appliance
may become hot enough to
cause burns - among these
surfaces are the oven vent,
the surface near the oven vent,
and the oven door.
Failure to follow this advice
could result in burns and scalds.
!
5
SAFETY AND WARNINGS
WARNING!
Cut Hazard
Take care - some edges are
sharp.
Failure to use caution could
result in injury or cuts.
!
6
SAFETY AND WARNINGS
IMPORTANT SAFETY INSTRUCTIONS
To reduce the risk of fire, electrical
shock, injury to persons or damage
when using the oven, follow the
important safety instructions listed
below:
Read all the instructions before using
the oven. Use the oven only for its
intended purpose as described in
these instructions.
Proper installation: be sure your
appliance is properly installed and
earthed by a qualified technician.
Isolating switch: make sure this
oven is connected to a circuit which
incorporates an isolating switch
providing full disconnection from the
power supply.
Household appliances are not
intended to be played with by
children.
7
SAFETY AND WARNINGS
Do not leave children alone.
Children should not be left alone or
unattended in the area where the
appliance is in use. They should never
be allowed to sit or stand on any part
of the appliance.
Children of less than 8 years old must
be kept away from the appliance
unless continuously supervised. This
appliance can be used by children
aged from 8 years and above, and
persons with reduced physical,
sensory or mental capabilities or
lack of experience and knowledge,
if they have been given supervision
or instruction concerning the use of
the appliance in a safe way and they
understand the hazards involved.
Cleaning and user maintenance shall
not be done by children without
supervision.
Do not place heavy objects on the
oven door.
Wear proper apparel. Do not wear
loose fitting or hanging garments
when using the appliance. They
could ignite or melt if they touch an
element or hot surface and you could
be burned.
8
SAFETY AND WARNINGS
User servicing: do not repair or
replace any part of the appliance
unless specifically recommended in
the manual. All other servicing should
be referred to a qualified technician.
Do not use water on grease fires.
Smother the fire or flame or use a dry
chemical or foam type extinguisher.
Use only dry oven mitts or potholders.
Moist or damp potholders on hot
surfaces could result in burns from
steam. Do not let potholders touch
hot areas or heating elements. Do
not use a towel or a bulky cloth for a
potholder. It could catch fire.
Do not heat unopened food
containers. They can build up pressure
that may cause the container to burst
and result in injury.
Safe food handling: leave food in the
oven for as short a time as possible
before and after cooking. This is to
avoid contamination by organisms
which may cause food poisoning. Take
particular care during warm weather.
9
SAFETY AND WARNINGS
Always keep oven vents unobstructed.
Do not operate your appliance
by means of an external timer or
separate remote-control system.
Caution: Hot air can blow from the
vent at the top of the oven as part of
the oven’s cooling system.
Placement of oven shelves: always
position shelves in the desired
location while the oven is cool
(before preheating). If a shelf must
be removed while the oven is hot, do
not let the oven mitts or potholder
contact hot heating elements in the
oven or the base of the oven.
Do not clean the oven seal or use
any oven-cleaning products on it. It
is essential for a good seal, which
ensures that the oven operates
efficiently. Care should be taken not
to rub, damage or move it.
10
SAFETY AND WARNINGS
Do not use oven cleaners, harsh/
abrasive cleaning agents, waxes, or
polishes. No commercial oven cleaner,
oven liner, or protective coating of
any kind should be used in or around
any part of the oven. Do not use
harsh/abrasive cleaners, scourers or
sharp metal scrapers to clean the
oven door glass since they scratch the
surface, which may result in the glass
shattering.
Clean only the parts listed in this
manual.
Do not use a steam cleaner to clean
any part of the oven.
Do not store things children might
want above the oven. Children could
be burned or injured while climbing
on the oven to retrieve items.
Do not install or operate the
appliance if it is damaged or not
working properly. If you receive
a damaged product, contact your
dealer or installer immediately.
Use only bakeware approved for
oven use. Follow the bakeware
manufacturer’s instructions.
11
INTRODUCTION
Congratulations on your new purchase. Your Fisher & Paykel oven has a number of
features to make cooking a great experience for you:
a wide choice of oven functions
intuitive controls and displays
Before you start
Make sure the installer has completed the ‘Final checklist’ in the Installation instructions.
Read this guide, taking special note of the ‘Safety and warnings’ section.
Remove all packaging and dispose of it responsibly. Recycle items that you can.
Fit the side racks and catalytic panels (see ‘Fitting the side racks and catalytic panels’).
We recommend you then condition the oven, using the instructions following.
Note: Not all accessories are provided with all models. To purchase other accessories,
contact your nearest Fisher & Paykel Authorised Service Centre, Customer Care or visit
our local website listed on the back cover.
1 Control panel
2 Oven vent louvres
3 Oven light
4 Sliding shelf support
5 Wire shelf
6 Side rack
7 Step down oven wire
shelf
8 Oven door and handle
9 Oven seal
!0 Drip channel
Accessories:
!1 Grill rack
!2 Grid
!3 Roast Dish
!4 Flat baking tray
!5 Catalytic panels
(suitable for some
models only).
!1
!3
!2
!4
!0
!5
2
4
3
5
6
7
8
19
12
FIRST USE
Fixing nut
Side rack
Rear prongs
Catalytic panel
(if fitted)
Fitting the side racks and catalytic panels (some models only, purchased separately)
You will find your side racks and catalytic panels
(some models only, may be purchased separately)
in the accessory box supplied with your oven.
Fit the catalytic panel to the side rack
1 Ensure the panels are placed the correct way around:
in models with side lights: the cutout fits over the
light and the hole for the fixing screw goes to the
front of the oven.
in models with a ceiling light: the hole for the fixing
screw goes to the front of the oven.
(Note: panels should sit flush against the oven wall).
2 Fit the rear prongs of the side rack through the
holes in the catalytic panel.
Fit the side racks
1 Slide the rear prongs of the side rack into the holes at the rear of the oven
2 Fit the side rack front tab (and catalytic panel if fitted) over the fixing screw.
3 Replace the fixing nut. You may use a coin to tighten the nut.
13
A AA
FIRST USE
Illustrative purposes only -
oven functions may vary.
Using the touch controls
Use the ball of your finger, not its tip. The controls respond
to touch, so you don’t need to apply any pressure.
Function dial Temperature dial
A AA
A AA
Display
Touch controls
Timer
control
Temperature indicator
if lit:
oven is pre-heating
Cooking
time
control
Stop time
control
- and +
controls
Automatic cooking
stop indicator
if lit:
Automatic cooking stop
time is set
(see ‘Automatic cooking’)
Cooking time indicator
if lit:
Automatic cooking is set
(see ‘Automatic cooking’)
Timer indicator
if lit:
Timer is counting
down
The Control Panel
14
FIRST USE
Setting the Clock
IMPORTANT!
Before using your oven for the first time and after a power cut, the clock must be
set. The oven will not function if the clock is not set.
1 When the power to the oven is
turned on or restored after a power
failure, will flash in the display.
3 Touch the cooking time and
stop time controls together for 2
seconds to accept the time.
the display will stop flashing
the oven will beep to confirm
the time is set.
2 Touch the - or + controls to set the
time.
To Change the Time
4 Touch the cooking time and
stop time controls together for 2
seconds.
The centre dot will flash.
5 Touch the - and + controls to set the
new time.
6 Touch the cooking time and stop
time controls together again for 2
seconds to accept the new time.
the centre dot will stop flashing
the oven will beep to confirm the
new time is set.
15
FIRST USE
Condition the oven
It is important to condition your oven before using it for cooking and baking.
Conditioning will burn off any manufacturing residues and ensure that you get the best
results right from the start.
1 Make sure you have removed all packaging (including the yellow packing retainers).
Make sure the side racks and catalytic panels (some models only) are fitted.
2 Make sure you have set the clock.
3 Make sure all the shelves are fitted.
5 Set the temperature to 200 oC for 30
minutes.
While the oven is heating up, the
temperature indicator light will glow.
When the oven has reached set
temperature, the temperature indicator
light will go out.
Note: if the clock has not been set, the
cooling fans will come on, but the oven
light will not come on and the oven will
not heat up.
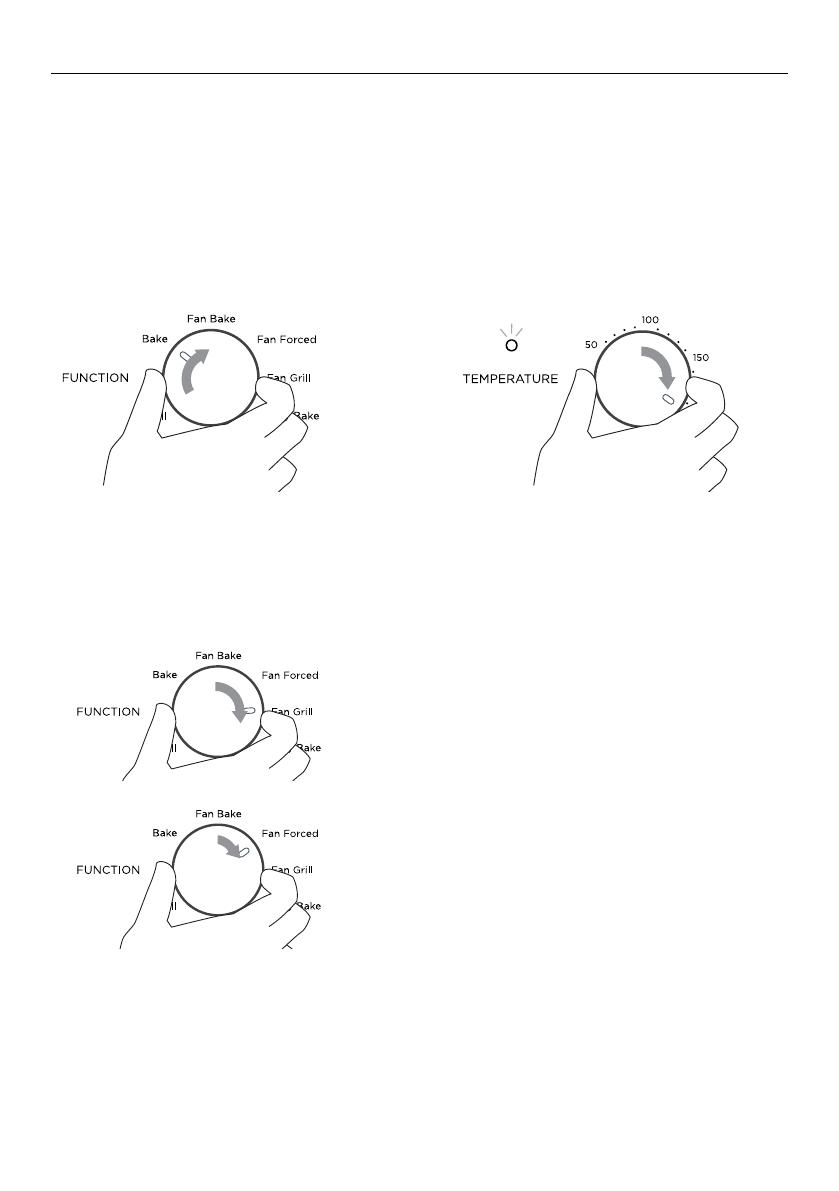
4 Select the Bake function.
The oven will come on.
6 After 30 minutes is up, select the
Fan Grill function, and heat for 20
minutes.
7 After 20 minutes is up, select the
Fan Forced Function.
After 20 minutes, switch the oven
off.
There will be a distinctive smell
and a small amount of smoke
during the conditioning process as
manufacturing residue is burnt off.
This is normal, but make sure the
kitchen is well ventilated while the
oven is conditioning.
Once cooled, wipe out the oven with
a damp cloth and mild detergent, and
dry thoroughly.
16
USING THE TIMER
You can use the timer at any time, even if you are not using the oven.
The time counts down in minutes (hours:min) until the last 5 minutes of cooking, when
it will countdown in seconds (min:sec).
You can set the timer for up to 4 hours.
IMPORTANT!
The timer does NOT turn the oven off.
1 Check the display shows the
correct time of day.
3 Touch the - and + controls to set
the time.
4 Touch the timer control to set
the timer or wait 5 seconds and
the display will show the time of
day and the timer indicator .
2 Touch the timer control.
the display will show
the timer indicator and dot
will flash.
5 To check the time remaining time:
Touch the timer control.
During the last 5 minutes of the
countdown the display will show
the time remaining.
17
USING THE TIMER
To cancel the timer
1 Touch the timer control to show
the remaining time.
2 Either:
Touch the - control and scroll the
time down to or
Touch and hold the - and +
controls together until the display
shows
3 the timer indicator and display will
flash for a few seconds and then
return to the time of day.
At the end of the countdown
The timer will ‘beep’ every 7
seconds.
The timer indicator will flash.
The display will show
To cancel the beeping and return
to the time of day, touch any
control.
18
COOKING GUIDE
General guidelines
This oven has been designed to utilise its four elements and rear fan in differing
combinations to provide you with enhanced performance and a wide range of functions,
allowing you to cook all types of food to perfection.
BAKING
For best results when baking, always pre heat your oven. The temperature indicator will
go out when the pre-set temperature is reached.
While the oven is heating the grill element may be on.
Do not open the door until at least 3/4 of the way through cooking.
Make sure cake pans do not touch each other or the sides of the oven.
When baking double the recipe (especially cookies) you may need to increase the time
by a couple of minutes.
Your cookware will influence baking times. Dark pans absorb the heat more quickly than
reflective pans; glass cookware may require a lower temperature.
Multi-shelf baking may also require a slight increase in cooking time.
Always leave a space between shelves when multi-shelf cooking to allow the air to
circulate.
Shelf Position Guide
Place your baking on a shelf that will have the top of your pan near the centre of the
oven cavity.
BAKE VENT BAKE FAN BAKE GRILL
FAN GRILL FAN FORCED
ROAST CLASSIC BAKE
PASTRY BAKE
BAKE VENT BAKE FAN BAKE GRILL
FAN GRILL FAN FORCED
ROAST CLASSIC BAKE
PASTRY BAKE
BAKE VENT BAKE FAN BAKE GRILL
FAN GRILL FAN FORCED
ROAST CLASSIC BAKE
PASTRY BAKE
Lower
Element
(concealed)
Rear Element
(concealed)
Outer
Element
Shelf positions - Full size ovens Shelf positions - Compact ovens
Fan
Inner
Element
1
1
2
2
6
5
4
4
3
3
  • Page 1 1
  • Page 2 2
  • Page 3 3
  • Page 4 4
  • Page 5 5
  • Page 6 6
  • Page 7 7
  • Page 8 8
  • Page 9 9
  • Page 10 10
  • Page 11 11
  • Page 12 12
  • Page 13 13
  • Page 14 14
  • Page 15 15
  • Page 16 16
  • Page 17 17
  • Page 18 18
  • Page 19 19
  • Page 20 20
  • Page 21 21
  • Page 22 22
  • Page 23 23
  • Page 24 24
  • Page 25 25
  • Page 26 26
  • Page 27 27
  • Page 28 28
  • Page 29 29
  • Page 30 30
  • Page 31 31
  • Page 32 32
  • Page 33 33
  • Page 34 34
  • Page 35 35
  • Page 36 36
  • Page 37 37
  • Page 38 38
  • Page 39 39
  • Page 40 40
  • Page 41 41
  • Page 42 42
  • Page 43 43
  • Page 44 44
  • Page 45 45
  • Page 46 46
  • Page 47 47
  • Page 48 48
  • Page 49 49
  • Page 50 50
  • Page 51 51
  • Page 52 52
  • Page 53 53
  • Page 54 54
  • Page 55 55
  • Page 56 56
  • Page 57 57
  • Page 58 58
  • Page 59 59
  • Page 60 60

Fisher and Paykel OB60SC5CEX2 User guide

Type
User guide

Ask a question and I''ll find the answer in the document

Finding information in a document is now easier with AI