Page is loading ...

SQA
Series Ultra Compact Full Range D-Class Amplifiers
// Owners Manual

Thank you for purchasing this Cadence SQA Series amplifier. Over the years, the technology used to create audio
amplifiers has grown by leaps and bounds.
We consider it our mission to use our expertise
in developing the latest
Please read this installation guide carefully for proper use of your Cadence power amplifier. Should you need technical
assistance during or after your installation please call our technical-line between 9:30 am and 5:00 PM PST at
(626) 465-3383. Read this entire guide fully before attempting your installation.
When installing the amplifier, secure it tightly. An unmounted amplifier in your car can cause serious injury to passengers
and damage to your vehicle if it is set in motion by an abrupt driving maneuver or short stop.
Page 2
Page 4
Page 14
Page 15
Page 16
SQA 600.1/SQA1200.1 Amplifier feature decriptions
SQA 500.4 Amplifier feature decriptions
SQA 600.1/SQA1200.1 MONO block amplifier applications
SQA 500.4 4 Channel amplifier applications
SQA Series amplifier features
SQA 600.1/SQA 1200.1/SQA 250.2/SQA 500.4/SQA 750.6 Amplifier applications
Troubleshooting
Page 5
SQA 750.6 Amplifier feature decriptions
Page 3
SQA 250.2 Amplifier feature decriptions
Page 6
Page 10
SQA 750.6 6 Channel amplifier applications
Page 12
SQA 250.2 2 Channel amplifier applications
Page 8
1
technologies and to bring you the absolute best sounding, most powerful amplifiers on the
market and of course at
a reasonable price.You will be amazed at the quality and power that these new amps offer.

2
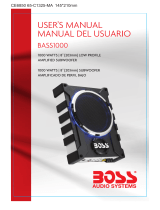
1. Line Out: To audio Inputs of satellite amplifier(if present).
2. Line Input: These inputs are for signal cables.
3. Remote Bass Control: Remote controls the Volume level.
4. Input Level Control: Enables the matching of input levels to the output levels from the source.
5. Subsonic: This setting acts as a low frequency cut off for your subwoofer. the subwoofer will
not play frequencies below the subsonic setting.
6. Bass Boost: Variable 0dB to 18dB.
7. Low Pass Filter: Variable 50Hz to 150Hz.
8. Low Pass Slope: Switch 12dB or 24dB.
9. Phase: Switch 0 or 180 .
10. Power & Protection Indicators: The bi-color LED glows green when power is on and no
problems are present. if one of the protection circuits comes on, it will change to red.
2 3 4 5 6 7 8 9 101
SQA 600.1/SQA 1200.1
AMPLIFIER FEATURE DESCRIPTIONS
MONOBLOCK-D

3
SQA 250.2
AMPLIFIER FEATURE DESCRIPTIONS
2 CHANNEL
1. Line Out: To audio Inputs of satellite amplifier(if present).
2. Line Input: These inputs are for signal cables.
3. Remote Control: Remote controls the Volume level.
4. Input Level Control: Enables the matching of input levels to the output levels from the source.
5. Filter Mode: Switch low pass, full range or high pass.
6. FR: Variable 50Hz to 150Hz.
7. Power & Protection Indicators: The bi-color LED glows green when power is on and no
problems are present. if one of the protection circuits comes on, it will change to red.
1 2 3 4 5 6 7

1. Line Out: To audio Inputs of satellite amplifier(if present).
2. Line Input: These inputs are for signal cables.
3. Input Mode: Switch 2 channel or 4 channel.
4. Remote Level Mode: Switch all or 3
& 4.
5. Remote Control: Remote controls the
Volume level.
6. Inut Level Control: Enables the matching of input levels to the output levels from the source.
7. Filter Mode: Switch low pass, full range or high pass.
8. FR: Variable 50Hz to 150Hz.
9. Power & Protection Indicators: The bi-color LED glows green when power is on and no
problems are present. if one of the protection circuits comes on, it will change to red.
1 3 4
5
6 7 8 9
2
SQA 500.4
AMPLIFIER FEATURE DESCRIPTIONS
4 CHANNEL
4

5
SQA 750.6
AMPLIFIER FEATURE DESCRIPTIONS
6 CHANNEL
1. Line Input: These inputs are for signal cables.
2. Line Mode: Switch 2 channel or 6 channel.
3. Inut Level Control: Enables the matching of input levels to the output levels from the source.
4. Filter Mode: Switch low pass, full range or high pass.
5. FR: Variable 50Hz to 150Hz.
6. Remote Control: Remote controls the Volume level.
7. Remote Level Mode: Switch all or 3 & 4 or 5 & 6.
8. Power & Protection Indicators: The bi-color LED glows green when power is on and no
problems are present. if one of the protection circuits comes on, it will change to red.
1 2
6 7 8
3 4 5 4 53

6
1-OHM MINIMUM
SQA 1200.1
HAS 4 FUSES HERE.
REMOTE TURN-ON
CHASSIS GROUND
TO BATTERY +12V VIA FUSE
DESIGNATED
MONO LINE INPUT
*
MONO SUBWOOFER
SQA 600.1/SQA 1200.1 MONO BLOCK AMPLIFIER APPLICATIONS

2-OHM EACH MINIMUM
DUAL SUBWOOFER
SQA 1200.1
HAS 4 FUSES HERE.
REMOTE TURN-ON
CHASSIS GROUND
TO BATTERY +12V VIA FUSE
DESIGNATED
MONO LINE INPUT
*
7
PARALLEL MONO SUBWOOFERS
SQA 600.1/SQA 1200.1 MONO BLOCK AMPLIFIER APPLICATIONS

8
BRIDGED MODE
SQA 250.2 2 CHANNEL AMPLIFIER APPLICATIONS
4-OHM EACH MINIMUM
MONO
SUBWOOFERS
REMOTE TURN-ON
CHASSIS GROUND
TO BATTERY +12V VIA FUSE

2 CHANNEL MODE
SQA 250.2 2 CHANNEL AMPLIFIER APPLICATIONS
2/4OHM EACH MINIMUM
FULL
RANGE
SPEAKER
REMOTE TURN-ON
CHASSIS GROUND
TO BATTERY +12V VIA FUSE
9

10
4-OHM EACH MINIMUM
MONO
SUBWOOFERS
REMOTE TURN-ON
CHASSIS GROUND
TO BATTERY +12V VIA FUSE
Input mode switch
in CH 2 position
BRIDGED MODE
SQA 500.4 4 CHANNEL AMPLIFIER APPLICATIONS

11
2-OHM EACH MINIMUM
FULL
RANGE
SPEAKER
REMOTE TURN-ON
CHASSIS GROUND
TO BATTERY +12V VIA FUSE
Input mode switch
in CH 4 position
4 CHANNEL MODE
SQA 500.4 4 CHANNEL AMPLIFIER APPLICATIONS

12
BRIDGED MODE
SQA 750.6 6 CHANNEL AMPLIFIER APPLICATIONS
4-OHM EACH MINIMUM
MONO
SUBWOOFERS
CHASSIS GROUND
TO BATTERY +12V VIA FUSE
REMOTE TURN-ON
Input mode switch
in CH 2 position

6 CHANNEL MODE
SQA 750.6 6 CHANNEL AMPLIFIER APPLICATIONS
13
2/4OHM EACH MINIMUM
FULL
RANGE
SPEAKER
CHASSIS GROUND
TO BATTERY +12V VIA FUSE
REMOTE TURN-ON
Input mode switch
in CH 6 position

SQA SERIES AMIPLIFIER FEATURES
MODEL
Output Power Rating
RMS @ 4 OHM
SQA 600.1
SQA 1200.1
120W x 2
80W x 2
SQA 250.2
RMS @ 2 OHM
RMS @ 1 OHM
240W x 1
420W x 1
600W x 1
450W x 1
800W x 1
1200W x 1
N/A
N/A
250W x 1
N/A
50-150Hz
Low Pass / Full / High Pass
Yes
Yes
Yes
Yes
Yes
RMS @ 4 OHM Bridged
RCA Low Level Input
High Level Input
Green & Red Power Status Indicators
Phase Switch
Adjustable Input Sensitivity
Variable Bass Boost
Crossover Mode
Low Pass Filter
Subsonic Filter
High Pass Filter
Subwoofer Gain Remote Control
Hi-Level Signal Auto Turn-on /off
on Circuits
Thermal, Short and Overload Protecti
Soft Delay Remote Turn-On
2×20A
7.87“ x 7.3” x1.9“
Fuse Rating
Dimensions(LxWxH)
RCA Output
Signal to NOise
N/A
Yes
N/A
Yes
N/A
Yes
N/A
Yes
Yes Yes Yes
Yes
Yes
0 to +18dB@45Hz
Low Pass
50-150Hz
10-50Hz
2×40A
9.0“x 7.3” x1.9“
>96dB >96dB >96dB
0 or 180
N/A 50-150Hz
Yes Yes
N/A
Yes
N/A N/A
N/A
Yes
N/A N/A
Yes
Yes
Yes
0 to +18dB@45Hz
Low Pass
50-150Hz
N/A
125W x 4
80W x 4
SQA 500.4
N/A
N/A
250W x 2
N/A
50-150Hz
Low Pass / Full / High Pass
Yes
Yes
Yes
Yes
Yes
2×30A
8.25“ x 7.3” x1.9“
Yes
>96dB
50-150Hz
Yes
N/A
N/A
N/A
N/A
125W x 6
80W x 6
SQA 750.6
N/A
N/A
250W x 3
N/A
50-150Hz
Low Pass / Full / High Pass
Yes
Yes
Yes
Yes
Yes
2×40A
11“ x 7.3” x1.9“
Yes
>96dB
50-150Hz
N/A
N/A
N/A
N/A
N/A
Low Pass Slope
12 or 24 dB 12 or 24 dB
10-50Hz
4×30A
10.6“ x 7.3” x1.9“
0 or 180
0 0
14

SQA 600.1/ SQA 1200.1/SQA250.2/SQA500.4/SQA750.6 AMPLIFIER APPLICATIONS
General:
Level (GAIN) Control Setup:
At this point you are ready to get more specific on the settings for your amplifier.
If you are not sure what the Radio output sensitivity is, follow these general guide lines:
Turn the level control up slowly, till you hear distortion, then back off a few degrees on the control, If at any point your amplifier goes into
protection. you will need to turn the Level to the left a bit and then try again. If you reach a point where the output does not increase, stop
turning the Level control to the right as the amplifier/subwoofer combo has reached its max output on this application.
Subsonic:
This setting acts as a low frequency cut off for your system bass reproduction. The point that you set it at cuts off any frequencies from
reproduction beyond this point. The 12 o’clock position is a great starting point. EXAMPLE: If you adjust the Subsonic to 25Hz, the amplifier
will not play frequencies below 25Hz but will play frequencies from 25Hz to the chosen Low Pass frequency.
High Pass:
When in Hi Pass operation this setting acts as a low frequency cut off your system reproduction. The point that you set it at cuts off any
frequencies from reproduction beyond this point.The 12 o’clock position is a great starting point. EXAMPLE: If you adjust the High Pass
to 100Hz ,the amplifier will not play frequencies below 100Hz but will play frequencies from 100Hz to the chosen Low Pass frequency.
Ensure that the level is turned completely to the left prior to turning the system on. Next you should insert a CD or cassette that you are
familiar with to use as a reference, and turn the head unit volume control to about 80% of its full setting. The system sound level will of
course be very low, and the following procedures will help you to match the amplifier input sensitivities properly to the head unit output
signal level. It is important to match the amplifier LEVEL input sensitivity to the Radio/CD output sensitivity. This can be located in the
Radio/CD manual. If the Radio/CD output sensitivity is 2 volts, then adjust the amplifier LEVEL input to 2 volts.
Phase:
Low Pass:
The Low pass control acts as a ceiling and doesn’t allow frequencies to the right of the desired setting to be reproduced. The 12 o’clock
position is a great starting point. EXAMPLE: If you adjust the Low Pass to 80Hz, the amplifier will not play frequencies above 80Hz but will
play frequencies from 80Hz to the chosen Subsonic frequency.
Bass EQ:
This setting is a fixed bass boost at 45Hz that is variable from 0-18dB. This feature provides impact to your bass, but if not adjusted
correctly, it can be over used and cause damage to your subwoofers and amplifiers. It is best to slowly turn this setting clockwise until the
desired punch is felt, it is not recommended to exceed the 12 o’clock position unless listening at a low volume or a low recording quality as
this can result in high distortion and possibly clipping.
15
The phase switch allows you to change the phase of your subwoofer so that it best blends with your component speakers. While listening
to a song with strong bass material set the switch to the position that gives the best blending of the subwoofers and component speakers.

TROUBLESHOOTING
AMPLIFIER WILL NOT POWER UP.
Check for good ground connection.
Check that remote DC terminal has at least 13.8v DC.
Check that there is battery power on the + terminal.
Check for shorts on speaker leads.
Check that the volume control on the head unit is turned down low.
Remove speaker leads, and reset the amplifier. If the Protection LED still comes on ,then the amplifier is faulty.
Check all fuses.
Check that protection LED is not lit,If it is lit,shut off amplifier briefly and then repower it.
HIGH HISS OR ENGINE NOISE (ALTERNATOR WHINE) IN SPEAKERS.
PROTECTION LED COMES ON WHEN THE AMPLIFIER IS POWERED UP.
Check that the minimum speaker impedance for that model is correct.
Check for speaker shorts.
Check that there is good airflow around the amplifier. In some applications, an external cooling fan may be required.
AMPLIFIER(S) GETS VERY HOT:
Check that the Level control(S) is set to match the signal level of the head unit.
Check that all crossover frequencies have been properly set.
Check for shorts on the speaker leads.
This is always caused by a poorly-grounded RCA patch cord.
DISTORTED SOUND
HIGH SQUEAL NOISE FROM SPEAKERS.
Disconnect all RCA inputs to the amplifier(s)-if hiss/noise disappears, then plug in the component driving the amplifier and unplug its
inputs. If hiss/noise disappears, go on until the faulty/noisy component is found.
It is best to set the amplifier`s input level as insensitive as possible. The best subjective S/N ratio is obtainable this way. Try to drive as
high a signal level from the head unit as possible.
Before removing your amplifier, refer to the list below and follow the suggested procedures. Always test the speakers and their wires first.
16

// Features and specifications subject to change and or improvement without notice.
Though we tried our best to ensure that this manual is free and clear of errors please don’t hold us responsible for printing errors. //
Copyright by Cadence Acoustics LTD.
www.cadencesound.com
/