Page is loading ...

• Please read all instructions prior to installation.
• Installation of this xture must comply with local building codes.
• Installation of this xture must be done by a qualied electrician.
• Veuillez lire toutes les instructions avant l’installation.
• L’installation de ce luminaire doit être faite selon le code local
de construction.
• L’installation de ce luminaire doit être faite par un électricien qualié.
• Favor de leer toda las instrucciones antes de comenzar la instalacion.
• La instalacion de esta luminaria (este producto) debera de cumplir con los
codigos locales de construccion.
• La instalacion de esta luminaria (este producto) debera ser realizada por un
electricista calicado.
16259
INSTRUCTIONS
Thank You
You’ve just
purchased a
lighting product
designed and built
to provide you
with many years of
enjoyment.
Merci
Vous venez
d’acheter un
luminaire conçu pour
vous donner
des années de plaisir.
Gracias
Usted acaba de
adquirir un excelente
producto de alumbrado
disenado y construido
para proveerle muchos
años de satisfaccion.
16259/04/08
Tools Required • Outils Nécessaires • Herramientas Requeridas
INSTALLATION & CONNECTIONS
IMPORTANT SAFETY INSTRUCTIONS
SAVE THESE INSTRUCTIONS FOR FUTURE REFERENCE
NOTE: Use a qualied electrician for installation of this lighting xture.
INSTALLATION INSTRUCTIONS
1. Turn off power at main fuse box.
2. Install mounting backplate (A) to junction box with 2 screws supplied.
Make sure black and white wires of junction box run through the middle
opening of the mounting backplate.
3. Fasten open end of ground wire (bare copper) to ground wire or ground
screw of junction box or ground screw on mounting backplate.
4. Connect black wire of power supply to the black wire of xture and connect
white wire of power supply to the white wire of xture. NOTE: All wire
connections should be made with wire nuts or marettes (included) and
pushed back into junction box.
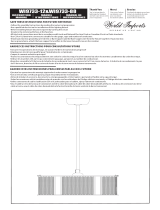
5. Mount canopy of xture (B) over mounting backplate (A) and secure with 2
caps (C) supplied.
6. Tighten center rod (D) onto canopy of xture (B).
GLASS AND BULB INSTALLATION
FOR CENTRAL LAMP:
1. Install 40w Max G9 bulbs (included) into socket.
2. Mount glass (E) and bottom cover (F) over center rod (D), and secure by
tightening cap (G) onto center rod (D). Do not over tighten!
FOR ADJUSTABLE TRACK HEADS:
1. Slip glass (H) over socket and secure glass by tightening socket ring (I)
using socket ring tool (J) supplied. Do not over tighten.
2. Install 40W Max. G9 bulbs (included) into socket
3. Install bulb cover (K) over socket. Do not over tighten.
TURN ON POWER
ENJOY YOUR EASYLITE™ LIGHTING PRODUCT

I
H
K
J
B
A
E
F
G
D
C
INSTALLATION ET CONNEXIONS
IMPORTANTES CONSIGNES DE SÉCURITÉ
GARDEZ CES INSTRUCTIONS POUR CONSULTATION FUTURE
IMPORTANT: Employer un électricien qualie pour l’installation de
ce luminaire.
INSTRUCTIONS D’ INSTALLATION
1. Coupez le courant au boitier à fusibles principal.
2. Installer montant (A) de contreplaque à la boîte de jonction avec 2 vis
fournies. Assurer que le noir et les ls blancs de passage de boîte de jonction
le milieu ouvrant de la contreplaque montant.
3. Attacher la n ouverte de l de sol (découvre le cuivre) fonder la vis de l ou
sol de boîte de jonction ou la vis de sol sur monter de contreplaque.
4. Prener les ls noir du lustre et relier aux ls noir codé de la source
d’alimentation et le l blanc du lustre et relier aux l blanc codé de la source
d’alimentation. NOTE: Utiliser toujours des connecteurs ou marettes
(incluse) pour faire ces connexions et remetter toujours toutes les connexions
dans la boite de dérivation.
5. Posez le canopé du luminaire (B) sur la plaque de montage arrière (A) et xez
l’assemblage en place avec les 2 vis (C) fournies.
6. Serrez la barre centrale (D) sur la coupelle du plafonnier (B).
INSTALLATION DU VERRE ET DE L’AMPOULE
POUR LA LAMPE CENTRALE:
1. Mettez des ampoules G9 de 40W Max (incluses) dans la douille.
2. Montez le verre (E) et la couverture inférieure (F) sur la barre centrale (D) et
xez-les en serrant le capuchon (G) sur la barre centrale (D).
Ne serrez pas trop!
POUR LES SPOTS DE RAIL AJUSTABLES :
1. Insérez le verre (H) sur la douille et xez le verre en letant l’anneau de
la douille (I) en utilisant l’outil pour douille (J) fourni. Ne les serrez
pas à l’ excès!
2. Installer 40W Maximum. G9 ampoules (inclus) dans la douille.
3. Installer la couverture d’ampoule (K) par-dessus la douille. Ne pas serre trop!
REMETTEZ LE COURANT
PRENEZ PLAISIR AVEC VOTRE PRODUIT LUMINAIRE
EASYLITE™
INSTALACIÓN Y CONEXIÓNES
INSTRUCCIONES IMPORTANTES DE SEGURIDAD
GUARDE ESTAS INSTRUCCIONES PARA CONSULTARLAS
EN EL FUTURO
IMPORTANTE: Usar un electricista calicado para la instalación de
esta luminaria.
INSTALLATION INSTRUCTIONS
1. Desconecte la corriente de la caja de principal de fusibles.
2. Instale montando espaldar C a la caja de empalme con 2 tornillos suminis
trados. Cerciórese alambres blanquinegros de caja de empalme corren por el
centro que abre del espaldar que monta.
3. Abroche el n abierto de cable de toma de tierra (descubre cobre) moler el
tornillo de alambre o suelo del tornillo de caja de empalme o suelo a
montar espaldar.
4. Conecte los cables negro codicado del suministro eléctrico a los cables
negro del apliqué. Conecte los cables blanco codicado del suministro
eléctrico a los cables blanco del apliqué. NOTA: Toda conexión deberá ser
hecha con insuladores de rosca (incluidos) y luego proceder a introducir
todas las conexiones dentro de la caja de unión.
5. Monte el dosel del candelabro (B) sobre la placa posterior de montaje (C)
y fíjelo con los 2 tornillos (D) suministrados.
6. Apriete la varilla central (D) en el aditamento del canope (B).
INSTALACIÓN DEL BOMBILLO Y CRISTAL
PARA LA LÁMPARA CENTRAL:
1. Instale bombillas G9 de 40W máx (incluidas) en el enchufe.
2. Instale el vidrio (E) y la cubierta inferior (F) sobre la varilla central (D) y
asegúrela al apretar la tapa (G) en la varilla central (D).
¡No apriete demasiado!
PARA LOS CABEZALES PARA RIEL:
1. Instale el vidrio (H) sobre el portalámpara y, con la herramienta que se
suministra (I),asegure el vidrio por apretando el anillo (J) en el portalám
para. No los apriete demasiado!
2. Instale el Max. 40W. Las bombillas G9 (incluyó) en el enchufe.
3. Instale la cubierta de bombilla (K) sobre el enchufe.
No vuelva a hacer se aprietan!
ENCIENDA LA LUZ
DISFRUTE DE SU PRODUCTO DE ILUMINACION
EASYLITE™
/