La Crosse Technology WS-1913IT Quick Setup Manual

Category
Weather stations
Type
Quick Setup Manual

La Crosse Technology WS-1913IT is a professional weather center that provides accurate weather data for your home. With its wireless transmission capability, you can place the outdoor sensors up to 330ft away from the base station, giving you flexibility in setting up your weather station.

Its multifunctional display shows indoor and outdoor temperature, humidity, wind speed, wind direction, rainfall, and air pressure. It also features weather forecasts, dew point, and moon phase information. The weather tendency indicator helps you predict upcoming weather changes.

The WS-1913IT includes a self-emptying rain gauge that accurately measures rainfall and displays it in various units. It also has programmable alarms for weather conditions, allowing you to stay informed and prepared.

1
Cable connection between the wind sensor and
the thermo-hygro transmitter
OPTIONAL
Wireless
transmission Self-
Emptying Rain sensor
to weather centre
Wireless transmission -
Thermo-hygro transmitter
to weather centre
Weather Centre
Wind Sensor
Rain Sensor (sold separately)
Thermo-hygro
Transmitter
QUICK SET UP MANUAL
PROFESSIONAL WEATHER CENTRE
INITIAL SETUP:
2
Note: When putting the Weather Centre into operation,
it is important to have them in close proximity (e.g. on a
table) while completing wiring and set-up of the system.
This step is important to allow testing of all components
for correct function before placing and mounting them at
their final destinations (See Positioning below).
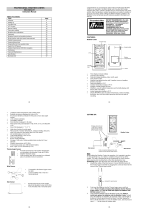
1. Unwind the cables of the Wind sensor. Connect
the Wind sensor to the Thermo-hygro transmitter
by plugging the connector head into the socket of
the Thermo-hygro sensor.
2. First insert the batteries into the Thermo-hygro sensor and optional rain sensor
(purchased separately) (See How to install and replace the batteries into the
Thermo-hygro sensor and How to install and replace the batteries into the rain
sensor below).
3. Then insert the batteries into the Weather Centre (See How to install and replace
the batteries into the Weather Centre below). Once the batteries are installed, all
segments of the LCD will light up. It will then display the time as 12:00, the date as
1.1.09, the weather icons, and air pressure value. "- - -" will be shown for outdoor
data.
4. The Weather Centre will start receiving data from the transmitter. The transmission
reception icon will be blinking to indicate that the centre is trying to get the thermo-
hygro transmitter data. The outdoor temperature, humidity and wind data should
then be displayed on the Weather Centre. If this does not happen after 135 seconds,
the batteries will need to be removed from all units. You will have to start again from
step 2.
5. The transmitter reception icon is now blinking again to indicate that the centre is
trying to get the rain sensor data. It will stop blinking once the rain sensor has been
detected. If this does not happen after 135 seconds, you will need to start again from
step 2.
6. You may need to check the cable for correct connection and all the components for
correct function by manually turning the wind-gauge by moving the wind-vane; tilting
the rain sensor to hear the impact of the internal moving seesaw, etc. (see
Positioning below).
7. Time and date must be manually set.
8. After the Weather Centre has been checked for correct function with regard to the
above points and found fit, the initial set up of the weather centre system is finished
and the mounting of the system components can take place. It must be ensured
Socket for wind
sensor
3
however that all components work properly together at their chosen mounting or
standing locations.
Note: After batteries are installed in the transmitter, install the batteries in the weather
centre to receive the signal from the transmitters as soon as possible. If the weather
centre is powered more than 5 hours after the transmitter is powered, the weather centre
will never receive the signal successfully from the transmitters. In this case, you will need
to reinstall the batteries for all the transmitters to redo the setup procedure.
After the batteries are installed, there will be synchronization between weather centre and
the transmitters. At this time, the signal reception icon will be blinking. When the signal
is successfully received by the Weather Centre, the icon will be switched on. (If it is not
successful, the icon will not be shown in LCD) This allows you to see whether the last
reception was successful (icon on) or not (icon off). Short blinking of the icon shows that a
reception is in progress.
If the signal reception is not successful on the first frequency (921MHz) for 45 seconds,
the frequency is changed to 926MHz and the learning is tried another 45 seconds. If still
not successful, the reception is tried for 45 seconds on 916MHz. This will also be done for
re-synchronization.
Transmitter signal reception icon
4
HOW TO INSTALL AND REPLACE THE BATTERIES INTO THE THERMO-
HYGRO TRANSMITTER
The outdoor Thermo-hygro transmitter works with 2 x AA IEC LR6,
1.5V batteries. To install and replace the batteries, please follow the
steps below:
1. Uninstall the rain cover of the transmitter.
2. Remove the battery compartment cover.
3. Insert the batteries, observing the correct polarity (see the
marking in the battery compartment).
4. Replace the battery cover and the rain cover onto the unit.
Note: When changing batteries in any of the units, all units need to be reset by following
the setup procedure. This is because the thermo-hygro sensor will assign a random
security code at start-up and this code must be received and stored by the weather centre
in the first several minutes of power being supplied to it.
HOW TO INSTALL AND REPLACE THE BATTERIES IN THE WEATHER
CENTRE
The Weather Centre works with 2 x C, IEC LR14, 1.5V batteries. When the batteries need
to be replaced, the low battery symbol will appear on the LCD.
To install or replace the batteries, please follow
the steps below:
1. Remove the battery compartment cover.
2. Insert the batteries observing the correct
polarity (see the marking in the battery
compartment).
3. Replace the battery cover.
5
HOW TO INSTALL AND REPLACE BATTERIES INTO THE RAIN SENSOR
(OPTIONAL- SOLD SEPERATELY)
To install and replace the batteries, please follow the steps below:
1. Unlock the main cover from the rain sensor base and remove the cover.
2. Remove the battery cover at the top of the rain sensor.
3. Insert 2 x AAA IEC LR3 1.5V batteries into the battery compartment, observing the
correct polarity.
4. Replace the battery cover and the main cover on the unit.
Note: When changing batteries in any of the units, all units need to be reset by following
the setting up procedure. This is because the thermo-hygro sensor and rain sensor
(optional) assign a random security code at start-up and this code must be received and
stored by the Weather Centre in the first 135 seconds of power being supplied to it.
Note: The stored history records will not be retained after battery change or whenever
battery is removed from the Weather Centre.
FUNCTION KEYS:
Weather Centre:
The Weather Centre has 4 easy-to-use function keys.
MIN/MAX key
SET key
+ key
HISTORY key
Figure 1
Figure 2
Figure 3
6
SET key
Press and hold for 3 seconds to enter manual setting modes: LCD contrast, Manual
time setting, 12/24 hour time display, Calendar setting, ºC/ ºF temperature unit, Wind
speed unit, Rainfall unit, Pressure unit, Relative pressure reference setting, Weather
tendency threshold setting
Press to toggle between the display of Mode 1 or Mode 2:
Mode1: "Wind speed + outdoor temp + rel. pressure"
Mode 2: "Gust + Dew Point temp + rainfall data (only if there is a rain sensor-
optional)"
Note: (Mode 2 displayed will be shown for 30 seconds. Then it will return to normal
display.
Press to activate the reset mode when MAX or MIN record is shown
+ key
In display Mode 1, press to toggle the date, weekday, + date, Indoor temp, or sec
In display Mode 2, press to toggle the Relative Pressure, 24 hour rainfall and Total
rainfall (if there is a rain sensor- optional).
Press to adjust (increase) the level of different settings
Press to confirm to reset the MIN/MAX record
HISTORY key
Press to display the weather data history records or exit manual setting mode
MIN/MAX key
Press to display MIN/MAX records of various weather data or adjust (decrease) the
level of different settings
7
LCD SCREEN
The LCD screen is split into 3 sections displaying the following information:
1. Time and date/ indoor temp/ second
2. Wind data, outdoor temperature and humidity, dew point, weather forecast icon,
tendency indicator and battery indicators.
3. Air pressure history, relative air pressure, rainfall data (optional)
*When the Weather Centre successfully receives the transmission signals, the icon will
be switched on. (If not successful, the icon will not be shown on the LCD). User can
therefore easily see whether the last reception was successful (“ON” icon) or not (“OFF”
icon). On the other hand, the short blinking of the icon shows that a reception is
being done at that time.
Wind speed / gust in
mph, km/h, m/s
Calendar / indoor
temperature / seconds
display
Weather tendency
indicator
Time display
Air pressure
history histogram
Outdoor relative
humidity in %
Weather forecast
Icon
Relative air pressure /
24 hr rainfall / Total
rainfall display* (only if
there is a rain sensor
being used)
Wind Chill in
C or F
Low battery indicator
(weather centre)
Transmitter signal
reception icon*
Low battery
indicator
(transmitter)
Outdoor
temperature
/ dew point
in C or F
MI/MAX icons
HISTORY
icon
Low battery
indicator (rain
sensor - optional)
8
In normal display user may press the SET key shortly to toggle between Mode1 and Mode
2 display:
Mode 1: Wind speed, outdoor temperature and relative air pressure are shown.
Mode 2: Wind gust, dew point, and rainfall (optional) readings are shown.
Note: To view the rainfall data, press the + key after entering Mode 2 display.
Wind gust icon
Dew point icon
Rainfall icon
In Mode 2, this reception
icon is showing the
condition of the reception
of the signal from Rain
sensor (only if a rain
sensor is being used)
Wind speed icon
Outdoor temp
icon
Rel. Air Pressure icon
In Mode 1, this reception icon is showing the condition of the
reception of the signal from Thermo-hygro transmitter
Transmitter signal reception icon
9
POSITIONING:
Using 915MHz wireless transmission gives users little restriction on placement because all
units can be positioned virtually anywhere within a 330 ft / 100 meters radius of the base
station. Please ensure that the cable included in this set meets your distance
requirements (see accessories in the main user manual for adding extension cables).
Important: Ensure all signals can be received and/or all cable distances meet with your
requirements at the point of fixing particularly before you start drilling any mounting holes.
Wind sensor
Secure the main unit to the shaft of the mast holder using the single screw provided with
the front of the sensor (marked E) facing in the East-West direction otherwise wind
direction will not be accurate. Now fix the entire unit to a suitable mast using the U-bolt,
washers and nuts found in this set.
Note: For best results mount the wind sensor onto a mast to allow the wind to freely travel
from all directions to enable an accurate reading (ideal mast size should be from Ø
5
/
8
to
1
1
/
4
). Ensure that the cable of the wind sensor meets your distance requirements
Thermo-hygro Sensor
To wall mount the thermo-hygro sensor, fix the wall holder onto the desired wall (2 screws
are supplied), plug the sensor firmly into the wall holder and then carefully replace the rain
cover back over the thermo-hygro sensor.
Note: After mounting the units, should the weather data not be received, user may need to
remove the batteries from all units and redo the set-up procedures after about 5 minutes.
Rain sensor (optional)
The rain sensor should be mounted horizontally about 2-3ft off from the ground (or higher)
in an open area away from trees or other coverings to allow rain to fall naturally for an
accurate reading.
Note: For best results ensure the base is horizontal to allow maximum drainage of any
collected rain
10
All rights reserved. This handbook must not be reproduced in any form, even in excerpts,
or duplicated or processed using electronic, mechanical or chemical procedures without
written permission of the publisher.
This handbook may contain mistakes and printing errors. The information in this
handbook is regularly checked and corrections made in the next issue. We accept no
liability for technical mistakes or printing errors, or their consequences.
All trademarks and patents are acknowledged.
EJMA1913T910
Printed in China
  • Page 1 1
  • Page 2 2
  • Page 3 3
  • Page 4 4
  • Page 5 5
  • Page 6 6
  • Page 7 7
  • Page 8 8
  • Page 9 9
  • Page 10 10

La Crosse Technology WS-1913IT Quick Setup Manual

Category
Weather stations
Type
Quick Setup Manual

La Crosse Technology WS-1913IT is a professional weather center that provides accurate weather data for your home. With its wireless transmission capability, you can place the outdoor sensors up to 330ft away from the base station, giving you flexibility in setting up your weather station.

Its multifunctional display shows indoor and outdoor temperature, humidity, wind speed, wind direction, rainfall, and air pressure. It also features weather forecasts, dew point, and moon phase information. The weather tendency indicator helps you predict upcoming weather changes.

The WS-1913IT includes a self-emptying rain gauge that accurately measures rainfall and displays it in various units. It also has programmable alarms for weather conditions, allowing you to stay informed and prepared.

Ask a question and I''ll find the answer in the document

Finding information in a document is now easier with AI