Page is loading ...

RADIO CONTROLLED ALARM CLOCK WITH SOLAR PANEL
OPERATING MANUAL
INTRODUCTION:
Congratulations on purchasing this Alarm Clock with solar panel with DCF-77 radio-
controlled time. The operation of this product is simple and straightforward and by
reading this operating manual, users will receive the optimum benefits of all its
features.
The alarm clock
FEATURES:
• DCF-77 Radio controlled clock with manual setting option
• 24 hours time display
• Calendar: date and month
• Alarm snooze programmable duration (1-59 min)
• Time zone setting (±9 hours)
• Two independent alarm time settings
• LCD back-light
• Rechargeable alkaline 1,5V battery
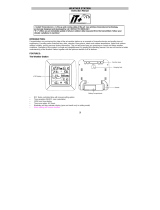
SETTING UP:
SNOOZE/24HR AL/
key
Battery cover
Battery compartment
Battery cover
1. Firstly, flip open the battery cover at the back of the alarm clock and remove the
insulation plastic piece from the battery compartment.
2. Checking the correct polarization, insert the provided 1.5V rechargeable alkaline
battery into the battery compartment and replace the cover.
Note:
The included battery is a rechargeable alkaline battery. It needs to be inserted into
the battery compartment as power source for normal operation. The solar panel itself
does not provide enough power to operate the clock.
AL/MIN key
AL/HR key
Solar panel

3. When the battery is inserted, all the segments of the LCD will light up briefly and
alarm beeps once.
4. The time (hour, minutes and seconds) will be represented by “--:-- -- “. The DCF
reception tower at the top of the seconds will start flashing and the alarm times
will be shown at the preset time of 6:00.
5. The clock will now start receiving the DCF time signal. After approximate 3 to 5
minutes, the DCF time will be displayed.
6. If reception is not successful within approximately 7-10 minutes, it will attempt to
receive the signal in the next following hour (DCF time reception is every full
hour). The reception is temporarily terminated. Your alarm clock is now
operational.
IMPORTANT!
• It is recommended to place the alarm clock under any source of light
daily for 12 hour to allow sufficient charging time for the rechargeable
alkaline battery. Under this recommended condition, the rechargeable
alkaline battery life can be used up to 5 years. Otherwise the life
expectancy of the battery is approximately 2 years, depending on alarm
activation times and backlight usage.
• Do not use any normal Ni-Cd or NiMH or Lithium battery charger to
recharge the rechargeable alkaline battery. Only use a charger unit
designed for this specific type of battery and purpose.
• Do not insert any other kind of battery other than the 1,5V rechargeable
alkaline battery in the battery compartment as they may cause damage
to the clock and may result to cause an explosion!
Note:
If the low battery indicator is displayed on the LCD, position the alarm clock under
any source of light or place the rechargeable battery into an appropriate Alkaline
charger to charge up its rechargeable alkaline battery.
Unless the alarm clock is manually reset, the low battery indicator will remain
displayed.
BATTERY CHANGE:
Please help in the preservation of the environment. Return used
batteries to an authorised depot.
LCD SCREEN
DCF-77 Tower Icon
Time
Calendar display
(date and month),
alternatively ALARM 2
Alarm time
Alarm 1 Icon

RADIO CONTROLLED TIME:
The time base for the radio-controlled time is a Cesium Atomic Clock operated by
the Physikalisch Technische Bundesanstalt Braunschweig which has a time
deviation of less than one second in every one million years.
The time is coded and transmitted from Mainflingen near Frankfurt via frequency
signal DCF-77 (77.5 khz) and has a transmitting range of approximately 1,500 km.
The alarm clock receives this signal and converts it to show the precise time and so
when within this range the received time is completely accurate.
CHECKING FOR DCF-77 RECEPTION:
The alarm clock will automatically start scanning for the DCF-77 frequency signal
after the battery is inserted. In normal surroundings (for example away from
interfering sources such as TV sets), it takes between 3-5 minutes to receive the
signal. If after 10 minutes of inserting the battery into the alarm clock and the DCF-
77 signal is not received, then check the following list before manually setting the
time (see Manual time setting):
1. The distance of the alarm clock should be at least 1.5-2.0 meters away from
interfering sources such as computer monitors or TV sets.
2. Avoid placing the alarm clock onto or in the immediate proximity of metal, doors,
windows frames or structures.
3. Within thick concrete rooms such as basements and tower blocks, the DCF-77
signal is naturally weaker. In extreme cases, place the alarm clock closer to a
window and/or point its front or rear towards the general direction of the
Frankfurt/Main transmitter (avoid positioning within close proximity of metal
frames or structures).
Note:
Users may be located in areas where atmospheric disturbances are the direct cause
for not receiving the DCF-77 frequency signal. During nighttime, atmospheric
disturbances are usually less severe and reception is possible in most cases. With a
single daily reception, it is adequate for the alarm clock to keep time deviation to
below 0.5 seconds in a period of 24 hours.
When reception is successful, the DCF-77 tower icon will start flashing on the LCD.
Once the signal is “locked”, the DCF-77 tower icon will stay fixed on LCD and the
received time will automatically correct the manually set time. As well as the time,
the date will also be received by the alarm clock and will be displayed accordingly in
the calendar section of the LCD.
FUNCTION KEYS:
The radio-controlled alarm clock uses the following keys:
SNOOZE/ : Alarm snooze function
24HR AL/ : Enter time setting mode, time zone and snooze duration, stop
alarm and snooze
: Back-light-On
AL/HR : Alarm 1 time setting, alarm 1 icon (((1))), alarm STOP for alarm 1
: Set the hours and time zone

: Back-light-On
AL/MIN : Alarm 2 time setting, alarm 2 icon (((2))), alarm STOP for alarm 2
: Set the minutes and snooze duration
: Back-light-On
THE ALARM SOUND
When the alarm 1 is activated, it sounds as follows:
From 0 to 26 seconds : 2 short and gentle continuous beeps
From 27 to 54 seconds : 4 short continuous beeps
From 55 seconds to 1 minute 35 seconds : very short continuous beeps
Notes: The alarm 1 & 2 will automatically cut off after a time of 1 minute and 35
seconds. The alarm is not switched off but will sound again at the same
time on the following day.
ALARM SETTING:
TO SET ALARM 1 & 2:
1. Press the “AL/HR” key until (((1))) icon appears and the AL 1 icon on the LCD
starts flashing. If the waiting time is too long, flashing will stop and the time
can not be set any longer. In such case simply press the “AL/HR” key once
again and the display will resume flashing.
2. While the display is flashing: Set the hours and minutes of the desired alarm
time by use of the “AL/HR” (hours) or the “AL/MIN” keys (minutes)
respectively. (If the respective key is pressed permanently the hours setting
will continuously advance by steps of 1 and the minutes setting by steps of 5).
3. Once the alarm time is set, press the “SNOOZE/24HR AL/
” key to confirm
or wait approximately 8 seconds (automatic exit of alarm time setting mode,
AL 1 will stop flashing).
4. To set alarm 2, repeat above steps but use the “AL/MIN” key.
Note: If both alarms are set for the same time then only alarm 2’s sound will be
heard. The date cannot be displayed when Alarm 2 setting is activated.
TO CHANGE FROM ALARM 2 TO DATE DISPLAY:
1. Press and hold down the “AL/MIN” key, the AL2 icon will flash (if present) and
the alarm on/off icon “(((2)))” (if present) will disappear.
2. Press the “SNOOZE/24HR AL/
” key to confirm or wait approximately 8
seconds to exit. The date will appear in place of alarm 2 time setting.
Hours setting
AL 1
(flashing)
3. To return to alarm display, simply press the “AL/MIN “ key again.
Minutes setting
Note: The date can only be displayed with reception of DCF time and the calendar
will change accordingly to DCF time from Frankfurt.

TO TURN ALARM OFF FOR 24 HRS WHEN IT IS RINGING
(BOTH ALARM 1 OR 2):
1. Press the “SNOOZE/24HR AL/ ” key to start the desired snooze time or
press and
hold until the confirmation tone sounds the “SNOOZE/24HR AL/ ”
key to switch the alarm off for 24 hours.
2. Or, press the “AL/HR” key to stop alarm 1 or the “AL/MIN” key to stop alarm
2. This will turn the alarm off for 24 hours.
TO DEACTIVATE ALARM FROM GOING OFF AT ALL:
Alarm 1:
1. In normal mode display, press and hold the “AL/HR” key. The alarm icon
“AL1” will flash first then after a few seconds the alarm on/off icon “(((1)))” will
disappear indicating that it has now been turned off.
2. ess “SNOOZE/24HR AL/ Pr
” key to exit the mode
Alarm 2:
1. In normal mode display, press and hold the “AL/MIN” key. The alarm icon
“AL2” will flash first then after a few seconds the alarm on/off icon “(((2)))” will
disappear indicating that it has now been turned off.
2. ess “SNOOZE/24HR AL/ Pr
” key to exit the mode. Date will automatically
be displayed (providing DCF time signal is revived).
TO REACTIVATE THE ALARM SETTING:
Alarm 1:
1. In normal mode display, press the “AL/HR” key. The alarm icon “AL 1” will
flash first, then the alarm on/off icon “(((1)))” will appear indicating that it has
now been turned on.
2. Press the “SNOOZE/24HR AL/
” key to exit this mode.
Alarm 2:
1. In normal mode display, press the “AL/MIN” key. The alarm icon “AL 2” will
flash first, then the alarm on/off icon “(((2)))” will appear indicating that it has
now been turned on.
2. Press the “SNOOZE/24HR AL/
” key to exit this mode. Date cannot be
displayed
MANUAL TIME SETTING:
Minutes Setting
(flashing)
Hours Setting (flashing)
In some cases after inserting the battery, the alarm clock may not be able to receive
the DCF-77signal. In this situation, the time should be manually set (before manual
setting see Checking DCF-77 Reception above).

1. Press and hold down the “SNOOZE/24HR AL/ ” key until the time on the
LCD starts flashing.
2. Now manually set the time in hours and minutes by pressing the “AL/HR” and
“AL/MIN” keys respectively. (Pressing these keys continuously moves the
hours consecutively by 1 and moves the minutes consecutively by 5)
3. When the time is set, press the “SNOOZE/24HR AL/
” key to confirm or wait
for approximately 8 (leaving the automatic time set mode, digits stop blinking).
Note: The unit will still try and receive the signal despite the time being manually
set. When it receives the signal, then the DCF tower icon will stay fixed on
the LCD. If reception has been unsuccessful, then the DCF tower icon will
disappear but reception will still be attempted the following hour.
TIME ZONE SETTING:
To change to a different time zone (±9 hours):
1. Press and
hold down the “SNOOZE/24HR AL/ ” key to enter the time setting
mode
2. Press the “SNOOZE/24HR AL/
” key once more, the time zone and snooze
time setting will be displayed at the lower part of the LCD (Left digit = Time
zone, right digit = Snooze)
3. Using the “AL/HR” key to select the desired time zone. Each press changes
the digits by 1 hour.
4. When the desired time zone is selected, press the “SNOOZE/24HR AL/
”
key to confirm or wait approximately 8 seconds to automatically return to the
normal mode display.
Note: If the time zone is changed, the calendar display will not change to the new
time zone.
SNOOZE SETTING:
The snooze time is set as default for 5 minutes by the manufacturer. The actual
snooze time required should be displayed as one minute less than in the snooze
time setting. This is because it activates from the start of next minute after the
“SNOOZE” key was pressed – it does not count the current minute that it was
pressed in.
0 = Central Europe
For example: if the alarm is set at 7:00 and 10 minutes snooze time is required so
that when pressed it will go on again at 7:10, then 9 minutes has to be set as the
snooze time.
Time zone
Snooze time

To use the snooze feature, simply press the “SNOOZE/24HR AL/ ” key when the
alarm is sounding and the alarm will snooze for 5 minutes before automatically
sounding again. When the alarm is snoozing, the alarm icon (((1))) and/or (((2))) will
start flashing indicating that the alarm is active but is in Snooze mode.
TO CHANGE TO A SNOOZE TIME (1-59 MINUTES), THEN SIMPLY:
1. Press and hold down the “SNOOZE/24HR AL/ ” key to enter the time setting
mode
2. Press the “SNOOZE/24HR AL/
” key once more, the time zone and snooze
time setting will be displayed at the lower part of the LCD (Left digit = Time
zone, right digit = Snooze)
3. Using the “AL/MIN” key to select the desired snooze time. Each press
changes the digit by 1.
4. When the desired snooze time is selected, press the “SNOOZE/24HR AL/
”
key to confirm or wait approximately 8 seconds to automatically return to the
normal mode display.
LCD BACK-LIGHT:
The LCD back-light is automatically switched ON when any one of the 3 function
keys are pressed. The back-light will be switched on for approximately 2 seconds
before automatically switching OFF. However, if any of the keys are pressed and
held down, then back-light will remain ON constantly unit the key is released.
MAINTENANCE:
• Avoid placing the alarm clock in areas prone to vibration and shock as this may
damage and inaccurate readings.
• Avoid exposure to sudden changes in temperature such as direct sunlight,
extreme cold and wet or moist conditions.
• When cleaning the display and casing, use a soft damp cloth only.
Do not use solvents or souring agents as they may mark the LCD and casing.
• Do not submerge the alarm clock into water.
• Do not attempt to make any repairs to the alarm clock. Return it to its original
point of purchase for repair by a qualified engineer. Opening and tampering with
the unit may invalidate its guarantee.
SPECIFICATIONS:
Recommended operating
temperatures : 0°C to +50°C
Power source : 1 x AA, 1.5V rechargeable Alkaline battery
Recharging source : Solar panel (Any light sources: solar or artificial)
Battery life : Approximately 2 years (depending on alarm activation
and backlight usage)
Dimensions (L x W x H) : 88 x 44 x 100 mm

LIABILITY DISCLAIMER
• The manufacturer and supplier cannot accept any responsibility for any incorrect
readings and any consequences that occur should an inaccurate reading take
place.
• This product is not to be used for medical purposes or for public information.
• The specifications of this product may change without prior notice.
• This product is not a toy. Keep out of the reach of children.
• No part of this manual may be reproduced without written consent of the
manufacturer.
/