Page is loading ...

Catalog No. FAP130-2039-02 Printed U.S.A Form Disconnect Switch Kit 8/23/2011 pg. 1
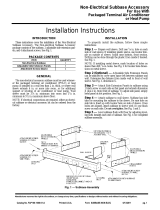
Disconnect Switch Accessory
For Use With
Packaged Terminal Air Conditioner
Installation Instructions
INTRODUCTION
These instructions cover the installation of the Subbase Disconnect Switch Accessory for packaged terminal air
conditioner (PTAC) or heat pump units.
SAFETY CONSIDERATIONS
Installing and servicing air-conditioning equipment can be hazardous due to system pressures and electrical
components. Only trained and qualified personnel should install or service air-conditioning equipment. When
working on air-conditioning equipment, observe the precautions provided in literature, tags, and labels
attached to the unit.
Follow all safety codes. Wear safety glasses, protective clothing, and work gloves. Use quenching cloth for
brazing operations. Have fire extinguisher available. Read these instructions thoroughly and follow all warnings
or cautions included in literature and attached to the unit. Consult local building codes and current editions of
the National Electrical Code (NEC) NFPA 70. In Canada, refer to current editions of the Canadian electrical code
CSA 22.1.
Recognize safety information. This is the safety-alert symbol . When you see this symbol on the unit and in
instructions or manuals, be alert to the potential for personal injury.
Understand these signal words: DANGER, WARNING, and CAUTION. These words are used with the safety-alert
symbol. DANGER identifies the most serious hazards which will result in severe personal injury or death.
WARNING signifies hazards which could result in personal injury or death. CAUTION is used to identify unsafe
practices which may result in minor personal injury or product and property damage. NOTE is used to highlight
suggestions which will result in enhanced installation, reliability, or operation.

Catalog No. FAP130-2039-02 Printed U.S.A Form Disconnect Switch Kit 8/23/2011 pg. 2
Figure 1 – Package Contents
GENERAL
The Subbase Disconnect Switch Accessory consists of a single-throw double-pole switch assembly designed to
interface to a receptacle kit in an electrical subbase. See Fig. 2. This accessory provides a power disconnect for
the unit when required by NEC (National Electrical Code) or local codes.
Figure 2 – Non-Electric Subbase
INSTALLATION
PACKAGE CONTENTS
FIELD SUPPLIED MATERIAL REQUIRED
ITEMS
QUANTITY
ITEMS
DPST Switch
1
Subbase Receptacle Kit
Switch Junction Box
1
Wire
Switch
Cover (inc Screws)
1
Wire Nuts
3" Interconnecting Conduit Nipple
1
Grounding Screw or Clip
Attachment Screws (Junction Box)
4
Attachment Screws (Switch) 2
Conduit Nuts
2

Catalog No. FAP130-2039-02 Printed U.S.A Form Disconnect Switch Kit 8/23/2011 pg. 3
Mechanical Assembly
Step 1 — Disconnect all power to the unit.
Step 2 — Remove knockouts “A” & “B” from subbase as shown in figure 3. If receptacle or conduit is already
installed in knockout A, it must be removed along with the junction box.
Figure 3 – Remove Knockout A & B in Subbase
Step 3 — Remove knockout “#1” from one side of the “Receptacle” junction box as shown in Figure 4.
Figure 4 – Receptacle Junction Box Knockout #1
NOTE
S
:
- IF FUSE-KIT Accessory will also be installed, refer to FUSE-KIT installation instructions first.
- IF subbase is already installed on PTAC unit, remove to simplify installation of disconnect switch assembly.
- Disconnect switch can only be used with an electrical subbase.

Catalog No. FAP130-2039-02 Printed U.S.A Form Disconnect Switch Kit 8/23/2011 pg. 4
Step 4 — Remove knockout “#1” from both sides of “Switch” junction box as shown in figure 5.
Figure 5 – Switch Junction Box Knockout #1
Step 5 — Insert “Switch” junction box in subbase hole “B”. Then insert “Receptacle” junction box in subbase hole
“A” with knockout hole facing “Switch” junction box as shown in figure 6. Use factory supplied screws to fasten
the “Receptacle” and Switch” junction boxes to the subbase.
Figure 6 – Junction Boxes Installed
Step 6 — Insert interconnecting conduit nipple into “Receptacle” junction box knockout hole “#1” and “Switch”
junction box knockout hole “#1”, as shown in figure 7. Then start conduit nuts on each side of the interconnecting
conduit nipple.
Figure 7 - Insert Interconnecting Conduit Nipple
Step 7 — Tighten Conduit nuts inside Switch and Receptacle junction boxes until interconnecting conduit nipple is
secured in place as shown in figure 8.
Figure 8 - Tighten Conduit Nuts

Catalog No. FAP130-2039-02 Printed U.S.A Form Disconnect Switch Kit 8/23/2011 pg. 5
Wiring Assembly
Figure 9 – Wiring Diagram

Catalog No. FAP130-2039-02 Printed U.S.A Form Disconnect Switch Kit 8/23/2011 pg. 6
Step 8 — Attached field supplied conduit from wall to knockout hole “#1” on “Switch” junction box. Using field
supplied conduit nuts, tighten conduit to “Switch” junction box as shown in figure 10.
Figure 10 – Attach Conduit to Junction Box
Step 9 — Connect Power Source wiring to “Disconnect Switch” as shown in figure 11. Power source wiring and
disconnect switch must be properly grounded using a field supplied ground wire and grounding screw or clip.
Refer to wiring diagram in Figure 9 above.
Figure 11 – Wire Power Source to Disconnect Switch
Step 10 — Add field supplied wires to “Disconnect Switch” and pass wires through the interconnecting conduit
nipple into the “Receptacle” junction box as shown in figure 12.
Figure 12 – Install wiring for Receptacle
NOTE
:
Terminate all Ground Wires
per code and acceptable trade practices.

Catalog No. FAP130-2039-02 Printed U.S.A Form Disconnect Switch Kit 8/23/2011 pg. 7
Step 11 — Use factory supplied screws to fasten “Disconnect Switch” to junction box as shown in figure 13.
Figure 13 – Fasten Disconnect Switch to Junction Box
Step 12 — Use instructions and wiring diagram provided with the Subbase Receptacle Kit Accessory for proper
wiring of the Receptacle outlet as shown in figure 14.
Figure 14 – Wire Receptacle Outlet
Step 13 — Use factory supplied screws to fasten “Receptacle” to junction box on the subbase as shown in figure
15.
Figure 15 – Fasten Receptacle to Junction Box

Catalog No. FAP130-2039-02 Printed U.S.A Form Disconnect Switch Kit 8/23/2011 pg. 8
Step 14 — Use factory supplied screws to fasten cover plates to both the “Receptacle” and “Disconnect Switch”
on the subbase as shown in figure 16.
Figure 16 – Install Cover Plates
Step 15 – Install subbase on PTAC wall sleeve per the installation instructions for a non electric subbase. See
figure 17 for a completed installation.
Figure 17 – Attach Subbase to Wall Sleeve
/