Page is loading ...

Air conditioner
Installation manual
Differential Pressure Switch MOS-P1050
࡙ Thank you for purchasing this Samsung product.
࡙ Before operating this unit, please read this Installation manual carefully and retain it for future
reference.

2
English
Contents
Safety Information 3
Safety Information 3
Installation 5
Installing the Differential Pressure Switch 5
Differential Pressure Switch
Installing the differential pressure switch onto the ERV
Connecting the connecting wires between the differential pressure switch and the ERV PBA
Setting using the differential pressure switch

3
English
Safety Information
This installation guide explains how to install a differential pressure switch onto the ventilation system. Please read this manual
thoroughly before installing the product.
WARNING
Hazards or unsafe practices that may result in severe personal injury or death.
CAUTION
Hazards or unsafe practices that may result in minor personal injury or property damage.
Must follow directions.
Do NOT attempt.
Make sure the machine is grounded to prevent electric shock.
Unplug the power plug from the wall socket.
Do NOT disassemble.
FOR INSTALLATION
WARNING
Contact a service center for installation.
࡙ Failure to do so may result in product malfunction, water leakage, electric shock and fire.
You must use wires that meet specifications for installation.
࡙ Failure to do so may result in fire or damage to a differential pressure switch.
All electric works should comply with local regulations and installation work carried out by a qualified technician.
࡙ Installation by an unqualified technician may result in product malfunction, electric shock, and fire.
Check whether the installation work is performed in accordance with the installation instructions.
࡙ Incorrect installation of a differential pressure switch may result in electric shock or fire.
Safety Information

Safety Information
4
English
Safety Information
FOR INSTALLATION
CAUTION
When connecting a wire, do not tighten it too much.
࡙ Failure to do so may result in breakage of the wire.
Make sure the differential pressure switch installation doesn't cause interference with other electrical appliances,
particularly in a hospital etc.
࡙ Failure to do so may result in abnormal operation.
Do not install the product in an area where combustible gas leaks or possible gas leakage is expected.
࡙ Failure to do so may result in breakage of the wire.
Do not install the product in conditions where it is exposed to oil, steam etc.
࡙ Use of the product in an area exposed to oil, steam, sulfuric acid gas etc may result in component damage or product
malfunction.
Do not install the product in a place where acid or alkali liquid or special sprays are used.
࡙ Failure to do so may result in electric shock or abnormal operation.
FOR OPERATION
WARNING
Do not remodel or repair the differential pressure switch yourself.
࡙ Failure to do so may result in product malfunction, electric shock and fire, so contact a service center for repair.
When disposing of a differential pressure switch, contact a service center.
Do not move or reinstall an installed differential pressure switch yourself.
࡙ Failure to do so may result in electric shock or fire.

5
English
Installation
Differential Pressure Switch
Product and components
Name
Differential Pressure
Switch
Plastic Tube PVC Tube Screw (PH, M4, L10)
Shape
Name Screw (PH, M3, L10) Screw (TH, M4, L8) Pin-terminal connector Holder Wire
Shape
Component description
Pin-terminal No.1
Pin-terminal No.2
Pin-terminal No.3
Cover
65.0mm
65.0mm57.5mm
עߧ
עߧ
Pressure adjustment
dial
Screw type cable
connection part
Low pressure tube
connection socket (P2)
High pressure tube
connection socket (P1)
Installing the Differential Pressure Switch

Installing the Differential Pressure Switch
6
English
Installation
Installing the differential pressure switch onto the ERV
1 Connect the PVC tubes to the two sockets on the side of the differential pressure switch, and connect the plastic
tubes to the opposite side as shown in the figure.
࡙ Connect the low pressure side PVC tube to the socket P2 (upper socket) and the high pressure side PVC tube to the socket
P1 (lower socket).
࡙ Cut the PVC tube to fit the size of the product.
Low pressure tube (P2)
High pressure tube (P1)
2 Untighten the screws on the ERV, as marked in the figure, and then assemble the differential pressure switch using
screws (PH, M4, and L10).
॰ AN026**
Fixing position of the differential pressure switch
Assembly position of the low pressure tube
॰ AN035**, - AN050**, AN080**, - AN0100**
ࣚ
The screws are covered with insulation at the insulation cutting positions indicated by the + symbols.
Assembly position of the low pressure tube
Fixing position of the differential pressure switch
CAUTION
࡙ When installing the differential pressure switch, make sure that its sockets to which the tubes are connected face
downward (based on product installation). Failure to do so may cause moisture to enter the switch or errors to occur in
differential pressure measurement.

7
English
Installation
3 Disassemble the circular cover next to the electrical control part of the ERV, and then assemble the low pressure
plastic tube connected to the differential pressure switch socket P2. Then, fix the low pressure PVC tube to the
product using the holder wire as shown in the figure.
࡙ Disassembling the circular cover and assembling the plastic tube
plastic tube direction
Screw (PH, M3, L10)
NOTE
࡙ Make sure that the direction of the plastic tube as indicated by the arrow in the figure is identical with the air flow direction.
॰ AN026**
ࣚ Assemble the holder wire to the screw located at the position indicated in the figure, and then fix the PVC tube.
Plastic tube direction
॰ AN035**, - AN050**, AN080**, - AN0100**
ࣚ Fix the PVC tube using the holder wire located at the position indicated in the figure.
Plastic tube direction
CAUTION
࡙ In any case, be careful not to twist or press the PVC tube. Failure to do so may cause errors in pressure measurement,
leading to product malfunction.
࡙ If the direction of the plastic tube is not identical with the air flow direction, errors may occur in pressure measurement,
leading to product malfunction.

Installing the Differential Pressure Switch
8
English
Installation
4 Assemble the high pressure plastic tube(P1) to the OA duct installed on site, and then fix the high pressure PVC
tube using the holder wire.
࡙ Assemble the plastic tube so that its direction is identical with the air flow direction in the OA duct.
࡙ Assemble the plastic tube at a position which is 300 to 500 mm away from the product.
ࣚ Assemble the plastic tube to a side of the OA duct.
॰ AN026**
ࣚ Assemble the holder wire to the inspection cover assembly screw on the top of the product, and then fix the PVC tube.
ࣚ Assemble the plastic tube to the external OA duct, and then fix the PVC tube using the holder wire.
Plastic tube
direction
॰ AN035**, - AN050**, AN080**, - AN0100**
ࣚ Assemble the plastic tube to the external OA duct, and then fix the PVC tube using the holder wire.
Plastic tube direction
8.0mm 8.0mm
ע
2.5
ע
7. 5
ע
2.5
NOTE
࡙ To assemble the plastic tube to the OA duct, it is required
to drill holes on the duct. For the hole sizes, refer to the
figure:
CAUTION
࡙ In any case, be careful not to twist or press the PVC tube. Failure to do so may cause errors in pressure measurement,
leading to product malfunction.
࡙ If the direction of the plastic tube is not identical with the air flow direction, errors may occur in pressure measurement,
leading to product malfunction.
࡙ If the plastic tube is assembled below the OA duct, the plastic tube can be blocked by dirt or dust. Be careful not to
assemble the plastic tube below the OA duct.

9
English
Installation
2 Apply a crimp type ring connector to each connecting
wire located at the body side of the differential
pressure switch, and then connect a pin-terminal
connector, as shown in the figure.
࡙ The cable and the crimp type ring connector do not
come with the product and must be purchased on site.
Connecting the connecting wires between the differential pressure switch
and the ERV PBA
1 Untighten the screw (1 EA) of the differential pressure switch, disassemble the cover, and then pass the cable
through the screw type cable connection part.
3 Connect the connecting wires to the pin-terminals No. 2 and No. 3 located on both sides to the differential pressure
switch dial, and then connect the opposite ends of the connecting wires to the HOOD terminals on the ERV PBA.

Installing the Differential Pressure Switch
10
English
Installation
4 Rotate the screw type connection part clockwise to seal the opening appropriately in accordance with the thickness
of the connecting wires.
CAUTION
࡙ Be sure to switch off the power supply before installation. (Failure to do so may cause electrical problems, leading to
abnormal operation of the product.)
࡙ The wiring must be installed in compliance with electrical wiring regulations.
࡙ If the diameter of the connecting wire is less than 5mm, the sealing of the screw type cable connection part may not be
complete.

11
English
Installation
50
300
100
350
150
400
200
450
250
500
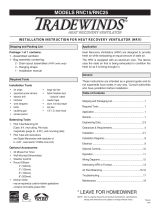
Model Differential pressure setting
AN026JSKLKN/EU 220
AN035JSKLKN/EU 200
AN050JSKLKN/EU 250
AN080JSKLKN/EU 280
AN100JSKLKN/EU 310
Setting using the differential pressure switch
1 Rotate the dial located at the center of the differential pressure switch until the number pointed by the yellow arrow
becomes equal to the differential pressure setting value of the product.
(Refer to the following table for the setting values by model.)
NOTE
࡙ When rotating the dial to set the differential pressure, be sure to rotate it in the direction that the number increases from
the minimum value to the setting value. If you rotate the dial in the direction that the number decreases to the setting value,
errors may occur in differential pressure measurement.
WARNING
࡙ Be sure to set the differential pressure while the product is turned off. If it is not turned off, an electric shock may occur
due to your contact with a peripheral wire.
2 Close the cover of the differential pressure switch, and then tighten the screw.
3 Set SEG17 of the installation option 1 (02 mode) of the product to 1. (The ANxxxJSKLKN / EU models ship with being
set to the factory default 1.).

DB68-07894A-01
/