Extron electronics Quantum Ultra Owner's manual

Type
Owner's manual
Product Category
1
IMPORTANT:
Go to www.extron.com for the complete
user guide,
installation instructions,
and
specifications bef
ore connecting the
pr
oduct to the po
wer source.
Replacing the Fan for the Quantum Ultra
®
Power Supplies
The largest (top) fan cools the power supplies. If this fan fails, you can order a new fan from
www.extron.com and replace it as described in this guide. The fan is hot-swappable, that is, it
can be replaced while the Quantum Ultra is operating, without the need to power down the unit.
ATTENTION:
When a fan fails, replace it immediately. Do not run the unit for a long period without
a fan.
Lorsqu’un ventilateur cesse de fonctionner, remplacez-le immédiatement. NE
prolongez PAS le fonctionnement de l’unité sans ventilateur.
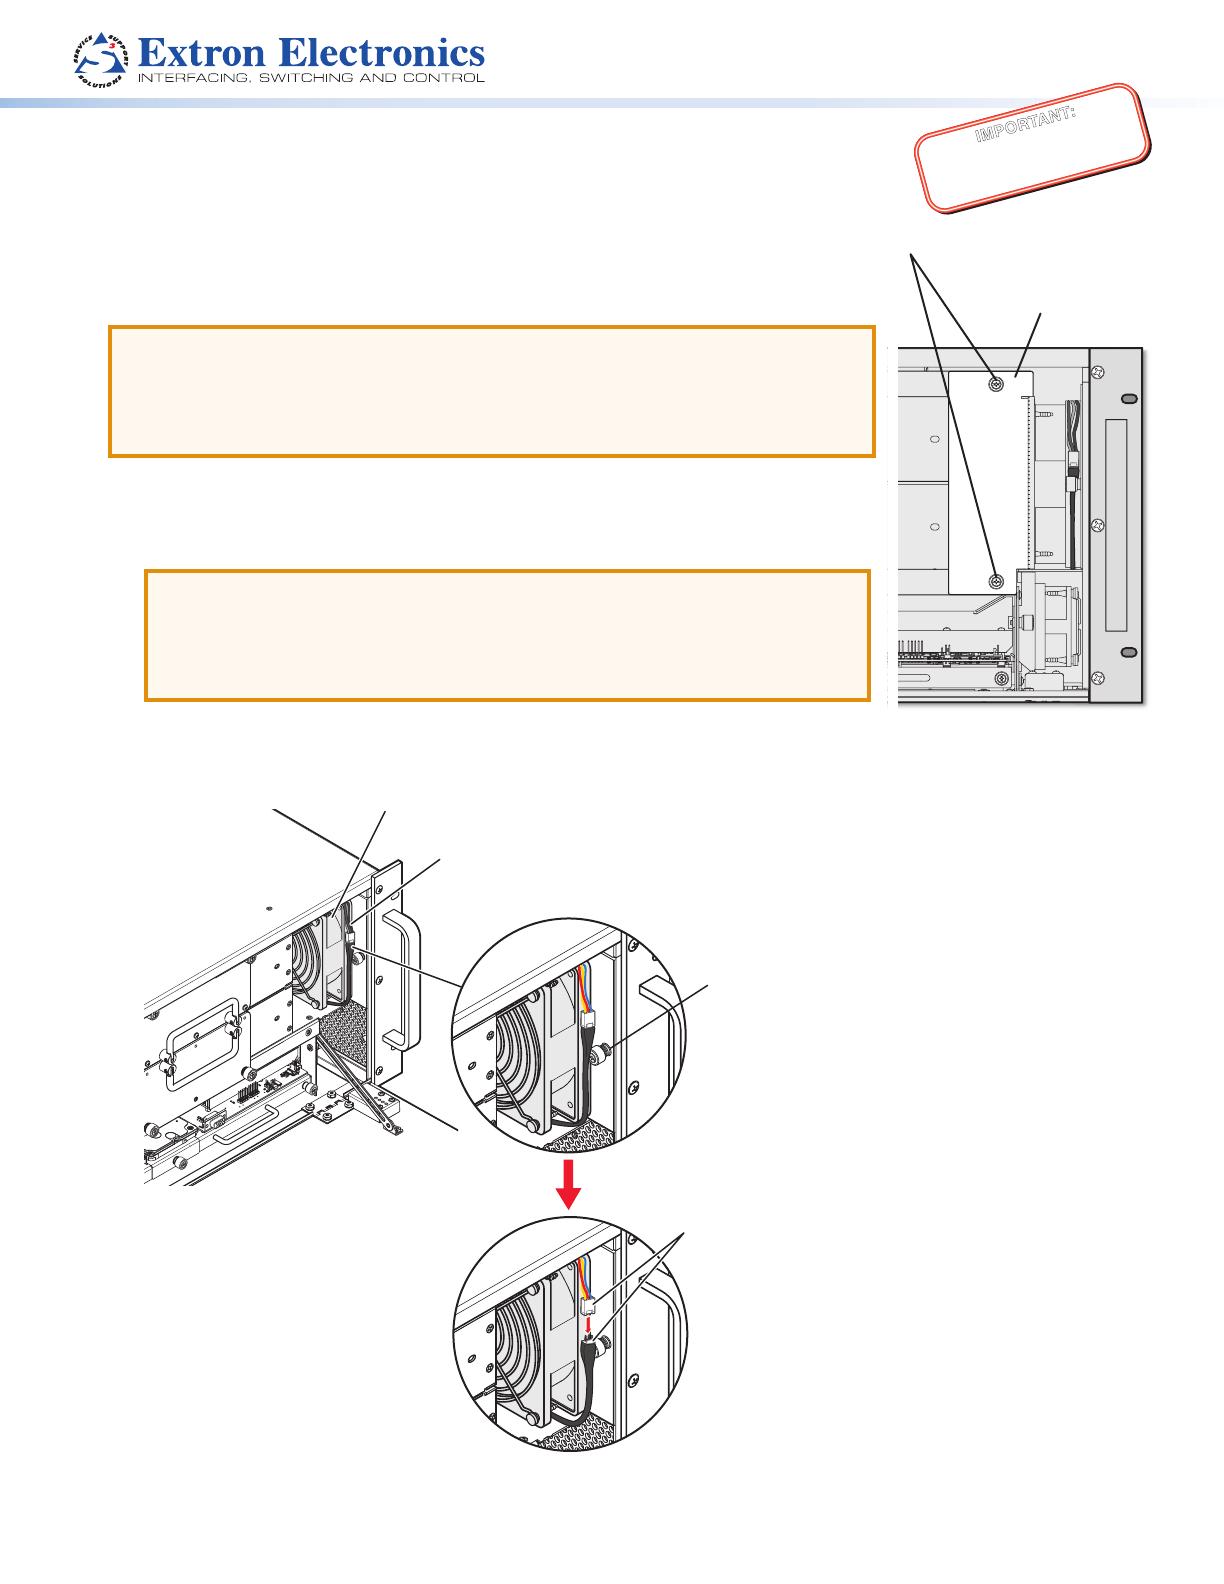
1. Use a tool to loosen the two thumbscrews on the cover panel and remove the panel (see
gure 1 at right). The thumbscrews cannot be removed completely.
2. Use a tool to loosen the thumbscrew that holds the fan to the chassis (see gure 2,
1
).
ATTENTION:
Thumbscrews should be tightened with a tool after both initial installation and
subsequent access to the panel.
Les vis doivent être serrées avec un outil adapté après la première installation et
l’accès postérieur au panneau.
Figure 1. Removing the Cover Panel
3. Disconnect the small fan cables (see gure 2,
2
).
Fan
Cables
1
Loosen the thumbscrew
.
2
Disconnect the cables.
Figure 2. Detaching the Top Fan
Loosen thumbscrews.
Take off the panel.
Replacing the Fan for the Power Supplies (continued)
2
4. Slide the fan out.
Figure 3. Sliding the Power Supply Fan Out of the Chassis
5. The replacement fan has two tabs on the back (see the illustration
at right).
These tabs t into two slots in the back of the fan compartment of the
chassis (see gure 4). Line up the new fan with the right wall of the
chassis, the tabs facing toward the back and the thumbscrew and
cables facing outward, toward you.
Slots for tabs.
Figure 4. Slots for Tabs in the Back of the Fan Compartment
T
abs
68-3176-01
Rev. A 08 17
3
Extron Headquarters
+800.633.9876 Inside USA/Canada Only
Extron USA - West Extron USA - East
+1.714.491.1500 +1.919.850.1000
+1.714.491.1517 FAX +1.919.850.1001 FAX
Extron Europe
+800.3987.6673
Inside Europe Only
+31.33.453.4040
+31.33.453.4050 FAX
Extron Asia
+65.6383.4400
+65.6383.4664 FAX
Extron Japan
+81.3.3511.7655
+81.3.3511.7656 FAX
Extron China
+86.21.3760.1568
+86.21.3760.1566 FAX
Extron Middle East
+971.4.299.1800
+971.4.299.1880 FAX
Extron Australia
+61.8.8113.6800
+61.8.8351.2511 FAX
Extron India
1800.3070.3777
(Inside India Only)
+91.80.3055.3777
+91.80.3055.3737 FAX
© 2017 Extron Electronics — All rights reserved. All trademarks mentioned are the property of their respective owners. www.extron.com
6. Slide the fan straight back into the chassis until the tabs are inserted into the slots (see gure 5,
1
). Ensure that the ends of
both cables are not trapped behind or under the fan and are accessible from the front.
11
Figure 5. Inserting the Replacement Fan
7. When the fan unit is in place, use a screwdriver or other appropriate tool to tighten the thumbscrew, and connect the two fan
cables.
  • Page 1 1
  • Page 2 2
  • Page 3 3

Extron electronics Quantum Ultra Owner's manual

Type
Owner's manual

Ask a question and I''ll find the answer in the document

Finding information in a document is now easier with AI