Page is loading ...

Please read and save these instructions. Read carefully before attempting to assemble, install, operate or maintain the product described.
Protect yourself and others by observing all safety information. Failure to comply with instructions could result in personal injury and/or prop-
erty damage! Retain instructions for future reference.
Powerex • 150 Production Drive • Harrison, OH 45030 • USA
Descriptions
GENERAL
The Powerex Oilless Rotary Scroll Air
Compressor has advanced scroll com-
pressor technology through the devel-
opment of a completely oilless unit.
The Powerex Scroll Compressor offers a
dynamically balanced air end which
insures vibration-free operation. The
rotary design permits a continuous
100% duty cycle. No oil separation, oil
filtration, or inlet valves are required
on the Powerex Scroll unit.
COMPRESSION CYCLE
The Powerex oilless rotary scroll air
compressor is based on the theory of
scroll compression. A scroll is a free
standing, intricate spiral bounded on
one side by a solid, flat plane or base. A
scroll set, the basic compression ele-
ment of a scroll compressor, is made up
of two identical spirals which form
right and left hand parts. One of these
scroll components is indexed or phased
180
o
with respect to the other so the
scrolls can mesh. Crescent-shaped gas
pockets are formed and bounded by
the spirals and the base plate of both
scrolls. As the moving scroll is orbited
around the fixed scroll, the pockets
formed by the meshed scrolls follow
the spiral toward the center and dimin-
ish in size. The moving scroll is prevent-
ed from rotating during this process so
the 180
o
phase relationship of the
scrolls is maintained. The compressor’s
inlet is at the outer boundary of the
scrolls. The compressed gas is dis-
charged through the outlet at the cen-
ter of the fixed scroll so no valves are
needed.
Scroll Tankmount/Basemount Air Compressors
TIP SEAL
The tip seal on the scroll compressor is
self-lubricated and allows the unit to
operate efficiently without oil and
expensive filtration. The tip seal should
be replaced every 10,000 hours of
operation.
BEARINGS
The bearings on the scroll compressor
are regreaseable to allow extended
compressor life. Service should be per-
formed every 10,000 hours of opera-
tion.
DRY TYPE INLET FILTER
(P/N 91348550)
Order P/N 91348550 for both the 3 HP
and 5HP units. Change every 2,500
hours or more often in dirty locations.
HOURMETER
The hourmeter on the scroll compres-
sor indicates the actual number of
hours the unit has been in operation.
The hourmeter is also used to deter-
mine maintenance and service timing.
An hourmeter must be installed
with every Scroll compressor.
CONDENSATE DRAIN VALVE
A condensate drain valve must be
installed on any tank used to allow
removal of the liquid which will collect
during compressor operation.
Drain liquid from
tank daily.
!
NOTICE
IN258902AV 9/06
PURE AIR TECHNOLOGY
Breathable Air Warning
This compressor/pump is NOT
equipped and should NOT be used
“as is” to supply breathing quality
air. For any application of air for
human consumption, you must fit
the air compressor/pump with
suitable in-line safety and alarm
equipment. This additional equip-
ment is necessary to properly filter
and purify the air to meet minimal
specifications for Grade D breath-
ing as described in Compressed
Gas Association Commodity
Specification G 7.1 - 1966, OSHA 29
CFR 1910. 134, and/or Canadian
Standards Associations (CSA).
DISCLAIMER OF WARRANTIES
IN THE EVENT THE COMPRESSOR
IS USED FOR THE PURPOSE OF
BREATHING AIR APPLICATION
AND PROPER IN-LINE SAFETY
AND ALARM EQUIPMENT IS NOT
SIMULTANEOUSLY USED, EXIST-
ING WARRANTIES ARE VOIDED,
AND POWEREX DISCLAIMS ANY
LIABILITY WHATSOEVER FOR
ANY LOSS, PERSONAL INJURY OR
DAMAGE.
!
DANGER

2
Scroll Air Compressors Tankmount/Basemount
Installation
RECEIVING THE UNIT
Immediately upon receipt of the scroll
compressor, the unit should be inspect-
ed for any damage which may have
occurred in shipment. Any shipping
damage must be immediately filed with
the freight carrier.
The compressor nameplate should be
checked to see if the unit is the correct
model and voltage as ordered.
APPLICATION
When the scroll compressor is to be
used in applications other than the
compressing of atmospheric air, please
contact a Powerex representative for
engineering and warranty information
at 1-888-769-7979.
INSTALLATION SITE
1. The scroll compressor must be locat-
ed in a clean, well lit and well venti-
lated area.
2. The area should be free of excessive
dust, toxic or flammable gases, mois-
ture, water and direct sunlight.
3. Never install the compressor where
the ambient temperature is higher
than 104
o
F or where humidity is high.
4. Clearance must allow for safe, effec-
tive inspection and maintenance.
5. If necessary, use metal shims or leveling
pads to level the compressor. Never use
wood to shim the compressor.
VENTILATION
1. If the scroll compressor is located in a
totally enclosed room, an exhaust fan
with access to outside air must be
installed.
2. Never restrict the cooling fan
exhaust air.
3. Never locate the compressor where
hot exhaust air from other heat gen-
erating units may be pulled into the
unit.
WIRING
Refer to the general product manual.
All electrical hook-ups must be per-
formed by a qualified electrician.
Installations must be in accordance
with local and national electrical codes.
Use solderless terminals to connect the
electric power source.
PIPING
Refer to the general product manual.
1. Make sure the piping is lined up
without being strained or twisted
when assembling the piping for the
scroll compressor.
2. Appropriate expansion loops or
bends should be installed at the com-
pressor to avoid stresses caused by
changes in hot and cold conditions.
3. Piping supports should be anchored
separately from the compressor to
reduce noise and vibration.
4. Never use any piping smaller than
the compressor connection.
5. Use flexible hose to connect the out-
let of the compressor to the piping so
that the vibration of the compressor
does not transfer to the piping.
SAFETY VALVES
Tank mounted compressors are shipped
from the factory with safety valves
installed in the tank. The flow capacity
of the safety valve is equal to or greater
than the capacity of the compressor.
1. The pressure setting of the safety
valve must be no higher than the
maximum working pressure of the
tank.
2. Safety valves should be placed ahead
of any possible blockage point in the
system, i.e. shutoff valve.
3. Avoid connecting the safety valve
with any tubing or piping.
4. Manually operate the safety valve
every six months to avoid sticking or
freezing.
Operation
BEFORE START UP
1. Make sure all safety warnings, labels
and instructions have been read and
understood before continuing.
2. Remove any shipping materials,
brackets, etc.
3. Confirm that the electric power
source and ground have been firmly
connected.
4. Be sure all pressure connections are
tight.
5. Check to be certain all safety relief
valves, etc., are correctly installed.
6. Check that all fuses, circuit breakers,
etc., are the proper size.
7. Make sure the inlet filter is properly
installed.
8. Confirm that the drain valve is closed.
9. Visually check the rotation of the
compressor pump. If the rotation is
incorrect, have a qualified electrician
correct the motor wiring.
START-UP AND OPERATION
1. Follow all the procedures under
“Before start-up” before attempting
operation of the compressor.
2. Switch the electric source breaker on.
3. Open the tank discharge valve com-
pletely.
4. Check that the compressor operates
without excessive vibration, unusual
noises or leaks.
5. Close the discharge valve completely.
6. If the pressure does not rise on a
three phase unit, turn the unit off.
Have a qualified electrician switch
the breaker OFF and exchange the L1
and L2 connections (two out of three
phases of electric source) inside the
magnetic starter enclosure.
7. Check the discharge pressure. Also
make sure the air pressure rises to the
designated pressure setting by check-
ing the discharge pressure gauge.
8. Check the operation of the pressure
switch by opening the tank outlet
valve and confirming the compressor
starts as pressure drops.
Minimum Clearances
Above 24”
Drive belt side 12”
Other sides 20”

3
Scroll Air Compressors Tankmount/Basemount
RESET
RESET
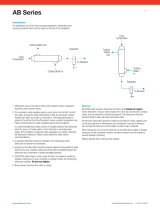
Figure 1 - SBS Scroll Basemount Simplex
Figure 2 - STS Scroll Tankmount
Figure 3 - STD Scroll Tankmount Duplex
Aftercooler
Scroll Air End
Pressure
Switch
Starter
ASME Receiver
30/60 Gallon
Auto Drain
(optional)
ASME Receiver
30/60 Gallon
Beltguard
Pulley
Belt
3/4” NPT
Outlet
Aftercooler
Scroll
Air End
Aftercooler
Scroll
Air End
ASME
Receiver
Tank
Lag
Pressure
Switch
Starter
Lead
Pressure
Switch
Motor
3 or 5 HP
Beltguard
Pulley
Belt
3/4” NPT
Outlet

RESET
4
Scroll Air Compressors Tankmount/Basemount
SCFM Full Load Gallon Dimension Ship
Model HP Phase @100 PSIG Voltage Amperage Tank LxWxH Weight (Lbs.)
SBS0307 3 3 8.6 208/230/460 8.7/8.0/4.0 Basemount 29x19x19 160
SBS1307 3 1 8.6 230 17 Basemount 29x19x19 175
SBS0507 5 3 14.7 208/230/460 13.7/13.2/6.6 Basemount 29x19x19 180
SBS1517 5 1 14.7 230 25 Basemount 29x19x19 190
Specifications
Scroll Basemount Simplex - Model SBS
SCFM Full Load Gallon Dimension Ship
Model HP Phase @100 PSIG Voltage Amperage Tank LxWxH Weight (Lbs.)
STS030 3 3 8.6 208/230/460 8.7/8.0/4.0 30 / 60 39x22x35 / 51x23x39 280 / 390
STS130 3 1 8.6 230 17 30 / 60 39x22x35 / 51x23x39 295 / 405
STS050 5 3 14.7 208/230/460 13.7/13.2/6.6 30 / 60 39x22x35 / 51x23x39 300 / 410
STS151 5 1 14.7 230 25 30 / 60 39x22x35 / 51x23x39 310 / 420
Scroll Tankmount Simplex - Model STS
SCFM Full Load Gallon Dimension Ship
Model HP Phase @100 PSIG Voltage Amperage Tank LxWxH Weight (Lbs.)
STD030 3 (2) 3 17.2 208/230/460 17.4/16.0/8.0 80 64x26x40 650
STD130 3 (2) 1 17.2 230 34 80 64x26x40 680
STD050 5 (2) 3 29.4 208/230/460 27.4/26.4/13.2 80 / 120 64x26x40 / 71x35x75 690 / 715
STD151 5 (2) 1 29.4 230 50 80 / 120 64x26x40 / 71x35x75 710 / 735
Scroll Tankmount Duplex - Model STD
D
X
X
X
X
X
X
X
X
X
X
X
X
X
X
X
X
X
X
Refrigerated or Desiccant Dryers
Magnetic Starter
Automatic
Drain
Corrosion Resistant Tanks
MODEL SBS MODEL STS MODEL STD OPTIONAL EQUIPMENT
RESET
RESET

5
Maintenance Schedule
Operating Hours
Item Action needed 500 2500 5000 10,000 15,000 20,000 Remarks
Tank Drain moisture Daily
Inlet air filter Replace (Every 2,500 hrs or less) Part #91348550
Blower fan Clean
Fan Duct Clean
Compressor Fins Clean (Every 2,500 hrs or less)
Bearings Grease Service Center Only
Tip seal Replace
Dust seal Replace
V-belt Inspect, replace *Note 3
Pressure Switch Confirm operation
Magnetic starter Inspect Replace if contact
points deteriorated
Safety valve Confirm operation (Every 2,500 hrs or less)
Pressure gauge Inspect (Every 2,500 hrs or less)
Inspect
Replace
NOTES:
1. Inspect and perform maintenance periodically according to maintenance schedule.
2. The maintenance schedule relates to the normal operating conditions. If the circumstances and load condition are adverse,
shorten the cycle time and do maintenance accordingly.
3. * The tension of the V-belt should be adjusted during the initial stage and inspected every 2,500 hours afterwards. Proper
belt tension for 3 HP units is 7 lbs./.16” deflection; for 5 HP units, 7 lbs./.19” deflection.
4. See Compressor Pump Manuals for replacement or service procedures.
Scroll Air Compressors Tankmount/Basemount

6
Scroll Air Compressors Tankmount/Basemount
Electrical Wiring Diagram - Simplex
Figure 4 - 3-5 HP Basemount/Simplex Single-Phase 208/230 Volts
Field furnished
power supply
Disconnect
Red
Black
Motor
Red
Red
Pressure
electric
switch
L1
L2
T1
T2
Open
Red
Black
Red
Red
Red
Red
Black
Red
Blank
Main disconnect and branch circuit protection to be installed by a
qualified electrician in accordance with national and local codes.

7
Scroll Air Compressors Tankmount/Basemount
Electrical Wiring Diagram - Simplex
Figure 5 - 3-5 HP Basemount/Simplex Three-Phase 208-230/460 Volts
Disconnect
Black
Motor
Red
Pressure
electric
switch
L1
L2
T1
T2
L3
T3
Blue
Red
Red
Red
Black
Blue
Field furnished
power supply
Main disconnect and branch circuit protection to be installed by a
qualified electrician in accordance with national and local codes.

8
Scroll Air Compressors Tankmount/Basemount
PANEL DATA - 3 PHASE, 60 Hz
OVERLOAD SETTINGS TOTAL PANEL
F.L.A. F.L.A.
TOTAL
UNIT 208 230 460 PANEL 208 230 460
HP VOLT VOLT VOLT HP VOLT VOLT VOLT
3 10.29 9.2 4.6 6 21.1 18.9 9.7
5 15.56 14.0 7.0 10 31.6 28.5 14.5
Figure 6 - 3-5 HP Duplex Three-Phase 208-230/460 Volts

9
Scroll Air Compressors Tankmount/Basemount
Replacement Parts List for SBS Models
RESET
RESET
RESET
Ref. SBS Model
No. Description Part Number Qty.
1 Motor 3 HP 3 Phase MC022374AV 1
Motor 3 HP 1 Phase MC301519AV 1
Motor 5HP 3 Phase MC022307AV 1
Motor 5HP 1 Phase MC301520AV 1
2 Base BA000301AV 1
3 Angle bracket ST185500AV 4
4 Beltguard back BG303800AV 1
5 Bracket SL050700AV 1
6 Beltguard front BG303900AV 1
7 3 HP Beltguard bracket BG304000AV 1
5 HP Beltguard bracket BG304100AV 1
8 Δ Belt:
3 HP BT010700AV 1
5 HP BT010700AV 2
9 Δ Motor pulley:
3 HP PU009753AV 1
5 HP PU009754AV 1
10 Pressure switch CW207559AV 1
11 Starter:
3 HP 230V 1 Phase JP001045AV 1
5 HP 230V 1 Phase IP001046AV 1
3 HP 230V 3 Phase JP001047AV 1
5 HP 230V 3 Phase JP001049AV 1
3 HP 460V 3 Phase JP001048AV 1
5 HP 460V 3 Phase JP001050AV 1
12 90° Elbow ST074204AV 1
13 1/2" Flare ST126207AV 1
14 Discharge tube SL300900AV 1
15 90° Flare elbow ST126204AV 1
16 Aftercooler SL300100AV 1
17 Left aftercooler bracket SL300200AV 1
18 Right aftercooler bracket SL300300AV 1
19 Δ Check valve IP087700AV 1
20 Δ Safety valve V-215100AV 1
21 Scroll air end:
3 HP SL014002AJ 1
5 HP SL016502AJ 1
(Δ) Not shown.
1
2
3
4
5
6
7
10
11
12
13
14
15
16
17
18
21

10
Scroll Air Compressors Tankmount/Basemount
Replacement Parts List for STS Models
Ref. STS Model
No. Description Part Number Quantity
1 Motor:
3 HP 3 Phase MC022374AV 1
3 HP 1 Phase MC301519AV 1
5 HP 3 Phase MC022307AV 1
5 HP 1 Phase MC301520AV 1
2 Starter:
3 HP 230V 1 Phase JP001045AV 1
5 HP 230V 1 Phase JP001046AV 1
3 HP 230V 3 Phase JP001047AV 1
5 HP 230V 3 Phase JP001049AV 1
3 HP 460V 3 Phase JP001048AV 1
5 HP 460V 3 Phase JP001050AV 1
3 Receiver tank:
30 gallon AR024700AJ 1
60 gallon AR022500AJ 1
4 Beltguard BT303900AV 1
5 Motor pulley:
3 HP PU009753AV 1
5 HP PU009754AV 1
6 Guard plate BG217500AV 1
7 Aftercooler SL300100AV 1
8 Tube air end/aftercooler SL301000AP 1
9 Tube aftercooler/tank SL300900AP 1
10 Check valve IP087700AV 1
11 Pressure gauge GA016701AV 1
12 Safety valve V-215100AV 1
13 Pressure switch CW207573AV 1
14 Scroll air end:
3 HP SL014002AJ 1
5 HP SL016502AJ 1
15 Belt:
3 HP BT010702AV 1
5 HP BT010702AV 2
4
1
2
5
6
3
7
8
14
9
10
11
12
13
15

11
Scroll Air Compressors Tankmount/Basemount
Replacement Parts List for STD Models
Ref. STD Model
No. Description Part Number Quantity
1 Motor:
3 HP 3 Phase MC022374AV 1
3 HP 1 Phase MC301519AV 1
5 HP 3 Phase MC022307AV 1
5 HP 1 Phase MC301520AV 1
2 Starter alternator panel:
3 HP 230V 1 Phase ZZ000435AJ 1
5 HP 230V 1 Phase ZZ000436AJ 1
3 HP 230V 3 Phase ZZ000418AJ 1
5 HP 230V 3 Phase ZZ000419AJ 1
3 HP 460V 3 Phase ZZ000420AJ 1
5 HP 460V 3 Phase ZZ000421AJ 1
3 Receiver tank:
80 gallon AR022900AJ 1
120 gallon AR023600AJ 1
4 Beltguard BT303900AV 1
5 Belt:
3 HP BT010700AV 2
5 HP BT010700AV 4
6 Motor pulley:
3 HP PU009753AV 1
5 HP PU009754AV 1
7 Guard plate BG217500AV 1
8 Aftercooler SL300100AV 1
9 Tube air end/aftercooler SL301000AP 1
10 Tube aftercooler/tank SL300900AP 1
11 Check valve IP087700AV 1
12 Pressure gauge GA016701AV 1
13 Safety valve V-215100AV 1
14 Pressure switch (Lead) CW207558AV 1
15 Pressure switch (Lag) CW207559AV 1
16 Scroll air end:
3 HP SL014002AJ 1
5 HP SL016502AJ 1
2
1
4
5
6
7
3
8
15
16
14
11
10
9
12
13

Scroll Air Compressors Tankmount/Basemount
Powerex • 150 Production Drive • Harrison, OH 45030 • USA
Powerex Limited Warranty
Powerex 3 Year / 10,000 Hour Extended Parts Limited Warranty - Powerex warrants each Compressor
Pump or Scroll Air-End against defects in material or workmanship from the date of purchase for a period of
Three years or 10,000 hours, whichever may occur first. This warranty applies to the exchange of part(s) of
the compressor pump or air-end found to be defective by an Authorized Powerex Service Center.
Powerex 1 Year / 5,000 Hour Inlet to Outlet Limited Warranty - Powerex warrants each Compressor
Unit, System, Pump, or Air-End against defects in material or workmanship from the date of purchase for a
period of One Year or 5,000 Hours, whichever may occur first. This warranty applies to the exchange of
defective component part(s) and labor performed by an Authorized Powerex Service Center.
The above mentioned warranty applies to POWEREX manufactured units or systems only.
Items listed in the operator’s manual under routine maintenance are not
covered by this or any other warranty.
THERE IS NO OTHER EXPRESS WARRANTY. IMPLIED WARRANTIES, INCLUDING THOSE OF MERCHANTABILI-
TY AND FITNESS FOR A PARTICULAR PURPOSE, ARE LIMITED TO ONE YEAR FROM THE DATE OF PURCHASE:
AND TO THE EXTENT PERMITTED BY LAW, ANY AND ALL IMPLIED WARRANTIES ARE EXCLUDED. THIS IS
THE EXCLUSIVE REMEDY AND LIABILITY FOR CONSEQUENTIAL DAMAGES UNDER ANY AND ALL WAR-
RANTIES IS EXCLUDED TO THE EXTENT EXCLUSION IS PERMITTED BY LAW.
All claims pertaining to the merchandise in this schedule, with the exception of warranty claims, must be
filed with POWEREX within 6 months of the invoice date, or they will not be honored. Prices, discounts and
terms are subject to change without notice or as stipulated in specific product quotations. All agreements
are contingent upon strikes, accidents, or other causes beyond our control. All shipments are carefully
inspected and counted before leaving the factory. Please inspect carefully any receipt of merchandise not-
ing any discrepancy or damage on the carrier’s freight bill at the time of delivery. Discrepancies or damage
which obviously occurred in transit are the carrier’s responsibility and related claims should be made
promptly directly to the carrier. Returned merchandise will not be accepted without prior written autho-
rization by POWEREX and deductions from invoices for shortage or damage claims will not be allowed.
UNLESS OTHERWISE AGREED TO IN WRITING, THESE TERMS AND CONDITIONS WILL CONTROL IN
ANY TRANSACTION WITH POWEREX any different or conflicting terms as may appear on any order form
now or later submitted by the buyer. All orders are subject to acceptance by POWEREX.

The Powerex Oilless Rotary Scroll Air
Compressor has advanced scroll com-
pressor technology through the devel-
opment of a completely oilless unit.
The Powerex Scroll Compressor offers a
dynamically balanced air end which
insures vibration-free operation. The
rotary design permits a continuous
100% duty cycle. No oil separation, oil
filtration, or inlet valves are required
on the Powerex Scroll air compressor.
The Powerex oilless rotary scroll air
compressor is based on the theory of
scroll compression. A scroll is a free
standing, intricate spiral bounded on
one side by a solid, flat plane or base. A
scroll set, the basic compression ele-
ment of a scroll compressor, is made up
of two identical spirals which form
right and left hand parts. One of these
scroll components is indexed or phased
180
o
with respect to the other so the
scrolls can mesh.
Crescent-shaped gas pockets are
formed and bounded by the spirals and
the base plate of both scrolls. As the
moving scroll is orbited around the
fixed scroll, the pockets formed by the
meshed scrolls follow the spiral toward
the center and diminish in size. The
moving scroll is prevented from rotat-
ing during this process so the 180
o
phase relationship of the scrolls is main-
tained. The compressor’s inlet is at the
outer boundary of the scrolls. The com-
pressed gas is discharged through the
outlet at the center of the fixed scroll
so no valves are needed.
Description
Please read and save these instructions. Read carefully before attempting to assemble, install, operate or maintain the product described.
Protect yourself and others by observing all safety information. Failure to comply with instructions could result in personal injury and/or prop-
erty damage! Retain instructions for future reference.
Powerex • 150 Production Drive • Harrison, OH 45030 • USA
Scroll Air Compressor Service and Maintenance
Breathable Air Warning
This compressor/pump is not equipped
and should not be used “as is” to supply
breathing quality air. For any application
of air for human consumption, the air
compressor/pump will need to be fitted
with suitable in-line safety and alarm
equipment. This additional equipment is
necessary to properly filter and purify
the air to meet minimal specifications
for Grade D breathing as described in
Compressed Gas Association Commodity
Specification for air, OSHA, ANSI and/or
Canadian Standards Associations (CSA).
DISCLAIMER OF WARRANTIES
In the event the compressor is used for
the purpose of breathing air application
and proper in-line safety and alarm
equipment is not simultaneously used,
existing warranties shall be voided, and
Powerex disclaims any liability whatso-
ever for any loss, personal injury or
damage.
!
DANGER
IN259803AV 10/05
The inlet filter on the scroll compressor
assures 99% particulate free air is
admitted to the unit. Order P/N
IP032901AV for both the 3 HP and 5HP
units. Change every 2,500 hours or
more often in dirty locations.
1. Remove filter cover by releasing
spring clamps (See Figure 1).
2. Remove wing screw.
Do not attempt to
clean filter. This
filter requires replacement and is to be
replaced when contaminated.
3. Clean inlet plate, filter cover and six
(6) silencer tubes using an air gun or
by wiping dry with a cloth.
4. Install new inlet filter (Part Number
IP032901AV) and reassemble cover.
See Service and Maintenance Video
for Visual and Audio Instructions
(Part Number IP633900AV).
!
CAUTION
GENERAL
Dry Type Inlet Filter
2500 HOURS - MAINTENANCE
Figure 1 Inlet Filter and Cover Assembly
Inlet Plate
Silencer Tubes
Filter Cover

2
Scroll Air Compressors
GREASE DELIVERY
SLAE03 SLAE05
Bearing 1st Time 2nd Time 1st Time 2nd Time
Orbit Scroll Bearing 5 Times 3 Times 6 Times 4 Times
Pin Crank Bearing Orbit Scroll Side 5 Times 3 Times 6 Times 4 Times
Pin Crank Bearing Housing Side 5 Times 3 Times 6 Times 4 Times
NOTE: Each pump of the grease gun equals 0.65 grams of grease.
Figure 2
Figure 3
45°
Grease
Fitting
Grease Gun
Extension
Adaptor
Counter
Weight
Key
Way
Extension
Adaptor
Orbit Scroll
Bearings
Grease Fitting
Housing
Side Bearings
Grease
Gun
Plastic
Dust Cap
3 Grease Caps
Air End Pulley & Cooling
Fan (Not Shown)
Fan Duct Shroud
(Not Shown)
Per OSHA
regulations, ALL
power must be locked out before per-
forming any maintenance.
This service should
be performed by an
authorized Powerex Service Center to
avoid failure.
1. Remove the plastic dust cap. Use
only one of two locations found on
the air end (See Figure 2).
2. Rotate the compressor pulley until
the grease fitting is visible through
the dust cap hole (See Figure 2).
This will allow regreasing of the
main bearings.
3. Use a grease gun extension adaptor
to engage the grease fitting and
supply the proper volume of grease
as indicated on the grease delivery
chart (See Grease Delivery chart
below & Figure 2).
Use only Powerex
genuine grease.
Pump grease gun before feeding (this
eliminates air from the grease passage
of the extension adapter. (Complete
Grease Kit Part Number IP616200AJ and
Grease Tube Part Number IP600000AV).
4. Replace plastic dust cap.
The bearings on the scroll compressor
are regreaseable to allow extended
compressor life. Service should be per-
formed every 10,000 hours of opera-
tion.
1. Remove the V-Belts and the fan
cover.
2. Remove the air end pulley and cool-
ing fan with a gear puller (See
Figure 3).
!
CAUTION
!
CAUTION
!
WARNING
Grease Compressor
Bearings
10,000 HOURS - MAINTENANCE
3. Remove the fan duct shroud.
4. Remove the three grease caps. Do
not attempt to loosen or tight-
en the bolt.
5. Grease all three pin crank bearings
(See Figures 3, 4 & 5 and Grease
Delivery Chart below).
The grease fitting,
located in the cen-
ter of the pin crank bearing, feeds only
the orbit scroll side bearing. Use a
needle adapter to supply grease to the
housing side bearing. PUMP GREASE
!
CAUTION
GUN BEFORE FEEDING TO ELIMINATE
AIR FROM GREASE PASSAGE OF THE
NEEDLE ADAPTER. Hold grease gun for
5 - 10 seconds after feeding to prevent
grease blowback from the grease fit-
ting.
6. Replace grease caps, fan shroud,
pulley, etc.
(See Scroll Service and
Maintenance Video for Audio and
Visual Instructions.)
GREASING PIN CRANK BEARINGS
MAIN BEARINGS

3
Scroll Air Compressors
Figure 4
Figure 5
Extension
Adaptor
Needle
Adaptor
Orbit Scroll Bearings
Grease Fitting
Housing
Side Bearings
Maintenance Schedule
Operating Hours
Item Action needed 500 2500 5000 10,000 15,000 20,000 Remarks
Tank Drain moisture Daily
Inlet air filter Replace (Every 2,500 hrs or less) Part #IP032901AV
Blower fan Clean
Fan Duct Clean
Compressor Fins Clean (Every 2,500 hrs or less)
Bearings Regrease (Every 5,000 hours for 145 psig scroll) Service Center Only
Tip seal set Replace (Every 5,000 hours for 145 psig scroll)
V-belt Inspect, replace *Note 3
Pressure Switch Confirm operation
Magnetic starter Inspect Replace if contact
points deteriorated
Safety valve Confirm operation (Every 2,500 hrs or less)
Pressure gauge Inspect (Every 2,500 hrs or less)
Inspect
Replace
NOTES:
1. Inspect and perform maintenance periodically according to maintenance schedule.
2. The maintenance schedule relates to the normal operating conditions. If the circumstances and load condition are adverse,
shorten the cycle time and do maintenance accordingly.
3. * The tension of the V-belt should be adjusted during the initial stage and inspected every 2,500 hours afterwards. Proper
belt tension for 3 HP units is 7 lbs./.16” deflection; for 5 HP units, 7 lbs./.19” deflection.
4. See Compressor Pump Manuals for replacement or service procedures.

expensive filtration. The tip seal should
be replaced every 10,000 hours of oper-
ation.
1. Confirm if the tip seal you pur-
chased is correct for the air end you
are repairing (See Parts Listing
below).
2. Confirm if the following parts are
included (See Figure 6).
1. Remove six nuts with T-type wrench
and then FS set from air end (See
Figure 7).
2. Remove LP and HP tip seals from
Fixed Scroll set and Orbit set. Using
the tip of a ball-point pen at the
start will make it much easier (See
Figure 7).
3. Remove dust from Scroll with clean
cloth or air.
Figure 7
Scroll Air Compressors
4
NOTE: In order to distinguish between the tip seal for Fixed Scroll and the tip seal for Orbit Scroll place the tip seal as
shown below then view from the arrow direction and refer to the figure on the right.
Orbit Scroll
Fixed Scroll
Facing
Right
Facing
Left
Lip
(Bottom Side)
Lip
(Inside)
Per OSHA
regulations, ALL
power must be locked out before per-
forming any maintenance.
The “Tip Seal Set” is a replacement
part for SLAE03 and SLAE05 air ends.
Please read these instructions thor-
oughly and carefully to ensure correct
replacement.
NOTE: Replace tip seal on SLAE03HP
and SLAE50HP at 5,000 hours when
operated at 145 psig.
(See Scroll Service and
Maintenance Video for Audio and
Visual Instructions.)
The tip seal on the scroll compressor is
self-lubricated and allows the unit to
operate efficiently without oil and
!
WARNING
Tip Seal Set
Replacement
10,000 HOURS - MAINTENANCE
CONFIRMATION OF THE PARTS
REPLACEMENT
Item
No. Description Qty.
1 HP tip seal for FS 1
2 LP tip seal for FS 1
3 HP tip seal for OS 1
4 LP tip seal for OS 1
5 Dust Seal 1
6 Backup Tube 1
HP = High Pressure LP = Low Pressure
FS = Fixed Scroll OS = Orbital Scroll
Figure 6
1
2
3
45
6
FS or Fixed
Scroll
Tip Seal Removal
OS or Orbit
Scroll
Tip Seal
Set SLAE03 SLAE03HP SLAE05 SLAE05HP
Air End
Model 3 hp
SLAE0
3 hp HP
3
5 hp 5 hp HP
Part No. 92510050 92510050 IP604600AV 92663060

5
Scroll Air Compressors
Figure 9
Lip Direction
Lip Surface
(Inside)
Enter
Side
Lip Side
(Grooved Bottom)
Machined
To Avoid Movement
During Installation
Figure 10
Dust
Seal
3 o’clock
Position
6 o’clock
Position
Back-up
Tube
Figure 8
Figure 11
NOTE: Tips seals for Fixed Scroll and
Orbit Scroll have opposing seal cut
angels (See NOTE and explanatory dia-
gram below).
Insert tip seal so that the lip of tip seal
is on the bottom of seal groove and
inner side of involute and the direction
of lip faces the center of involute (curv-
ing spiral). See Figure 9. This is to be
done for both FS and OS sets.
Use caution not to tear or distort lip.
1. Insert new HP tip seal from the cen-
ter section for OS or Orbit Scroll so
that there will be no clearance at the
tip (start) section (See Figure 8
and 9).
2. Insert so that new LP tip seal will
contact closely with HP tip seal
inside Scroll Groove (See Figure 7
on page 4).
Insert approxi-
mately half of the
LP tip seal and remove the tip seal to
confirm that a notch in the tip seal has
been achieved. This will prevent move-
ment during installation (See Figure
11).
3. Repeat the same procedure for FS
or Fixed Scroll tip seal set, remove
!
CAUTION
INSERTING TIP SEALS
Tip Seal Set
Replacement
(Continued)
both the dust seal and backup tube
located on outermost side FS set.
4. Insert new backup tube in the FS
Scroll in the 6 o’ clock position (See
Figure 10).
5. Insert new dust seal on the backup
tube. Face seamed section of the
dust seal in the 3 o’clock position
(See Figure 10).
8. After replacing tip seal set, reassem-
ble Fixed Scroll set to the Orbit
Scroll. Tighten 6 nuts temporarily
and confirm if crankshaft rotates
smoothly by hand and tighten them
firmly. Tightening torques are:
NOTE: Assemble so that dust seal and
tip seal will not drop between Orbit
Scroll set and Fixed Scroll set.
Bolt
Torque First Second
SLAE03/SLAE03HP 15 in lb. 175 in lb.
SLAE05/SLAE05HP 15 in lb. 175 in lb.

6
Scroll Air Compressors
Figure 12 - Compressor Parts
19
1
2
4
3
6
5
8
7
10
9
12
11
14
15
16
17
18
15
17
A
A
B
B
13

7
Scroll Air Compressors
Ref. Part No. For Models
No. Description SLAE03 SLAE05 SLAE03HP SLAE05HP Quantity
1 Airend Pulley 92805020 IP600400AV 92805020 IP600400AV 1
2 Key IP600600AV IP600600AV IP600600AV IP600600AV 1
3 Centrifugal Fan IP601300AV IP601300AV IP601300AV IP601300AV 1
4 Fan Duct (1) IP601400AV IP601400AV IP601400AV IP601400AV 1
5 Fan Duct (2) IP601500AV IP601600AV IP601500AV IP601600AV 1
6 Fan Cover IP601700AV IP601700AV IP601700AV IP601700AV 1
7 Fan Dust Gasket (1) IP601800AV IP601900AV IP601800AV IP601900AV 1
8 Heat Insulation Pipe IP602000AV IP602000AV IP602000AV IP602000AV 1
9 Filter Plate IP602100AV IP602100AV IP602100AV IP602100AV 1
10 Cartridge Filter IP032901AV IP032901AV IP032901AV IP032901AV 1
11 Intake Pipe IP602200AV IP602200AV IP602200AV IP602200AV 1
12 Intake Filter Cover IP016101AV IP016101AV IP016101AV IP016101AV 1
13 Filter Cover Pipe IP602300AV IP602300AV IP602300AV IP602300AV 6
14 Fan Duct Gasket (2) IP602400AV IP602400AV IP602400AV IP602400AV 1
15 O-Ring IP603200AV IP603200AV IP603200AV IP603200AV 2
16 Long Nipple 96647011 96647011 96647011 96647011 1
17 Dust Cap IP603500AV IP603500AV IP603500AV IP603500AV 2
18 Wing Bolt IP604200AV IP604200AV IP604200AV IP604200AV 1
19 Tip Seal Set 92510050 IP604600AV 92510050 92663060 1
20 * Grease Gun Kit IP616200AJ IP616200AJ
21 * Grease Gun IP616100AJ IP616100AJ
22 * Grease (80g.) IP600000AV IP600000AV
• Not Shown
Service Parts List

Scroll Air Compressors
Powerex • 150 Production Drive • Harrison, OH 45030 • USA
Powerex Limited Warranty
POWEREX 3 YEAR / 10,000 HOUR EXTENDED PARTS LIMITED WARRANTY - Powerex warrants each Compressor Pump
or Scroll Air-End against defects in material or workmanship from the date of purchase for a period of Three years or
10,000 hours, whichever may occur first. This warranty applies to the exchange of part(s) of the compressor pump or
air-end found to be defective by an Authorized Powerex Service Center.
POWEREX 1 YEAR / 5,000 HOUR INLET TO OUTLET LIMITED WARRANTY - Powerex warrants each Compressor Unit,
System, Pump, or Air-End against defects in material or workmanship from the date of purchase for a period of One
Year or 5,000 Hours, whichever may occur first. This warranty applies to the exchange of defective component
part(s) and labor performed by an Authorized Powerex Service Center.
Coverage
. The above mentioned warranty applies to Powerex manufactured units or systems only. Items listed
in the operator’s manual under routine maintenance are not covered by this or any other warranty. Failure to
complete maintenance as stated in the maintenance schedule will void this warranty.
THERE IS NO OTHER EXPRESS WARRANTY. IMPLIED WARRANTIES, INCLUDING THOSE OF MER-
CHANTABILITY AND FITNESS FOR A PARTICULAR PURPOSE, ARE LIMITED TO ONE YEAR FROM THE
DATE OF PURCHASE: AND TO THE EXTENT PERMITTED BY LAW, ANY AND ALL IMPLIED WARRANTIES
ARE EXCLUDED. THIS IS THE EXCLUSIVE REMEDY AND LIABILITY FOR CONSEQUENTIAL DAMAGES
UNDER ANY AND ALL WARRANTIES IS EXCLUDED TO THE EXTENT EXCLUSION IS PERMITTED BY LAW.
L
imitation of Liability. To the extent allowable under applicable law, Powerex’s liability for consequential and
incidental damages is expressly disclaimed. Powerex’s liability in all events is limited to, and shall not exceed,
the purchase price paid.
Warranty Disclaimer
. Powerex has made a diligent effort to illustrate and describe the products in this
literature accurately; however, such illustrations and descriptions are for the sole purpose of identification,
and do not express or imply a warranty that the products are merchantable, or fit for a particular purpose, or
that the products will necessarily conform to the illustrations or descriptions.
Product Suitability
. Many jurisdictions have codes and regulations governing sales, construction, installation,
and/or use of products for certain purposes, which may vary from those in neighboring areas. While Powerex
attempts to assure that its products comply with such codes, it cannot guarantee compliance, and cannot be
responsible for how the product is installed or used. Before purchase and use of a product, please review the
product applications,and national and local codes and regulations, and be sure that the product, installation,
and use will comply with them.
Claims
. Claims pertaining to the merchandise in this schedule, with the exception of warranty claims, must be
filed with POWEREX within 6 months of the invoice date, or they will not be honored. Prices, discounts and
terms are subject to change without notice or as stipulated in specific product quotations. All agreements are
contingent upon strikes, accidents, or other causes beyond our control. All shipments are carefully inspected
and counted before leaving the factory. Please inspect carefully any receipt of merchandise noting any
discrepancy or damage on the carrier’s freight bill at the time of delivery. Discrepancies or damage which
obviously occurred in transit are the carrier’s responsibility and related claims should be made promptly
directly to the carrier. Returned merchandise will not be accepted without prior written authorization by
POWEREX and deductions from invoices for shortage or damage claims will not be allowed. UNLESS
OTHERWISE AGREED TO IN WRITING, THESE TERMS AND CONDITIONS WILL CONTROL IN ANY
TRANSACTION WITH POWEREX any different or conflicting terms as may appear on any order form
now or later submitted by the buyer. All orders are subject to acceptance by POWEREX.
/