Page is loading ...

Two-Way Radio
User’s Guide
Fo r Mor e In formatio n
For further i nformat ion, yo u may c all Mot or ola at 1-800-6 38-5119 (U.S. an d
Cana da) or vi sit us on the Interne t at ht tp ://www.motoro la.com.
Safety and General Information
Important Information on Safe and Efficient Operation
Read This Information Before Using Your Radio.
The informa ti on prov ided in this d ocument s upersed es the general
safe ty info rm ation i n user guides publish ed prior to Dece mber 1, 2002.
Transmit and Receive Procedure
Your tw o- way rad io cont ains a transmi tt er and a recei ver. To co ntrol
your exposu re and en sure co mplianc e with th e gener al popu lation/
unco ntrolle d environ ment ex posure limits, a lways a dhere t o the
foll owing p ro cedure:
• Tran smit no more t han 50% o f the t ime.
• To r ec eive ca lls, re lease t he PTT bu tton.
• To t ra nsmit ( talk), press t he Push t o Tal k (PTT) button .
Transmitt ing 50% o f the t ime, or less, is impo rt ant bec ause th e radio
gene rates m ea surable RF ene rgy exp osure o nl y when transmi tting ( in
term s of me as uring s tandard s compl iance).
Exposure to Radio Frequency Energy
Your Mo to rola tw o-way r adio co mplies wi th the followi ng RF e nergy
expo sure st an dards a nd guid elines:
• Unit ed Stat es Federa l Commu nicatio ns Comm is sion, C ode of Federal
Regu lations ; 47CFR p art 2 s ub-part J.
• Amer ican Na ti onal St andards Instit ute (AN SI )/Insti tute of Electr ical
and Electro ni c Engin eers (I EEE) C9 5. 1-19 92 .
• Inst itute o f Electri cal and Electr onics E ng ineers (IEEE) C95.1-1 999
Edit ion.
• Inte rnation al Commis sion on Non-Io nizing Ra diation Protec tion
(ICN IRP) 19 98 .
• Mini stry of H ealth ( Canada) Safety Code 6 . Limits of Huma n Expos ure
to R adiofre qu ency El ectroma gnetic Fields in the Fr equency Range
from 3 KHz to 300 GH z, 1999 .
• Aust ralian Co mmunica tions A uthorit y Radio co mmunica tions
(Ele ctromag ne tic Rad iation— Human E xposure ) Standar d, 2003 .
• ANATEL AN NEX to Resolut ion No. 3 03 of J uly 2, 2002 “R egulati on of
limi tation of exposu re to e lectric al, mag ne tic and electr omagnet ic
fiel ds in t he radio frequen cy rang e betwe en 9 KHz and 300 GHz” an d
“Att achment t o resol ution # 303 fro m July 2, 2002”.
To ensure op ti ma l radio performance and mak e su re human exposure to
radio frequency el ec tr omagnetic energy is within th e gu idelines set forth
in the above sta nd ar ds , always adhere to the foll ow in g procedures.
Portable Radio Operation and EME Exposure
Ante nna Car e
Use only th e supplie d or an approv ed repl ac ement a ntenna.
Unau thorize d antenna s, modi ficatio ns, or at tachmen ts coul d damag e the
radi o and m ay violat e FCC r egulati ons.
Do N OT hold t he ante nna whe n the r adio is “ IN USE. ” Holdi ng the
ante nna aff ec ts its effecti ve rang e.
Body -Wor n Operati on
To m aintain compli ances w it h FCC/H ealth C anada R F expos ur e
guid elines if you we ar a ra dio on your bo dy when t ransmit ting al ways
plac e the r ad io in a Motoro la-supp lied or a pproved clip h older, hol st er,
case or bod y harness for th is prod uct. Us e of non- Motorol a-appro ved
acce ssories m ay exce ed FCC/ Health Canada RF exposu re guid elines.
If y ou do n ot use on e of th e Motor ola-sup pl ied or approve d body- worn
acce ssories a nd are not usi ng the radio h el d in th e norma l use p osition ,
ensu re the ra dio and its an tenna a re at lea st 1 in ch (2.5 cm) fr om
your body whe n trans mitting
.
Data Operat io n
If a pplicab le , when using a ny data featur e of the radio w ith or without
an a ccessor y cable,
posi tion the radio a nd its antenna at least one
inch (2.5 cm) from t he body
.
Appr oved Ac ce ssories
For a list of approv ed Moto rola ac cessori es , visit our Web si te at
www.motoro la.com.
Electromagnetic Interference/Compatibility
Note :
Nea rly eve ry electr onic de vice is suscep ti ble to electro magneti c
inte rferenc e (EMI) i f inade quately shield ed , desig ned or otherwi se
conf igured fo r elect romagne tic com patibil it y. T hi s devic e compl ies wit h
Part 15 of th e FCC R ules. O peratio n is su bj ect to the fol lowing two
cond itions:
1. This device ma y not c ause ha rmful i nterfer en ce; and
2. This device mu st acce pt any interfe rence r ec eived, includi ng
inte rferenc e that ma y cause undesi red ope ra tion.
Faci lities
To a void el ectroma gnetic in terfere nce and /or com patibil it y confl icts,
turn off yo ur radio in any facilit y where p osted n otices instruc t you t o do
so. Hospita ls or hea lth car e facil ities m ay be usi ng equi pment t hat is
sens itive t o externa l RF en ergy.
Airc raft
When instru ct ed to d o so, t urn off your r ad io when onboar d an ai rcraft.
Any use of a radio m ust be in acco rdance wi th appl icable regulat ions
per airline c rew ins tructio ns.
Medi cal Dev ic es – Pa cemaker s
The Advance d Medical Tech nology Associa tion re co mmends that a
mini mum sep ar ation o f 6 inc hes (15 cm) be m aintain ed betw een a
hand held wi re less ra dio and a pace maker. These recomm endatio ns are
cons istent wi th the indepen dent re search by and re commend ations of
the U.S. Fo od and Dr ug Admi nistrat ion.
Peop le with p acemake rs shou ld:
• ALWAYS kee p the rad io more than 6 inches ( 15 cm) from th eir
pace maker w he n the r adio is turned ON.
• Not carry t he radio in the breast pocket.
• Use the ear o pposite the pa cemaker to min im ize the potent ial for
inte rferenc e.
• Turn the radio O FF imme diately i f there is any reason to sus pe ct that
inte rferenc e is taki ng plac e.
Medi cal Dev ic es – He aring A ids
Some digita l wireles s radio s may i nterfer e with so me hear ing aid s. In
the event o f such in terfere nce, yo u may w an t to co nsult y our hea ring ai d
manu facture r to disc uss alt ernativ es.
Medi cal Dev ic es – Ot her
If y ou use an y other person al medi cal dev ic e, cons ult the manufa cturer
of y our dev ic e to de termine if it is adeq ua tely sh ielded from RF energy.
Your ph ys ician m ay be a ble to assist yo u in ob taining this i nformat io n.
Safety and General Use While Driving
Chec k the l aw s and r egulati ons reg arding th e use o f radio s in th e area
wher e you d ri ve, and always obey t hem. If y ou do u se your radio while
driv ing, pl ea se:
• Give full a tt ention to driv ing and to the r oad.
• Use hands-f re e opera tion, i f avail able.
• Pull off th e road an d park before making or answer ing a c all if driving
cond itions so requir e.
The use of a two-way radio while e ngaged in activi ties re quiring
conc entrati on may ca use dis tractio n or ot he rwise i mpair y our abi lity to
safe ly part ic ipate i n such activit ies. Al wa ys use technol ogy saf ely.
Do n ot plac e a porta ble rad io in t he area o ver an air bag or in the air b ag
depl oyment ar ea. Air bags i nflate with gr ea t force . If a portabl e radio i s
plac ed in t he air ba g deplo yment a rea and t he air bag inf lates, the rad io
may be prop el led wit h great force and cau se seriou s injur y to oc cupants
of t he vehi cl e.
Pote ntially E xplosiv e Atmos pheres
Turn off your ra dio pri or to e nt ering a ny area with a potent ia lly exp losive
atmo sphere. O nly rad io type s that are esp ec ially q ualifie d shoul d be
used in suc h areas a s “Intr insical ly Safe .” Do not remove , insta ll or
char ge batt er ies in such ar eas. Sp arks in a potent ially e xplosiv e
atmo sphere ca n cause an exp losion or fire r esultin g in bo dily in jury or
even death.
Note :
The areas w it h poten tially explosi ve atmo sp heres r eferred to
abov e inclu de fuelin g areas such a s below d ecks on boats, fuel o r
chem ical tr an sfer or storag e facil ities, ar eas whe re the air con tains
chem icals o r particl es (suc h as gr ain, du st or met al powd ers) an d any
othe r area wh ere you would normall y be ad vi sed to turn of f your vehicle
engi ne. Are as with p otentia lly exp losive at mospher es are often—b ut not
alwa ys—post ed .
Blas ting Ca ps and Ar eas
To avoid p os si bl e interference with blastin g op er ations, turn off your
radio when you a re n ea r electrical blasting caps, i n a blasting area, or in
areas posted “Turn off two-way ra di os .” Obey all signs and instruc ti on s.
Operational Cautions
Ante nnas
Do n ot use an y porta ble rad io that has a da maged a ntenna.
If a
dama ged ant en na come s into contact with y ou r skin, a mino r burn can
resu lt.
Batt eries
All batteri es can ca use pro perty d amage a nd /or bod ily inj ury suc h as
burn s if a co nductiv e mater ial—lik e jewel ry, ke ys or bea ded cha ins—
touc h expos ed termin als. Th e condu ctive m at erial m ay comp lete an
elec trical ci rcuit ( short c ircuit) and be co me quit e hot. Exercis e care in
hand ling an y charged batter y, par ticular ly when p lacing it insi de a
pock et, pur se or oth er cont ainer w ith met al object s.
Exer cise ca re when r emoving NiMH o r AA ba tt eries. Do not use sha rp or
cond uctive to ols to remove either of thes e batteri es.
Batt ery Cha rg er Safe ty Inst ruction s:
Save these In structi ons
1. Do no t expos e the cha rger to rain o r snow.
2. Do no t opera te or dis assembl e the c harger if it has receiv ed a sh arp
blow, or h as been d ropped or dama ged in any way.
3. Never alter the AC cord o r plug provided with the unit. If the plug will
not fit the outlet, have t he proper outlet installed by a qualified
electrician. An improper c ondition can result in a risk of electric shock.
4. To red uce the risk of damage to th e cord or plug, pull the plu g rather
than th e cord when d isconnecting th e charger fro m the AC rece ptacle.
5. To re duce th e risk of elec tr ic shoc k, unpl ug the charger f rom the
outl et befo re attemp ting an y maint enance or cleani ng.
6. Use o f an at ta chment not rec ommende d or so ld by Mot orola m ay
resu lt in a r isk of fire, e lectric shock or person al inju ry.
7. Make sure th e cord is locate d so it will n ot be ste pped on , tripp ed
over or sub je cted to damage or str ess.
8. An ex tension c ord sho uld not be use d unles s absolut ely nec essary.
Use of an i mp roper e xtensio n cord could r es ult in a risk of a fi re and/
or e lectric s hock. I f an ex tension cord m us t be us ed, mak e sure that:
• The pins on t he plug of the extens ion cor d are the same n umber,
size and sh ap e as th ose on the plu g of th e charger.
• The extensi on cord i s prope rly wir ed and in good e lectric al
cond ition.
• The extensi on cord s ize is 18 AWG for le ngths u p to 100 feet, a nd
16 AWG for length s up to 1 50 feet .
9. The s upply c or d of th e AC ad aptor c annot b e replace d. If t he cord is
dama ged, ca ll custom er serv ice at 1-800-6 38 -5119 ( U.S. an d Canad a).
FCC Licensing Information
Your Motorola radio operates on General Mobile Radio Service
(GMR S) fr equen cies and i s sub ject to th e Rul es an d Reg ulati ons o f
the Feder al Co mmuni catio ns Co mmiss ion ( FCC). The FCC r equir es
that all opera tors using GMRS freq uenci es ob tain a rad io li cense
befo re op erati ng th eir e quipm ent. To ob tain the F CC fo rms, pleas e
requ est F orm 6 05 an d 159 , wh ich i nclud es al l of the f orms and
inst ructi ons y ou wi ll ne ed.
If y ou wi sh to have the docum ent f axed or ma iled, or i f you have
ques tions , ple ase u se th e fol lowin g con tact infor matio n:
For a fax : For mail service: If you ha ve questions
Contact the Fax-On Call the FCC about the FCC License:
Demand sy stem Forms Hot line Call the FCC
1-202-418 -0177 1-800-418 -FORM 1-888-CALL-FCC
(3676) (225-5322 )
You may also visit the FCC’s Web site at h ttp:/ /www.fcc. gov.
Chan ges o r mod ifica tions not expre ssly appro ved b y Mot orola may
void the user’s a uthor ity g rante d by the F CC to oper ate t his r adio and
shou ld no t be made. To c omply with FCC requi remen ts, t ransm itter
adju stmen ts sh ould be ma de on ly by or u nder the s uperv ision of a
pers on ce rtifi ed as tech nical ly qu alifi ed to perf orm t ransm itter
main tenan ce an d rep airs in th e pri vate land mobil e and fixe d
serv ices as ce rtifi ed by an o rgani zatio n rep resen tativ e of the u ser o f
thos e ser vices . Rep lacem ent o f any tran smitt er co mpone nt (c rysta l,
semi condu ctor, etc.) not authorized by the FCC equipment
auth oriza tion for t his r adio could viol ate F CC ru les.
Note :
Use of t his r adio outsi de th e cou ntry where it w as in tende d to
be d istri buted is s ubjec t to gover nment regu latio ns an d may be
proh ibite d.
Getting Started
Installing the Batteries
Each radio us es 1 Ni MH rech argeabl e batte ry pack o r 3 AA alkalin e
batt eries a nd beeps when th e batte ries ar e low.
Installing NiMH Rechargeable Battery Pack
1. Tur n the r adio of f.
2. With the bac k of the radio f acing y ou, lif t the bat tery co ver lat ch up
and remove th e cover.
3. Remov e the b at tery pa ck from the cl ear pla st ic bag (Do not
disa ssemble o r unwra p the b attery pack).
4. Inser t the N iM H batte ry pack with t he diag ra m facin g you.
5. Repos ition t he batter y cover and pr ess dow n to secu re.
Installing the Three AA Alkaline Batteries
1. Turn the radio o ff.
2. With the bac k of the radio f acing y ou, lif t the bat tery co ver lat ch up
and remove th e cover.
3. Inser t the t hr ee AA a lkaline batter ies wit h + and - polari ty as s hown
insi de.
4. Repos ition t he batter y cover and pr ess dow n to secu re.
Radio Battery Meter
The radio b at tery ic on show s the b attery ch arge le vel, fr om full
to e mpty . When t he radi o has o ne segmen t left, the ra dio chi rp s
peri odicall y or afte r relea sing ( Lo w Batte ry Aler t).
Removing the NiMH Battery Pack
1. Turn the radio o ff.
2. With the ba ck of the radio facing you, li ft the ba ttery l atch up to
rele ase the b attery cover a nd remo ve the co ver.
3. Gent ly remo ve the Ni MH batt ery.
4. Repo sition th e batte ry cove r and p ress do wn to sec ure.
Removing the Three AA Batteries
1. Tur n the r adio of f.
2. With the bac k of the radio f acing y ou, lif t the bat tery la tch up to
rele ase the b attery cover a nd remo ve the co ver.
3. Gentl y remov e each ba ttery b y easin g each ba ttery o ut indi viduall y.
4. Repos ition t he batter y cover and pr ess dow n to secu re.
Note s
• Exer cise ca re when r emoving NiMH o r AA ba tt eries. Do not use
shar p or co nd uctive tools t o remov e eithe r of thes e batte ries.
• Remo ve the ba tteries before storin g your ra dio for extend ed peri ods
of t ime. Ba tt eries c orrode over ti me and ma y cause perman ent
dama ge to y ou r radio .
Using the Battery Charger
The battery c harger provide s drop- in char gi ng conv enience for Ni MH
batt eries a nd can be placed on any flat s ur face, s uch as a desk or
work bench. Ch arge th e NiMH battery overni gh t (at l east 16 hours)
befo re usin g it for the fir st time . After t he init ial cha rge, an empty
batt ery is fu lly cha rged wi thin 14 hours.
1. Follo w the s te ps abov e to in stall a NiMH B at tery Pa ck.
2. Plug the AC po wer sup ply cor d into the jac k on the desk st and.
3. Plug the AC po wer sup ply int o a sta ndard w al l outle t.
4. With a radio f acing f orward, slide it into o ne of t he char ging po ckets.
Using the Car Charger (Optional accessory)
1. Plug DC cord i nto car ’s 13.8V D C outlet or ciga rette l ighter so cket.
2. Snap charger t o rear of radi o over chargin g contact s. Char ger fit s in
one directi on only.
3. An em pty bat te ry is f ully ch arged i n 14 ho ur s.
Note s
• The red lig ht will g low con tinuous ly to i nd icate t he radi o is co rrectly
conn ected a nd chargi ng. The light will re ma in red after t he batt ery
pack is ful ly charge d.
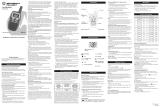
Model T9580RSAME
Display Screen Guide
• When moving b etween hot and cold t emperat ur es, do not cha rge the
batt ery unt il the ba ttery t emperat ure acc li mates ( usually about 20
minu tes).
• For optimal b attery life, r emove t he radi o from th e charg er with in 16
hour s. Do n ot store the rad io whil e conne ct ed to t he char ger.
• Turn radi o off w hile ch arging.
Attaching and Removing the Belt Clip
1. Attac h belt cl ip to p ocket o r belt strap.
2. Align the be lt clip p ost wit h the h ole in th e back of the radio.
3. Gentl y push un til the clip c licks i n place .
To R emove
1. Push down on t he rele ase tab at the top of t he belt clip t o relea se the
catc h.
2. Pull the bel t clip aw ay from the ba ck of t he radio.
Turning Your Radio On and Off
Turn clo ckwise to turn t he radi o on an d count erclock wi se to t urn
the radio o ff .
1. In th e ON po si tion, t he radi o chirp s and b ri efly sh ows all featur e
icon s avail ab le on t he radi o.
2. The d isplay sc reen th en show s the c urrent ch annel, code an d all
feat ures th at are en abled.
Setting the Volume
Pres s and h ol d for t hree se conds w hi le rota ting un til you r each
a co mfortab le listen ing lev el.
1. Rotat e clockwi se to i ncrease the vo lu me.
2. Rotat e counter clockwi se to d ecrease t he volu me.
Do n ot hold t he radi o close to you r ear. If th e volum e is se t to an
unco mfortab le level, it cou ld hurt your e ar.
Talking and Listening
To c ommunic ate, al l radio s in your group must be set to t he same
chan nel and I nterfer ence El iminato r Code.
1. To ta lk, pre ss and hold .
2. When you are f inished talkin g, rele ase .
For maximum c larity, hold the rad io two to thre e inches away fr om your
mout h and s pe ak dire ctly in to the microph on e. Do n ot cove r the
micr ophone wh ile tal king.
Talk Range
Your ra di o is de signed to maxi mize pe rf ormance and im prove
tran smissio n range. Do not use the radios c loser t han fiv e feet apart.
Power Boost
To b oost yo ur radi o’s p ower up to hig h power, p re ss the top por tion of
the bu tton wh en talk ing. If you kn ow your p arty is close by, yo u can
cons erve yo ur batter y’s energy b y pushi ng the lower p art of th e
butt on to u se less p ower.
Note :
If you are o n an FR S only channel (see c ha nnel an d frequ encies
char t) the ra dio wil l only use low power wh en eith er port ion of the
is p ressed.
Monitor Button
Pres sing an d holding for t hree se co nds all ows you to lis ten to th e
volu me leve l of the radio w hen you are no t receivi ng. Thi s allow s you t o
adju st the vo lume, i f neces sary. You can al so pres s to che ck for
acti vity on t he curr ent cha nnel be fore yo u talk.
Push to Talk Timeout Timer
To p revent acciden tal tra ns mission s and s ave bat tery li fe , the r adio
emit s a con ti nuous w arning tone an d stops t ransmit ting if you pr ess
for 60 cont in uous se conds.
Menu Options
Selecting the Channel
Your ra di o has 2 2 chann els. Ch annels 8- 14 are FRS low power only an d
all other c ha nnels a re GMRS (See t he "Cha nn els and Freque ncies" table
on o verleaf f or deta ils).
When you pr es s the b ottom p ortion of the al l chann els are low
powe r . If you press t he top portion o f the t o boost the po we r
GMRS channe ls will b e high power .
Note :
When on FRS o nly cha nnel to p or bo ttom pr es s of wi ll only be
lowe r power .
1. With the rad io on, pr ess . The cur re nt chan nel fla shes.
2. Press or and select an unu se d or qu iet cha nnel.
3. Press t o save the cha nnel se tting o r to co ntinue set up.
Selecting The Interference Eliminator Code
Inte rferenc e Elimina tor Cod es help minimi ze interf erence by bloc king
tran smissio ns from u nknown sources . You r radio has 12 1 Inter ference
Elim inator Co des. Co des 1 – 38 are the st an dard an alog co des tha t
appe ar on o th er FRS/ GMRS ra dios. C odes 39 – 121 ar e addit ional d igital
code s added f or supe rior in terfere nce pro te ction. 0 is th e off p osition ,
no a nalog o r digital codes are ena bled.
To s et the code fo r a cha nn el:
1. Press until the cod e start s to fl as h.
2. Press or to select the cod e.
3. Press t o save the cod e setti ng or t o conti nue set up.
You can s et a di fferent code f or each c hannel using t his pro cedure. A n
exte nded pr es s of o r allo ws you to scroll throug h the
Inte rferenc e Code ra pidly s o you c an quic kl y reach the co de you want.
Note :
You mus t set the Interf erence Elimina to r Code to 0 on a radi o that
uses Interf er ence El iminato r Codes to com mu nicate with ra dios th at do
not have In te rferenc e Elimi nator C odes. S el ect 0 f or “no tone, n o code”
and OFF wil l flash o n your radio’s disp lay.
Setting and Transmitting Call Tones
Your ra di o can t ransmit differ ent cal l tones t o other radios in you r group
so y ou can al ert the m that you wan t to ta lk . You have 10 cal l tones f rom
whic h to ch oo se.
To s et a ca ll tone :
1. With the rad io on, pr ess t hree ti me s until the cu rrent c all ton e
sett ing (0 - 10) fla shes an d appea rs .
2. Press or to change and hea r the cal l tone.
3. Press t o set t he new call to ne or t o conti nue set up.
To t ransmit your c all ton e to othe r radio s set t o the s am e chann el and
Inte rferenc e Elimina tor Cod e as yo ur radi o, press .
Note :
Set ting th e call to 0 disa bles th e call to ne feat ure.
Hands-Free Use Without Accessories ( )
You can u se the iVOX fe ature t o trans mi t hands -free w ithout the nee d for
any headset a ccessor ies. On ce iVOX is tur ne d on, t he radi o detec ts your
voic e and t ra nsmits when yo u speak into t he intern al micr ophone.
1. Press until a ppears on the di splay. The cu rrent s etting
On/O ff will f lash.
2. Press or to select On or O ff .
3. Press t o set o r to continu e set up.
Hands-Free Use With Accessories ( )
You can t ransmit hands- free mo re reli ab ly with the us e of op tional
head set acc es sories. Once V OX is t urned o n, the ra dio det ects yo ur
voic e and t ra nsmits when yo u speak .
Many access or ies (so ld sepa rately) are av ai lable f or your radio. For
more inform at ion, vi sit our Web site a t www. mo torola. com or
http ://shop .g iantint l.com.
1. Turn the rad io off and pl ug the VOX accessory into th e accessory p ort.
2. Tur n the r adio on . VOX s hows on t he disp lay.
3. Adjus t the v ol ume app ropriat ely by rotatin g . Lower the vo lume
befo re plac in g the a ccessor y on yo ur head o r in yo ur ear.
4. To tu rn off, simply remove a ccessor y.
Note :
The re is a s hort de lay bet ween th e time yo u start talkin g and
when the ra di o trans mits. T here is a shor t delay b efore t he tran smissio n
is c omplete d.
Setting the Sensitivity Level When in or
Mode
Adju sting t he radio’s s ensitiv it y level helps minimiz e the p os sibilit y of
unin tended no ises tr iggerin g a tra nsmissi on and he lps the radio pick up
soft voices .
1. Press until V OX and the lev el sett in g (1-3) appear on the displa y.
2. Press or to select the sen si tivity level.
3. Press t o set o r to continu e set up.
3 =
High Sensitiv ity
for quiet en vironme nts
2 =
Medi um Sensit ivity
for most e nv ironmen ts
1 =
Low Sensitivi ty
for noisy en vironme nts
Note :
Whe n you c on nect a headset , the r adio is a utomati cally s et to t he
last chosen s ensitiv ity lev el.
VibraCall™ Alert
VibraCal l™ is a vibrat ing ale rt that n otifies you th at your r adio is
rece iving a m essage. This i s usefu l in no is y envir onments . When the
aler t is on , the rad io vibr ates on ce ever y 30 seco nds whe n you r eceive a
mess age on th e chann el and code yo u set.
1. To t urn vib rating alerts on , press until is disp layed. The
curr ent set ti ng will flash.
2. Press or to change the set ti ng to O ff/On.
3. Press t o set o r to continu e set up.
QT Noise Filtering
The QT nois e- filteri ng feat ure hel ps to e ns ure uni nterrup ted
comm unicati on with o ther Mo torola radios th at have this f eature. This
feat ure als o filters out un wanted transmi ss ions fr om othe r radio s. This i s
usef ul in p la ces whe re ther e is he avy rad io traffi c, such as amu sement
park s or sk i resorts .
Note :
QT n oise fi lt ering i s not a vailabl e when th e radio is sca nning.
To t urn QT noise f ilterin g on or o ff:
1. Press until display s. The cu rrent s etting On/Off will fl as h.
2. Press or to turn no ise fil te ring On or Off .
3. Press t o confi rm your select ion or t o conti nue set up.
To t ransmit to a r adio th at has QT noise filteri ng turn ed on:
1. Selec t the s am e chann el and Interfe rence E li minator Code a s the
othe r radio .
2. Press to send a call tone. This al lo ws your voice to pass throug h
the QT nois e filter on the receivi ng radi o.
3. Press a nd spea k norma lly.
Note :
If y ou skip s tep 2, the beg inning of your m essage may not be
hear d on th e receivi ng radi o. For a 30-se co nd peri od, sta rting a fter th e
last transm is sion, a ll tran smissio ns rece iv ed on t he sele cted ch annel
and code wi ll pass t hrough the QT noise f il ter.
Keypad Tones
You may e nable o r disab le the speaker k ey tone s. You wil l hear the key
tone each t im e a but ton is pushed.
1. Press until appears . The c ur rent se tting O n/Off w ill fla sh .
2. Press either or to turn O n or Off.
3. Press t o confi rm or to cont in ue set up.
Note :
Whe n the k ey tone f eature is off, the fo ll owing a re not disable d:
• Transmit timeout a lert to ne
• Call tone
• Low battery a lert to ne or
• The transmi tt ed talk confir mation tone
Transmitting a Talk Confirmation Tone
You can s et your radio to tran smit a un ique to ne when you fi nish
tran smittin g. It is like sa ying “R oger” o r “Over” to let others know yo u
are finishe d talking .
1. With the rad io on, pr ess un til the appears . The c urrent
sett ing On/ Of f flash es.
2. Press or to turn O n or Of f.
3. Press t o set o r to q uit men u mode.
2 digits for
Channel, SAME
State Location
Code, SAME
Message Number
3 characters for
Interference
Eliminator,
SAME County
Location,
SAME Event
Codes
-
Battery Meter
-
Channel Power
Indicator
-
Lock
-
Talk Confirmation
Tone (Roger Beep)
-
Noise Filtering
- Specific Area
Message Encoding
-
On/Off for each
feature
-
Vibrate
-
Scan
-
Call Tone,
Keypad Tone
-
Weather Alert
-
Hands-Free Use
Without
Accessories
-
Hands-Free Use
With Accessories
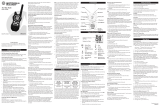
Control Buttons
Use to :
• Turn radio on/off
• Incre ase or decrea se
volume
Use Push
to Talk to:
• Talk
• Save a setting
• Boost the
radio ’s
power
Use to:
• Transmit call tone
Speaker
LED Indicator
Use to:
• Select Menu options
• Exit the Menu (when
pressed while in
last Menu)
• Lock and unlock the
keypad (when held
down and not in a
Menu)
Accessory Jack
Microphone
Use Monitor
to:
• Scan to see if
anyone is o
n other
channels
• Monitor the
selected channel for
activity
Use and
to:
• Scroll through
menus
• Turn weather on/off
HI
LO
T9580RSAME
KE M-P K14190 -52

Special Features
Keypad Lock
To a void ac cidenta lly cha nging y our rad io sett in gs:
1. Press and h ol d unt il displa ys.
2. When in lock mode, yo u can t urn the radio on and off, ad just th e
volu me, rec eive, t ra nsmit, send a call to ne, and monito r chann els. Al l
othe r funct ions ar e locked.
To u nlock t he radi o, pres s and h old un ti l is no longer displa yed.
Scanning Channels
Use scan to search t he 22 c hannels for tr ansmiss ions fr om unkn own
part ies, to find s om eone in your g roup wh o has a ccident ally ch anged
chan nels, o r to qu ic kly fin d unuse d chann els for your o wn use.
Ther e is a priorit y feature and 2 modes o f scann ing ( b asic an d
adva nced ) to make y our sea rch mor e effec tive. T he basi c scan mode
uses the ch annel a nd code c ombinat ions fo r each of the 22 chan nels as
you have se t them ( or with the de fault c ode val ue of 1 ). The “Advanc ed
Scan ” mode will sc an all ch annels for any and al l codes , detec t any
code in use , and u se that c ode val ue temp orarily for th at chan nel.
Prio rity is given to the “h ome cha nnel,” that is , the c hannel (and
Inte rferenc e Elimi na tor Cod e) your radio was set to whe n you s tart th e
scan . This means t he initia l chann el (and code s etting) is sca nned mo re
ofte n than the oth er 21 cha nnels, and you r radio will r espond quickly to
any activit y occur ri ng on t he home channe l as a priorit y.
To s tart Sc anning:
1. Brief ly pres s the ke y. T he scan w ill app ear in the dis play,
and the rad io will b egin to scroll throug h the c hannel and cod e
comb ination s.
2. When the rad io dete ct s cha nn el acti vity ma tching the cha nnel an d
code combin ation, it stops scrolli ng and you can hear t he
tran smissio n.
3. To re spond a nd talk to the person transm itting, p ress wi thin fi ve
seco nds aft er the en d of th e trans mission .
4. The r adio wi ll resu me scro ll ing thr ough th e chann els fiv e secon ds
afte r the e nd of a ny receiv ed acti vity.
5. To st op scan ning, b riefly press t he key.
To s tart Ad vanced Scannin g:
1. Set t he Inte rferenc e Elimi na tor Cod e to “z ero” or OFF.
2. Brief ly pres s the ke y. T he scan w ill app ear in the dis play,
and the rad io will b egin to scroll throug h the c hannels . No
Inte rferenc e Elimi na tor Cod es will filter what i s heard .
3. When the rad io dete ct s cha nn el acti vity wi th ANY code (o r NO co de),
it s tops sc rolling a nd you can hea r the t ransmis sion. A ny
Inte rferenc e Elimi na tor Cod e that may be in use by that party will be
dete cted an d displ ay ed.
4. To re spond a nd talk to the person transm itting, p ress wi thin fi ve
seco nds of the end o f the t ransmis sion. T he radi o will transmi t using
the newly d etected I nterfer ence El iminato r Code.
5. The r adio wi ll resu me scro ll ing thr ough th e chann els fiv e secon ds
afte r the e nd of a ny receiv ed acti vity.
6. To st op scan ning, b riefly press t he key.
Scan ning No tes:
1. If yo u press w hile th e radio is scr olling through inacti ve
chan nels, t he tran sm ission will be on the “home channel ”. Scan ning
will resume five s ec onds af ter the end of your t ransmis sion. You
ma y press the ke y to stop scanni ng at a ny time .
2. If th e radio stops on an u nd esired transmi ssion, you may immedi ately
re sume th e scan by brie fl y press ing or .
3. If th e radio repeat ed ly st op s on an undesi red tra nsmissi on, you may
temp orarily remove t hat cha nnel fr om the scan li st by p ressing and
ho lding or for t hree se conds. You may re move mo re than
one channel in thi s way.
4. To re store t he remo ved cha nnel(s) to the scan l is t, tu rn the ra dio off
and then ba ck on, or exit a nd re-e nter th e scann ing mod e by pr essing
.
5. You cann ot remo ve the ho me chan nel fro m the s can lis t.
6. In Ad vanced Scan, t he dete ct ed code will o nly be used fo r one
tran smissio n. You must note th e code, exit s can, an d set t hat
dete cted co de on t ha t chann el to p ermanen tly use the de tected
code .
Faceplate Removal (relevant only for models that this applies to)
The facepla tes sna p on. The y are n ot scre wed on.
To r emove t he face plate, lift at the in dentati on locate d at th e cente r of
the bottom section o f the f aceplat e. Do n ot use screwdr iver.
Weather Receiver
Your ra dio can t une in to broa dcasts by the United States Nationa l
Ocea nic and Atmosp he ric Adm inistra tion (N OAA) Na tional Weat her
Radi o (NWR) and En vi ronment Canada Wea theradi o. You can listen t o a
weat her cha nnel or s et your radio to aler t you t o emerg ency we ather
broa dcasts that in te rrupt r outine broadca sts. Wh en you listen to a
weat her cha nnel, y ou cannot use yo ur radi o in sc an mode or for
two- way com municat io ns.
Your T9 580 We ather A lert us es Spec ific Ar ea Mess age Enc oding ( SA ME)
data transm itted b y the Nat ional Weath er Serv ice (NW S) and
Envi ronment Canada ( EC). S AME dat a codes and di splays digital
loca tion sp ecifica ti ons of timely warning s and a lerts o n hazar ds and
weat her rel ated ev en ts and informa tion.
Both NOAA a nd Envi ro nment C anada h ave tra nsmitte rs loca ted
thro ughout the Uni te d State s and C anada, respect ively. These
tran smitter s broad ca st watc hes, fo recasts , and o ther in formati on 24
hour s a day.
Note :
NOA A weath er radi o station s are a ssigned to cov er spec ific
area s and s ervice ma y be li mited. Please check w ith you r local weathe r
offi ce for frequen cy and de tails, or visi t
http ://www.nws.no aa.gov/ nwr/sam e.htm#p ro gram in the US A or
www.msc-sm c.ec.gc .ca/cd/ factshe ets/wxr ad io in C anada.
NWR/ EC Broa dcast S er vice Ar ea cove rage ca n be fo und at
http ://www.nws.no aa.gov/ nwr/usf rames.h tm l in th e USA o r
http ://www.msc.ec .gc.ca/ msb/wea theradi o/ transmi tter/in dex_e.c fm in
Cana da.
List eners w ho need t o progr am NWR SAME re ceivers with t he prop er
coun ty and/ or mari ne area o f their choice ("CLC" in Can ada) ca n obtai n
the informa tion by t elephon e at 1- 888-NWR SAME (1 -888-69 7-7263) in the
USA or 416- 739-436 9 in Cana da.
The use of the NOA A logo do es not provide an end orsemen t or im plied
endo rsement by NOA A' s Natio nal Weather Servic e, nor does th e use o f
the Weat he radio l ogo pro vide an endors ement o r impli ed endo rsement
by E nvironm ent Can ad a.
Turning Weather Channel Reception On and Off
1. To tu rn weat her rec eption on, pre ss and hold f or three seconds .
2. To turn off, pr es s and hold or turn th e radio off and then back o n.
Setting the Weather Channel
1. After turnin g weath er rece pt ion on, press . The c urrent channel
flas hes.
2. Press or t o select the app ropriat e chann el with good
rece ption i n your ar ea.
3. Press to sa ve the we ather c hannel setting or to contin ue
set up.
Setting the Weather Alert
Your radio can be set to respond to N OA A Weather R ad io emergency
messages when i n tw o-way standby. On reception of an alert s ig nal the
receiver automa ti ca lly switches to weather reception a nd a special alarm
tone sounds. An a ud io broadcast of weather or emerge nc y information
will follow. If the SAM E Lo cation Code is set to the value f or your area,
the display scr ee n will indicate the 3 letter SAME E ve nt Code and can
display the dat e, t ime of alert, and duration of the a lert period. Up to 5
active SAME Eve nt C odes are stored.
1. After turnin g weath er rece pt ion on, press twice. On/Off displa ys.
2. Press or to select On /Off. I f you a ctivate Wea ther Al ert and return t o
tw o-way m ode, wi ll disp lay.
3. Press to sav e the w ea ther ch annel s etting or to continu e set
up.
As w ith two -way ra di o recep tion, w eather channel recept ion dep ends
on h ow clos e you a re to a t ransmit ter and whethe r you a re indo ors or
outd oors. Weather channe ls may contain static or noi se.
Weather Al ert wil l not f unction while activel y trans mitting or rec ei ving
in t wo-way mode. To avoid missin g a We ather A lert me ssage, the 2-w ay
chan nel sho uld be ch anged t o a rel atively quiet channel and us e an
Inte rferenc e Elimi na tor Cod e other than t he defa ult Cha nnel 1 Code 1
sett ing.
Setting the SAME Location Code
The NWS/EC has ass ig ned a 6 digit value f or each area, typical ly by
Stat e and C ounty. The T9 580 use s only th e secon d throu gh sixt h digit s of
the locatio n code an d will respond to any event regardl ess of the fir st
digi t. The second an d third digits are th e 2-dig it stat e/equiv alent
terr itory i dentifi er SS; th e last three d igits a re the county or equi valent
area identi fier CC C. Omit t he lead ing dig it (usu ally ze ro) and use on ly the
last 5 digi ts when p rogramm ing the receiv er.
1. After turnin g weath er rece pt ion on, press three times. 00 and
000 display. The flashi ng digi t will be select ed to m atch th e locat ion
code desire d.
2. Press or to s elect the appropria te value, then to
advance t o the next digit. Co ntinue until all 5 di gits SS and CCC are
programme d. The first digit (u sually 0) in the SAME Location Code is
not used by the T9580.
3. Press or to s ave the SAME l ocation code s etting and exi t
weat her set up.
Enabling Weather Alert
To e nable t he Weather Alert m ode, re tu rn to 2 -way mo de afte r
prog ramming . Pres s and hol d for three s econds. The T 9580 is now
able to fun ction i n two-way weathe r alert mode. When n ot tran smittin g
or r eceivin g a two -w ay sign al, the radio will mo nitor t he sele cted
weat her cha nnel fo r alerts for the user's locati on code .
Viewing SAME Event Codes
When your r eceiver h as deco ded an alert, a three letter code
repr esentin g the a le rt type is dis played at the bottom of the screen. See
the SAME Ev ent Cod es table for cod es and meaning s.
The SAME Lo cation Co de must be a n on-zero value (defaul t setti ng) to
view Event Codes. I f no Lo cation Code is entere d, the receive r will alert
for all eve nts, re ga rdless of loca tion or type, and the Wea ther Re ce iver
will not mu te at t he end of the em ergency voice announc ement.
Weather Receiver (continued)
Pres s and h old for 3 secon ds to e xit wea ther re ception mode a t any
time .
If t he SAME Locati on Code h as been set, t he disp lay bac klight will fl ash
for the dur ation o f the voi ce anno uncemen t. At the end of the
anno uncemen t, the T9 580 ret urns to the FR S/GMRS channel and re sumes
moni toring the wea th er chan nel for additi onal al erts.
Up t o 5 act ive eve nt codes are sto red. T he SAME displa y icon will fl ash
as a remind er when a n event code h as not been re viewed. Press
once to rev iew the se events . The and w ill scr oll thr ough th e
even t codes (if ac ti ve) and will b e label ed 1-5 in orde r of re ception .
Pres s repea te dly on any eve nt to d isplay the Jul ian Dat e (1-36 6,)
GMT time of alert (H H and M M,) and time o f effec tivity (HH and MM) fo r
each event code. Th e Julia n Date and GMT are di splayed as bro adcast
by N OAA/EC, and wo ul d be co nverted to the local date an d time
acco rding t o the u se r's loc ation a nd time zone.
When viewin g the e ve nt code , 2-way PTT wi ll func tion no rmally. You
can display the ev en t code and eas ily rel ay the informa tion to other
2-wa y users .
Duri ng the effecti ve time p eriod f or any receive d SAME event, has
the additio nal fun ct ion of viewing event codes. Additi onal pr esses o f
fun ction t o change channel , code, and ot her set tings. When th e
effe ctive t ime has e xpired for eac h event code, the cod es are
auto matical ly eras ed and f unction s norma lly.
SAME Event Codes
NWR-SAME / EAS Weather Related Events
Bliz zard Warning .......................................................................................................BZW
Coas tal Flo od Wat ch..................................................................................................CFA
Coas tal Flo od War ning.............................................................................................CFW
Dust Storm Warnin g .................................................................................................DSW
Flas h Flood Watch ...................................................................................................... FFA
Flas h Flood Warni ng .................................................................................................FFW
Flas h Flood Statem en t................................................................................................FFS
Floo d Wa tc h .................................................................................................................. FLA
Floo d Wa rn ing ............................................................................................................. FLW
Floo d State ment ...........................................................................................................FLS
High Wind Watch ......................................................................................................HWA
High Wind Warning ................................................................................................ HWW
Hurr icane Watch ........................................................................................................HUA
Hurr icane Warning ...................................................................................................HUW
Hurr icane S tatemen t .................................................................................................HL S
Seve re Thun derstor m Watc h ................................................................................ SVA
Seve re Thun derstor m Warn ing .............................................................................SVR
Seve re Wea ther St atement .....................................................................................SVS
Spec ial Mar ine Wa rning .......................................................................................SMW
Spec ial We ather S tatemen t....................................................................................SP S
Torn ado Watch ............................................................................................................TOA
Torn ado Warning ........................................................................................................TOR
Tropical Storm Watch .............................................................................................. TRA
Tropical Storm Warni ng .......................................................................................... TRW
Tsunami Watch ........................................................................................................... TSA
Tsunami Warni ng ...................................................................................................... TSW
Wint er Stor m Watc h ................................................................................................W SA
Wint er Stor m Warn ing ...........................................................................................WSW
NWR SAME / EAS Non-Weather Related Events
Emer gency A ction N ot ificati on ............................................................................ EAN
Emer gency A ction Termin ation .............................................................................EAT
Nati onal In formati on Center................................................................................... NIC
Nati onal Pe riodic Test ............................................................................................. NPT
Requ ired Mo nthly Test ............................................................................................ RMT
Requ ired Weekly Test ..............................................................................................RW T
NWR SAME / EAS State and Local Events
Admi nistrat ive Mes sa ge ......................................................................................... ADR
Avalanch e Wa tch .......................................................................................................AVA
Avalanch e Wa rning ..................................................................................................AVW
Chil d Abduc tion Em er gency....................................................................................CA E
Civi l Dange r Warn ing ..............................................................................................CDW
Civi l Emerg ency Me ss agee ....................................................................................CEM
Eart hquake Warnin g ................................................................................................ EQW
Evac uation Immedia te ................................................................................................ EVI
Fire War ni ng ................................................................................................................FRW
Haza rdous M aterial s Warn ing ............................................................................HMW
Law Enforce ment Warning .....................................................................................LEW
Loca l Area Emergen cy ..............................................................................................L AE
911 Telep hone Ou tage Em ergency .......................................................................TOE
Nucl ear Pow er Plan t Warn ing ............................................................................ NUW
Radi ologica l Hazar d Warn ing .............................................................................. RHW
Shel ter In Place Warning ......................................................................................SP W
Vol cano Warnin g .......................................................................................................VOW
Administrative Events
Netw ork Mes sage No ti ficatio n .......................................................................... NM N
Prac tice/De mo War ning .........................................................................................DMO
Warranty
Consumer Two-Way Radio Products and Accessories
purchased in the United States or Canada.
What Does this Warranty Cover?
Subj ect to the exc lu sions c ontaine d to th e right , Giant Intern ational Ltd.
warr ants th e Motor ol a brand ed cons umer tw o-way r adios t hat ope rate
via Family Radio S er vice or Genera l Mobil e Radio Servic e that it
manu facture s (“Pro du cts”), the Mot orola b randed or cert ified
acce ssories sold f or use wi th thes e Produ cts tha t it ma nufactu res
(“Ac cessori es”) to b e free from de fects i n mater ials an d workm anship
unde r norma l consu me r usage for th e perio d(s) ou tlined below. This
limi ted war ranty i s a consu mer’s excl usive r emedy, and ap plies a s
foll ows to new Mot or ola bra nded Pr oducts and Acc essorie s
manu facture d by Gi an t Inter nationa l Ltd., and pu rchased by con sumers
in t he Unit ed Stat es or Can ada, wh ich are accomp anied b y this written
warr anty:
Products Covered
Prod ucts an d Accesso ries
as
defi ned abo ve, unl es s other wise
prov ided fo r below.
1.
Deco rative Accessori es
and Cases.
Dec orative covers
and cases.
2.
Mona ural He adsets.
Ear
buds and bo om head se ts that
tran smit mo no soun d through a
wire d conne ction.
3.
Cons umer Two-Way R adio
Acce ssories .
4.
Prod ucts an d Accesso ries
that are Re paired or
Repl aced.
Length of Coverage
One (1) yea r
fro m the d ate of
purc hase by the fi rs t consu mer
purc haser o f the p ro duct un less
othe rwise p rovided f or belo w.
1.
Limi ted lif etime war ranty
for
the lifetim e of ow ne rship b y the
firs t consu mer pur ch aser of the
prod uct.
2.
Limi ted lif etime war ranty
for
the lifetim e of ow ne rship b y the
firs t consu mer pur ch aser of the
prod uct.
3.
Nine ty (90) days
fro m the d ate
of p urchase by the f irst
cons umer pu rchaser o f the
prod uct.
4.
The balance of the o riginal
warr anty or for nine ty (90)
days
fro m the d ate ret ur ned to
the consume r, wh ichever is
long er.
Exclusions
Norm al Wear and Tear.
Per iodic m aintena nc e, repa ir and replace ment
of p arts du e to no rm al wear and te ar are exclude d from coverag e.
Batt eries.
Onl y batte ries wh os e fully charge d capac ity fal ls belo w 80%
of t heir ra ted cap ac ity and batter ies tha t leak are cov ered by this l imited
warr anty.
Abus e & Mis use.
Def ects or damage t hat res ult fro m: (a) imprope r
oper ation, storage , misuse or abus e, acci dent or neglec t, such as
phys ical da mage (c ra cks, sc ratches , etc.) to the surfac e of th e produ ct
resu lting f rom mis us e; (b) contact with l iquid, water, rai n, extr eme
humi dity or heavy pe rspirat ion, sa nd, dir t or th e like, extrem e heat, or
food ; (c) u se of t he Produc ts or A ccessor ies for commer cial pu rposes or
subj ecting the Pro du ct or A ccessor y to ab normal usage o r condi tions; or
(d) other a cts whi ch are no t the f ault of Motoro la or G iant In ternati onal
Ltd. , are e xcluded f rom cov erage.
Use of Non- Motorola branded Produc ts and Accesso ries.
Def ects
or d amage t hat res ul t from the use of Non -Motoro la bran ded or certifi ed
Prod ucts, A ccessor ie s, Soft ware or other periphe ral equ ipment are
excl uded fr om cove ra ge.
Unau thorize d Service or Mod ificati on.
Def ects or damage s resulti ng
from servic e, test in g, adju stment, instal lation, mainte nance, alterat ion, or
modi ficatio n in an y way by someone other than Mo torola, Giant
Inte rnation al Ltd. o r its a uthoriz ed serv ice cen ters, a re excl uded fr om
cove rage.
Alte red Pro ducts.
Pro ducts o r Acces so ries wi th (a) serial numbers or
date tags t hat hav e been re moved, altered or obl iterate d; (b) broken seals
or t hat sho w evide nc e of ta mpering ; (c) m ismatch ed boar d seria l
numb ers; or (d) no nc onformi ng or n on-Moto rola br anded h ousings , or
part s, are exclude d from co verage.
Comm unicati on Servic es.
Def ects, d amages, o r the f ailure of Prod ucts
or A ccessor ies due t o any c ommunic ation s ervice or sign al you may
subs cribe t o or us e with th e Produ cts or Accesso ries is exclud ed from
cove rage.
Patent and Copyright Information
Manu facture d, dist ri buted o r sold by Gian t Inter nationa l Ltd., offici al
lice nsee fo r this pr oduct. Motorol a, the Motorol a logo tradema rks and
the Motorol a trade d ress ar e owned by Mot orola, Inc. an d are u sed
unde r licen se from M otorola , Inc. Please contact Giant Interna tional Ltd.
at 8 00-638- 5119 fo r questio ns/comm ents, w arranty, supp ort, or servic e
rela ted to this pr od uct. MO TOROLA and the Styliz ed M Lo go are
regi stered in the U. S. Pate nt & Tradema rk Offi ce. All other product or
serv ice nam es are th e prope rty of their r especti ve owne rs.
© Mo torola, Inc. 2 00 7. All rights reserve d.
What Other Limitations Are There?
ANY IMPLIED WARRA NTIES, INCLUDI NG WITH OU T LIMITATION TH E
IMPL IED WA RRANTIE S OF ME RCHANTABILIT Y AND F ITNESS FOR A
PARTI CULAR P URPOSE, SHALL BE LIMI TED TO TH E DURATION OF THI S
LIMI TED WA RRANTY, OTHERW ISE THE REPAIR, REPLAC EMENT, OR
REFU ND AS P ROVIDED U NDER TH IS EXPR ESS LIM ITED WARRANTY IS THE
EXCL USIVE R EMEDY O F THE CON SUMER, AND IS PROVIDE D IN LI EU OF
ALL OTHER WARRANT IES, EX PRESS O F IMPLI ED . IN NO EVENT SHALL
MOTO ROLA OR GIANT IN TERNATIONA L LTD. B E LIABLE, WHETHE R IN
CONT RACT OR TORT ( IN CLUDING NEGLIG ENCE) F OR DAMA GES IN EXCESS
OF T HE PURC HASE PR IC E OF TH E PRODU CT OR A CCESSOR Y, OR F OR ANY
INDI RECT, INC IDENTAL, S PECIAL OR CONS EQ UENTI AL DAMAGE S OF AN Y
KIND , OR LO SS OF R EV ENUE OR PROFIT S, LOSS OF BUS INESS, LOSS OF
INFO RMATI ON OR O THER FI NANCIAL LOSS A RISING OUT OF OR IN
CONN ECTION WITH TH E ABILITY OR INA BILITY TO USE THE PRO DUCTS O R
ACCE SSORIES TO THE F ULL EXT ENT THE SE DAMA GES MAY BE
DISC LAIMED BY LAW.
Some states and ju ri sdictio ns do n ot allo w the l imitati on or e xclusio n of
inci dental or cons eq uential damage s, or l imitati on on t he leng th of a n
impl ied war ranty, so the above limitat io ns or e xclusio ns may not app ly to
you. This w arranty g ives yo u speci fic leg al righ ts, and you ma y also have
othe r right s that va ry from state to stat e or fr om one jurisdi ction t o
anot her.
Who is covered?
This warran ty exte nd s only to the first c onsumer purcha ser, and i s not
tran sferabl e.
What will GIANT INTERNATIONAL LTD. do?
GIAN T INTER NATIO NAL LTD. , at it s optio n, will a t no ch arge re pair,
repl ace or refund th e purch ase pri ce of a ny Prod ucts or Access ories t hat
does not co nform t o this wa rranty. We may us e funct ionally equiva lent
reco ndition ed/ ref ur bished/ pre-ow ned or new Pro ducts, Accesso ries or
part s.
How to Obtain Warranty Service or Other Information?
To o btain s ervice or info rmation , pleas e call:
USA Two-Way Radios Canada Two-Way Radios
1-800-638-5119 1-800-638-5119
giantintl@callcenter.com giantintl@callcenter.com
For Accesso ries
, pl ease ca ll the te lephone number design ated ab ove for
the product with w hi ch they are us ed.
You wil l recei ve instru ctions on how to ship the Pr oducts or Acce ssories
at y our exp ense, t o a GIANT INTERN ATI ONAL LTD. Authori zed Rep air
Cent er. To obt ain ser vice, y ou must includ e: (a) a copy of your r eceipt, bill
of s ale or other c om parable proof of purc hase; ( b) a wr itten d escript ion of
the problem ; (c) t he name o f your service provid er, if app licable ; (d) t he
name and lo cation of the in stallat ion fac ility ( if appl icable) and, m ost
impo rtantly ; (e) y ou r addre ss and telepho ne numb er.
Channels and Frequencies
Cha nnel Frequency Des cription Channe l F reque ncy Des cription
1 462 .5625 MHz GMRS/F RS 12 467.6625 MHz FRS
2 462 .5875 MHz GMRS/F RS 13 467.6875 MHz FRS
3 462 .6125 MHz GMRS/F RS 14 467.7125 MHz FRS
4 462 .6375 MHz GMRS/F RS 15 462.5500 MHz GMRS
5 462 .6625 MHz GMRS/F RS 16 462.5750 MHz GMRS
6 462. 6875 MHz GMR S/FRS 17 462 .6000 MHz GMRS
7 462. 7125 MHz GMR S/FRS 18 462 .6250 MHz GMRS
8 467 .5625 MHz F RS 19 46 2.650 0 MHz GMRS
9 467. 5875 MHz FRS 20 462.67 50 MH z GMRS
10 4 67.6125 MHz FRS 2 1 462.7000 MHz GMRS
11 4 67.6375 MHz FRS 2 2 462.7250 MHz GMRS
T9580RSAME
Weather Channels and Frequencies
Weather Weather
Channel Frequen cy Channel Frequency
WX1 162. 550 MHz WX7 162.525 MHz
WX2 162. 400 MHz WX8 161.650 MHz
WX3 162. 475 MHz WX9 161.775 MHz
WX4 162. 425 MHz WX10 161.750 MHz
WX5 162. 450 MHz WX11 162.000 MHz
WX6 162. 500 MHz
WX1-7 NOAA/EC (SAME)
WX8-11 MARINE /CANADA/FR
/