Page is loading ...

17
ENGLISH TECHNICAL PASSPORT
Cooker hood
APPEAL TO THE CUSTOMER!
Dear Customer,
Thank you for purchasing our equip-
ment! We are sure that appliances of
the KUPPERSBERG brand, which are
modern, functional and made of high
quality materials and components, will
be a reliable assistant in your kitchen.
Please read this manual carefully
before starting any installation work. It
will help you avoid premature failure, as
well as extend the life of your appliance
to the maximum possible.
Please note that the installation of
this appliance must be carried out by a
qualied technician and in accordance
with these instructions. The manufac-
turer is not liable for any consequences
of failure to observe this condition.
1. GENERAL
INSTRUCTIONS
1.1 Please read our guidelines
carefully before installing and using an
appliance in order to achieve reliable
performance. Please keep this manual
in a safe place for future reference.
CAUTION! The appliance should
be kept at room temperature for at
least two hours before it can be used
(switched on).
1.2 The cooker hood is designed to
remove polluted air from area above a
cooking appliance. Intended for domes-
tic use only, the cooker hood complies
with IЕС 60335-2-31:2006.
CAUTION! Do not use the appli-
ance for other purposes! Improper use
causes risks of injuries and property
damage. In these cases, the appliance
will not be covered by warranty.
1.3 The cooker hood reduces aerial
level of harmful products of natural gas
incomplete combustion, partially re-
moves unpleasant cooking odors and
decreases greasing of walls, ceiling and
furniture with fatty particles and smoke.
1.4 The appliance is an exhaust-
type air-cleaning unit equipped with
a cross ow fan (turbine) with an alu-
minium grease lter (supplied with the
hood). Optionally, an odor-absorbing
carbon lter can be supplied (available
on request). The cooker hood (width
600 or 900 mm) is made of carbon steel
sheets with additional decorative and
protective powder coating.

18
TECHNICAL PASSPORT ENGLISH
Cooker hood
1.5 Considering the type of instal-
lation above a kitchen range, two opera-
tion modes can be selected:
 air exhaust with corrugated alu-
minium/plastic air ducts (Ø 150 mm or
120 mm) into a stationary kitchen air
shaft (chimney) (see section 5 );
 recirculation (closed-loop kitch-
en air circulation) when a cooker hood
is not connected to a chimney; air is
forced through an aluminium grease
lter (supplied with the hood) and a op-
tional odor-absorbing carbon lter and,
nally, returns to a kitchen (Fig. 2).
1.6 CAUTION! Before installing
a cooker hood connect it to the mains
power supply and check all its functions
to ensure technical serviceability.
1.7 We recommend that all work
on the installation, connection and re-
pair of your cooker hood be performed
only by qualied specialists who are
professionally engaged in such work.
1.8 The manufacturer is not re-
sponsible for any failure or damage
caused by improper installation, opera-
tion or repair.
1.9 The manufacturer reserves the
right to make changes in design of the
appliance in order to improve its quality
and performance.
1.10 See technical specications in
the User Manual and on the label locat-
ed on an interior surface of the cooker
hood (remove lters to access).
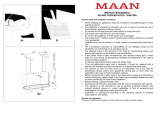
1.11 CAUTION! Install the cooker
hood on a wall at 650-750 mm above
an electric stove. As for a gas stove,
install the appliance at 750-850 mm
above a cooktop (Fig. 1).

19
ENGLISH TECHNICAL PASSPORT
Cooker hood
2. MAIN TECHNICAL SPECIFICATIONS
KUPPERSBERG
LORA / KAMINOX
Voltage (V)
220 - 230
Frequency (HZ)
50
Operation modes
3
Nominal input power (W) Motor
120
Light bulbs
2х2
Standard ventilation system
Connection capacity (m³/h)
800
Overall hood dimensions
(мм)
Width
600 Or 900
Depth
430
Height (min - max)
550-780 / 540-780
Air duct connection size (mm)
Ø150/Ø120
Net weight (kg) 10,1 (600 mm) –
12,3 (900 mm)
Noise level (db) 63 – 64
Protection class
I
Operation mode
S1 (long-term)
Accessories (available as an option)
Charcoal lter KF
-
L
ARMORED POWER CORD WITH EARTHING
Scope of delivery
Cooker hood
1 Pc
External chimney 1 Pc
Internal chimney 1 Pc
Chimney bracket 1 Pc
Plastic tube adapter (ø150 to ø120 mm) 1 Pc
Multipurpose countersunk screw 4.5х40 6 Pcs
Pan-head screw 2.9х9.5 2 Pcs
Expansion dowel ø8х40 6 Pcs
User manual 1 Pc
3. CONTENTS OF DELIVERY

20
TECHNICAL PASSPORT ENGLISH
Cooker hood
4. SAFETY REQUIREMENTS
CAUTION! Do not connect your cooker hood to an electric stove power supply.
Avoid mechanical and thermal damage of a power cord.
4.1 During assembling, using and
maintenance it is strictly prohibited:
 to connect the cooker hood to the
mains power supply if its voltage and
frequency are out of values specied in
Section 2;
 to use light bulbs whose power is
exceeding 2 W (LED);
 to perform maintenance, to re-
place a light bulb, to remove a lter or
to clean an appliance when the cooker
hood is plugged into the mains;
 to use the cooker hood near an
open-ame source, an open gas burner
or a heating unit. Heating elements must
be covered with pots or pans;
 to cook alcohol-containing food;
 to leave a deep fryer unattended;
 to use the cooker hood with re-
moved lters;
 to connect the cooker hood to an
electric stove mains power supply or to
cut a plug during installing.
CAUTION!
Do not connect your cooker hood to
an electric stove power supply. Avoid me-
chanical and thermal damage of a power
cord.
4.2 To avoid an electric shock, plug
the cooker hood in a three-wire (schuko
type) socket.
4.3 Connect the cooker hood to a
separate air shaft. Do not connect other
appliances to the same air shaft.
4.4 To use the cooker hood simul
-
taneously with other heating appliances
(e.g., gas/oil heaters, ovens etc.), except
electric ones, provide additional fresh air
intake to a room where a range hood is
installed (e.g., open a fanlight window).
4.5 When the cooker hood is in
-
stalled above a stove at appropriate in-
stallation height H (Fig. 1), use an air duct
Ø 150 -Ø 120 mm to exhaust air into the
ventilation channel. Lesser diameter will
cause an additional resistance to air lead
-
ing to increased noise, vibration and mo-
tor overheating.
4.6 Ensure that reusable aluminium
grease lters are cleaned in a timely man
-
ner so as not to reduce hood performance
and avoid the risk of re due to grease and
dust accumulation.
4.7 In case of ignition, do not switch
the cooker hood on in order to reduce
smoking until entire re containment.
4.8 In case of under cooker hood ig
-
nition, cover ame with dense cloth and
plug an appliance out; do not use water to
ght a re near electric appliances.
4.9 Avoid mechanical and thermal
damage of a power cord.

21
ENGLISH TECHNICAL PASSPORT
Cooker hood
5.1 The cooker hood is a ventilat-
ing air-cleaning exhaust-type appliance
equipped with a fan (turbine) with an
aluminium grease lter. The single-mo-
tor appliance (width 600 or 900 mm) is
made of carbon steel sheets with addi-
tional decorative and protective powder
coating. The cooker hood is a T-shaped
appliance with decorative chimney that
closes the ventilation duct. The hood is
designed for installation in the kitchen
on the wall above the stove.
5.2 Considering the type of instal-
lation two operation modes can be se-
lected (see section 1.5):
 air exhaust into a kitchen chim-
ney (Fig. 1);
 recirculation (closed-loop kitch-
en air circulation) (Fig. 2).
5. DESCRIPTION
Distance H:
65 - 75 cm for electric stoves
75 - 85 cm for gas stoves
Fig. 1 Fig. 2

22
TECHNICAL PASSPORT ENGLISH
Cooker hood
It must be noted that when the
cooker hood switched on in a closed
room, the pressure is automatically
reduced, which must be balanced by the
1 – chimney bracket (for fastening)
2 – internal chimney
3 – external chimney
4 – air duct adapter
(Ø150 mm to Ø120 mm)
5 – hood housing
DO NOT PLACE HEAVY OBJECTS ON THE HOOD PANEL!
6 – power cord with earthing
7 – aluminium grease lter
8 – light bulbs (LED)
9 – mode select switch
(mechanical)
10 – decorative glass
fresh air supply. This can be achieved by
opening doors, windows or by using a
special ventilation system.
The cooker hood consists of the
following components (Fig. 3):
Fig. 3

23
ENGLISH TECHNICAL PASSPORT
Cooker hood
6. INSTALLATION INSTRUCTIONS
6.1 Select an operation mode and
a place to install the cooker hood.
6.2 Take the cooker hood out of the
packing box.
6.3 Connect the appliance to the
mains power supply and check all its
functions.
Please note that the installation
height of the hood above the electric
stove should not be less than 650 mm,
and above the gas ones – less than 750
mm (Fig. 1).
6.4 Mark xing points on the kitch-
en wall. For this purpose, make a pa-
per template with the coordinates of 4
holes on the back panel of the housing
(points A, B, C, D; see installation dia-
gram); attach the template to the wall
at the required height specied earlier
and level it (Fig. 4).
Fig. 4

24
TECHNICAL PASSPORT ENGLISH
Cooker hood
6.5 Mark and drill 2 holes at points
A and B with a drill bit Ø 7 mm (depth
40 mm).
6.6 Insert the dowels into the
drilled holes and screw in countersunk
screws 4.5x40 at points A and B, so that
the distance between the wall and the
head of the screw is 5 mm.
6.7 Hang the turbofan unit using
the screws at support points A and B.
6.8 If necessary, install the air duct
adapter (Ø150 x 120 mm) on the tube
of the hood.
6.9 Install the telescopic chimney
casing on the hood housing. Lift the top
panel of the casing with the bar to the
ceiling so that it covers the ventilation
duct, and mark 2 holes for fastening
(points E, F) in accordance with the slots
of the bar (Fig. 4).
6.10 Drill 2 holes Ø 7 mm, insert
dowels and fasten the bar with counter-
sunk screws 4.5x40 to the wall.
6.11 If the cooker hood will oper-
ate in the mode with air exhaust into
a kitchen chimney, install the duct of
selected diameter according to the in-
structions, providing sufcient tight-
ness.
Ø120 мм
Ø150 мм
6.12 If the hood will operate in the
recirculation mode, then the air duct is
not necessary. It is necessary to install
the odor-absorbing carbon lter (op-
tional) on the T-shaped pin of a turbo-
fan lid.
6.13 Install the outer panel of the
chimney casing into the grooves on the
hood housing, and lift the inner one
upwards to align the mounting holes
with the bar and connect the sides with
2 pan-head screws 2.9x9.5 (Fig. 4).
6.14 Ensure that the cooker hood is
properly secure. Connect a power cord
to the mains power supply using a sock-
et. To provide additional protection in
case of power supply voltage variations,
connect the appliance using an addi-
tional 6А circuit breaker.

25
ENGLISH TECHNICAL PASSPORT
Cooker hood
226677
228844//332244
555500 // 778800
660000//990000
443300

26
TECHNICAL PASSPORT ENGLISH
Cooker hood
7. CONTROL OF THE COOKER HOOD
7.1 The cooker hood with the
mechanical switch has 3 fan speeds.
You can select low, medium or high-
speed mode depending on the cooking
evaporation output.
7.2 Switch the cooker hood on and
select an appropriate operation mode
prior to cooking. It is recommended
to increase the cooker hood operation
by 3-5 minutes after cooking. In this
way, the kitchen air will be cleaned of
residual fumes and odours.
7.3 On the bottom surface of
the housing there is a button switch
for selecting of operating mode and
switching on the light bulbs (Fig. 5).
0 – the fan is switched off.
1 – low power level
2 – middle power level
3 – high power level
Fig. 5
The switch (with the symbol of a
light bulb) is designed to turn on the
light bulbs in case of insufciently
illuminated cooktop.

27
ENGLISH TECHNICAL PASSPORT
Cooker hood
8.CLEANING AND MAINTENANCE
8.8 Replace (optional) carbon
lters used during recirculation mode
every 3 – 6 months depending on the
intensity of using of the cooker hood.
To install the lters on a T-shaped pin
of a turbofan lid, axial pressure and
clockwise rotation are required.
8.9 The cooker hood is equipped
with an LED lamps to illuminate a
cooktop. Before replacing the light
bulbs, switch the cooker hood off and
allow them to cool down.
Remove the lamp from the hood
housing by pulling it out and disconnect
the wire from the battery (Fig. 7).
Then, install a new one with the
same characteristics and insert the
lters.
8.1 CAUTION! Before cleaning,
switch the cooker hood off.
8.2 For external cleaning of
stainless steel cooker hood, use
special agents and follow the relevant
instructions.
8.3 Do not clean the cooker
hood with abrasive detergents, coarse
sponges or cleaning agents containing
soda ash, acids, chlorides or solvents.
8.4 When washing, avoid moisture
entering the conductive parts of
the cooker hood, and especially the
electronic control unit. After washing,
wipe all surfaces with a soft cloth.
8.5 You can use conventional glass
cleaning agents to clean glass surfaces.
8.6 Since an aluminium lter
becomes clogged with airborne grease
and dust, presoak it in hot water with
an effective detergent and wash every
1.5 - 2 months.
Changing the colour of the lter
after washing does not affect the
performance quality.
8.7 To remove the aluminium lter
(Fig. 6), press on the spring sliding part
and, pulling down, remove the lter
from the panel. Install the lter in the
reverse order/
Do not install lter after washing
until it is completely dry.

29
ENGLISH TECHNICAL PASSPORT
Cooker hood
Manufacturers:
CIARKO Spółka z ograniczoną odpowiedzialnością Sp.K.
38-500 Sanok, ul.Okulickiego 10, Polska
Importers:
LLC «MG Rusland», 141400
Moscow region, Khimki, Butakovo, 4
The manufacturer reserves the right to make any changes to design, outside
appearance and scope of supply of appliance.
/