Page is loading ...

81-11202
TOOLS NEEDED
10mm Socket Allen Wrench
COMPONENTS & HARDWARE
# QTY # QTY
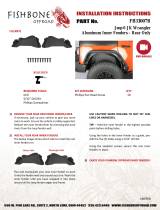
A 1 Driver Side Inner Fender B 1 Passenger Side Inner Fender
C 10 M6x16mm Allen Head Bolt D 2 M6 Flange Nut
E 10 M6 Flat Washer F 2 Speed Clip
California Proposition 65 Warning!
This product may contain one or more chemicals known to the State of California to cause cancer and birth
defects or other reproductive harm. For more information
g
o to www.P65Warnin
g
s.ca.
g
ov.
A B
C D E F
Installation Instructions
Front Inner Fender
Part#: 81-11202
FITS: 07-18 Jeep Wrangler JK
Page 1
Thank you for purchasing our Inner Fender. Please take a few minutes to read and thoroughly familiarize yourself
with the installation procedures in this manual. Following the steps will save you time and help reduce mistakes.
Once the instructions are reviewed, if you feel that you are not capable of safely installing the parts seek the help of a
qualified installation expert to help you complete the job. For Technical assistance call 866-988-8348
IMPORTANT NOTICE and DISCLAIMER:
Modification of your vehicle may create a dangerous condition which could cause property damage to
personal property or serious bodily injury. The buyer hereby expressly assumes all risks associated with
any such modifications.
The Manufacturer of this product will not accept responsibility for personal injury or property damage
arising from the failure of any parts manufactured or sold by Paramount Automotive or any of its agents.

81-11202
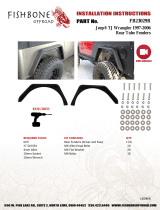
Step 1.
Remove plastic fastener with slot head screw driver as shown above.
Removing Factory Fender
Step 2.
Using a 10 mm socket remove the 5 bolts indicated as shown above. Using Christmas tree clip removal tool
(not supplied) or similar tool remove any remaining factory mounting clips. (NOTE: set aside factory hardware
and flares if you intent to reinstall the factory wheel well liner. See last section for further details)
Page 2

81-11202
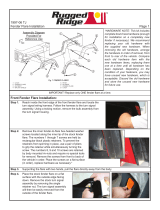
Step 3.
Disconnect turn signal harness by firmly pressing down on the Mate-n- lock plug.
Take hold of the front part of the flare and firmly pull up to release the hidden factory mounting clips as shown
above. Move to the center of the flare then rear of the flare pulling firmly up and back. You will hear a clicking
sound as the clips are released as shown above. Repeat steps 1-3 above for other side.
Removing Factory Fender Continued
Installing Front Inner Fender
Page 3
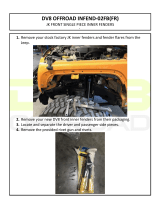
Step 1.
While holding the inner fender in place using a white
marker mark the area for drilling as shown. Remove
inner liner.
Step 2.
Using the previously marked location as a guide drill
a hole on those locations. Use a 3/8 drill bit as
shown.

81-11202
Step 4.
Place inner fender back onto vehicle. Line up the
holes in the inner fender with the holes on the vehicle
and previously drilled holes. Place a M6x16mm Allen
head bolt with supplied M6 flat washer through the
hole in the inner fender onto the vehicle as shown.
Finger tighten only.
Step 3.
Locate and install supplied speed clip over the
previously drilled hole as shown. Line up the hole in
the speed clip with the previously drilled hole.
Installing Front Inner Fender Continued
Step 5.
Place a supplied M6x16mm Allen head bolt with
supplied M6 flat washer through the hole in the inner
fender and through the previously drilled holes. Place
a supplied M6 flange nut at the end of bolt. Tighten
down using a 10mm socket. Tighten down all
hardware. Reinstall fenders back onto vehicle.
Repeat step 1-7 for other side.
Page 4
This completes the installation.
/