Page is loading ...

Always turn water OFF before disassembling the faucet. Open faucet handles to alleviate water pressure to
insure that COMPLETE water shut-off has been accomplished.
Before turning water on during either rough-in or trim-out, make sure the cartridge retainer nut is in place. The cartridge and cartridge retainer nut
were properly installed and tested before leaving the factory. Although it is unlikely, it is nevertheless possible that through the handling of the
faucet by any number of persons the cartridge retainer nut may not be properly installed. This should be carefully checked at time of rough-in and
trim-out. If the cartridge retainer nut is not properly installed, water pressure could force the cartridge out of the faucet body. Personal injury or
water damage to the premises could result.
CAUTION:
CAUTION:
Avant de démonter la vanne, FERMEZ tourjours l'eau. Ouvrez les deux manettes des vannes afin de déten-
dre la pression de l'eau, ceci afin d'êytr sûr que l'eau COMPLETEMENT fermée.
Avant d'ouvrir l'eau soit pendant la pose de la plomberie brute ou pendant la pose de la garniture, assurez-vous que l'écrou de retenue de la car-
touche est en place. La cartouche et l'écrou de retenue ont été correctement installés et testés avant de quitter l'usine. Bien que peu probable, il
est néanmoins possible que comme la vanne a été manipulée par plusieurs personnes, l'écrou de retenue ne soit pas correctement serré. Ceci
devra étre soigneusement vérifié lors de la pose de la plomberie brute ou lors de la pose de la garniture. Si l'écrou de retenue de la cartouche
n'est pas correctement instllé, la pression de l'eau pourrait déloger la cartouche du bâti. Ceci pourrait causer des blessures corporelles ou des
dégats par l'eau.
INSTALLATION INSTRUCTIONS
INSTRUCTIONS D'INSTALLATION
MB074D
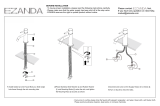
TWO-HANDLE LAVATORY FAUCETS
ROBINETS DE LAVABO A DEUX POIGNEES
Equipped with "Flow-Rator Aerator.
Pourvus du gazéigicateur "Flow-Rator".
ACRYLIC KNOB
HANDLES
POIGNEES EN
ACRYLIQUE
TRANSPARENT
HANDLE KNOB
BOUTON DE
POIGNEE
MOUNTING
NUT/WASHER
ECROU/RONDELLE
DE MONTAGE
UNION NUT
ECROUS UNION
SUPPLIES
(NOT FURNISHED)
ALIMENTATIONS
(PAS FOURNIES)
LIFT ROD
TIGE DE
LEVAGE
ESCUTCHEON
ROSACE
ESCUTCHEON GASKET
JOINT DE ROSACE
SHORT LEVER
HANDLE
LEVIER DE
POIGNEE COURT
4"
1-1/4"
3-1/4"

To Install
MB074D
CARTRIDGE
STEM
TIGE DE
CARTOUCHE
CARTRIDGE
CARTOUCHE
BODY
BATI
HANDLE
SCREW
VIS DE POIGNEE
HANDLE
KNOB KIT
TROUSSE DE
BOUTON DE
POIGNEE
HANDLE KNOB
INSERT KIT
TROUSSE DE
COUVERCLE DE
POIGNEE
HANDLE
SCREW
VIS DE POIGNEE
HANDLE KNOB
BOUTON DE
POIGNEE
HANDLE
KNOB KIT
TROUSSE DE
BOUTON DE
POIGNEE
CARTRIDGE
NUT
ECROU DE
CARTOUCHE
REPLACEMENT
CARTRIDGE
CARTOUCHE DE
REMPLACEMENT
ESCUTCHEON
PLUG
BUTTON
BOUTON DE
BOUCHON
DE ROSACE
ESCUTCHEON
ROSACE
ESCUTCHEON
GASKET
JOINT
DE ROSACE
FLOW-RATOR
AERATOR
GASEIFICATEUR
"FLOW-RATOR"
MOUNTING
NUT/WASHER
ECROU/RONDELLE
DE MONTAGE
TAILPIECE
NUT
ECROU DE
RACCORD
HANDLE KNOB
INSERT KIT
TROUSSE DE
COUVERCLE DE
POIGNEE
ACRYLIC KNOB
HANDLE
POIGNEE EN
ACRYLIQUE
TRANSPARENT
INSERT
AND RING
CAPUCHON ET
ANNEAU EN "O"
HANDLE
SCREW
VIS DE
POIGNEE
SHORT
LEVER HANDLE
LEVIER DE
POIGNEE COURT
1. Be sure basin is clean and dry. Place faucet supplies down through basin holes.
Position faucet.
2. To fasten faucet on basin: Adjust the position of the faucet on the basin to best accom-
modate bowl size. From under the sink, place the mounting nut/washers on the faucet
supplies, large side up. Thread on mounting nut/washers by hand. Check faucet posi-
tion. Align and match escutcheon and escutcheon gasket together. Make final tighten-
ing of the mounting nut/washers by hand.
Pour Installer
1. Assurez-vous que la surface du lavabo est séche et propre. Passez les alimentations
du robinet à traverse les trous du lavabo. Mettez le robinet en place.
2. Afin de fixer le robinet sur le lavabo: régiez la position du robinet sur le lavabo, afin de
mieux accomoder la grandeur de la cuvette. Par le dessous du lavabo, placez
l'écrou/les rondelles de montage sur les alimentations due robinet, le bord le plus large
vers le haut. Vissez l'écrou/les rondelles de montage àla main. Vérifiez l'emplacement
du robinet. Alignez la rosace et le joint de rosace ensembles. Faites le serrage défini-
tif de l'écrou/les rondelles à la main.
To Assemble
CAUTION: Failure to follow these instructions can cause the cartridge to be damaged beyond repair.
1. Turn cartridge stem LEFT (counterclockwise) to ON, (internal hole in piston lined up with hole in shell). Push the
cartridge straight down into the body. Fit the key on the cartridge into the notch in the body. This will position the
handle stop on the cartridge to the side.
2. Screw down the cartridge nut. Start by hand and DO NOT CROSS THREAD. Tighten firmly with wrench.
3. CAUTION: Make sure that the other cartridge on the opposite side is completely assembled into the faucet.
4. Now the handle knob can be installed. Match the flats in the handle knob with the flats on the cartridge stem and
drop the handle knob down on the stem.
5. Screw in the handle screw, snug. Do not overtighten. Press the handle knob insert into place.
CAUTION: Shut OFF the faucet handles before opening the water supplies to prevent accidental flooding.
To Disassemble
CAUTION: Turn OFF BOTH water supplies and open BOTH faucet handles to allevi-
ate water pressure to insure that COMPLETE water shut-off has been accomplished.
These instructions are the same for both the hot and cold sides. Parts and procedures are the same
for each side.
1. Use a flat bladed instrument to pry off the handle knob insert (on knob handles).
2. Use a screwdriver and remove the handle screw.
3. Pull handle up and off.
4. Unscrew the cartridge nut. Use a wrench.
5. Using pliers, pull cartridge straight up by the cartridge stem.
Flushing Instructions
IMPORTANT: Pipe chips, sand, stones, and other solid objects can damage the sealing
surface of the faucet cartridge and cause a leak. To avoid damage, DO NOT OPERATE
VALVE until you have followed these instructions:
1. After installing and connecting your new faucet, turn on both supply valves and look for
any leaks.
2. At the valve turn on both hot and cold water and allow the water to run for 15 seconds.
3. Turn off the water, unscrew the aerator from the end of spout and clean any debris from
the cone screen.
4. Replace the aerator.
Instructions Pour Rincer Le Robinet
IMPORTANT: Des débris de tuyauterie, du sable, de la pierraille et autres solides que
l'on retrouve dans le système de plomberie de nouvelles constructions peuvent endommager
la surface éntanche de la cartouche du robinet et causer des fuites. Pour éviter de tels dégats,
NE PAS FAIRE FONCTIONNER LA VALVE avant de suivre les instructions suivantes.
1. Aprés avoir installé et raccordé votre nouveau robinet, ouvrir les deux soupapes d'alimen-
tation et vérifier s'il y a des fuites.
2. À la soupape, ouvrir l'eau chaude et groide et laisser couler pendant 15 secondes.
3. Couper l'eau, dévisser l'aérateur du bout du bec et enlever les débris du tamis conique.
4. Replacer l'aérateur.

Pour Assembler
ADVERTISSEMENT: Le fait de ne pas suivre ces instructions pourrait endom-
mager la cartouche au point qu'elle ne puisse être réparée.
1. Tournez la tige de la cartouche vers la GAUCHE (sense contraire des aiguilles d'une
montre) jusqu'a la position ouverte (le trou a l'intérieur du piston est aligne avec le trou
dans la cartouche). Poussez la cartouche au fond du bâti. Ceci mettra l'arrêt de la
poignée en place dans le côté de la cartouche.
2. Vissez l'écrou de la cartouche. Commencez à serrer à la main et N'ECRASEZ PAS
LES FILETS. Serrez fermement avec une paire de pinces.
3. AVERTISSEMENT: Assurez-vous que l'autre cartouche du côté opposé est
entierement assemblée dans le robinet.
4. Il est maintenant possible d'instller le bouton de la poignée. (Note: pour les modéles a
poignée stylises, voir l'illustration). Faites en sorte que les bords plats du bouton de la
poignée correspondent avec les bords plats de la tige de la cartouche et laissez
retomber le bouton de la poignée sur la tige. NOTE: le numero 90227 et 90228 sont
donnés uniquiement à titre de référence pour l'installation. Pour le remplacement de la
poignée veuillez vous référrer à la liste des pièces de rechange.
5. Serrez fermement la vis de la poignée. Ne serrez pas trop. Avec une pression du doigt
mettez le couvercle de la poignée en place.
AVERTISSEMENT: Avant d'ouvrir les alimentations d'eau, fermez les poignées du
robinet ceci afin d'éviter une inondation accidentelle.
Pour Demonter
AVERTISSEMENT: Fermer les DEUX alimintations d'eau et ouvrez les DEUX poignées du robinet, afin de détendre la pres-
sion de l'eau et de vous assurer que l'eau a été COMPLETEMENT fermée.
Ces instructions s'appliquent à la fois aux côté chaud et froid. Les piéces et les procedures sont les mêmes pour chaque côté.
1. Avec la lame d'un cuteau ôtez le couvercle de la poignée.
2. Otez la vis de la poignée avec un tounevis.
3. Otez le bouton de la poignée, la poignée triangulaire deluxe, ou la poignée stylisée en tirant vers le haut.
4. Dévissez l'écrou de la cartouche en utilisant une paire de pinces.
5. Retirez la cartouche en prenant la tige de la cartouche entre des pinces et tirez vers le haut.
Lavatory Lift Rod and Waste Assembly
1. Thoroughly clean around drain opening in lavatory sink. Apply 1/4 inch bead of
plumber's putty (not furnished) around the bottom side of drain seat (as shown).
2. Slip upper drain body down through the drain opening and screw onto the lower
drain body.
3. Position the drain body (with pivot rod opening extending rearward) and tighten
mounting nut until the drain body is snug. Wipe excess plumber's putty from the
drain seat area.
4. Position drain plug in either of the following ways:
A. VANDALPROOF - This design is to prevent unauthorized removal of
the drain plug. Unscrew the pivot nut and remove the pivot rod. Inside
the drain body position the pivot rod through the drain plug hole as
shown in the illustration below. Screw the pivot nut back on the drain
body. DO NOT OVERTIGHTEN.
B. EASY REMOVAL - This design is for quick removal of drain plug for
cleaning. Just drop in the drain plug as shown in the illustration below.
5. Install lift rod, with knob attached, into top of spout as shown. Secure lift rod strap
to bottom end of lift rod as shown. With pivot rod in the down position, assemble
strap to pivot rod using the spring clip. The strap will have to be bent to reach the
pivot rod on some installations. Adjustment may be required so lift rod clears spout
tube and connection.
6. With the drain plug in full open position, adjust lift rod and knob to clear faucet and
tighten lift rod strap screw.
HANDLE LUG
ERGOT DE POIGNEE
HANDLE STOP
ARRET DE POIGNEE
CARTRIDGE
STEM
TIGE DE
CARTOUCHE
CARTRIDGE
STEM
TIGE DE
CARTOUCHE
HANDLE
STOP
ARRET DE
POIGNEE
KEY
CLE
NOTCH
ENCOCHE
FRONT
AVANT
VANDALPROOF
HOLE
PLUMBER'S
PUTTY (NOT
FURNISHED)
SEAT
DRAIN PLUG
MOUNTING
WASHER
BOTTOM
GASKET
O-RING
MOUNTING
NUT
LIFT ROD
STRAP
LIFT ROD
STRAP SCREW
FAUCET
LIFT ROD
AND KNOB
SPRING CLIP
PIVOT ROD
PIVOT NUT
1-1/4"
DRAIN
BODY
2-1/16"
8-3/8"
PIVOT ROD VANDALPROOF
POSITION
FOR EASY
REMOVAL
PIVOT ROD
/