Page is loading ...

840073500
Coffeemaker Safety........................ 2
Parts and Features.......................... 3
Using Your Coffeemaker ................ 4
Cleaning Your Coffeemaker.......... 5
Troubleshooting.............................. 7
Customer Service.......................... 8
In USA: 1-800-572-3331
In Canada: 1-800-267-2826
Coffeemaker

2
IMPORTANT SAFEGUARDS
SAVE THESE INSTRUCTIONS!
Coffeemaker Safety
When using electrical appliances, basic
safety precautions should always be
followed to reduce the risk of fire, electric
shock, and/or injury to persons, including
the following:
1. Read all instructions.
2. Do not touch hot surfaces. Use handles
or knobs. Care must be taken, as burns
can occur from touching hot parts or
from spilled, hot liquid.
3. To protect against electric shock, do not
place cord, plug or coffeemaker in water
or other liquid.
4. Close supervision is necessary when any
appliance is used by or near children.
5. Unplug from outlet when the coffeemaker
is not in use and before cleaning. Allow to
cool before putting on or taking off parts
and before cleaning the appliance.
6. Coffeemaker must be operated on a flat
surface away from the edge of counter
to prevent accidental tipping.
7. Do not operate any appliance with a
damaged cord or plug, or after the
appliance malfunctions or is dropped or
damaged in any manner. Call our
toll-free customer service number for
information on examination, repair or
electrical or mechanical adjustment.
8. The use of accessory attachments not
recommended by Hamilton Beach/
Proctor-Silex, Inc. may result in fire,
electrical shock or personal injury.
Consumer Safety Information
9. Do not use outdoors.
10. Do not let cord hang over edge of
table or counter or touch hot surfaces,
including stove.
11. The carafe is designed for use with this
coffeemaker. It must never be used on a
range top or in a microwave oven.
12. Do not set a hot carafe on a wet or cold
surface.
13. Do not use a cracked carafe or one with
loose or weakened handle.
14. Do not clean carafe with abrasive
cleansers or steel wool pads, or other
abrasive material.
15. Be certain carafe lid is securely in place
during brew cycle and when pouring
coffee, do not use force when placing lid
on carafe.
16. Do not place coffeemaker on or near a
hot gas or electric burner or in a heated
oven.
17. To disconnect coffeemaker, turn
controls to OFF, then remove plug from
wall outlet.
18. Warning: To reduce the risk of fire
or electric shock, do not remove the
bottom cover. No user serviceable parts
are inside. Repair should be done by
authorized service personnel only.
19. Do not use appliance for other than
intended use.
This appliance is equipped with a grounded-
type 3-wire cord (3-prong plug). This plug
will only fit into an electrical outlet made for
a 3-prong plug. This is a safety feature. If
the plug should fail to fit, contact an electri-
cian to replace the obsolete outlet. Do not
attempt to defeat the safety purpose of the
grounding pin, part of the 3-prong plug.
This appliance has a short cord to reduce
hazards of becoming entangled or tripping
over a longer cord. A grounded-type 3 wire
extension cord may be used if the electrical
rating of the extension cord is equal to or
greater than the rating of the coffeemaker.
Use only an extension cord rated 15 amperes
or greater. Care must be taken to arrange the
extension cord so that it will not drape over
countertop or tabletop where it can be pulled
on by children or tripped over.
To avoid an electrical circuit overload,
do not use another appliance on the same
circuit with your coffeemaker.

3
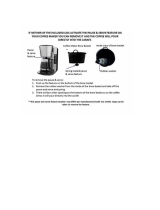
Parts and Features
1. Reservoir
2. Carafe
3. Keep Hot Plate
4. Swing Open Filter Basket
Removable Filter Basket
Swing Open Filter Basket Holder
(not removable)
Tab
Slot
Removable Water Reservoir

4
Using Your Coffeemaker
To Make Coffee
1. Plug in coffeemaker.
2. Before first use, wash the carafe,
then run one full carafe of clean
water through a complete cycle by
following steps 7 through 11.
3. To make coffee, swing open filter
basket holder and remove filter
basket. Place disposable paper filter
in filter basket. Use a good quality
cupcake (basket) style filter, 8 to 12
cup size. A permanent filter may
also be used.
4. For each cup of coffee being made,
place one level measuring table-
spoon of ground coffee into filter.
5. Place the filter basket in the filter
basket holder by aligning tab and slot.
6. Close filter basket holder, making
sure it is securely in place.
7. Fill carafe with the desired amount
of cold water. Flip open reservoir
cover and pour into reservoir or lift
out the removable reservoir and fill
with water to the desired level.
Carefully replace the removable
reservoir in the coffeemaker. Make
sure it is fully seated for proper
water flow. Flip reservoir cover
down to close.
8. Place carafe with carafe lid
attached on Keep-Hot Plate.
9. Turn coffeemaker on.
10. The coffeemaker will shut off in
two hours.
11. When finished turn off and unplug.
How to Brew Good Coffee
Quality coffee comes from quality
ingredients. For the best coffee, you
should start with freshly ground coffee
from freshly roasted beans. The beans
can be purchased and stored in an
airtight container in the freezer. Just
prior to brewing, remove the amount
needed and grind the beans. Once the
bean is broken, the intense rich flavor
begins to deteriorate.
If using the blade-type coffee grinder,
shake it occasionally during grinding to
redistribute the whole beans for a more
uniform grind. Experiment to find the
right grind for your coffeemaker and
taste. If the beans are ground too finely
it will produce a bitter taste; if ground
too coarsely the coffee will taste weak
and watery.
Some specialty coffees recommend
using more than one tablespoon of
ground coffee per cup. Your new
coffeemaker is designed to brew good
quality coffee using less amounts of
ground coffee. One level tablespoon
of ground coffee per cup is recom-
mended. Of course, the amount of
ground coffee used depends upon
your personal preference.
The quality of your drinking water will
affect the flavor of your coffee. If you
do not drink water straight from the
tap, do not use it to make coffee. If
your water has an off taste or smell,
or if you have extremely hard water,
use bottled drinking water or filtered
water to make coffee. If the water is
from the tap, it should be freshly drawn
and cold for the best coffee flavor.
The amount of coffee to water depends
upon personal preference. One table-
spoon of ground coffee per cup is
recommended.
Automatic coffeemakers generally use
a 5 ounce cup size. The coffeemaker’s
carafe and reservoir are marked in
“cups” for easy measuring.

5
Coffeemaker Features
Pause ’N Serve
This feature allows you to pour a cup
of coffee before the entire brew cycle
has completed. By removing the
carafe, the flow of coffee from the
bottom of the filter basket will stop.
CAUTION: The carafe should be
replaced within 20 seconds. The
flow of coffee will resume when
carafe is returned to the Keep-Hot
Plate.
Automatic Shutoff
The Automatic Shutoff feature shuts off
the Keep-Hot Plate 2 hours after brew
cycle begins. Always turn coffeemaker
OFF and unplug when finished.
10-Cup Removable Water
Reservoir
Wash before first use. Hand wash or
place in top rack of household auto-
matic dishwasher. The 10-cup reservoir
can be removed for easy filling or
occasional washing. Simply flip open
reservoir cover and raise the removable
reservoir handle. Lift out the removable
reservoir and fill with water to desired
level. Carefully place removable reser-
voir back into the coffeemaker’s
reservoir. Make sure the removable
reservoir is fully seated for proper water
flow. When using the removable reser-
voir it is only possible to make a 10
cup pot of coffee, as the water level
marks indicate. To make a full 12 cup
carafe remove the removable reservoir
and fill the coffeemaker’s reservoir.
Cleaning Your Coffeemaker
To Clean the Inside of the Coffeemaker
NOTE: To prolong the life of your
coffeemaker, periodic cleaning is rec-
ommended. In areas with hard water
more frequent cleaning is necessary.
1. Place empty carafe on Keep-Hot
Plate and drop the empty filter
basket into the coffeemaker. Firmly
close the filter basket holder.
2. Pour one pint of plain white vinegar
into the reservoir.
3. Plug unit into electrical outlet and
turn ON.
4. After 30 seconds turn OFF.
5. Wait 30 minutes to allow the vinegar
to clean. Then turn ON again. When
the brew cycle is finished, turn OFF.
6. Empty carafe and rinse. Pour one
carafe of cold tap water into the
reservoir. Place carafe on Keep-Hot
Plate.
7. Turn ON. When the brew cycle is
finished, empty the carafe. Repeat
this process with one more carafe
of cold tap water.
8. Turn OFF when complete.
9. Wash carafe and filter basket before
making a beverage.

6
To Clean the Coffeemaker Parts
Carafe Safety Precautions
• Do not use a cracked carafe or a
carafe having a loose or weakened
handle.
• This carafe is designed to be used
only on the Keep-Hot plate of your
coffee-maker. Do not use on a gas
or electric rangetop, or in a
microwave or conventional oven.
• To avoid breakage, handle carafe
with care. Avoid impact. Glass will
break as a result of impact. Use
care when filling with water to avoid
hitting faucet.
• Do not place hot carafe on cool
or wet surface. Allow to cool before
washing or adding liquids.
• Do not set empty carafe on a hot
heating surface.
• Do not clean with steel wool pads,
abrasive cleanser or any other
materials that may scratch.
• Do not place hands inside carafe.
When handling, be careful if wearing
any hand jewelry, especially diamond
rings. Jewelry can scratch the
glass, which increases the possibility
of breakage.
• Do not bump, scratch, or boil dry.
• Discard carafe if it is cracked,
scratched, or heated while empty
for an extended period of time.
• To avoid accidents, do not pour in
the direction of people.
• If stirring in the carafe, use only
wooden, plastic, or rubber utensils.
Do not use metal utensils.
• Follow the above safety precautions
carefully to avoid serious burn injuries
which may result if breakage occurs
while carafe holds heated liquids.
This symbol reminds you that glass is fragile and can break which could
result in personal injury.
This symbol alerts you to the potential danger for personal injury if you
fail to read and follow these safety precautions.
1. Unplug coffeemaker and allow to
cool before cleaning.
2. Wipe keep-hot plate with a clean,
damp cloth. Do not use abrasives.
3. Occasionally wipe the water spreader
area, located above the filter basket,
with a clean, damp cloth.
4. To remove the carafe lid, push the
hinge part of the lid to one side, then
gently but firmly push down the other
side. The pin will release from the
hinge. Then remove lid.
5. The carafe, carafe lid and removable
filter basket may be washed in the
top rack of household automatic
dishwasher or in hot, soapy water.
Rinse and dry. The filter basket
holder is not a removable part.
6. To remove stains on the carafe,
scrub with baking soda or a mild
cleanser. For hard to remove stains,
fill the carafe with hot tap water and
add 2 tablespoons of automatic
dishwasher detergent. Let this sit
overnight, then wash and rinse.
7. All other outside surfaces of the
coffeemaker can be cleaned with
a clean, damp cloth.

7
T roubleshooting
QUESTION
Doesn’t brew or
won’t heat.
Filter Basket or
Pause ’N Serve
overflows.
Longer than
normal brew time.
ANSWER
• Check to be sure power cord is firmly plugged
into a live power outlet.
• The automatic shutoff feature turns the coffee-
maker off two hours after making the coffee.
Turn coffeemaker ON.
• Excessive amounts of ground coffee will clog
the filter basket. We recommend one level
tablespoon of ground coffee per cup.
• Make sure coffee is not ground too finely. This
will clog the filter. Permanent filters are more
likely to clog than paper filters.
• Be sure to use a good quality cupcake or
basket style filter. The sides of the filter should
be upright against side of filter basket to avoid
filter collapsing.
• When using Pause ’N Serve, hot water continues
to flow into the filter basket and may overflow if
the carafe is not returned to the Keep-Hot plate
within 20 seconds.
• Make sure that carafe is fully seated on the
keep-hot plate.
• Filter basket holder must be securely closed.
• Mineral deposits can build up in the pump of
your coffeemaker. We recommend periodic
cleaning of the inside of your coffeemaker.
More frequent cleaning may be necessary,
depending upon the hardness of your water.
See “To Clean the Inside of Your Coffeemaker.”
• If using the removable reservoir, make sure the
O-ring on bottom is attached and reservoir is
firmly seated in coffeemaker’s reservoir.
Most questions you may have about your new coffeemaker can be easily
answered. This handy guide lists some common coffeemaker problems and tells
you how to correct them. If you need further assistance, please call our toll-free
customer service number listed on the front cover of this booklet, and found on
the back of the coffeemaker.

8
Web site address: www.commercial.hamiltonbeach.com
H
AMILTON BEACH PROCTOR-SILEX,INC.
P
ROCTOR-SILEX CANADA,INC.
263 Yadkin Road
Southern Pines, NC 28387
Picton, Ontario K0K 2T0
8/00
840073500
Customer Service
If you have a question about your coffeemaker, call our toll-free customer service
number. Before calling, please note the model, type, and series numbers and fill
in that information below. These numbers can be found on the bottom of your
coffeemaker. This information will help us answer your question much more
quickly.
MODEL: ______________ TYPE: _______________ SERIES: ________________
TWO-YEAR LIMITED WARRANTY
Hamilton Beach/Proctor-Silex, Inc. warrants this appliance to be free from defects in
material and workmanship for a period of two (2) years from the date of original purchase,
except as noted. There is no warranty with respect to the following, which may be supplied
with this appliance: glass parts, glass containers, cutter/strainer, nonstick soleplate and/or
nonstick cooking surfaces. This warranty extends only to the original consumer purchaser
and does not cover damage from abuse, neglect, or any other use not found in the printed
directions. HAMILTON BEACH/PROCTOR-SILEX, INC. EXPRESSLY DISCLAIMS ANY
AND ALL IMPLIED WARRANTIES, INCLUDING WARRANTIES OF MERCHANTABILITY
AND FITNESS FOR A PARTICULAR PURPOSE. ANY LIABILITY HEREUNDER IS
EXPRESSLY LIMITED TO THE REPAIR OR REPLACEMENT OF A DEFECTIVE PRODUCT
OR AN AMOUNT EQUAL TO THE PURCHASE PRICE PAID THEREFOR, AND ALL CLAIMS
FOR SPECIAL AND CONSEQUENTIAL DAMAGES ARE HEREBY EXCLUDED. Some
states or provinces do not allow this exclusion or limitation of incidental or consequential
losses, so the foregoing disclaimer may not apply to you. If you have a claim under this
warranty, DO NOT RETURN THE APPLIANCE TO THE STORE! Please call our CUSTOMER
SERVICE NUMBER. (For faster service please have model, series, and type numbers ready
for operator to assist you.)
CUSTOMER SERVICE NUMBERS
In the U.S. 1-800-572-3331
In Canada 1-800-267-2826
Web site address: www.commercial.hamiltonbeach.com
KEEP THESE NUMBERS FOR FUTURE REFERENCE!
This warranty gives you specific legal rights, and you may also have other legal rights
which vary from state to state, or province to province.
/