Italia TR6304 Installation guide

Type
Installation guide
1/2
Installation & Care Guide
By DGB Enterprises LLC
www.italiabath.com
Italia Robe Hook
Phillips Screwdriver
1 x Allen Wrench
2 x Plastic Wall Anchors
2 x Mounting Screws
1 x Mounting Bracket Plate
(Located pre-installed in item. Must
be removed prior to installation).
1 x Set Screws
(Located pre-installed in item. Must be loosened
to remove the mounting plate prior to installation).
Tools required:
Hardware Included:
Image featured: VE2702
Power Drill ¼” Drillbit
Tile / Masonry Stone Drillbit
if Drilling Into Tile or Stone
(Masonry wall anchors not included)
Hammer
Level Tape Measure Pencil
Remove mounting plate from back of robe hook.
a. Use the provided allen wrench to loosen set screw on
bottom of the robe hook to remove the mounting plate.
Level and mark position of the robe hook on the wall.
a. If mounting into ceramic or tile, place masking tape on the
mounting areas before marking the location to prevent the
drill from slipping and damaging the tile.
1 2
Tools & Hardware
Installation Instructions
2/2
Use a soft cloth or sponge with water, then dry with a soft cloth. Avoid detergents, abrasive cleaners, solvents, steel and bronze wool.
Visit https://youtu.be/2NOdXiNzMic for an easy to follow installation video.
Contact i[email protected] for questions or further information
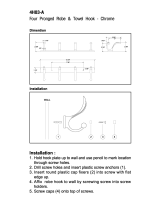
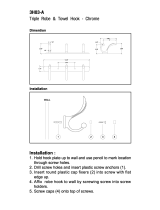
Drill holes in using ¼” drillbit.
a. Mounting into wood studs is recommended;
b. If mounting into tile use a masonry stone drillbit.
Insert provided anchors if mounting into drywall. Anchors
not necessary if mounting into wood studs.
a. Optional: Use a dab of caulking on the wall anchors for
a better hold;
b. If drilling into tile use masonry wall anchors (not included).
Install the mounting plate with the provided screws.
a. The ange side should be facing out;
b. Optional: Use a dab of caulking on the back of each
mounting disc for a better hold.
Place the robe hook over the mounting plate with the set
screw on the bottom.
Use the provided allen wrench to adjust the set screw to
lock into place with the mounting bracket.
4
5 6
7 8
Place mounting plate on the wall and mark position of
the holes in the mounting plate.
3
Care Instructions
  • Page 1 1
  • Page 2 2

Italia TR6304 Installation guide

Type
Installation guide

Ask a question and I''ll find the answer in the document

Finding information in a document is now easier with AI