Page is loading ...

DO NOT RETURN YOUR TABLE TO THE STORE
Before visiting your local retailer, call our customer
service department at 1-866-994-6390 from 9:00 am
to 5:00 pm Eastern time, Monday through Friday.
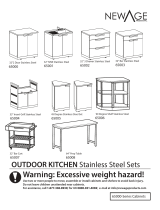
Model NO: CGWM-094
OUTDOOR
PREP TABLE
Customer Service Hotline
1-866-994-6390

SAFETY INFORMATION
CARE AND MAINTENANCE
2
WARNINGS AND USAGE
-----------------------------------------------------------------------------------
IMPORTANT: ALL INSTRUCTIONS AND SAFEGUARDS IN THIS SECTION MUST BE FOLLOWED TO
PREVENT DAMAGE AND/OR INJURY.
• Not for permanent installation.
• For outdoor use only
• Use caution with all electric appliances, tools, extension cords and lights on and around table.
• Surface can become hot in direct sun or high temperatures.
• Maximum top weight load of 50 LBS
• Maximum shelf weight load of 30 LBS
• Use only on level surfaces.
• Before use ensure wheels are height adjusted so that the table does not rock when in use.
• Lock wheels when in use.
• Do not allow children to climb the product.
CALIFORNIA PROPOSITION 65 WARNING:
• WARNING: This product can expose you to lead, which is known to the State of California
to cause cancer and birth defects or other reproductive harm. For more information go to
www.P65Warnings.ca.gov
CLEANING
-----------------------------------------------------------------------------------
Painted and Plastic surfaces
Wash with mild detergent or non-abrasive cleaner and warm water.
Stainless steel surfaces
Wash with mild detergent and warm soapy water or use a stainless steel cleaner. Wipe dry with a soft cloth
after each use. Wash only in the direction of the stainless brushed finish to avoid damage.
Stainless steel can rust under certain conditions. This can be caused by acidic marinades, chlorine, saltwater,
exposure to coastal climates, other natural elements, or improper cleaning tools such as wire or steel wool.

WHAT’S IN THE BOX
2
(x4)
(x1)
(x1)
(x1)
(x1)
(x2)
(x2)
(x2)
(x1)
(x1)
(x1)
(x1)
(x1)
(x1)
(x1)
(x32) (x1)
(x2)
1
3
4
5
6
7
8
11
10
9
12
13
14
15
16
AA BB
PART PARTDESCRIPTION DESCRIPTIONQTY QTY
3
Counter Top
Assembly
Garbage Bag
Ring
Garbage Bag
Support
Side Panel
Name Plate
Left Back
Leg (LB)
Shelf
Left Front
Leg (LF)
Right Back
Leg (RB)
Paper Towel
Bar
Right Front
Leg (RF)
Towel
Bar End
Locking
Caster
Non-Locking
Caster
Screw Wrench
Tool
Hook
Rear
Support
COMPONENTS
-----------------------------------------------------------------------------------
HARDWARE AND TOOLS
-----------------------------------------------------------------------------------

EXPLODED VIEW
4

Assembly Tip: To avoid scratching prep table and to protect floor/patio surfaces, reuse cardboard packaging
and lay parts on top while assembling.
STEP 1
-----------------------------------------------------------------------------------
To create “screw assemblies” for future steps, install all 40 of the lock washers (BB) onto all 40 screws (AA).
Install locking casters (16) and non locking casters (8) on opposing ends as shown. Use the double-ended
open wrench (BB) to attach the 4 casters (16, 8) onto the bottom of each leg.
ASSEMBLY INSTRUCTIONS
Please be careful when handling components. Always wear work gloves during assembly and set up. Read
and follow all safety statements, warnings, assembly instructions and use and care instructions before
attempting to assemble and use. Before beginning assembly of product, make sure all parts are present.
Compare parts with package contents list and hardware contents list. If any part is missing or damaged, DO
NOT attempt to assemble the product.
Estimated Assembly Time: 1 hour
Tools required for assembly: (included) Wrench, (not included) Phillips Head Screwdriver (magnetic tip will be
helpful), Gloves
Screw Assembly
AA BB
ASSEMBLY PREPARATION
5
Included
Not Included

ASSEMBLY INSTRUCTIONS
STEP 2
-----------------------------------------------------------------------------------
Use screw assemblies to attach the middle portion of left back leg (4) (LB) and the right back leg (14) (RB) to the
shelf (13) as shown below.
• Note: it is important to not fully tighten the screws during initial assembly of the parts. Wait until
the counter top assembly is installed before fully tightening all screws on the cart.
• Note: Legs are punched with markings to indicate position for assembly, (LB, RB, LF, RF).
6
STEP 3
-----------------------------------------------------------------------------------
Use screw assemblies to attach the left front leg (5) (LF) and the right front leg (15) (RF) to the shelf (13).
2
2
2
2
x 2
x 4
x 2

ASSEMBLY INSTRUCTIONS
7
2
x 8
STEP 4
-----------------------------------------------------------------------------------
Use screw assemblies to attach side panels (3) to the left and right leg assemblies using four screws for each).
2
2
2
2
x 4
x 8

ASSEMBLY INSTRUCTIONS
8
STEP 5
-----------------------------------------------------------------------------------
Use screw assemblies to attach name plate (12) to the left front leg (5) (LF) and the right front leg (15) (RF).
Next use screw assemblies to attach the rear support (11) to the left back leg (4) (LB) and the right back leg
(14) (RB).
22
x 2x 2

STEP 6
-----------------------------------------------------------------------------------
Use screw assemblies to attach the garbage bag support (10) to the right leg assembly using the two
previously installed screws and the slotted upper holes. Then install two screws in the lower holes to secure in
place.
ASSEMBLY INSTRUCTIONS
9
22
x 2x 2

ASSEMBLY INSTRUCTIONS
10
STEP 7
-----------------------------------------------------------------------------------
Use screw assemblies to attach both of the towel bar ends (7) to the left leg assembly.
2
2
x 4

STEP 8
-----------------------------------------------------------------------------------
Install the paper towel bar (6) between the two towel bar ends (7) by flexing them slightly outward inserting bar
and releasing.
ASSEMBLY INSTRUCTIONS
11

STEP 9
-----------------------------------------------------------------------------------
Use screw assemblies to attach the counter top assembly (1) to the prep station base. Now tighten all
screw assemblies that have been installed throughout the unit.
ASSEMBLY INSTRUCTIONS
12
2
2
2
2
x 2
x 2

STEP 10
-----------------------------------------------------------------------------------
Install the tool hooks (2) by screwing them into the front edge of the counter top assembly (1). Place the
garbage bag ring (9) into the garbage bag support (10).
ASSEMBLY INSTRUCTIONS
13

CONNECTION INSTRUCTIONS
14
STEP 11
-----------------------------------------------------------------------------------
Once the completed prep table is in its’ desired location use the threaded posts of the casters (8, 16) to level
the table and lock nuts with the double-ended open wrench (BB) to hold the adjusted position.

STEP 18
-----------------------------------------------------------------------------------
Install a garbage bag by inserting the bag through the garbage bag ring (9) and then wrapping the open end of
the bag around the ring. Feed the bottom of the bag through the garbage bag support (10) and then place the
garbage bag ring (9), with the opening of the bag wrapped around it, into the garbage bag support (10).
STEP 19
-----------------------------------------------------------------------------------
Pull the bag from its’ bottom to ensure it is fully secured by the garbage bag ring (9) and garbage bag
support (10).
GARBAGE BAG INSTRUCTIONS
15

To register your Cuisinart product, please visit https://cuisinart.registria.com.
For FAQ’s and replacement parts, please contact us at [email protected].
For our consumer care department, please contact us at grilling@thefulhamgroup.com
or call 1-866-994-6390.
Model # CGWM-094
North American Distributor:
The Fulham Group
Newton, MA 02466
WARRANTY AND REPLACEMENT PARTS
1 Year Limited Warranty
PROOF OF PURCHASE is required to access this warranty program, which is in effect from the date of purchase.
Customers will be subject to parts, and shipping and handling fees if unable to provide proof of the purchase or after
the warranty has expired.
If you have any questions or problems, you can call our customer service department at 1-866-994-6390 from 9:00am
to 5:00pm EST, Monday through Friday for assistance.
This limited warranty applies to the functionality of the product ONLY. It does not cover cosmetic issues such as
scratches and dents, damage from abrasive or chemical cleaners or any tools used in the assembly or installation of
the table, surface rust, or the discoloration of stainless steel surfaces. Paint is not warranted and will require touch up.
RUST is not considered a manufacturing or materials defect.
This limited warranty will not reimburse you for the cost of any inconvenience, food, personal injury or property damage.
WARRANTY PROVISIONS
This warranty is non-transferable and does not cover failures due to misuse, improper installation or maintenance.
This warranty is for replacement of defective parts only. We are not responsible for incidental or consequential damages
or labor costs.
This warranty does not cover corrosion or discoloration after the prep table is used, or lack of maintenance, hostile
environment, accidents, alterations, abuse or neglect.
This warranty does not cover damage caused by abrasive or chemical cleaners, or any damage to other components
used in the installation or operation of the prep table.
Paint is not warranted and may require touch-up.
DISCLAIMER OF IMPLIED WARRANTIES; LIMITATION OF REMEDIES
Repair or replacement of defective parts is your exclusive remedy under the terms of this limited warranty.
Manufacturer will not be responsible for any consequential or incidental damages arising from the breach of either
this limited warranty or any applicable implied warranty, or for failure or damage resulting from acts of God,
improper care and maintenance, accident, alteration, replacement of parts by anyone other than
manufacturer, misuse, transportation, commercial use, abuse, hostile environments (inclement weather, acts of
nature, animal tampering), improper installation or installation not in accordance with printed manufacturer instructions.
For replacement parts, call our customer service department at 1-866-994-6390 from 9:00am to 5:00pm EST, Monday
through Friday for assistance.
16
/