Page is loading ...

More Power To The Pedal
Register your Byocycles electric bike to claim your
Five year extended warranty absolutely free
by completing the form on our website
www.byocycles.com
SEPTEMBER 2017
Owner’s Manual

Introduction
Thank You For Choosing A Byocycle Electric Bike.
To ensure your safety when riding, please read this manual carefully
before you make your rst journey.
The dealer you have purchased your ByoCycle from will have
performed a pre delivery inspection (PDI). This can be located on
page 21 of this manual.
Before riding your ByoCycle, it is advisable to check your tyres are
the right pressure and your brakes are in good working order. Both
of these will affect the quality of your ride. Please be aware that in
adverse weather conditions the braking and tyre performance will
decline, so please take extra care.
When riding your ByoCycle please observe the highway code, this is
not only for your safety but also the safety of other road users.
When cycling we recommend wearing a helmet and high visibility
clothing. We advise to use the bike lights at all times.
By following the steps laid out in this manual, you will prolong the
usage of your Byocycle as well as increasing your overall enjoyment.
We wish you many happy miles of cycling.
Regards
The ByoCycles Team
Page 2

Page 3
Table Of Contents
Contents ..............................................................................3
Legal Information ..............................................................4
Getting to Know Your Bike ...............................................6
Control and Equipment ................................................ 10
Battery Information ........................................................ 12
Battery Care .................................................................... 14
Looking After Your Bike .................................................. 16
Trouble Shooting ............................................................. 18
Warranty ........................................................................... 19
Extended Warranty ........................................................ 21
Pre Delivery Inspection .................................................. 22
Service Schedule ............................................................ 23

Legal Information
EU Declaration of Conformity
The Manufacturers
authorised representative
ByoCycles Ltd, 53 Kent Road
Southsea, Hampshire, PO5 3HU.
United Kingdom of Great Britain
Tel: +44 (0) 2392 88362
Hereby conrms for the
product, Product name:
ZEST, ZEST+, IBEX, IBEX+, TORNADO,
CHAMELEON LFD, CHAMELEON FDXL,
CITY SPEED, BOXER BYO-16-ZES,
BYO-16-ZESCD, BYO-16-IBX,
BYO-16-IBXCD, BYO-16-FDH,
BYO-16-LFD, BYO-16-FDXL, BYO-16-MTF,
BYO-16-MTFXL
Year of construction: 2016
The Conformity with all
applicable directives from
the guideline:
General Product Safety Directive
2001/95/EC
Machinery Directive 2006/42/EC
LVD Directive 2014/35/EU
EMC Directive 2014/30/EU
ROHS Directive 2011/65/EU
The following harmonising
Standards were applied
to the product:
DIN EN 15194: Bicycles – electrically
power assisted cycles – EPAC bicycles.
Technical documentation
by:
ByoCycles ltd, 36 New Lane
Havant, Hampshire, PO9 2JL
United Kingdom of Great Britain
I hereby declare that the equipment named above has been designed to
comply with the relevant sections of the above referenced specications.
The unit complies with all applicable Essential Requirements of the Directives.
Zack Pollard Date 22/12/2015
Brand Development Manager
Page 4

In Great Britain (excluding Northern Ireland), if you’re 14 or over you don’t need a licence to
ride an electric bike. Nor will they need to be registered, taxed or insured.
Electric bikes meeting the requirements are called ‘electrically assisted pedal cycles’
(EAPCs). They can be 2-wheeled bicycles, tandems or tricycles.
Your Byocycles Electric Bike meets or surpasses all of the following regulations.
EAPC Requirements
The requirements are:
• The bike must have pedals that can be used to propel it
• The electric motor shouldn’t be able to propel the bike when it’s travelling more
than 15.5mph
• The motor shouldn’t have a maximum power output of more than 250 watts
It must also display one item from each of the following:
• The power output or manufacturer of the motor
• The battery’s voltage or maximum speed of the bike
• The bike cannot be propelled past 6km/h without human input
Where You Can Ride An EAPC
If a bike meets the EAPC requirements it’s classed as a normal pedal bike. This means you
can ride it on cycle paths and anywhere else pedal bikes are allowed.
Use On Public Roads
Before riding your ByoCycle, ensure you are familiar with the road laws of your specic
country, observing the highway code at all times. Pedelecs fall under the jurisdiction of the
same EU laws as bicycles. Pedelecs are also subject to the same laws as bicycles when
using cycle paths.
Legal Information
Page 5

Page 6
Getting to Know Your Bike
Your bicycle has been designed to do the following things:
• CHAMELEON TORNADO - On road use, commuting, leisure
(excluding off road use).
• CHAMELEON LS - On road use, commuting, leisure
(excluding off road use).
• CHAMELEON FDXL/XL/BOXER - On road use, commuting, leisure
(including light off road use, canal paths, forest paths).
• ZEST/ZEST+ - On road use, commuting, leisure
(including canal paths and unsealed roads).
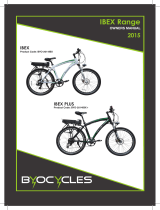
• IBEX/IBEX+ - On road use, commuting, leisure
(including light off road use, canal paths, forest paths, unsealed roads).
• CHAMELEON FD/CITY SPEED - On road use, commuting leisure
(excluding off road use).
TORNADO
Chameleon
LS
Chameleon
FDXL
Chameleon
ZEST ZEST+
IBEX IBEX+

Saddle
Seat Post
Handlebar
Brake Lever
Display
Brake Fork Tyre
PedalChainwheelChain
Deraileur
IBEX Models
Getting to Know Your Bike
Handle Bar
Adjustment System
LCD Display
Stem Height
Adjusting System
Battery
Seatpost
Pannier Rack
Motor
(Ibex Model)
Gear Cable
Derailleur
Inner Tube
Valve
Reector
Disk Brake
Fork
Chain
Chainwheel
Pedal
Saddle
Front Light
LED Display ZEST
(Left Hand Side Of
Handlebars)
ZEST Models
Power
Switch
Battery
Motor
(Zest Model)
Motor
(Zest+ Model)
Motor
(Ibex+ Model)
Page 7

Cockpit Parts Identication
Your ByoCycle comprises of various components you should take note of. These vary
from items that affect safety to the bike’s operational features. The image below lists the
equipment for the various styles of ‘LED Specication’ bikes.
Brake
Lever
Display - Assistance Level
& Light Control
Bell
Gear
Shifter
Brake
Lever
Height Adjustment
Stem Clamp
Getting to Know Your Bike
Display
Pedal
Front Light
Seat Post
Saddle
Frame
Clamp
Handlebar
Folding Stem
Front Fender
Rear
Carrier
Brake Lever
Brake Fork Tyre
ChainwheelChainDeraileur
Crank
Chainwheel
Rear
Fender
Tyre
Motor
The same basic components for
TORNADO, LS, FD, CITY SPEED, XL,
FDXL and BOXER.
Page 8
Folding Models
Grips
Throtle
(Pre 2016)

DHMC LCD
Bafang LCD
LCD Screen Operation
From top to bottom (buttons)
1: Long press = Turn power on/off
Short press = turn light on/off
2: Assistance/menu up
3: Assistance/menu down.
1
2
3
Getting to Know Your Bike
Down Up
Headlight
On/Off
Mode
Full LCD operating instructions available on our website.
www.byocycles.com
Page 9

Controls And Equipment
LED Display
The LED display is tted to lefthand side of the handlebars. This
display will allow you to operate the front light as well as the
power input for the motor. Using the ‘MODE’ button you can
scroll through the amount of assistance you wish to receive from
the motor. This is indicated by the 5 LED Lights.
Pedelec Control
Your ByoCycle has a ‘pedelec’ control, this means the motor will provide assistance whilst
you pedal. To operate the pedelec function, press the ‘ ’ button on the LED display and
start pedalling. To control the assistance level press the ‘MODE’ button on the LED display
which will cycle through the assist levels.
Lights
Your ByoCycle is tted with front and rear lights. The front light is powered by the main
Lithium-Ion battery pack, and the rear light is powered by standard AA batteries. To
operate the front light, press the ‘Light’ button on the LED display. To operate the rear
light, press the ‘Light Switch’ on the underside of the light unit itself.
Gears
Your ByoCycle uses Shimano 6-21 speed gear system, this gives you a range of gears to
get you up hills as well as down them. The gears are operated by the indexed shifter on
the right hand side handlebars.
Brakes
The brakes tted to your ByoCycle are cable
operated V-style brakes or disc brakes. The brake
levers are tted with motor cut-out switches. The
moment pressure is applied to the brakes, even
lightly, the motor will cut-out.
The Ibex+ comes equipped with hydraulic
disc brakes.
Please contact your local Byocycles dealer for more advice.
i
To improve your riding experience, always ensure you are in the optimum gear when you are
going up-hill or when you have come to a stop at a junction. Being in the correct gear will
enable you to get going again easier. Dérailleur gears are not designed to be changed when
the bicycle is stood still.
Motor cut
out cable
Cable guide
Ferrules
Page 10

Page 11
Manifold Wire/Harness
The manifold wire is a great way to simplify the service and replacement of electronic
components on your ByoCycle. On the FD, LS, FDXL, ZEST and IBEX the electrical
components on the handlebars lter into one wire and run back to the control box.
In the event your bicycles electronics do not appear to be working correctly, we strongly
recommend seeking advice from your ByoCycle specialist before attempting to work on the
bike yourself. A simple check you can do, is to check the plug and play connections have
not come apart, as shown below.
Handlebar Adjustment
We recommend that you refer to your Byocycles Specialist to adjust the handlebars for
comfort and safety before leaving the premises if an ajustment is required.
Wheel Removal
In the event you need to remove either or both wheels, you will need to undo the wheel
nuts using a spanner/socket. If your bike is tted with V-Style brakes, you will need to
disconnect the brakes to remove the wheel, this can be done by undoing the brake
cable clamp on the right hand brake arm. Please make sure the brakes are re-connected
before riding again.
When removing the motor wheel ensure you disconnect the motor wire at the junction
point half way between the wheel and the control box. When reconnecting ensure that
the arrows on both sides of the connector matchup. Damage can be caused if the bike is
powered on with the arrows misaligned.
Controls And Equipment
WARNING! Do not extend the seat post beyond its maximum height, this can cause failure
without warning, resulting in serious injury to the rider and fellow road users.

Page 12
CHAMELEON LS, FDXL, FD, BOXER, CITY SPEED
Battery On/Off/Lock
To lock your battery into position, turn the key 1 click clockwise to the ‘OFF’ position. This will
prevent the battery being stolen when the bike is not in use. To turn the battery on, rotate the
key clockwise another click to the ‘on’ position. This will make the bicycle’s electrical system
live, when in this position the key cannot be removed from the battery. To turn the battery
‘OFF’, rotate the key anti-clockwise by 1 click. To disengage the battery lock, push the key
into the battery and rotate the key anti-clockwise a further 1 click to the ‘unlock’ position.
Turn the key clockwise, by one click, to the ‘OFF’ position, to engage the battery lock (by
turning the key only one click the electronic system will remain inactive), the battery is now
secure in the frame.
To remove the battery, insert the key to the lock, push it in and turn anticlock-wise, this will
release the battery enabling you to lift it free, using the handle, from the bike.
Battery Display
On the top of the battery is an LED indicator, this will indicate how much power the battery
has remaining. The LEDs will either light up green or red. If they light up red, connect the
battery to a charger as soon as possible. To test the power level insert the key to the battery
and turn clockwise to the ‘on’ position, then press the red button to display the battery
power.
Battery Information
Power Levels Are As Follows:
• 3 green lights = 75% to 100%
• 2 green lights = 50% to 75%
• 1 green light = 25% to 50%
• 1 red light = less than 25%

Page 13
IBEX, IBEX+, ZEST, ZEST+
Battery on/off switch
Within the IBEX and ZEST ranges, on the battery itself there is a simple on/off rocker switch.
The lock on the battery is for removal of the battery from the bike for charging.
TORNADO
The TORNADO LCD controls the on/off of the bike. The lock on the bottom of the bike is for
battery removal only.
CHARGING
Your new Byocycles Electric bike comes with a charger similar to the one pictured below.
Charge The Battery
A. Before using your ByoCycle, we advise that you charge the battery fully. This is done by
rstly connecting the supplied charger to the battery then connecting the charger to the
mains socket. By connecting the charger in this sequence it minimizes the chance of
short circuiting the system.
B. Turn the plug on and observe the light on the charger, this should be red in colour
C. Once the light goes green it means the battery is fully charged and you’re good to go!
(charging may take upto 3 hours).
• The charging port for the TORNADO is located on the bottom of the bike.
• The charging port for the ZEST is located on the left hand side, near the crank.
• The charging port for the ZEST+, IBEX+, IBEX, CHAMELEON FD, FDXL, CITY SPEED and
BOXER are all located on the battery.
Battery Information
WARNING! If you are not planning on using your battery for an extended period of time, fully
charge the battery before putting it into storage, we recommend you give the battery a top up
charge every 4 weeks during this time to prevent any of the cells breaking down.

Page 14
Battery Care
WARNING! If you are not planning on using your battery for an extended period of time, fully
charge the battery before putting it into storage, we recommend you give the battery a top up
charge every 4 weeks during this time to prevent any of the cells breaking down.
Cleaning
When cleaning your battery, do not use any corrosive solvents or cleaners.
Ensure that the connections are free from water at all times.
Storage & Transport
When storing your battery, whether it is for the short term or the long term, store in a dry and
warm environment. The batteries’ capacity will be adversely affected and possibly cause
the battery cells to break down if the battery is left in cold temperature environments. This will
cause the battery to give a lower than stated range. The optimum temperature for storing
your battery is 22°C.
Maintenance
Your battery requires very little maintenance. The lithium-Ion technology allows the battery to
be charged at any point in its cycle, whether nearly full or nearly empty. If you are not going
to use the battery for an extended period of time, you are required to fully charge the battery
and then give it a top up charge once every 4 weeks.
Disposal
Your battery must be disposed of by the proper method. It is best to contact your local
council to see how they wish to dispose of such an item.
WARNING! If the battery is left for an extended period of time with the display having the red
indicator light lit, damage can be caused to the battery. The consequences of this will mean
that the usable life of the battery will decrease.

Page 15
Battery Care
Capacity/Range/Usage
It is important to note that there are many factors that will affect the performance/range of
your battery (distance between charges). This will include the level of pedal assist you use, the
terrain you are riding (surface as well as incline vs decline); weather conditions, tyre pressure
as well as rider and load weight.
To maximise the range of your battery, it is advisable to pedal away from a standing start
as this is where the most power is used. You can do this by minimising the use of the throttle/
walk assist mode, which can lower the level of assistance. Most people will nd the low level
of assistance to be more than enough power.
Under high loads the handlebar display will dip occasionally. This is nothing to be worried
about, as when the loading on the battery decreases, it will naturally recover a small portion
of its voltage.
Both the LED and LCD display on the handlebars as well as the display on the battery will
indicate the capacity the battery has remaining. The four LEDs indicate 25% capacity each,
however due tothe variations when using the battery we recommend, if the situation allows,
recharging the battery when it drops below 50%.
WARNING! When using your ByoCycle in very cold weather, your battery range will decrease as
the cold temperatures reduce the batteries capacity and efciency. So plan ahead and make
sure you have enough charge to complete your journey.

Page 16
Looking After Your Bike
Tyres And Wheels
To ensure your tyres are at the appropriate pressure,
seek the information on the side walls of the tyre. This
will give you a guide for the correct air pressure.
Check your tyres for any wear marks, such as cracking
in the side walls, cuts, embedded debris such as glass
and/or stones, and also the general shape of the tyre
to see if it is free of any bumps or being squared (over
worn in the centre of the tyre).
To ensure your brakes work, apply pressure to the
brake levers and try to move the bike, pulling the rear
brake will cause the wheel to lock up as you move forward.
Pulling the front brake will cause the rear wheel to raise from the ground.
Check your wheels on a regular basis for buckles and bends in the rim. The line around
your rim is a ‘wear indicator’ if this isn’t visible, then you must seek replacement ASAP.
Before Each Ride
Before each ride ensure the following items are checked:
• Tyres are pumped up correctly and are free of damage and foreign objects.
• Brakes are working correctly.
• Gears work correctly
• Handlebars and stem are tted correctly
• If you have a folding bike, ensure the folding clamps are securely fastened.
• Wheels run true and smoothly.
• Frame and fork are free of damage
• All nuts and bolts are tight as well as all quick release clamps being secure.
WARNING! If you are unsure about any part of the bike being below the appropriate standards,
stop riding and consult your ByoCycle specialist. Failure to do so could result in the bicycle failing
without warning, possibly causing serious injury to the rider.
After Each Ride
After each ride ensure the following items are checked:
• The bike is clean and free of any dirt that can cause degradation to the frame
and components
• The battery is stored in a warm place free of moisture.
• The bike is secure and not likely to fall over or be stolen.
• Wipe the bicycle clean with a damp cloth.

Page 17
Looking After Your Bike
Mechanical Maintenance
All bicycles require maintenance to their mechanical parts, there is no set time to do this
as riding style and conditions will effect the wear life of the bicycle components.
Components that will require regular maintenance and possible replacement are:
• Gear cable • Brake cables • Tyres • Cassette
• Bearings • Spokes • Chain Ring • Brake pads
• Nuts and bolts • Gear Cables • Chains
If there is any doubt about the condition of these items, please seek help from you
ByoCycle specialist.
Tyre Maintenance
Tyres take a lot of punishment and should be inspected regularly. When inspecting your
tyres you should look out for the following:
• Any cuts in the tyre from sharp objects.
• Any debris embedded into the tyre.
• Any cracking in the tyre walls.
• Any bulges or parts of the tyre that are misshaped.
• The centre of the tyre being over worn, giving a squared shape to the centre of tyre.
Water Resistance
Your ByoCycle is designed to be ridden in all weather conditions, this includes wet
weather. The bicycle and it’s electrical components are splash resistant. However leaving
your bicycle to endure the elements, without appropriate cover or protection, will cause
corrosion, especially in coastal areas where salt and grit is most common. Negligence is
not covered under the warranty.
WARNING! Failure to properly look after your tyres could result in the tyre failing without warning,
in the worst cases, this can cause the rider to have an accident, resulting in serious injury to the
rider and other fellow road users.
WARNING! Do not submerge your motor, controller, throttle, LED display, battery or wiring loom
in water.
Spares
Spares are available from your ByoCycle retailer or any good bike shop.
Servicing
Your ByoCycle electric bike should be serviced by a competent cycle mechanic at least
once every 6-12 months.

Page 18
Trouble Shooting
Fault Possible Cause Action
Bike seems
underpowered
Battery Charge Low Recharge Battery
Display Issue Contact ByoCycle Specialist
Motor Issue Contact ByoCycle specialist
Power on but no drive
from the motor
Motor connection
loose
Check motor connection is secure
Motor failure Contact ByoCycle specialist
4th LED ashing Motor connection
loose
Check motor connection
Short range after full
battery charge
Battery damaged Contact ByoCycle specialist
Tyre pressures low Re-inate tyres to a higher pressure
Charger issue Contact ByoCycle specialist
Frequent riding uphill,
on high assist or
overloading
Change pedal assist setting and
pedal away from a stand still
1st LED ashing
Connection issue Contact Byocycles Specialist
Battery low Charge Battery
Charger going straight
to green
Broken charger Replace Charger
Damaged battery Replace Battery

1. Standard Warranty
ByoCycles LTD warrants by way of replacement components, to items purchased new from
an approved dealer subject to the terms and conditions set out below in items 3-8 for a
period of 2 years for the frame and fork and 1 year for all non-consumable parts.
2. Extended Warranty
By registering online you can upgrade your warranty to the periods listed in the table
below. Provided your new ByoCycle is purchased new from an approved dealer and the
registration is made on our website within 3 weeks of purchase. (Please ask your place of
purchase if you need assistance).
Part Standard Warranty Extended Warranty
Frame and Fork 2 years 5 years
Battery & Electrical Components 1 year 2 years
Non Consumable Parts 1 year 2 years
3. Bicycle Components
ByoCycles LTD warrant all components excluding consumable items.
4. Electrical Components
Electrical Components including Controller, LED or LCD Display, Pedelec Sensor, battery,
motor and charger.
5. Battery
a. Battery capacity is warranted not to fall by more than 22% in the rst year
after purchase.
b. If you have Extended Warranty the battery capacity is warranted not to fall by more
than 40% during the second year of purchase.
c. Your battery warranty will be void if any attempt is made to open the battery by
anyone other than ByoCycles trained technicians.
6. Frame and Forks
a. Your frame and fork have a 2 year warranty.
b. If you have extended your warranty, it is extended to 5 years.
C. The permissible total weight of a rider and luggage of all of the ByoCycles range
is 125kg.
Warranty
Page 19

7. Your warranty does not cover damage due to the following
a. Improper use, servicing, assembly or maintenance.
b. Wear and tear to consumable items such as: tyres, saddles, innertubes, chains,
chainwheels, freewheels/cassettes, brake pads, cables, handlebar grips, bottom
brackets, headsets or frame bearings.
c. Corrosion, rust, hairline cracks in paint, chips in paint, water damage, the results of
metal fatigue.
d. Failure or loss cause by accident, misuse, abuse and theft.
e. Neglect (poor care and maintenance) overloading with excessive weight and towing
f. Incorrect assembly.
g. Modications to the bike and the mounting of accessories.
8. General Conditions of Warranty
a. Your bike will only be covered under this warranty if the cycle was purchased from an
ofcial Byocycles dealer.
b. Only the rst owner of the bicycle is covered by this warranty.
The warranty is not transferable.
c. You must be able to provide proof of purchase with date of purchase if requested.
d. All warranty work must be undertaken by an approved Byocycles dealer.
e. Warranty includes the cost of replacement parts and shipping to an approved Byocycles
dealer only. No labour charge is expressed or implied, this is down to the individual
retailer to decide.
f. Claims for loss of use or compensation of any kind are excluded and will not be
warranted under any circumstances.
g. In the event of a claim for warranty, the original warranty period will not extend.
h. Your warranty will be null and void if you elect to repair a defective component
yourself or if you use a replacement component not supplied by Byocycles or an
approved reseller.
i. In the case of a claim for a damaged frame, the frame or complete bike (cleaned) must
be returned to your place of purchase for examination. If your place of purchase is no
longer trading, Byocycles reserve the right to charge for any labour/delivery/collection.
j. Disassembling any part or component beyond which is shown in the users manual is a
complete void of warranty.
Your statutory rights remain unaffected.
Warranty cont.
Page 20
/