Page is loading ...

Quick Guide
X100 SERIES

2 X100 Series Quick Guide
INSTALL & CONNECT SETUP CONFIGURERECORDING SOFTWARE
INTRODUCTION.................................................................................................... 3
i Overview ............................................................................................................ 3
ii Features ............................................................................................................. 3
Standard Features across the Range ............................................................... 3
Additional Features ......................................................................................... 4
iii Minimum System Requirements ................................................................ 5
iv Notes on Installation ................................................................................... 6
INSTALL & CONNECT ......................................................................................... 7
1.1 X100C Wireless IP Cube Camera ................................................................ 7
1.2 X10⁴P Wireless Pan Tilt Zoom IP Camera ................................................ 9
1.3 X100D IP Dome Camera .............................................................................. 12
1.4 X100V Vandal Resistant IP Dome Camera ............................................... 16
1.5 X100B IP Bullet Camera .............................................................................. 21
1.6 X100T IP Body Camera ................................................................................ 24
1.7 X10⁴S Vandal Resistant IP Speed Dome .................................................. 28
1.8 X100VS Video Server (Codec) .................................................................... 31
SETUP (Quick Guide) ............................................................................................ 34
2.1 Setting up your Network ............................................................................ 34
2.2 Search and Setup by IPWizard II ............................................................... 35
2.3 Access Your IP Camera On Your Web Browser ....................................... 40
(See full version of the SET UP chapter on the User Manual CD)
CONFIGURE .............................................................................. See User Manual CD
RECORDING SOFTWARE ........................................................ See User Manual CD
APPENDIX 1: HOW TO CALIBRATE AN AUTO IRIS LENS ............................... 41
XVISION SUPPORT .............................................................................................. 43
WARRANTY ........................................................................................................... 43
QUICK GUIDE CONTENTS

X100 Series Quick Guide 3
INSTALL & CONNECT SETUP CONFIGURE RECORDING SOFTWARE
This user guide explains how to operate your camera from a computer. Read this manual completely and
carefully before you operate the device.
STANDARD FEATURES ACROSS THE RANGE
The following are features of the X100 IP Camera Series:
i OVERVIEW
ii FEATURES
• Easy ‘Plug and Play’ installation and configuration using the Setup Wizard
• 1.3 Megapixel High Definition images up to 1280x1024 resolution, 3x the resolution of standard
CCTV cameras
• IEEE 802.3af Power over Ethernet (except X100C and X104P)
• Choice of compressions and multiple streams for optimum performance in any environment
• Up to 30 fps in VGA mode, 15 fps in Megapixel mode
• Digital Zoom for detailed viewing
• Remote Viewing from anywhere in the world using any standard PC or Mac web browser
• Supports 3G Mobile Viewing on all popular Smart Phones
• Intelligent Motion Detection with Automatic Email Alerts & Local Alarm* Notifications when
motion is detected
• Two-way audio for remote communication with people near the camera*
• Alarm Input and Output (except X100C and X104P)
• Supports DDNS (Dynamic Domain Name System)
• Supplied with Free Multi-channel Management and Recording software for up to 64 IP Cameras
*Speakers will need to be plugged in to the camera for this function

4 X100 Series Quick Guide
INSTALL & CONNECT SETUP CONFIGURERECORDING SOFTWARE
ADDITIONAL FEATURES
X100C WIRELESS IP CUBE CAMERA
• Features White LEDs for 10m Night Vision
• 4.0mm Lens for 50° viewing angle
• SD Card Recording
• Designed for Wall, Ceiling or Desk
mounting
• Suitable for indoor use only
X104P WIRELESS PAN TILT ZOOM
IP CAMERA
• Features White LEDs for 10m Night Vision
• 4.0mm lens for 50° viewing angle
• Motorised Pan (355°) and Tilt (100°)
• Designed for Wall, Ceiling or Desk
mounting
• Suitable for indoor use only
X100D IP DOME CAMERA
• 4.0mm Lens for 50° viewing angle
• Optional lenses available for 35°, 43°, 85°,
or 135° viewing
• Power Over Ethernet
• Designed for Wall or Ceiling Mounting
• Suitable for indoor use only
X100V VANDAL RESISTANT IP DOME
CAMERA
• Vandal Resistant
• Features IR LEDs for 30m Night Vision
• 2.7 to 9.0mm Lens for 20 to 80° viewing
angle
• Power Over Ethernet
• Designed for Wall or Ceiling Mounting
• Suitable for indoor or outdoor use
X100B IP BULLET CAMERA
• Features IR LEDs for 20m Night Vision
• 4.0mm Lens for 50° viewing angle
• Power Over Ethernet
• Designed for Wall or Ceiling Mounting
• Suitable for indoor or outdoor use
X100T IP BODY CAMERA
• C/CS Mount Lens with Auto Iris Support
• Supplied with a 4.0mm lens as standard
for 50° viewing angle
• Optional lenses available for fixed or
varifocal viewing angles
• Power Over Ethernet
• Designed for Wall or Ceiling Mount
• Optional Accessories available for external
mounting
• Suitable for indoor use as supplied
X104S VANDAL RESISTANT IP SPEED
DOME
• Vandal Resistant
• 4.0mm lens for 50° viewing angle
• Motorised Pan (355°) and Tilt (100°)
• Power Over Ethernet
• Designed for Ceiling Mount
• Optional Wall Mount available
• Suitable for indoor or outdoor use
X100VS VIDEO SERVER
• Single Input Video Server
• Converts any type of analogue CCTV
camera into IP
• Power Over Ethernet
• SD Card Recording
• Audio Input
• Suitable for indoor use only

X100 Series Quick Guide 5
INSTALL & CONNECT SETUP CONFIGURE RECORDING SOFTWARE
The following are the minimum system requirements for the X100 Series IP Camera Range:
Network Environment Wired Models Wireless Model (X100C, X104P)
Network Interface: 10/100MBase-TX Ethernet 10/100MBase-TX Ethernet
802.11b/g or n WLAN
Browser: Internet Explorer 6.0, Safari 5.0, FireFox 3.5 or later
System Hardware
CPU: Pentium 4, 2.0 GHz or higher
Memory: 512 MB or above
VGA Card Resolution: 1024 x 768 or above
Sound Card: for 2 Way Audio function (optional depending on model)
System Requirements for Viewing and Recording Software
Estimated Total
Display and
Recording FPS:
QVGA 120 120 to 360 360 to 540 540 to 960 960+
VGA 30 30 to 90 90 to 135 135 to 240 240+
SXGA 8 8 to 23 23 to 34 34 to 60 60+
CPU:
Intel P4
2.4GHz
Intel P4
3.2GHz
Intel
Pentium D
950
3.4GHz
Intel Core 2
Duo
E8600
3.3GHz
Intel Core
2 Quad
Q9650
3.0GHz
RAM: 512 MB 1 GB 2 GB
Display:
1024 x 678 resolution or above
DirectX 9.0c or above
Intel 945G/965G or above
OS:
Windows XP,
Windows Vista*
Windows 7
Hard Drive: Minimum 60GB recommended
For Multi-channel recording, use 7200rpm or higher speed HDD
Ethernet: 100 MBps 1 GBps
Chipset: Intel 945 or Intel 965 or above
*When using Vista it is recommended that extra memory is installed
iii MINIMUM SYSTEM REQUIREMENTS

6 X100 Series Quick Guide
INSTALL & CONNECT SETUP CONFIGURERECORDING SOFTWARE
iv NOTES ON INSTALLATION
• Please unpack all boxes carefully and identify that all the parts are present.
• Do not aim the camera at the sun or similar intense light.
• Treat the camera with care.
• Do not open the camera to make internal adjustments unless instructed to do so in this manual.
• Avoid using the camera in very hot or very cold temperatures or in areas of high humidity (unless the
camera is designed for outdoor use).
• Ensure the camera is well ventilated. It should not be placed near heated devices such as radiators or
heat elements.
• The camera should be installed on a firm and solid surface. Wall or Ceiling mounting the camera should
be done with care to ensure the camera weight can be supported safely.
• Do not cut the camera cables, this will void the warranty.
• Only use the supplied power adaptor. Using a different adaptor may cause the camera to malfunction,
heat up or catch fire. Any damage cause to the camera by using the incorrect power adaptor will void
the warranty.
• Do not tamper or open the power adaptor supplied.

X100 Series Quick Guide 7
INSTALL & CONNECT SETUP CONFIGURE RECORDING SOFTWARE
PACKAGE CONTENTS
• X100C IP Camera
• Wireless Antenna
• Camera Bracket
• Fixing Screws & Wall Plugs
• 12V DC Power Adaptor
• User’s Manual & Software CD
IDENTIFY PARTS
1.1 X100C WIRELESS IP CUBE CAMERA
CONNECTIONS
FRONT VIEW
Microphone
Focus Ring
Reset Button
SD Card Slot
Network Port
Audio Output Socket
12V DC Power Socket
Wireless Antenna
Connector
Night Vision LEDs
Network Type LED
(Green/Orange)
Green LED indicates
Wired connection is
active. Orange LED
indicates Wireless
connection is active.
Insert SD Card for on
board recording
Ensure only the 12V DC
Power Adaptor supplied
with the camera is used.
INSTALL & CONNECT INSTALL & CONNECT

8 X100 Series Quick Guide
INSTALL & CONNECT SETUP CONFIGURERECORDING SOFTWARE
INSTALLATION
The X100C IP Camera can be mounted on a Wall or Ceiling. It can also be desk mounted using the
bracket supplied.
1. For Wall or Ceiling mounting, make a hole where the camera is to be installed to insert the 12V DC
Power Adaptor and LAN cable.
2. Feed the 12V DC Power Adaptor, and LAN cables through the hole.
3. Use the screws and wall plugs supplied to fix the bracket on a wall or ceiling as shown.
4. Adjust the camera direction and angle of view as required using the bracket.
- Make any lens (focus) adjustments using the manual Focus Ring after you have connected the camera and have
setup live viewing via your PC.
5. Connect the 12V DC Power Adaptor and LAN cable to camera.
6. The camera is now ready for you to setup and configure using your PC.
- See SETUP on page 34.
For Wireless Connection
Attach the Wireless Antenna to the camera. Configure your camera’s IP settings using a Wired
connection before you start.
- See SETUP on page 34.
For Audio
Connect the 3.5mm microphone Audio Out Socket to an audio output device such as a speaker with an
amplifier for voice alerting or for enabling the 2 Way Audio function.
Resetting your camera
The Reset Button is used to restore the factory default settings. If you are experiencing problems
with the IP camera, sometimes restarting the device will make the system revert back to a normal state.
To reset, hold the button for at least 5 seconds. The camera will restore factory settings & reboot.
Note: Restoring the factory default setting will lose all the previous settings including the IP address.
You will need to run the IPWizard II program to re-configure the camera to enable it to work properly again.
INSTALL & CONNECT
Focus Ring
To Power
To Network
Turn anti-clockwise to
loosen for adjustment

X100 Series Quick Guide 9
INSTALL & CONNECT SETUP CONFIGURE RECORDING SOFTWARE
PACKAGE CONTENTS
• X104P IP Camera
• Wireless Antenna
• L-Bracket with 2x Screws
IDENTIFY PARTS
1.2 X10⁴P WIRELESS PAN TILT ZOOM IP CAMERA
CONNECTIONS ON BASE SIDE
FRONT VIEW
• Fixing Screws & Wall Plugs
• 12V DC Power Adaptor
• User’s Manual & Software CD
Lens
Lens Mechanism
Camera Body
Camera Base
Microphone
Network Type LEDs
(Green/Orange)
Green LED indicates
Wired connection is
active. Orange LED
indicates Wireless
connection is active.
The body of the
camera can pan (left
to right) 355°.
The Lens Mechanism can tilt
(up & down) 100°.
Focus Ring
Night Vision LEDs
Network Port
12V DC Power Socket
Ensure only the 12V DC
Power Adaptor supplied
with the camera is used.
AUDIO
OUT
12V DC RESETLAN
Reset Button
Audio Output
Socket
Wireless Antenna
Connector
INSTALL & CONNECT

10 X100 Series Quick Guide
INSTALL & CONNECT SETUP CONFIGURERECORDING SOFTWARE
INSTALLATION
The X104P IP Camera can be mounted on a Wall or Ceiling using the L-Bracket provided. It is designed
for internal use only. It can also be desk mounted as supplied.
1. For Wall or Ceiling mounting, make a hole where the camera is to be installed to insert the 12V DC
Power Adaptor and LAN cable.
2. Feed the 12V DC Power Adaptor and LAN cables through the hole.
3. Use the screws and wall plugs supplied to fix the bracket to the camera, then to the ceiling as
shown. For wall mounting, fix the bracket to the wall before mounting the camera to the bracket.
4. Connect the 12V DC Power Adaptor and LAN cable to camera.
5. The camera is now ready for you to setup and configure using your PC.
- See SETUP on page 34.
Lens Adjustment
Make any lens (focus) adjustments after you have
connected the camera and have setup live viewing via
your PC.
To adjust the lens, open the Dome Cover by turning it
anti-clockwise and rotate the Focus Ring.
For Wireless Connection
Attach the Wireless Antenna to the camera. Configure your camera’s IP settings using a Wired
connection before you start.
- See SETUP on page 34.
For Audio
Connect the 3.5mm microphone Audio Out Socket to an audio output device such as a speaker with an
amplifier for voice alerting or for enabling the 2 Way Audio function.
CEILING MOUNT
Power &
LAN cable
Power &
LAN cable
WALL MOUNT
INSTALL & CONNECT
Focus Ring

X100 Series Quick Guide 11
INSTALL & CONNECT SETUP CONFIGURE RECORDING SOFTWARE
Resetting your camera
The Reset Button is used to restore the factory default settings. If you are experiencing problems
with the IP camera, sometimes restarting the device will make the system revert back to a normal state.
To reset, hold the button for at least 5 seconds. The camera will restore factory settings & reboot.
Note: Restoring the factory default setting will lose all the previous settings including the IP address.
You will need to run the IPWizard II program to re-configure the camera to enable it to work properly again.
INSTALL & CONNECT

12 X100 Series Quick Guide
INSTALL & CONNECT SETUP CONFIGURERECORDING SOFTWARE
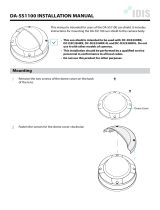
1.3 X100D IP DOME CAMERA
PACKAGE CONTENTS
• X100D IP Camera
• Fixing Screws & Wall Plugs
• 12V DC Power Adaptor
IDENTIFY PARTS
Dome Housing
Side Cable Exit
Dome Base
Dome Cover
Turn anti-clockwise
to remove
Reset Button
Network Port
Status LEDs
INTERNAL CONNECTIONS
To access the internal connections, turn the dome base anti-clockwise to uncover the dome housing.
Green LED indicates
connection is active.
Orange LED indicates
power is ON.
Remove when inserting
cables through the side
of the dome
Terminal Block
VCC12
GND
DIGITAL_IN
ALARM_OUT
AUDIO_IN
AUDIO_OUT
AUDIO_GND
• Power Cable with terminal connections
• User’s Manual & Software CD
INSTALL & CONNECT

X100 Series Quick Guide 13
INSTALL & CONNECT SETUP CONFIGURE RECORDING SOFTWARE
INSTALLATION
1. Select a mounting position on a wall or ceiling. Rotate the dome housing anti-clockwise to remove
the camera from the mounting base.
2. Use the mounting base to mark up screw positions and make a hole in the wall or ceiling to insert the
LAN cable and 12V DC Cable (if using Power over Ethernet, 12V DC Power is not required).
3. Feed the cables through the hole.
4. Use the screws and wall plugs supplied to fix the mounting base.
5. Insert the cables through the side cable exit or from the rear of the camera.
Holes for
fixing base to
wall or ceiling
Holes for
fixing base to
wall or ceiling
Push cables through
the side cable exit
Push cables through
the side cable exit
To Network
Power Cable To Power Adaptor
To Network
Power Cable To Power Adaptor
CEILING MOUNT
WALL MOUNT
INSTALL & CONNECT

14 X100 Series Quick Guide
INSTALL & CONNECT SETUP CONFIGURERECORDING SOFTWARE
6. Adjust the camera direction and angle of view as required using the camera bracket inside.
- Make any lens (focus) adjustments using the manual Focus Ring after you have connected the camera and have
setup live viewing via your PC.
7. Connect the Power Cable to the correct terminals; attach Positive (+) to VCC12 and Negative (-) to
GND as shown (if using PoE this step is not required):
8. Connect the LAN cable to the Network Socket and the 12V DC Power Adaptor to the Power Cable.
9. Re-attached the dome housing to the dome base.
10. The camera is now ready for you to setup and configure using your PC.
- See SETUP on page 34.
Note: Incorrect wiring may cause damage to the camera.
Please ensure + and - terminal connections are fitted correctly.
+
-
VCC12
GND
DIGITAL_IN
ALARM_OUT
AUDIO_IN
AUDIO_OUT
AUDIO_GND
Power CablePower Adaptor
(to Mains Power)
INSTALL & CONNECT
CAMERA DIRECTION ADJUSTMENT
Focus Ring
Camera bracket
For Horizontal
Adjustment
Using an Optional Lens
The X100D camera is supplied with a 4.0mm board lens for 50° viewing angle. The lens can be manually
replaced with an Xvision Megapixel Board Lens to achieve a different viewing angle. Any lens change
should be made after you have connected the camera and have set up live viewing via your PC so that
the focus can be set correctly.
Camera’s
Tilt bracket
Camera’s
Board hinge
For Vertical
Angle
Adjustment
For Horizontal
(Left/Right) Board
Adjustment

X100 Series Quick Guide 15
INSTALL & CONNECT SETUP CONFIGURE RECORDING SOFTWARE
Note: Restoring the factory default setting will lose all the previous settings including the IP address.
You will need to run the IPWizard II program to re-configure the camera to enable it to work properly again.
Note: The following Xvision Megapixel lenses are compatible with the X100D IP camera:
• XL010P-PRO (1.55mm Fixed Iris Megapixel Lens, for 135° viewing angle)
• XL035P-PRO (3.5mm Fixed Iris Megapixel Lens, for 85° viewing angle)
• XL060P-PRO (6.0mm Fixed Iris Megapixel Lens, for 43° viewing angle)
• XL080P-PRO (8.0mm Fixed Iris Megapixel Lens, for 35° viewing angle)
INSTALL & CONNECT
To replace the lens:
1. Open the dome cover and carefully turn the lens to unscrew it from the board mount.
2. Once removed, slide off the small spring around the lens and place this onto the new lens.
3. Screw the new lens onto the board mount and set the required focus by turning the lens.
4. Replace the dome cover once all adjustments have been made.
For Audio
Connect an external Microphone for monitoring audio. Connect an audio output device such as a
speaker with an amplifier for voice alerting or for enabling the 2 Way Audio function.
See table below for details on connection.
Audio and Alarm Connections
Grouping Terminal Name Connect to:
POWER
VCC12 Positive (+) Power Cable
GND Negative (-) Power Cable
ALARM SENSOR
DIGITAL_IN Alarm Sensor Input
ALARM_OUT Alarm Output
AUDIO
AUDIO_IN External Microphone / Audio Input
AUDIO_OUT External Speaker / Audio Out
AUDIO_GND Audio Ground
Resetting your camera
The Reset Button is used to restore the factory default settings. If you are experiencing problems
with the IP camera, sometimes restarting the device will make the system revert back to a normal state.
To reset, hold the button for at least 5 seconds. The camera will restore factory settings & reboot.
Place spring on
new lens before
screwing back on
to board mount

16 X100 Series Quick Guide
INSTALL & CONNECT SETUP CONFIGURERECORDING SOFTWARE
1.4 X100V VANDAL RESISTANT IP DOME CAMERA
Factory Default
Reset Button
Network Port
Status LEDs
PACKAGE CONTENTS
• X100V IP Camera
• Fixing Screws
• Allen Key
• 12V DC Power Adaptor
IDENTIFY PARTS
INTERNAL CONNECTIONS
To access the internal connections, use the Allen Key to open the screws and uncover the dome housing.
Dome Cover
Green LED indicates
Wired connection is
active. Orange LED
indicates power is ON.
• Power Cable with terminal connections
• Side Exit Fitting
• Stopper
• User’s Manual & Software CD
Terminal Block
VCC12
GND
DIGITAL_IN
ALARM_OUT
AUDIO_IN
AUDIO_OUT
AUDIO_GND
INSTALL & CONNECT
Tamper Resistant
Screw Fittings
Dome Housing
Top Cable Exit
Optional Side Cable Exit
Supplied with Side Exit
Fitting and Stopper (to block
off unused cable exit)
Side Exit
Fitting
Stopper

X100 Series Quick Guide 17
INSTALL & CONNECT SETUP CONFIGURE RECORDING SOFTWARE
To Network
Power Cable To Power Adaptor
INSTALLATION
1. Select a mounting position on a wall or ceiling. Decide whether the cables are to go through the
dome base or via the side cable exit and block off the unused exit with the stopper.
2. Remove the dome housing by unscrewing the tamper resistant screws with an Allen Key.
3. Use the mounting base to mark up screw positions and make a hole in the wall or ceiling to insert the
LAN cable and 12V DC Cable (if using Power over Ethernet, 12V DC Power is not required).
4. Feed the cables through the hole.
5. Use the screws and wall plugs supplied to fix the mounting base.
6. Insert the cables through the top or side cable exit.
INSTALL & CONNECT
Position hole so cables can
be pushed through the top
or side cable exit
To Network
Power Cable To Power Adaptor
Fixing Screws
for fixing base
to ceiling
Tamper Resistant
Screws for fixing
dome cover
CEILING MOUNT
WALL MOUNT
Position hole so cables can
be pushed through the top
or side cable exit

18 X100 Series Quick Guide
INSTALL & CONNECT SETUP CONFIGURERECORDING SOFTWARE
7. Adjust the camera direction and angle of view as required using the camera bracket inside.
- Make any lens (Zoom/Focus) adjustments after you have connected the camera & have setup live viewing via your PC.
- Make the Zoom Adjustment by rotating the screw anticlockwise for NEAR adjustment and clockwise for FAR
adjustment until you get the desired view. Next make the Focal Adjustment by rotating the screw anti-clockwise
for TELE adjustment and Clockwise for WIDE adjustment until you get the desired view.
- After adjustment, tighten both screws to set the Zoom and Focus Rings.
INSTALL & CONNECT
Camera bracket
CAMERA DIRECTION ADJUSTMENT
For Horizontal
Adjustment
Camera’s
Tilt bracket
For Vertical
Angle
Adjustment
Camera’s
Board hinge
For Horizontal
(Left/Right) Board
Adjustment
Zoom
Adjustment
Screw
Zoom and
Focus Rings
Focus
Adjustment
Screw
NEAR ~ FAR
WIDE ~ TELE
LENS ADJUSTMENT

X100 Series Quick Guide 19
INSTALL & CONNECT SETUP CONFIGURE RECORDING SOFTWARE
8. Connect the 12V DC Power Adaptor to the Power Cable and attach the positive (+) to VCC12 and
the negative (-) to GND as shown (if using POE this step is not required):
9. Connect the LAN cable to the Network Socket.
10. Re-attach the dome housing to the dome base.
11. The camera is now ready for you to setup and configure your camera using your PC.
- See SETUP on page 34.
- The Auto Iris lens on the camera will require calibration before use. After you have setup and configured the
camera, please ensure you CALIBRATE the Auto Iris lens. See Appendix 1: HOW TO CALIBRATE AN AUTO IRIS LENS
on page 41.
For Audio
Connect an external Microphone for monitoring audio. Connect an audio output device such as a
speaker with an amplifier for voice alerting or for enabling the 2 Way Audio function.
See table below for details on connection.
Audio and Alarm Connections
Grouping Terminal Name Connect to:
POWER
VCC12 Positive (+) Power Cable
GND Negative (-) Power Cable
ALARM SENSOR
DIGITAL_IN Alarm Sensor Input
ALARM_OUT Alarm Output
AUDIO
AUDIO_IN External Microphone / Audio Input
AUDIO_OUT External Speaker / Audio Out
AUDIO_GND Audio Ground
INSTALL & CONNECT
Note: Incorrect wiring may cause damage to the camera. Please ensure + and - terminal connections are
fitted correctly.
+
-
VCC12
GND
DIGITAL_IN
ALARM_OUT
AUDIO_IN
AUDIO_OUT
AUDIO_GND
Power CablePower Adaptor
(to Mains Power)

20 X100 Series Quick Guide
INSTALL & CONNECT SETUP CONFIGURERECORDING SOFTWARE
Resetting your camera
The Reset Button is used to restore the factory default settings. If you are experiencing problems
with the IP camera, sometimes restarting the device will make the system revert back to a normal state.
To reset, hold the button for at least 5 seconds. The camera will restore factory settings & reboot.
Auto Iris Lens
Remember to calibrate the Auto Iris lens once the camera has been set up and configured on the
network.
- See Appendix 1: HOW TO CALIBRATE AN AUTO IRIS LENS on page 41.
Note: Failure to calibrate the Auto Iris lens will result in the picture becoming dark over time.
Note: Restoring the factory default setting will lose all the previous settings including the IP address.
You will need to run the IPWizard II program to re-configure the camera to enable it to work properly again.
INSTALL & CONNECT
/