READ AND SAVE THESE INSTRUCTIONS
INSTRUCTIONS FOR MOUNTING LIGHT FIXTURE KG1N
BEFORE YOU START:
• THIS LIGHT FIXTURE NOT FOR USE ON 3 SPEED PULL-
CHAIN
FANS. (MODEL NUMBERS ENDING WITH A "D")
• Light fixture to fan compatibility chart located on last page of
instructions.
WARNING: To reduce the possibility of electrical shock, be sure that the power is turned off at its source
(fuse or circuit breaker). All electrical components must be installed in accordance with national and local
electrical codes. To reduce the risk of fire and electrical shock, use this light fixture only with UL Listed
Casablanca ceiling fans indicated as adaptable on the chart included with these instructions.
INSTALLATION
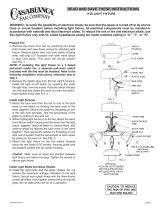
FIG. 1
FIG. 2
FIG. 3
FIG. 4
SWITCH
HOUSING
8-32 SCREW
CAP
PORCELAIN
WIRE NUT
8-32 SCREW
KEY SLOT
LIGHT
FIXTURE
GLASS
SHADE
LIGHT
BULB
1. Remove the cap from fan by removing two brass 8-32
screws and save these screws for attaching light fixture.
Remove plastic wire nuts from switch housing wires and strip
1/2" insulation from both wires (black and white). This cap
and plastic wire nuts will not be reused. See FIG. 1
2. Thread the two 8-32 screws half way into the two threaded
holes on the switch housing. See FIG. 2
3. While holding light fixture up to the fan, attach the wires
from the fan switch housing and the wires from the light fix-
ture together (black-to-black and white-to-white) by twisting
the bare ends of the wires together. Then secure the splices
by threading on the porcelain wire nuts provided. Test the
secureness of each splice by pulling on the wire nut. Check
that there is no bare wire showing from the wire nut then
cover both connections with electrical tape.
4. Align the two 8-32 screws on the switch housing with
the two key slots on the housing cover. Rotate light fixture
counter-clockwise, make certain screw heads have rotated
to the narrow end of the slot.
Caution: Make sure no wires are pinched between light
fixture and switch housing. Tighten the screws to secure
light fixture.
5. Insert the glass shade from the top opening.
See FIG. 3
6. Tilt the glass shade upward to the side to install light
bulbs. Do not exceed the maximum wattage indicated on
the light fixture. Place the glass shade back on the light
fixture so that the glass shade will not rattle when the fan is
in operation. See FIG. 4
CAUTION: Make sure no wires are pinched be-
tween light fixture and switch housing.
9943940 REV.E RD2/96KTL 8A099


