Page is loading ...

INNOTEK®,Inc.
1-800-826-5527
www.innotek.net
0405 2100277-1
IINNNNOOTTEEKK
®®
UUllttrraaSSmmaarrtt
™™
IInn--ggrroouunndd PPeett FFeenncciinngg SSyysstteemmss
IUC-4100, IUC-4200,IUC-5100, IUC-5200

Splice each end of your pet fencing loop wires to the twisted wire.You
must use the supplied waterproof splices. Connect the lead ends of
the twisted wire to the wall mount transmitter.Plug in the AC Adapter
and connect it to the transmitter.Turn the transmitter ON.The trans-
mitter’s green light should illuminate, indicating a successful contin-
uous loop.
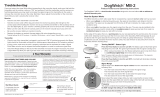
Run the containment wire around the property as outlined in your plan.Use
gradual rounded corners with wide radiuses.Avoid sharp (90°) angles.
SStteepp 33
Lay Out the Fence Wire
SStteepp 22
Install the Wall-mount transmitter
SStteepp 11
Design Your Fence
QQuuiicckk SSttaarrtt GGuuiiddee
IIUUCC--44110000,, IIUUCC--44220000,, IIUUCC--55110000,, IIUUCC--55220000
Have the local utility companies mark your underground lines; in
most communities this is a free service. On a sheet of paper, sketch
your house and yard. Draw a line around your property that repre-
sents the containment area for your dog, avoiding underground
utility lines. Where it is not possible to avoid utility lines, run your
wire perpendicular to the underground lines.
Locate the transmitter indoors on an exterior wall near an AC power
outlet; inside a garage or basement is ideal. The containment twisted
wire will need to run from the transmitter and pass through a window
or small drilled hole to the outdoors.
SStteepp 44
Final Connections
11
Boundary Wire
Splice
To wall-mount transmitter
IINNNNOOTTEEKK
®®
UUllttrraaSSmmaarrtt IInn--ggrroouunndd PPeett FFeenncciinngg SSyysstteemmss
Boundary Wire
10’
10’
Buried Cable
90˚
Page 5
Page 6
Page 6
Page 7
Follow Page Numbers For Detailed Instructions
About Your INNOTEK
®
UltraSmart
™
In-Ground Pet Fencing System
Discover what a difference an in-ground fencing system can make.You’ll discover
the ease and convenience of keeping your dog safe in your yard without the structure
and expense of traditional fencing.
Collar Charging Station plugs into any 110v AC wall
outlet.The collar fits in the cradle and charges the col-
lar in just 2-3 hours.It’s an attractive unit designed for
use in your home.
The Wall-mount transmitter controls the fencing field.
Mount it indoors,with field wires passing through the wall
and buried in the ground. You set controls to adjust the
size of the fencing field,strength of correction,and more.
Lightning Protection is an important part of your system.
This module is connected between the loop wire and the
transmitter.Without lightning protection, a lightning strike
within 1-2 miles of your installation can surge through
loop wire or AC power and may damage your transmitter.
Lightning protection is included in IUC-4200, IUC-5100,
and IUC-5200, and many other INNOTEK
®
fencing sys-
tems. Lightning protection module is also available as a
separate purchase; call us at 1-800-826-5527.
Boundary Wire is burial grade and rugged for virtual-
ly any ground conditions. You’ll lay the wire about 3-
inches deep.Twisting the boundary wire creates areas
in your yard that the dog can safely pass over. Pre-
twisted FasTrak
™
is included in IUC-4200, IUC-5100,
IUC-5200 and many other Innotek fencing systems.
ABOUT ZONES
Your dog’s collar will also work with the Zones
™
system,indoor avoidance to keep your dogs away
from things in your home.See page 9.
The UltraSmart Collar has been designed by profes-
sionals to offer optimal training stimulation in a sleek,
low profile design. The collar is packed with features
including PerfectFit
™
, an indication that the collar is fit-
ted properly to your dog.
You MUST charge
collar for 3 hours prior
to first use.
Important: Never leave the collar on the dog
for more than 12 consecutive hours.
See “Important Advice”, page 3.

66
Watch the training DVD and follow the training steps outlined in the separate
Training and Troubleshooting Guide.Your dog may show good initial response to
the training; be sure to follow the training procedure for several weeks.The con-
venience that your new fence offers plus the added safety for your dog and fam-
ily are well worth the time invested.
SStteepp 88
Train Your Dog
SStteepp 77
Bury Fence Wire
SStteepp 66
Test Your Fence
QQuuiicckk SSttaarrtt GGuuiiddee
((ccoonnttiinnuueedd)) IIUUCC--44110000,, IIUUCC--44220000,, IIUUCC--55110000,, IIUUCC--55220000
Set the FIELD WIDTH ADJUSTMENT knob
inside the transmitter to the 9 o'clock posi-
tion. Hold the supplied test light across the
skin contacts and walk the dog’s collar up
to the fence wire.Listen for the warning tone
and look for the test light to illuminate.You should receive a signal 8 to 12 feet from the wire.To increase
field width,rotate the adjustment knob clockwise.Test the collar in different places around the fenced area
to verify the range is consistent.
Dig a trench about 3-inches deep, using a
straight-edged spade or gas-powered
edger.Digging the trench at an angle helps
keep the wire in the ground where you
place it. Place training flags at edge of
selected boundary field where the warning tone is first heard, NOT at the wire.
22
33
SStteepp 55
Charge Collar
Choose a location close to a door that you and your dog use regular-
ly and plug in the wall charger.Position the collar in the charging cra-
dle.The collar fits in the cradle with the collar light to your left and
with the contacts that touch your dog’s skin facing down.The collar’s
light glows red while charging, green when charging is complete.
collar light
11..
Field Width
Adjustment Control
IMPORTANT ADVICE
1. Read the complete manual and follow all directions. If
you have any questions, please call 1-800-826-5527.
2. This device is intended for use only on dogs. Never attempt
to use it for any purpose not described in this manual.
3. Keep out of the reach of children.
4. Never perform set-up procedures while the collar is on
your dog.
5. Any collar worn for extended periods can cause a con-
dition similar to bedsores, known as Pressure
Necrosis. To reduce the possibility, you must do the
following:
• Never leave the collar on the dog for more than 12
consecutive hours per day.
• Check the fit to prevent excessive pressure; you
should be able to insert one finger between the collar
strap and your dog’s skin.
• Examine the dog’s neck daily for any signs of a
rash or a sore.
• Wash the dog’s neck area and the probes of the col-
lar weekly with a damp cloth.
• If the condition persists beyond 24 hours,see your
veterinarian.
6. Metal tags and collars should be removed as they may
interfere with proper operation.
7. Do not attempt to dismantle or repair any components
of this system; doing so will void the warranty in full.
The computerized circuitry should be serviced only by
an authorized expert.
8. Realize that because dogs have unique temperament,
there is no way of knowing how your dog will react to
the introduction of a pet fencing system.For the safe-
ty of your dog, a long lead should be used during ini-
tial training so you have control of the situation.
9. If you have reason to believe that your dog may pose
a danger to others, harm itself, or react adversely to
the collar,do not rely solely on this product to contain
your dog. If your dog shows signs of growling,
snarling or biting while using the collar, stop immedi-
ately. Aggression in dogs has many causes. We rec-
ommend that you consult a knowledgeable profes-
sional dog trainer or animal behaviorist with experi-
ence with aggressive dogs if your dog has shown any
of these characteristics.
10. Occasionally, a dog cannot be trained to respond to a
pet fencing collar.Sometimes even a properly trained
dog may disobey a command. Therefore, Invisible
Technologies, its distributors, and dealers cannot
guarantee that the system will in all cases keep the
customer’s animal from disobeying commands.
WE CARE.CALL US FIRST.
1-800-826-5527
LIMITED LIFETIME WARRANTY
Invisible Technologies warrants to the original retail purchas-
er,that INNOTEK
®
brand products will be free from defects in
material and workmanship, under normal use,for a period of
one year from the date of the original retail purchase. This
Limited Warranty excludes: accidental damage due to dog
chews; lightning damage where an INNOTEK
®
lightning pro-
tection component is not in use (in-ground pet fencing sys-
tems); or neglect,alteration and misuse.
Invisible Technologies offers several product exchange
options during the warranty period.If service is required, call
1-800-826-5527 to discuss the service plan that best
serves your needs. Costs are dependent on the processing
time and the desired shipping options. Please do not return
this product to your retailer
.
After one year from date of original retail purchase, we will
repair, replace or upgrade your product at a fixed rate
based on the component.
Invisible Technologies,Inc., shall not be liable or responsi-
ble for any incidental or consequential damages resulting
from the use of the product or caused by any defect, fail-
ure or malfunction of the product,whether a claim is based
upon warranty, contract,negligence or otherwise.
Inside Fencing Field
Page 8
Page 8
Page 9
FREE Professional Training Support
Additional behavior or training issues?
Looking for the best way to get a well-behaved dog?
Call our FREE Professional Training Support hotline at
1-800-364-3362

The Collar
The lightweight comfortable collar is integrated into a fash-
ionable collar strap your dog wears.The collar administers
the warning tone and correction should your dog attempt
to leave the yard.The collar is rechargeable; place the col-
lar on the charging cradle located on top of your charger
station.The collar’s light glows red while charging; it glows
green once charging is complete.
IUC-5100 Contain ‘N’ Train users – your collar features 2
lights.The one on the left reflects status of the system’s in-
ground fencing, the light on the right reflects commands
from the handheld remote.
PerfectFit
™
test
When you remove the collar from the charger,the system will
run through ReadyTest
™
for about 8 seconds,and then enter
PerfectFit
™
mode (blinking amber light). You have approxi-
mately 90 seconds to fit the collar to your dog as described
below.As the unit makes successful skin contact,it will emit
a quiet but audible click.After 5 consecutive clicks,you have
positive confirmation of the correct fit.
Should you not fit the collar within 90 seconds of removal from
the charger,it will operate without the PerfectFit
™
Test.
Fitting the Collar on your Dog
The collar strap should fit snugly towards the top of your dog’s
neck with the collar electronics on the bottom of the neck.
Check that the INNOTEK® logo is
right-side up. You should be able to
get one finger between the collar
strap and your dog’s neck. The con-
tacts must make contact with the
dog's skin for proper operation.A little
hair thinning may be required.
Occasionally, check the tightness of the skin contacts to
ensure they will not be lost from the collar. Lost compo-
nents are not covered under
your warranty.
Trim excess strap along the dia-
gonal score marks.You’ll want
to leave several inches of excess
strap. Note if your dog is young
and you expect him/her to grow,
you’ll want to leave extra strap
to adjust the collar fastening.
Replacement straps are available.
Call us at 1-800-826-5527.
Over-Stimulation Prevention – In the unlikely event that your
dog “freezes”in the pet fencing field, this feature limits stimula-
tion duration to 10 seconds.The system locks out further stimu-
lation for 10 seconds before resuming stimulation for another 10
seconds.This pattern will repeat for a maximum of three cycles,
a duration of 60 seconds.
Run-Through Prevention – This INNOTEK
®
system
includes a unique "run-through" prevention so that your
dog cannot escape the pet fencing field without activating
a strong stimulation.The collar automatically increases the
stimulation when your dog continues more than 1/3 of the
way through the pet fencing field, regardless of the trans-
mitter stimulation level setting. For example, if the signal is
detected 12 feet from the wire and your dog enters the pet
fencing field, this feature is activated when he is approxi-
mately 8 feet from the wire. At this point, your dog auto-
matically receives the highest level of stimulation.
The pet fencing wire must form a complete loop from the
transmitter.
Although the pet fencing wire is only buried 1 to 3-inches,
make sure you contact your utility companies to mark
underground cable and wire locations before you dig. In
most communities,marking the utility lines is a free service.
DO NOT run a wire within 10 feet or parallel to cable TV,
phone, or electrical lines. The signal can couple together,
causing inadvertent collar activation in the house and safe
parts of the yard.You can minimize interference by crossing
perpendicular to these lines.See Quick Step 1 illustration.
Depending on the system purchased, you should have
received the following components:
The Wall-Mount Transmitter
The transmitter is the system's control center. Lift the
hinged front cover to reveal the switches that can cus-
tomize your system.
Wall Transmitter User Controls
1. Field Width Adjustment Control
2. Field Size Switch
3. Stimulation Level Switch
4. Loop Wire Terminals
5. Collar Charge Reminder Switch
6. Power Connection
7. Battery Backup Monitor Switch
8. Power Switch ON/OFF
9. Alarm Volume Control
10. Indicator Light
1. Field Width Adjustment – Controls the distance from
the wire your dog can venture before hearing the
warning tone and receiving correction.
2. Field Size Switch – Set switch to small (SM) for
installations of 1,000 feet of wire or less.
3. Stimulation Level Switch – Select from levels Low,
Medium,or High,the correction level your dog will feel
after the 2-second warning tone (LOW and MED
selections only).The tone and correction occur at the
same time when level is set on HIGH.
4. Loop Wire Terminals – Spring-loaded connections
for the pet fencing wire.
5. Collar Charge Reminder Tone Switch – Not required
with this system.Set to OFF.
6. Power Connection – Power for the pet fencing sys-
tem. Connect the 24-volt DC adapter plug here, and
then plug the adapter into any 110v AC outlet.
7. “24/7” Battery Backup Monitor Switch – If power
to the system is interrupted, the battery back-up will
keep the system working up to 40 hours. Install 8 AA
alkaline batteries (not included). The monitor will
sound when batteries need to be replaced. For the
safety of your dog,the battery backup monitor should
be switched to ON and kept in good working order at
all times.
8. Power – ON/OFF Switch
9. Alarm Volume – Controls the volume of wall trans-
mitter alarms.Will not silence the alarm.
10. Indicator Light and Alarm – The light on the front of the
transmitter will indicate the following conditions.
External Lightning Protector
Several systems include external lightning protection,
which helps protect the transmitter from electrical power
surges and lightning strikes near your boundary wire. A
nearby lightning strike can cause failures due to high volt-
age damaging your transmitter. Severe lightning strikes
may damage the Lightning Protection, which is designed to
be a sacrificial link in the system.This enhanced lightning
protection (LP-4100) is available for other INNOTEK
®
pet
fencing systems by calling 1-800-826-5527.
IINNNNOOTTEEKK
®®
UUllttrraaSSmmaarrtt
™™
IInn--ggrroouunndd PPeett FFeenncciinngg SSyysstteemm
44
55
11..
Field Width
Adjustment Control
22..
Field Size Switch
33..
Stimulation
Level Switch
44..
Loop Wire Terminals
55..
Collar Charge Reminder Switch
66..
Power
Connection
77..
Battery Backup
Monitor Switch
88..
Power ON/OFF
Switch
99..
Alarm
Volume Control
1100..
Indicator Light
WWaallll TTrraannssmmiitttteerr––
UUsseerr CCoonnttrroollss
TTRRAANNSSMMIITTTTEERR SSTTAATTUUSS IINNDDIICCAATTIIOONNSS
SSTTAATTUUSS lliigghhtt AALLAARRMM CCOONNDDIITTIIOONN
TTOONNEE
Solid Green No Power On/System OK
Flashing Red Twice per second
Boundary Wire Broken/Disconnected
Flashing Yellow Once per second Backup Batteries Low
alarm can be turned
off with battery
backup monitor
alarm switch
None Once per 5 seconds AC Power Disconnected; Unit
Operating on battery
None No Transmitter is OFF or
Power is disconnected
IUC-4100 IUC-4200 IUC-5100 IUC-5200
Wall mount
transmitter
Installation Wire
Pre-twisted
Fastrak™ Wire
UltraSmart in-ground
fencing collar
UltraSmart
Contain N Train
®
collar
Contain N Train
handheld remote
ZONES™ transmitter
Lightning Protection
Training DVD
SStteepp 11
Design Your Fence

Customized Loops.You can create off limit areas,such as
pools and gardens by encircling the area with wire. Run
twisted wire from the fence loop to the encircled area,and
splice the ends together.
2. Rounding Corners
Use gradual turns at the corners with a minimum of 2.5-foot
radius.This will produce a more consistent pet fencing field.
3. Placing the wire
The wire must make a continuous loop from the transmit-
ter and back again.The signal passes from one transmit-
ter terminal around the loop and back to the transmitter
again. Keep in the mind that you will want an 8 to 12-foot
pet fencing signal field from your wire, so don't run the
wire too close to the house and make passageways too
narrow for your dog to pass.
4. Twisted Wire
Twisted wire cancels the radio signal coming from your
transmitter.This enables your dog to cross over the wire in
the safe part of the yard. Where there is single wire, the
fence is active and your dog will be unable to pass.Your kit
may have come with FasTrak pre-twisted wire or you can
purchase it as a separate kit by calling 1-800-826-5527.
You can twist your own wire by cutting two equal lengths
of wire supplied and twisting them together. Anchor one
end of the wires to something secure and insert the other
end in a power drill. Pull wire taut.The drill enables you to
twist the wire quickly.You will need at least 12 twists per
foot to effectively cancel the radio signal.
IMPORTANT TIPS
DO NOT run wire within 10 feet or parallel to cable TV,
phone or electrical lines.The signals can couple together,
causing inadvertent collar activation in the house and safe
parts of the yard.
The wire must form one continuous loop from the transmitter.
Work carefully.A nick in the wire can diminish signal strength
and create a weak area where your dog can escape.
Use twisted wire to run between the transmitter and the
interior loops,such as around pools and gardens.This will
allow your dog to safely pass around these areas.
(Reference Custom Loop illustration.)
1.Splicing to the boundary wire – Pull the twisted wire to
the perimeter location of the two ends of your boundary wire
loop. Splice the ends of
the twisted wire to the
ends of the boundary
wire with the supplied
waterproof splices as
shown. Use only waterproof splices supplied with this sys-
tem. Additional splices are available by calling 1-800-826-
5527,or at www.innotek.net.Use of wire nuts alone, electri-
cal tape or solder will not provide a waterproof and secure
connection for your system to function properly long-term.
To use the gel-filled capsule splice,strip 5/8-inch of insula-
tion from the wire ends. Insert ends of wire into nut and
twist to secure.Insert the wire nut as deeply as possible into
the waterproof gel and snap the lid shut. Tie a knot in the
wires as shown in Quick Step #4 to avoid having the wires
pull free during installation.
Only two wires can go into one splice.
2. Bring outside wire to transmitter – From the outside,
push the twisted pair of wires through the hole in the wall.
Strip about 1/2-inch of insulation from the two ends. Insert
ends into loop wire spring-loaded terminals marked on the
transmitter. (If using Lightning Protection, see alternate
wiring described on page 8).
3. Plug transmitter in – Use supplied power adapter and
plug adapter into the jack provided on the transmitter. Plug
the power adapter into a 110v wall outlet. Set transmitter
power switch to the ON position.The green light should illu-
minate on your transmitter indicating a properly installed
boundary loop. If the light does not come on, refer to the
Training and Troubleshooting Guide.
Place the power cord wire under the wire retention tab of
the housing.
For your dog’s safety, we recommend keeping the pet fenc-
ing wire at least 10-feet from the street. Keep in mind that
you will want to place the wire where there is room for an 8-
12 foot pet fencing field from the buried wire.
1. Select a Location – Select an indoor, dry location to
hang the wall-mount transmitter.You will need a standard
110v AC grounded outlet within 5 feet to power the trans-
mitter.Most people find an inside exterior wall of a garage
or basement works well.You will need easy access to run
the pet fencing wire outside.
2. Install the Mounting Plate – The mounting plate is
attached to the back of the transmitter. Remove by lightly
depressing the top tab and sliding the transmitter housing
up the plate. Use the mounting plate as your template and
mark holes with pencil.Fasten plate with supplied screws
and wall anchors if necessary.
3. Install Battery Backup Batteries –
(Optional, but rec-
ommended)
In the event your power goes out, your system
can run for up to 40 hours on 8 AA batteries (not included).
Install batteries and set BATTERY BACKUP MONITOR
switch to the ON position. If you choose not to use the bat-
tery backup system, set the BATTERY BACKUP MONITOR
switch to OFF.
4. Provide for wire access to outside – You will need to
get the wire from the transmitter to outside where the pet
fencing loop will run.This can be done through a window
or you can drill a 1/4-inch hole at the base of the wall to
pass the wire through.After final installation and testing is
complete,caulk the hole to prevent damage from moisture
or insects.
With the transmitter installed and the hole drilled for the
wire,you can position the boundary wire that will form your
fence.DO NOT bury the wire until you are sure that the sys-
tem is functioning properly.
1. Amount of wire
Your system includes 500 feet of boundary wire.The IUC-
4200, IUC-5100 and IUC-5200 include an additional 100
feet of pre-twisted wire. For larger areas, boundary kits
with wire and splices, as
well as convenient pre-
twisted wire are available
from your retailer or call 1-
800-826-5527. The chart
below offers some exam-
ples of wire coverage area.
Front and Back Yard Loop. The most common installa-
tion.The wire is placed just inside the property line to form
a square or rectangle.
Hourglass Loop.Allows your dog to be contained in either
the front or back yard but not around the side of the house.
When the wire runs parallel to itself as it goes toward the
side of the house be sure the wires don't come within 6-
feet of one another to avoid canceling the signal.
Double Loop. Confines your dog to the backyard only.The
wire needs to run around the backyard, using the house as
a natural barrier and doubling back to the transmitter to
finish the complete loop.When doubling back, make sure
that there is at least 6-feet between the lines to avoid can-
celing the signal.
SStteepp 33
Lay Out the Fence Wire
77
splice
pet fencing signal cancelled
in this area
FFrroonntt aanndd BBaacckk YYaarrdd LLoooopp
splice
HHoouurrggllaassss LLoooopp
splices
splices
splices
CCuussttoommiizzeedd LLooooppss
SStteepp 22
Install the Wall-mount transmitter
Acres Linear FT Needed
1 850
2 1200
3 1500
4 1700
5 1900
splice
6 ft.
DDoouubbllee LLoooopp
66
SStteepp 44
Final Connections

Test in a number of different areas until you are satisfied
that the system is functioning properly.
Next,walk all around the "safe" part of the yard to ensure
there are no areas where the signal may be lost, particu-
larly where there may be buried wires or cables.Test the
collar in and around the inside of the house as well.
As mentioned,cable and wires from cable TV, electrical or
telephone lines may conduct pet fencing signals inside and
outside the house that can activate the dog's collar acci-
dentally. While rare, if this occurs your boundary wire is
probably too close to these outside lines and should be
moved or modified; see previous section about running pet
fencing wires perpendicular to utility lines.
You may need the following tools for efficient installation:
Straightedge spade or a gas-powered edger.If you plan on
running the wire across a driveway you may also need a
caulk gun, silicone caulking and a circular saw with a
masonry blade.
1.Ensure system is turned off – Turn off the transmitter
and unplug the adapter from the AC outlet.
2. Bury the wire – With a straightedge spade,dig a slot 1
to 3-inches deep in your turf. Rock the spade back and
forth to create a V-shaped slot.You may choose to use a
gas-powered edger as well. A 30 to 45-degree angle cut
will be the easiest to close and keep the wire in the slot.
Make sure there is a little slack in the wire as you bury it
to compensate for expansion and contraction due to tem-
perature changes.
When crossing an asphalt driveway, make a 3/8-inch per-
pendicular cut across the driveway using the circular saw
and masonry blade. Place the wire in the crack and seal
with asphalt sealant.With concrete driveways, there is usu-
ally an expansion joint that can be cleaned out and used for
the same purpose and covered with clear silicone caulk.
The wire can be placed underwater in creeks and streams
by running the wire through PVC pipe or a length of cut
garden hose to prevent the wire from being damaged.
3. Place training flags – Repeat the TEST YOUR FENCE
steps outlined in the Step 6.As soon as you hear the warn-
ing tone, place one flag. Repeat the process in 10-foot
intervals around the pet fencing area.The flags will be your
dog's visual clue to the boundary during training, and will
be gradually removed during the training process.You are
now ready to begin training your dog. See the Training and
Troubleshooting guide.
Working With INNOTEK
®
ZONES
™
IUC-5200 users
This collar is also compatible with INNOTEK
®
ZONES™, a
battery-powered portable indoor avoidance system.Place a
ZONES™ transmitter near anything you want your pet to
avoid: plants, trash cans, fine furniture. When your dog
wearing the collar enters the avoidance ZONE, he will
receive a mild correction, designed to create just enough
discomfort to get him to leave the area.
Setting your ZONE
Install three AA alkaline batteries (not included) in the
ZONE. Determine the desired location and size for your
pet-free zone.Hold the ZONE so that the name is right side
up. Press the arrow-shaped UP button.A segmented line
will appear in the window. Each segment represents
approximately two feet of range from the unit.The arrow-
shaped DOWN button reduces the diameter of the pet-free
zone.Once range is set,place ZONE in desired area. Zones
has a maximum range of 5-6 feet.
Testing the Zone
You may wish to verify the range of the pet-free zone.
Holding the collar,start outside the range and walk slowly
toward the ZONE.The collar will emit a high-pitched tone
as it approaches the outer range of the pet-free zone, fol-
lowed by an escalating level of correction. If you cannot
hear the tone, hold the supplied test light on the collar
probes and repeat this test. The light will illuminate,
demonstrating stimulation.
Your First Indoor ZONES Session
Move your dog to an area away from the pet-free zone. Be
sure he’s wearing his INNOTEK® collar. Allow your dog to
enter the zone on his own. Monitor your dog during his first
session. Dogs learn at different speeds. It may take several
times for your dog to honor the pet-free zone.You may also
need to adjust the range so that your dog receives the warn-
ing sooner. If you find that your dog is confused or unsure
how to avoid the correction, it may be useful to put a long
leash on your dog and show him how to avoid the ZONE by
gently guiding him out of the range once he has entered.Be
sure to praise your dog for leaving the pet-free zone.
Important Information About Range
Your ZONES™ transmitter communicates with your pet’s
collar via a radio frequency signal. Due to the inherent
properties of radio signals, some locations may affect the
maximum range that can be achieved.This may be partic-
ularly noticeable around metal objects.Should you find that
1. If using lightning protection module,connect the twisted
wire ends from the pet fencing field to the spring-loaded
terminals marked “loop”on the lightning protection.
2. Use a short piece of twisted wire to connect from the ter-
minals marked “transmitter”on the Lightning Module to
the "Loop" terminals on the wall-mount transmitter.
3. Plug Lightning Protection Module into the grounded
110v outlet.
4. “Piggyback” the transmitter power adapter onto the AC
outlet on the Lightning Protection Module.See illustration.
The collar charging station has been designed to plug into a
standard 110v wall outlet and act as a charging stand for your
collar.It’s an attractive unit designed for use in your home.
Choose a location close to a
door that you and your dog
use regularly and plug in
the wall charger. Position
the collar in the charging
cradle.The collar fits in the
cradle with the skin con-
tacts facing down through
holes in the case.A built-in
safety circuit prevents the
unit from overcharging. The collar’s light glows red when
the collar is properly seated and charging; it will turn green
when charging is complete.
The collar will achieve a full charge in 2-3 hours. Each
charge can last up to two months.
Battery Caution: Do not charge your collar every night.
Frequent charging can have a negative effect on your col-
lar’s battery. We recommend the collar be used until bat-
tery status light blinks red.
ReadyTest™ feature
When you remove the collar from the charging station, the
unit will automatically go into self-test mode for about 8
seconds. The collar’s internal diagnostics will check that
the battery charge is full and that all circuits are working
correctly. Do not touch the skin contacts during this test.
Ready Test gives you added confidence that your pet fenc-
ing collar is working and ready to go.
If Continuous Red: If the ReadyTest
™
self-test fails, the
unit will tone and the LED will glow solid red for 20 sec-
onds. Replace in the charger for 5 seconds, then remove.
Do not touch the metal contacts.If the unit continues to fail,
call us at 1-800-826-5527.
PerfectFit
™
Test for Skin Contact
As part of the ReadyTest
™
,the collar will go into PerfectFit
™
mode. The collar will emit a click tone as the contacts
touch your dog’s skin. A proper fit will be acknowledged
with 5 consecutive click tones.
To skip the PerfectFit
™
test, just wait 90 seconds after
removal from charger. The collar will function normally,
bypassing the PerfectFit
™
test.
You should have your boundary wire laid out on top of your
lawn and properly connected. The collar should have
charged for 2-3 hours.DO NOT test the system on your dog.
1. Field size switch – Set to small (SM) for installations
using less than 1000-feet of wire. For larger installations,
move the switch to large (LG).
2.Adjust pet fencing field – Move the FIELD WIDTH knob
to the 9 o'clock position.
3. Test system
– Select a sec-
tion of straight
boundary wire
that is at least 50
feet long. Hold
the supplied test
light across the
collar’s skin con-
tacts, and posi-
tion the collar at your dog's neck height. Slowly walk the col-
lar toward the boundary wire. Listen for the warning tone and
watch for the test light to illuminate.The wider you can make
the pet fencing field, the less chance your dog can run-
through.Adjust the FIELD WIDTH as necessary and test again.
SStteepp 66
Test Your Fence
SStteepp 77
Bury Fence Wire
SStteepp 55
Charge Collar
Boundary Wire
99
88
transmitter
transformer
twisted pair connection
outlet
screw
LP-4100
signal
field wire
Final Connection Layout With Lightning Protection

Contain ‘N’ Train
®
IUC-5100 Users Only
Your Contain ‘N’ Train
®
system includes a handheld remote.
The remote offers 9 levels of preset stimulation. Level 1
delivers the mildest level, and Level 9 the most intense.
The collar will stimulate for as long as you hold down the
center red stimulation button (maximum 10 seconds).
You can use your remote to train your dog within the
boundaries of your in-ground fence, or you may remove
the dog from the fenced area.Be sure to remove the collar
from the dog when crossing the field boundaries.The train-
ing system has a working range of up to 150 yards.
Contain ‘N’ Train Collar
Your collar features two LED lights. The one on the left
reflects the status of your system’s in-ground fence.The light
on the right reflects commands from the hand-held remote.
Remote controls
The miniature handheld
remote includes a built-in
antenna, LCD display, and 6
control buttons.
• Stimulation – The red,
center button.Sends stim-
ulation signal to the collar
at the intensity shown in
the display window. The
button features four raised
bumps, one at each corner, for user confidence when
operating by touch only.
• Level up (+) / Level Down (-) – arrow
shaped buttons adjust stimulation intensity
through a range of levels from Low-1 to High-9.
• Tone – Green, speaker-shaped button.
Produces a harmless tone at the collar. No stimulation
is delivered. Use tones to reinforce correction. Some
people use tone as an alternate form of correction.
Button is also used as ON/OFF (see below).
• Dog 1/ Dog 2 – Switches remote controls from
the Dog 1 collar to the Dog 2 collar; great when training
two dogs at once.You can purchase a second accesso-
ry collar to expand your system to train two dogs.
• BOOST – Red, smaller stimulation button. Sends a
stimulation signal 2 levels higher than that shown in the
display window.For example, if you are training your dog
at level 3, pressing BOOST delivers a stimulation at level 5.
The display shows stimulation levels 1 through 9.
The lower part of the display shows which collar is
active. Press “Dog1/Dog 2” button once or twice
until collar 1 shows as active.
The display will stay ON, only going OFF 30 minutes after
the last button press
The back of the remote features a recessed groove in
which to rest your index finger while operating the controls
with your thumb.For best results at distance,take care not
to cover or shield the antenna with your body or hand, or
you may see a reduction in transmission range.
The remote is water-proof,though submersion is not rec-
ommended.It operates on a replaceable 12v Alkaline bat-
tery (23A or A23). These are commonly available where
you bought your system or where batteries are sold.
ON/OFF
To turn the training mode of the
collar on or off, hold the collar
within 1 inch of the remote
antenna,taking care not to touch
the skin contact points. Press
“Dog1/Dog 2” button once or
twice until collar 1 shows as
active. Press the TONE button,
also labeled “1/0”.The collar will emit a start-up tone,and
the right-hand light will glow solid green. This ON/OFF
command only works when remote and collar are in close
proximity; it will not work at a distance. Never turn the unit
ON/OFF while your dog is wearing the collar.
When not in use, be sure training function is OFF (right hand
collar light is off),or you may drain battery.
About Stimulation
We recommend that you always start training your dog with
the lowest stimulation, and increase to a higher level if nec-
essary.You will know when you’ve reached the right level
when your dog responds by twitching his head, neck or
shoulders or by perking up his ears.If the dog vocalizes,you
may need to go to a lower level.
Control the level of stimulation with the UP (+)/DOWN (-)
arrow buttons.Adjust the stimulation level from a low of 1,
to a high of 9.To correct your dog, press the center red stim-
ulation button.
You control the length of the stimulation by the time you
press the button.For a short stimulation,press and release
the button. For a longer stimulation, hold the button down.
A maximum of 10 seconds may be applied before the safe-
ty feature to prevent over-correction engages.After 10 sec-
onds,stimulation will be locked out for another 10 seconds.
you are not getting the desired range at the maximum set-
ting, altering the ZONE location by a few feet or changing
how the Zone is positioned (ie: standing on end instead of
laying flat) may help cover your pet free area.
Turning the Units OFF
To turn the ZONE OFF, continue to press and release the
DOWN arrow button until no bars are present in the win-
dow.The ZONE is now OFF.
Multiple Dog Households
All zones and collars come preset in mode A. In multiple
dog households,it may be desired to allow one dog access
to an area while denying access to another.Each collar can
operate on one of two different modes - A or B.
Each Zone may also
be set to either A.B,or
both (A and B) to allow
multiple configura-
tions.
Changing the system mode setting
1.Take your collar with a full battery charge (green light) and
set it within one foot of the Zone.
2.With the Zone turned OFF,press and hold the DOWN arrow
button until a vertical bar appears in the window.This bar will
indicate whether the Zone is set to mode A or mode B.The
collar will be programmed to reflect the mode setting on
your transmitter. Continue to hold DOWN arrow button
through the end of the next step. NOTE: You cannot repro-
gram the collar if the Zone is set on A/B mode.
3.Press and release the UP arrow button until desired mode
is indicated. Now press and hold the UP arrow button until
one bar segment appears, followed by three beeps from the
collar.The collar is now set for your chosen mode.
4. Important: Any collar that is within 6 feet of the trans-
mitter and turned on will be reprogrammed by these steps.
You may use this feature to program multiple collars at
once. However, make sure any collar you do not wish to
reset is 6 feet beyond the transmitter during this procedure.
Do not perform set-up procedure while the collar is on
your dog.
Add ZONES to your home
If you find your ZONE an effective way to keep your dog
from problem areas in your home,additional Zones are
available where you bought your IUC-5200 system, or call
us at 1-800-826-5527.
ALL USERS
Even if you did not purchase the IUC-5200 Contain ‘N’
Zones system, your dog’s collar will work with the
Zones system.Zones products are available where you
bought your in-ground fencing system, or call us at
1-800-826-5527.
1100
Trouble Shooting
Transmitter Check / charge batteries in collar
does not appear Check segment indicator on transmitter
to work Check / replace batteries in transmitter
Use an Innotek test light to check collar
for stimulation
Increase Zone size on transmitter
Check collar fit and make sure contacts
are touching skin
Check that transmitter Zone is set to
reflect collar setting (A/B/AB) - refer
to Multiple Dog Household section
for instructions
Range is too low Check / charge batteries in collar
Adjust transmitter to increase Zone size
Range is too high Adjust transmitter to decrease Zone size
Dog seems to Check / charge batteries in collar
receive no Use a test light to check for stimulation
stimulation Check the Zone setting on transmitter
Collar fails to Check / charge batteries in collar
sound off Dogs easily hear warning tone,but it may
warning tone be a pitch that is difficult for you to hear
Use an Innotek test light to check collar
for stimulation
1111

BOOST
Pressing the button sends a continuous signal to the
collar,raising the stimulation by 2 levels.For example,if the
stimulation level is set at Level 3, a touch of the con-
trol will correct at Level 5 . Some trainers like instant
access to a higher setting for circumstances with high dis-
tractions.
Tone
The button sounds a tone in the collar.No stimulation
is delivered when this button is pressed.The tone continues
for as long as the button is held down.There is no stimula-
tion delivered by the collar when pressing the tone button.
Tones can help strengthen a dog’s response to training.
Tones can be used as a warning tone
prior to pressing the
stimulation button; or can be a reward tone
when present-
ed with a praise,play,or food for good behavior.
The use of training tone is optional. Its use varies between
popular training methods. Whether the tone will mean
reward or warning to your dog is up to the training method
you choose. Remember: the one training tone CANNOT be
both a warning and a reward.
To learn more about tone training,consult your veterinarian
or a qualified canine training professional.
Compliance with US FCC and European
Telecommunications Regulations
This INNOTEK
®
Remote Training System is designed to
meet worldwide requirements for telecommunications
compliance.This system contains both receiver and trans-
mitter devices.In the US,each transmitter device complies
with Part 95 and/or Part 15 of the FCC rules; each receiver
device complies with Part 15 of the FCC rules.
Each device complies with Part 15 of the FCC Rules.
Operation is subject to the following two conditions: (1) this
device may not cause harmful interference, and (2) this
device must accept any interference received, including
interference that may cause undesired operation. Each
device may display indications as to where this system is
compliant worldwide.Note that in some countries,the use
of this INNOTEK
®
Remote Training System may be limited
due to national frequency planning requirements, and the
user is always responsible for respecting national and local
rules before operating.
U.S. Patent No. 6,184,790; 6,459,378; 6,327,999,
6,807,720; D417,835.Other patents pending.
We care. Call us first.
LIMITED LIFETIME WARRANTY
INNOTEK
®
, Inc., warrants to the original retail purchas-
er, that INNOTEK
®
brand products will be free from
defects in material and workmanship, under normal
use,for a period of one year from the date of the orig-
inal retail purchase. This Limited Warranty excludes:
accidental damage due to dog chews; lightning dam-
age where an INNOTEK
®
lightning protection compo-
nent is not in use (in-ground pet fencing systems); or
neglect, alteration and misuse.
INNOTEK
®
offers several product exchange options
during the warranty period.If service is required,call
1-800-826-5527 to discuss the service plan that
best serves your needs. Costs are dependent on the
processing time and the desired shipping options.
Please do not return this product to your retailer.
After one year from date of original retail purchase,
we will repair, replace or upgrade your product at a
fixed rate based on the component.
INNOTEK
®
, Inc., shall not be liable or responsible for
any incidental or consequential damages resulting
from the use of the product or caused by any defect,
failure or malfunction of the product, whether a
claim is based upon warranty, contract, negligence
or otherwise.
INNOTEK,and the INNOTEK logo are registered trademarks
of INNOTEK
®
, Inc. UltraSmart and the UltraSmart logo,
Contain ‘N’ Train, ZONES and Instant Pet-Proofing Barriers
are trademarks of INNOTEK
®
, Inc. All other product and
service names are the property of their respective owners.
Patents pending.
© 2004,INNOTEK
®
,Inc.All rights reserved
IINNNNOOTTEEKK®®,, IInncc..
11--880000--882266--55552277
wwwwww..iinnnnootteekk..nneett
FFRREEEE PPrrooffeessssiioonnaall TTrraaiinniinngg SSuuppppoorrtt
Additional behavior or training issues? Looking for
the best way to get a well-behaved dog? Just call
our
FFRREEEE
Professional Training Support hotline at
11--880000--336644--33336622
Training Notes:
1122
/