76711
A DIVISION OF DOUGLAS DYNAMICS, LLC
Access Hole Plug Kit
5.25 ft3 Tailgate Spreaders
PARTS LIST
76711 Hole Plug Kit
Item Part Qty Description Item Part Qty Description
1 1 Break-Thru Plug 2 6 1/2 x 3/4 Push Retainer Black Nylon
April 1, 2018
Lit. No. 76712, Rev. 00
1
2
CAUTION
Use standard methods and practices when
attaching spreader and installing accessories,
including proper personal protective safety
equipment.
CAUTION
Read this document before installing the
Access Hole Plug.

76711
Lit. No. 76712, Rev. 00 2 April 1, 2018
INSTALLATION INSTRUCTIONS
These instructions describe how to add a lubrication
access hole on 5.25 ft3 tailgate spreaders without a
pre-drilled hole in the main frame. The hole allows
convenient access for lubricating the auger bearing as
specied in the spreader Owner's Manual.
Check Current Orientation of Grease Zerk
• If the zerk points rearward (away from vehicle),
drill an access hole through the main frame as
described in these instructions.
• If the zerk points forward (toward the vehicle),
it can be accessed from the vehicle side of the
spreader frame, with no drilling necessary. If
preferred, the auger bearing may be adjusted
so the zerk points rearward (away from vehicle)
and an access hole drilled through the frame as
described in these instructions.
• If the zerk points either up or down, it will not be
accessible for lubrication. Follow the instructions
under "Adjust Orientation of Grease Zerk (If
Required)" to rotate the auger bearing so the
zerk points away from the vehicle. Drill a bearing
access hole as described in the following
instructions.
Drill Access Hole in Spreader Frame
1. If the spreader is installed in the vehicle, park the
vehicle on a smooth, level, hard surface, such as
concrete. Turn the vehicle ignition to the "OFF"
position and remove the key.
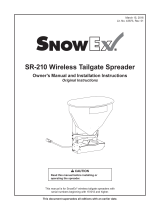
2. Mark the location for the bearing access hole by
measuring 10-3/4" over from the left-hand edge
of the lower panel of the spreader frame and
3-3/4" up from the bottom edge as shown.
3. Drill a 1/8" pilot hole at the marked location, then
drill a 1-1/8" hole.
4. De-burr the edge of the hole and insert the
supplied break-thru plug.
10-3/4"
3-3/4"
Break-Thru
Plug

76711
Lit. No. 76712, Rev. 00 3 April 1, 2018
Adjust Orientation of Grease Zerk
(If Required)
1. Remove the spreader from the vehicle and set it
on a rm, level surface.
2. Using a socket wrench remove the two
5/16" x 1‑1/4" auger bafe mounting screws.
Retain the bafe and all mounting hardware
for reinstallation.
3. Using a hex key, loosen the 5/16" auger set screw.
Bafe
5/16" x 1-1/4"
Mounting Screws
Auger
Set Screw
4. On the passenger side of the spreader frame,
remove the six push retainers securing the
transmission cover plate. Remove the cover plate
and set it aside.
5. Remove and retain the four 1/4" x 3/4" auger
transmission mounting screws. Slide the
transmission/motor assembly out of its
compartment, separating the transmission from
the auger. Make sure to retain the 5/8" nylon
washer that ts between the auger and the
hopper wall.
6. Remove and retain the four 5/16" x 1" cap screws,
washers, and locknuts that secure the hopper to
the spreader frame. Lift the hopper slightly from
the passenger side and slide the auger out from
the bearing. Set aside the auger.
1/4" x 3/4"
Mounting Screws
Transmission
Cover Plate

76711
Lit. No. 76712, Rev. 00 4 April 1, 2018
7. Remove the hopper from the frame to expose the
auger bearing.
8. Remove and retain the four 3/8" nuts that secure
the bearing to the frame. Reposition the bearing
so the grease zerk points toward the newly drilled
hole in the spreader frame, as shown below.
Reinstall the 3/8" nuts and tighten to 30 ft-lb.
9. Replace the hopper into the spreader frame but do
not reinstall the hopper mounting hardware yet.
10. Reinstall the auger into the bearing, lifting the
passenger side of the hopper slightly to allow the
auger to slide into place.
11. Replace the motor and transmission within
their frame compartment and reconnect the
transmission to the auger, making sure the
retained 5/8" nylon washer is in place between
the auger and the hopper.
12. Reinstall the transmission to the spreader frame
using the 1/4" x 3/4" cap screws retained in
Step 5. Tighten fasteners to 6 ft-lb.
13. Bump the auger up against the nylon washer.
Using a hex key, retighten the 5/16" auger
set screw.
14. Using the supplied push retainers, reinstall the
transmission cover plate removed in Step 4.
15. Reinstall the hopper mounting hardware removed
in Step 6.
16. Reinstall the auger bafe and fasteners removed
in Step 2, making sure to insert the cap screws
with washers from inside the hopper.
Grease
Zerk
3/8" Nuts
Auger Bearing
Copyright © 2018 Douglas Dynamics, LLC. All rights reserved. This material may not be reproduced or copied, in whole or in part, in any
printed, mechanical, electronic, lm, or other distribution and storage media, without the written consent of the company. Authorization to
photocopy items for internal or personal use by the company's outlets or spreader owner is granted.
The company reserves the right under its product improvement policy to change construction or design details and furnish equipment when
so altered without reference to illustrations or specications used. This equipment manufacturer or the vehicle manufacturer may require or
recommend optional equipment for spreaders. Do not exceed vehicle ratings with a spreader. The company offers a limited warranty for all
spreaders and accessories. See separately printed page for this important information.
Printed in U.S.A.
5/8" Nylon
Washer
/