YSI 550A User manual

Category
Measuring, testing & control
Type
User manual

YSI 550A Dissolved Oxygen (DO) Meter is an accurate and reliable instrument for measuring dissolved oxygen levels in water. It features automatic temperature compensation, a backlit display for easy reading in low-light conditions, and a rugged design that can withstand field use. The YSI 550A is ideal for a variety of applications, including water quality monitoring, environmental studies, and aquaculture.

YSI 550A Dissolved Oxygen (DO) Meter is an accurate and reliable instrument for measuring dissolved oxygen levels in water. It features automatic temperature compensation, a backlit display for easy reading in low-light conditions, and a rugged design that can withstand field use. The YSI 550A is ideal for a variety of applications, including water quality monitoring, environmental studies, and aquaculture.

8
Water Action Volunteers Level 2 Manual Updated January 2016
YSI Model 550a Dissolved Oxygen (DO) Meter
The YSI 550a Dissolved Oxygen (DO) meter needs to be calibrated before being used in the field
each and every time you monitor. Once calibrated, the meter must be left on until you/your
team is done with monitoring activities for the day at all monitoring locations.
In order to avoid damaging the meter, do not let sponge inside the probe chamber dry.
Maintaining a damp environment in the chamber will help to ensure that your meter has high
quality performance throughout the field season. Keep sponge moist by re-wetting it, at least
bi-weekly, if not more frequently. If the sensor membrane becomes damaged, you will need to
replace it (contact the WAV coordinator for assistance) and then wait at least 1 hour before
calibrating and using the meter to monitor at your stream site.
Get to know your YSI 550A DO meter
I
I
In
n
ns
s
st
t
tr
r
ru
u
um
m
me
e
en
n
nt
t
t
d
d
di
i
is
s
sp
p
pl
l
la
a
ay
y
y: displays temperature in either °C or °F
and dissolved oxygen in either mg/L (milligrams per liter) or %
air saturation.
Power button: powers the unit on or off.
Backlight button: turns the display backlight on or off. The
light will turn off automatically after two minutes of non-use.
Mode button: allows the user to select between % and mg/L
during calibration process. When monitoring, pushing ‘Mode’
switches the instrument display between DO %, DO mg/L, and
salinity calibration.
Arrow keys: increases or decreases the value during
calibrations.
: enter button
Probe: use to monitor water temp and dissolved oxygen content. Clean
the probe with DI water after each monitoring event and store in the
calibration chamber when not in use.
Maintaining your YSI 550A DO meter
Verify that the sensor membrane is in good condition by removing the sensor from the storage
chamber and check that the sponge is damp, if there are holes or tears in the membrane, and
for air bubbles beneath the membrane. If air bubbles or damage to the membrane is evident,
replace the membrane housing and solution. Ensure that membrane housing has been filled
with KCl solution for at least 1 hour before calibration and first use. Training videos for how to
calibrate the YSI 550A meter and monitor with it are available on the WAV website
(http://watermonitoring.uwex.edu/wav/monitoring/video.html). Please contact your local
coordinator or the WAV coordinator if you have any questions!
9
Water Action Volunteers Level 2 Manual Updated January 2016
YSI 550a DO Meter Calibration Procedure
*Before calibrating your meter at the beginning of the field season, please fill out the top
portion of the calibration log with the following information:
Your name as well as that of any other team members
Your organization name
The serial number for your meter (located on the back of the meter)
**The numbers along the top of the calibration log correspond to the steps in the protocol.
1. Turn on the meter and allow at least 15 minutes of warm up time before calibration.
Be sure to note the time that you turned on the meter as this information will be
important during the calibration process.
2. Verify that the sensor membrane is in good condition by removing the sensor from the
calibration/storage chamber and doing the following:
Check that the sponge is damp (rewet if necessary).
Shake or blow off excess water on the sensor.
Check for holes or tears in the membrane.
Check for air bubbles beneath the membrane.
3. Reinsert the sensor into the calibration/storage chamber at the back of the meter.
4. On the calibration log, record the date, time,
name of analyst (who is calibrating the meter),
and the altitude (in feet) at which the
calibration is taking place.
You can find your local altitude by using
a Wisconsin Atlas and Gazeteer or a
USGS topographic map.
i. Elevations may appear in meters, but you can convert meters to feet by
multiplying the meter value by 3.28.
5. Record the number of minutes of warm up time on the DO calibration log.
6. Record the stabilized probe temperature (°C) on
the DO calibration log (red box).
7. Record the stabilized pre-calibration D.O. (mg/L) on
the DO calibration log (orange box).
Press the MODE button to change from %
saturation to mg/L.
10
Water Action Volunteers Level 2 Manual Updated January 2016
8. Press and release both the UP ARROW and DOWN ARROW keys
at the same time to enter the calibration menu.
The meter will say CAL on the screen in large letters and
CAL in small letters in the lower left corner. This will stay
on the screen until the calibration process is done.
9. Press ENTER on the meter to show a value for altitude (x100) in feet.
For example, enter a 9
here indicates 900 ft and a
12 indicates 1200 ft.
10. Adjust the altitude with the up and
down arrow buttons for the
elevation where the calibration is
taking place and press ENTER.
The % saturation value is now showing on the meter display.
11. Allow the % saturation value (red box) to stabilize on the screen
This may take a minute or two to happen
12. Press ENTER (orange box).
The salinity of the water samples is now on the screen.
13. Press ENTER again to accept 0 (the salinity of fresh water).
The calibrated % saturation value is now on the screen
(red box) and the small CAL is no longer visible in the
lower left corner.
14. Press the MODE key (orange box) to switch to mg/L. (This key is
used to toggle between mg/L and % saturation.)
11
Water Action Volunteers Level 2 Manual Updated January 2016
15. Record the post-calibration D.O. (mg/L) on the calibration log.
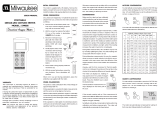
16. Look up the calibration chart D.O. value (mg/L) from the table
(available on the next two pages of this manual and as a
laminated sheet in the monitoring kit).
To read the table, find the probe temperature (y-axis)
and the altitude (x-axis) and record the corresponding
D.O. (mg/L) value as the calibration chart D.O. on the
calibration log.
If the difference between the post-calibration D.O. and the calibration chart D.O.
is greater than 0.3 (mg/L), re-calibrate the meter before using in the field.
17. Record any comments about the calibration process in the Comments field on the log.
18. Conduct a post-calibration drift test to verify accuracy of your calibration
If unsuccessful, check on the condition of the probe tip and contact the WAV
coordinator for further instructions.
**Post Calibration Drift
This quality control step must be performed to insure the collection of accurate data. After
calibration, check the meter for drift. This is a check as to how well the meter is holding the
calibration. Leave the meter where you calibrated it (this step is important to insure a stabilized
temperature) and walk away for 5 minutes. Upon returning, the DO percent saturation value
should be within a couple of percent of the calibrated percent saturation value you recorded. If
it has drifted more than a couple of percent, you must remove the cap membrane to check the
condition of the probe. If necessary, refurbish the probe tip according to your instrument’s
manual, and change the solution and membrane (contact the WAV coordinator for further
instructions. Once the refurbishment process is completed, wait one hour before repeating the
calibration procedures listed above (Steps 1-18).
19. After completing a successful calibration and post-calibration drift test, the DO meter
should be left on until the last reading of the day is completed.
20. Once monitoring is complete, moisten the sponge in the calibration chamber and turn
the meter off before storing it in the monitoring kit until the next field event.
Note: If you notice your meter is not calibrating properly, please check for bubbles or tears in
the membrane and replace if necessary. If replacing the membrane does not work, try cleaning
the probe by following instructions in the instrument’s manual (located in the pocket of your
meter case) or contact the WAV coordinator for further instructions or to inquire about a
replacement new meter.
Dissovled Oxygen Saturation (mg/L) Based on Elevation or Ambient Barometric Pressure (Station Pressure)
Elv: 2000 1900 1800 1700 1600 1500 1400 1300 1200 1100 1000 900 800 700 600 500 400 300 200 100 0* -200
Press: 706.5 709.1 711.8 714.5 717.1 719.8 722.5 725.1 727.8 730.5 733.1 735.8 738.5 741.1 743.8 746.5 749.1 751.8 754.5 757.1 760 765.1
032.0 13.6 13.6 13.7 13.7 13.8 13.8 13.9 14.0 14.0 14.1 14.1 14.2 14.2 14.3 14.3 14.4 14.4 14.5 14.5 14.6 14.62 14.7
133.8 13.2 13.3 13.3 13.4 13.4 13.5 13.5 13.6 13.6 13.7 13.7 13.8 13.8 13.9 13.9 14.0 14.0 14.1 14.1 14.2 14.22 14.3
235.6 12.9 12.9 13.0 13.0 13.0 13.1 13.1 13.2 13.2 13.3 13.3 13.4 13.4 13.5 13.5 13.6 13.6 13.7 13.7 13.8 13.83 13.9
337.4 12.5 12.6 12.6 12.7 12.7 12.7 12.8 12.8 12.9 12.9 13.0 13.0 13.1 13.1 13.2 13.2 13.3 13.3 13.4 13.4 13.46 13.6
439.2 12.2 12.2 12.3 12.3 12.4 12.4 12.5 12.5 12.6 12.6 12.6 12.7 12.7 12.8 12.8 12.9 12.9 13.0 13.0 13.4 13.11 13.2
541.0 11.9 11.9 12.0 12.0 12.0 12.1 12.1 12.2 12.2 12.3 12.3 12.4 12.4 12.5 12.5 12.5 12.6 12.6 12.7 12.7 12.77 12.9
642.8 11.6 11.6 11.7 11.7 11.7 11.8 11.8 11.9 11.9 12.0 12.0 12.1 12.1 12.1 12.2 12.2 12.3 12.3 12.4 12.4 12.45 12.5
744.6 11.3 11.3 11.4 11.4 11.5 11.5 11.5 11.6 11.6 11.7 11.7 11.8 11.8 11.8 11.9 11.9 12.0 12.0 12.1 12.1 12.14 12.2
846.4 11.0 11.0 11.1 11.1 11.2 11.2 11.3 11.3 11.3 11.4 11.4 11.5 11.5 11.5 11.6 11.6 11.7 11.7 11.8 11.8 11.84 11.9
948.2 10.7 10.8 10.8 10.9 10.9 10.9 11.0 11.0 11.1 11.1 11.2 11.2 11.2 11.3 11.3 11.4 11.4 11.4 11.5 11.5 11.56 11.6
10 50.0 10.5 10.5 10.6 10.6 10.7 10.7 10.7 10.8 10.8 10.8 10.9 10.9 11.0 11.0 11.0 11.1 11.1 11.2 11.2 11.2 11.29 11.4
11 51.8 10.3 10.3 10.3 10.4 10.4 10.4 10.5 10.5 10.6 10.6 10.6 10.7 10.7 10.8 10.8 10.8 10.9 10.9 10.9 11.0 11.03 11.1
12 53.6 10.0 10.1 10.1 10.1 10.2 10.2 10.2 10.3 10.3 10.4 10.4 10.4 10.5 10.5 10.5 10.6 10.6 10.7 10.7 10.7 10.78 10.8
13 55.4 9.8 9.8 9.9 9.9 9.9 10.0 10.0 10.1 10.1 10.1 10.2 10.2 10.2 10.3 10.3 10.3 10.4 10.4 10.5 10.5 10.54 10.6
14 57.2 6.6 9.6 9.7 9.7 9.7 9.8 9.8 9.8 9.9 9.9 9.9 10 10.0 10.0 10.1 10.1 10.2 10.2 10.2 10.3 10.31 10.4
15 59.0 9.4 9.4 9.4 9.5 9.5 9.6 9.6 9.6 9.7 9.7 9.7 9.8 9.8 9.8 9.9 9.9 9.9 10.0 10.0 10.0 10.08 10.2
16 60.8 9.2 9.2 9.2 9.3 9.3 9.3 9.4 9.4 9.5 9.5 9.5 9.6 9.6 9.6 9.7 9.7 9.7 9.8 9.8 9.8 9.87 9.9
17 62.6 9.0 9.0 9.1 9.1 9.1 9.2 9.2 9.2 9.3 9.3 9.3 9.4 9.4 9.4 9.5 9.5 9.5 9.6 9.6 9.6 9.66 9.7
18 64.4 8.8 8.8 8.9 8.9 8.9 9.0 9.0 9.0 9.1 9.1 9.1 9.2 9.2 9.2 9.3 9.3 9.3 9.4 9.4 9.4 9.47 9.5
19 66.2 8.6 8.7 8.7 8.7 8.8 8.8 8.8 8.9 8.9 8.9 8.9 9.0 9.0 9.0 9.1 9.1 9.1 9.2 9.2 9.2 9.28 9.3
20 68.0 8.5 8.5 8.5 8.5 8.6 8.6 8.6 8.7 8.7 8.7 8.8 8.8 8.8 8.9 8.9 8.9 9.0 9.0 9.0 9.1 9.09 9.2
Temp
Elevation Feet Above Sea Level/Equivalent Un-Corrected1 Barometric Pressure mm Hg
C
F
Dissovled Oxygen Saturation (mg/L) Based on Elevation or Ambient Barometric Pressure (Station Pressure)
Elv: 2000 1900 1800 1700 1600 1500 1400 1300 1200 1100 1000 900 800 700 600 500 400 300 200 100 0* -200
Press: 706.5 709.1 711.8 714.5 717.1 719.8 722.5 725.1 727.8 730.5 733.1 735.8 738.5 741.1 743.8 746.5 749.1 751.8 754.5 757.1 760 765.1
20 68.0 8.5 8.5 8.5 8.5 8.6 8.6 8.6 8.7 8.7 8.7 8.8 8.8 8.8 8.9 8.9 8.9 9.0 9.0 9.0 9.1 9.09 9.2
21 69.8 8.3 8.3 8.3 8.4 8.4 8.4 8.5 8.5 8.5 8.6 8.6 8.6 8.7 8.7 8.7 8.8 8.8 8.8 8.8 8.9 8.91 9.0
22 71.6 8.1 8.2 8.2 8.2 8.2 8.3 8.3 8.3 8.4 8.4 8.4 8.5 8.5 8.5 8.6 8.6 8.6 8.6 8.7 8.7 8.74 8.8
23 73.4 8.0 8.0 8.0 8.1 8.1 8.1 8.2 8.2 8.2 8.2 8.3 8.3 8.3 8.4 8.4 8.4 8.5 8.5 8.5 8.5 8.58 8.6
24 75.2 7.8 7.9 7.9 7.9 7.9 8.0 8.0 8.0 8.1 8.1 8.1 8.1 8.2 8.2 8.2 8.3 8.3 8.3 8.4 8.4 8.42 8.5
25 77.0 7.7 7.7 7.7 7.8 7.8 7.8 7.9 7.9 7.9 7.9 8.0 8.0 8.0 8.1 8.1 8.1 8.1 8.2 8.2 8.2 8.26 8.3
26 78.8 7.5 7.6 7.6 7.6 7.7 7.7 7.7 7.7 7.8 7.8 7.8 7.9 7.9 7.9 7.9 8.0 8.0 8.0 8.1 8.1 8.11 8.2
27 80.6 7.4 7.4 7.5 7.5 7.5 7.5 7.6 7.6 7.6 7.7 7.7 7.7 7.7 7.8 7.8 7.8 7.9 7.9 7.9 7.9 7.97 8.0
28 82.4 7.3 7.3 7.3 7.4 7.4 7.4 7.4 7.5 7.5 7.5 7.6 7.6 7.6 7.6 7.7 7.7 7.7 7.7 7.8 7.8 7.83 7.9
29 84.2 7.1 7.2 7.2 7.2 7.3 7.3 7.3 7.3 7.4 7.4 7.4 7.4 7.5 7.5 7.5 7.6 7.6 7.6 7.6 7.7 7.69 7.7
30 86.0 7.0 7.1 7.1 7.1 7.1 7.2 7.2 7.2 7.2 7.3 7.3 7.3 7.3 7.4 7.4 7.4 7.5 7.5 7.5 7.5 7.56 7.6
31 87.8 6.9 6.9 7.0 7.0 7.0 7.0 7.1 7.1 7.1 7.1 7.2 7.2 7.2 7.2 7.3 7.3 7.3 7.3 7.4 7.4 7.43 7.5
32 89.6 6.8 6.8 6.8 6.9 6.9 6.9 6.9 7.0 7.0 7.0 7.0 7.1 7.1 7.1 7.1 7.2 7.2 7.2 7.3 7.3 7.30 7.4
33 91.4 6.7 6.7 6.7 6.8 6.8 6.8 6.8 6.9 6.9 6.9 6.9 7.0 7.0 7.0 7.0 7.1 7.1 7.1 7.1 7.2 7.18 7.2
34 93.2 6.6 6.6 6.6 6.6 6.7 6.7 6.7 6.7 6.8 6.8 6.8 6.8 6.9 6.9 6.9 6.9 7.0 7.0 7.0 7.0 7.06 7.1
35 95.0 6.5 6.5 6.5 6.5 6.6 6.6 6.6 6.6 6.7 6.7 6.7 6.7 6.8 6.8 6.8 6.8 6.8 6.9 6.9 6.9 6.95 7.0
Source: J. Sullivan, WDNR-LaCrosse, March 2006
1Dissolved oxygen saturation values based on elevation due not account for TRUE station pressure. For more accurate dissolved oxygen saturation values use un-corrected pressure measurements.
Uncorrected barometric pressure values = National Weather Service Barometric Pressure in mm Hg x (Equivalent elevation pressure/760)
C
F
Temp
Elevation Feet Above Sea Level/Equivalent Un-Corrected1 Barometric Pressure mm Hg
*Dissolved oxygen saturation at 760 mm Hg derived from the tables of Benson & Kuause (1980), from C.M. Mortimer 1981. The oxygen content of air-saturated fresh waters over ranges of temperature
and atmospheric pressure of limnological interest. Mitt. Int. Ver. Limnol. No. 22. Stuttgart, Germany.
14
Water Action Volunteers Level 2 Manual Updated January 2016
YSI 550a DO Meter Monitoring Procedure
Before going out to your stream site to monitor dissolved oxygen (or any parameter), please
remember to fill out the top portion of the monitoring datasheet with your name (s), the
station name, and the station ID #, as well as the date and time of the monitoring event.
It is also important that you indicate what type of equipment was used to monitor for dissolved
oxygen. In this case, you will circle the YSI 550A Meter option on your datasheet.
To measure dissolved oxygen (DO) in the stream:
1. With the DO meter in hand, enter the stream downstream from your monitoring
location (as to not disturb the bottom sediment as you move towards the site).
a. You can also monitor dissolved oxygen from a bridge overpass as to not disturb
the bottom sediment.
2. Remove the probe from its chamber and insert it into the water to be measured.
a. Continuously stir or move the probe through the water (especially when
monitoring in very still water) while taking the measurement.
3. Allow the temperature and dissolved oxygen readings to stabilize.
a. This should take anywhere from 2 to 5 minutes.
4. Observe and record the water temp and the DO values on the monitoring datasheet.
5. Press the MODE button to change the instrument display.
6. Observe and record the % saturation value on the monitoring datasheet.
7. Rinse the probe with distilled water after each use, and return it to the storage
chamber.
8. Before storing the meter in the carrying case, moisten the probe sponge by soaking with
distilled water.
9. Press the green button on the meter to turn if off at the conclusion of the day’s
monitoring effort.
15
Water Action Volunteers Level 2 Manual Updated January 2016
Oakton Acorn pH 5 and 5+ Meter
WAV volunteers currently use one of three different pH meters:
1. pH 5 (original software and original outside casing)
2. pH 5 (updated software, but original outside casing)
3. pH 5+ (updated software and updated outside casing)
pH 5 meter
pH 5+ meter
Which pH meter do I have?
Before calibrating your pH meter, you will first need to ascertain which meter version you are
using. This information is important to know because the calibration protocol is varies slightly
between the different software versions.
The only way to tell if you have meter version #1 or #2 is by going through the calibration
process and seeing what happens between the calibration with the pH 7 buffer solution
calibration and the calibration with the pH 10 buffer solution. The original software tells the
meter to exit calibration mode and return to measurement mode upon completion of the first
calibration point. This means that you will complete two ‘one point’ calibrations as you have to
re-enter calibration mode in order to complete the pH 10 calibration. The software update on
the newer meters keeps the meter in calibration mode throughout the calibration process (the
values on the screen will continue to blink). This means that you will complete a ‘two point’
calibration when calibrating the meter.
For all meters used by WAV volunteers…
Both the Oakton Acorn pH 5 and the 5+ meters need to be calibrated before being used in the
field each and every time you monitor throughout the field season. Once calibrated, the pH
meter can be turned on and off between monitoring events if you monitor at multiple locations
in one day (unlike the DO meter).
When calibrating your meter, please use both the pH 7 and pH 10 buffer solutions (NIST)
provided in order to calibrate the meter. Do not reuse the buffer solutions following the
calibration as contaminants in the solution can impact the accuracy of the calibration and the
field measurements.
16
Water Action Volunteers Level 2 Manual Updated January 2016
In order to avoid damaging the meter, be sure to keep the pH electrode (specifically the bulb at
the end of the probe) wet when not in use. Store the electrode in the electrode soaker bottle
and keep it filled with electrode storage solution. Refresher storage solution can be found in
your monitoring kit. Contact the WAV coordinator if you need more solution.
If you notice your meter is not calibrating properly, try cleaning the probe by following the
instructions in the instrument’s manual (located in the pocket of your meter case) or contact
the WAV coordinator for directions.
*Before calibrating your meter at the beginning of the field season, please fill out the top
portion of the calibration log with the following information:
Your name, as well as that of any other team members
The name of your organization
The serial number for your meter (located on the back of the meter)
The type of meter that you are using
oThis can be recorded after the first calibration is completed
17
Water Action Volunteers Level 2 Manual Updated January 2016
Cal. procedure - pH 5 meter with original software and original outside casing
This calibration process will be completed by conducting two one-point calibrations. This means
that the meter will complete a single point calibration and then exit calibration mode each
time. You will have to restart the calibration process when using the pH 10 buffer solution by
pressing the CAL button.
1. Connect pH and temperature probes to meter.
a. Ensure that the pH probe connecter snaps into place.
2. Turn the meter on by pushing the On/Off button on the face of the meter.
3. Record the date, time, and the name of analyst
performing the calibration on the calibration log.
4. Remove the pH electrode from the electrode soaker
bottle.
5. Rinse the pH electrode with distilled water and shake the excess water off of the
electrode.
6. Click the MODE button to find the temperature
reading and record value on the calibration log.
7. Click the MODE button again to return to the pH screen on the meter.
8. Press the CAL button on the meter in order to start the calibration process (blinking).
9. Place the electrode and temperature sensors into the pH buffer solution and submerge
the glass bulb completely in the solution.
10. Wait for the reading to stabilize and record the
Stabilized pH value on the calibration log.
11. Press the ENTER key once and record the Calibrated
pH value (the meter is now out the calibration
mode and in measuring mode).
12. Check that the Calibrated pH value is within 0.2 of the pH buffer standard (7 or 10).
a. If the value is more than 0.2 higher or lower than its pH buffer value (compare
values in the grey columns, outlined in blue), recalibrate the meter (new line).
b. Record the new results on the next line of the pH meter calibration log.
13. Remove the electrode from the buffer solution (refill if necessary), rinse with distilled
water and shake off the excess water from the electrode.
14. To finish the calibration, repeat steps 6 through 12 for the pH 10 buffer solution.
15. Replace the pH probe in the electrode soaker bottle (refill if necessary), turn the meter
off, and head out to the field to complete your monitoring activities.
18
Water Action Volunteers Level 2 Manual Updated January 2016
Cal. procedure - pH 5 meter with updated software, but original outside casing
The updated software version in the pH 5 allows for you to complete a two-point calibration
without ever leaving the calibration mode. After you press ENTER following the first calibration,
the value on the screen will continue to blink, indicating that it is still in calibration mode (unlike
the old version that stopped blinking after you hit ENTER and went into measuring mode).
1. Connect the pH and temperature probes to meter.
a. Ensure that the pH probe connecter snaps into place.
2. Turn the meter on by pushing the On/Off button on the face of the meter.
3. Record the date, time, and the name of analyst
performing the calibration on the calibration log.
4. Remove the pH electrode from the electrode soaker
bottle.
5. Rinse the pH electrode with distilled water and shake the excess water off of the
electrode.
6. Click the MODE button to find the temperature
reading and record value on the calibration log.
7. Click the MODE button again to return to the pH screen on the meter.
8. Press the CAL button on the meter in order to start the calibration process.
9. Place the electrode and temperature sensors into the pH 7 buffer solution and
submerge the glass bulb completely in the solution.
10. Wait for the reading to stabilize and record the
Stabilized pH value on the calibration log.
11. Press the ENTER key once and record the Calibrated
pH value
12. Check that the Calibrated pH value is within 0.2 of the pH 7 buffer standard.
a. If the value is more than 0.2 higher or lower than its pH buffer value (compare
values in the grey columns, outlined in blue), recalibrate the meter.
b. Record the new results on the next line of the pH meter calibration log.
13. Remove the electrode from the pH 7 buffer solution, rinse with distilled water and
shake off the excess water from the electrode.
14. Place the electrode and temperature sensors directly into the pH 10 buffer solution and
submerge the glass bulb completely in the solution
19
Water Action Volunteers Level 2 Manual Updated January 2016
**With the software update, the meter stays in calibration mode between buffer solutions in
order to complete the two-point calibration. This means that you will not be able to record the
temperature for the pH 10 buffer solution either leave the space blank or scribble out the
column ( ) so that you remember that you can’t fill in this column.
15. Wait for the reading to stabilize and record the
Stabilized pH value on the calibration log.
16. Press the ENTER key once and record the
Calibrated pH value
a. The pH reading on the screen will stop
blinking as the meter should have exited
calibration mode and entered measurement mode.
17. Check that the Calibrated pH value is within 0.2 of the pH 7 buffer standard.
a. If the value is more than 0.2 higher or lower than its pH buffer value (compare
values in the grey columns, outlined in blue), recalibrate the meter.
b. Record the new results on the next line of the pH meter calibration log.
18. (the value on the screen will stop blinking as the meter should have exited calibration
mode and entered measurement mode).
19. Remove the electrode from the pH 10 buffer solution, rinse with distilled water and
shake off the excess water from the electrode.
20. Replace the pH probe in the electrode soaker bottle (refill if necessary), turn the meter
off, and head out to the field to complete your monitoring activities.
Cal. procedure - pH 5+ meter with updated software and updated outside casing
For the pH 5+ meter, the updated software version from the pH 5 is all wrapped up in a brand
new package! The updated version allows for you to complete a two-point calibration without
ever leaving the calibration mode. After you press ENTER following the first calibration, the
value on the screen will continue to blink, indicating that it is still in calibration mode (unlike the
old version that stopped blinking after you hit ENTER and went into measuring mode).
Follow the calibration procedure list above (page 19) for the pH 5 meter with the updated
software, but original outside casing in order to properly calibrate your pH 5+ meter. Please
contact your local coordinator or the WAV coordinator if you have any questions about how to
properly calibrate any of the meters!
20
Water Action Volunteers Level 2 Manual Updated January 2016
Oakton Acorn pH Meter Monitoring Procedure
Before going out to your stream site to monitor pH (or any parameter), please remember to fill
out the top portion of the monitoring datasheet with your name (s), the station name, and the
station ID #, as well as the date and time of the monitoring event.
To measure pH in the stream:
1. Connect any electrodes to the pH meter and turn the meter on by pushing the On/Off
button on the face of the meter.
a. The meter does not have to be left on following the calibration process.
2. Remove the electrode from the electrode soaker bottle.
a. Place the electrode soaker bottle to the side.
3. Rinse off the electrode with distilled water and shake off any excess water.
4. Wade into the middle of the stream from a safe access location
a. Walk upstream from the access point (downstream of monitoring location) as to
not disturb the bottom substrate.
5. Place pH and temperature probes into the stream and gently stir the probes.
6. Wait 2-3 minutes for pH reading to stabilize.
7. Record the pH reading on the monitoring datasheet.
8. Rinse the electrode with distilled water and shake off the excess water.
9. Place the electrode back in the electrode soaker bottle.
a. Refresh storage solution if necessary.
10. Turn the meter off using the On/Off button on the face of the meter.
11. Disconnect the electrodes from the meter and store the meter and electrodes in the
carrying case until the next monitoring event.
A refresher video for how to monitor pH with the Oakton Acorn pH meter is available on the
WAV website (http://watermonitoring.uwex.edu/wav/monitoring/video.html). Please contact
your local coordinator or the WAV coordinator if you have any questions!
21
Water Action Volunteers Level 2 Manual Updated January 2016
Transparency Tube
Sample Collection
Collect the sample away from the stream bank in the main flow (well-mixed) area. Be careful
not to disturb the stream bottom when you collect the water sample. If you get sediment from
bottom disturbances, dump out the sample, move upstream (away from the disturbed area)
and try again. For the observer, consistency is the key. If you initially wear your eyeglasses
when you take the reading, then always wear your eyeglasses to take this measurement.
However, you should never wear sunglasses when you take this reading.
Before going out to your stream site to monitor transparency (or any parameter), please
remember to fill out the top portion of the monitoring datasheet with your name (s), the
station name, and the station ID #, as well as the date and time of the monitoring event.
It is also important that the length of the transparency tube is recorded on the monitoring
datasheet for each monitoring event as this information will be used when the data is
evaluated as part of the quality assurance process.
In Stream
1. Make sure that the clamp on the drain tube is closed
2. Walk into the water at an access point downstream from the sampling location.
a. Be careful not to stir up the bottom sediment upstream of your sampling
location.
3. Face upstream (into the current) in the middle of the stream or in a well-mixed area off-
shore.
4. Collect your water sample by plunging your bucket or transparency tube 8-12 inches
beneath the surface or halfway down from the surface.
a. If using a bucket, scoop away from your body and into the current.
5. Cover the top of the transparency tube after you have filled it with water and return to
shore to take the reading.
From Shore
To collect a sample while standing on the shore, use a bucket or sample bottle attached to a
pole so that you can reach the water from your on shore location. Scoop from below the
surface in the upstream direction and be careful not to stir up the sediment upstream of your
sample. Pour the water into the transparency tube in order to take the transparency
measurement. Collect additional samples if more water is needed to fill the transparency tube
all the way to the top.
22
Water Action Volunteers Level 2 Manual Updated January 2016
Transparency Tube Monitoring Procedure
1. Remove large objects from the water sample.
a. If necessary, filter through a nylon stocking.
2. If the sample has settled, use a stirring stick to stir the
sample, or pour the sample into a clean bucket and
back into the transparency tube to suspend all
materials.
3. Stand out of direct sunlight and remove sunglasses if
you are wearing them.
a. If you cannot get to a shady place, use your
body to cast a shadow on the tube.
4. Looking into the transparency tube for the target
(black and white) disc on the bottom of tube.
a. If disc is visible, record the length of the tube
(e.g., 60, 100, or 120 cm) on the datasheet.
5. If target disc is not visible, have your partner let water out a little at a time using the
valve at the bottom until disc is just visible.
a. Have them stop letting water out
immediately when you can just see the
contrast between black and white on
the disc at the bottom of the tube.
6. Read the level of water in the tube using the
measuring tape on the side of the tube.
a. Measurement will be in centimeters.
7. Record the measurement on your monitoring
datasheet in the appropriate column.
8. Dump contents of tube on ground.
9. Collect a new sample and repeat steps 1 through 8 in order to complete a second trial.
10. Record the second measurement in cm on your monitoring datasheet.
A refresher video for how to monitor water clarity with a transparency tube is available on the
WAV website (http://watermonitoring.uwex.edu/wav/monitoring/video.html). Please contact
your local coordinator or the WAV coordinator if you have any questions!
38
Water Action Volunteers Level 2 Manual Updated January 2016
Entering Monitoring Data into SWIMS
NOTE: Your web browser should be Microsoft Internet Explorer version 5.5 or higher.
1. Use Internet Explorer and navigate to https://dnrx.wisconsin.gov/swims.
2. Enter your WAMS User ID and Password and click Sign In
3. Click the Submit Data tab along the menu bar at the top of the screen.
4. Click the Add New button on the left side of the screen
39
Water Action Volunteers Level 2 Manual Updated January 2016
5. Select your monitoring site from the Project dropdown list
a. Selecting the project SHOULD automatically select the monitoring station.
i. Please double check that the project and the station match when
entering your monitoring data.
b. If your monitoring location is not listed in the drop down Project list, please do
not enter your data at this time.
i. Contact local coordinator or the program coordinator to get your SWIMS
account assigned to the correct station(s).
6. Select your group of Data Collectors (single individual or multiple people) using the
down arrow to the right of the name field.
If the correct list of data collectors is not in the list, create a new group by following the
instructions below:
a. [If necessary] Create a new data collector group:
**This step is only necessary once for each group of collectors. After the group
has been created, it will be available via the dropdown box.
i. Click the binoculars icon (to the right of the Data Collectors field)
ii. To create a New Collector Group from the volunteers already attached to
the project, click Add (to the left of the names) for each volunteer
40
Water Action Volunteers Level 2 Manual Updated January 2016
iii. To add a new person to the collector group, search their name in the
‘Search People/Groups’ field at the top of the window
iv. Once complete, select Create and use this collector group to return to the
main data entry screen
7. Confirm that the monitoring Station is same as Project
a. If there is more than one station listed or the correct station is not listed, please
do not enter your data at this time. DO NOT USE THE BINOCULARS TO SELECT A
STATION THAT DOES NOT MATCH THE PROJECT FIELD.
i. Report missing or incorrect station information to the WAV Data
Manager and wait until the correct project and station information are
available before entering your monitoring data.
8. Click the Show Map button to confirm the location of your monitoring site. Notify the
data manager if the location is incorrect.
9. Enter the Start Date (mm/dd/yyyy) that you did your data collection work
a. A calendar window will pop up as well that you can use
10. Enter the Time that you started your data collection work
a. We require the start time information for all monitoring data. Be sure to enter
AM or PM, also. Note: 12 noon is 12:00 PM.
41
Water Action Volunteers Level 2 Manual Updated January 2016
11. Select the WAV Stream Monitoring 2015 form
a. The WAV Stream Monitoring 2015 form should be selected automatically. If it is
not, select it from the drop down list.
b. If it is not available, you will need to contact the program coordinator to correct
this before you will be able to enter your monitoring data.
12. DO NOT ENTER the Latitude and Longitude
a. The location of your monitoring site is already established in SWIMS. If you wish
to check the location of your monitoring site, click the Show Map button as
described in Step 8.
13. Enter the End Date and Time for when you completed your monitoring work.
a. These fields will autofill so you will need to update it accordingly.
42
Water Action Volunteers Level 2 Manual Updated January 2016
14. Enter additional data in Comments
a. Please, record any information that might help characterize your data. For
instance, include information on any activity occurring upstream that may be
affecting water quality, as well as observations you made regarding current
weather, wildlife at the site, upcoming storms, etc.
15. Click Next to go to the field work data entry screen
16. Enter your monitoring data from the red and purple boxes in the Result column
a. Enter the values recorded for each measured parameter. If you did not monitor
the parameter, LEAVE IT BLANK! Entering a ‘0’ into SWIMS does not indicate that
you did not monitor it; it indicates that you got a result of ‘0’!
b. Use the dropdown menus when available to record your response.
17. Click Save to save data.
a. You will now see the result for the transparency average (grey line).
18. To continue entering your monitoring results:
a. Click Next Date and Next Station to return to the initial ‘Create Monitoring Data’
screen to begin entering data for a different station or for a different date
b. Click Save and Return to List to view your recently updated monitoring data
c. Click Save and Next to move to the next data entry screen.
  • Page 1 1
  • Page 2 2
  • Page 3 3
  • Page 4 4
  • Page 5 5
  • Page 6 6
  • Page 7 7
  • Page 8 8
  • Page 9 9
  • Page 10 10
  • Page 11 11
  • Page 12 12
  • Page 13 13
  • Page 14 14
  • Page 15 15
  • Page 16 16
  • Page 17 17
  • Page 18 18
  • Page 19 19
  • Page 20 20
  • Page 21 21
  • Page 22 22
  • Page 23 23
  • Page 24 24
  • Page 25 25
  • Page 26 26

YSI 550A User manual

Category
Measuring, testing & control
Type
User manual

YSI 550A Dissolved Oxygen (DO) Meter is an accurate and reliable instrument for measuring dissolved oxygen levels in water. It features automatic temperature compensation, a backlit display for easy reading in low-light conditions, and a rugged design that can withstand field use. The YSI 550A is ideal for a variety of applications, including water quality monitoring, environmental studies, and aquaculture.

Ask a question and I''ll find the answer in the document

Finding information in a document is now easier with AI