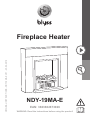
Blyss 3663602673026 Original Instructions Manual
- Category
- Fireplaces
- Type
- Original Instructions Manual
This manual is also suitable for

Fireplace Heater
ORIGINAL INSTRUCTIONS -NDY-19MA-E V01 - 25-06-2018
NDY-19MA-E
EAN: 3663602673026
WARNING: Read the instructions before using the product!

2 3
NDY-19MA-E NDY-19MA-E
Getting Started . . .
Safety warnings
PLEASE READ THE FOLLOWING
INSTRUCTIONS CAREFULLY
BEFORE USING THE APPLIANCE.
1.
CAUTION - Fire, electric shock, physical injury and material
damage hazards.
2.
To use the appliance, always follow the instructions for
assembly, use and maintenance as well as usage cautions.
3. Carefully read and retain these instructions.
4.
Before connecting the appliance, be sure that the mains
voltage available matches that specied on the rating plate.
5.
THIS APPLIANCE MUST BE WALL MOUNTED. IT IS NOT
SUITABLE FOR USE AS A FREE STANDING APPLIANCE.
Operating the product in any other position could cause a
hazard.
6. There may be trace of odour during the rst few minutes of
initial use. This is normal and will quickly disappear.
7.
The heater is hot when in use .To avoid burns, do not let
bare skin touch any hot surface.
8.
Keep combustible material such as furniture, cushions,
bedding, paper, clothes, curtains etc. at least 1m away from
the heater.
9.
Do not use the heater in areas where ammable liquids are
stored or where ammable fumes may be present.
10. Do not cover or obstruct any of the heat outlet grilles or the
air intake openings of the heater.
11.
Do not use the heater in any room where there is explosive
gas or while using inammable solvents, varnish or glue.
Let’s
get started...
These instructions are for your safety. Please read through them
thoroughly before use and retain them for future reference.
Getting Started... 02
Safety information 03
Before you start 06
Your product 06
Installation 07
In more detail... 9
Operation 9
Technical specication 13
Cleaning and maintenance 15
Recycling and disposal 17
Safety information

4 5
NDY-19MA-E NDY-19MA-E
Safety information Safety information
Getting Started . . .
Getting Started . . .
12.
Keep the heater clean. Do not allow any objects to enter any
ventilation or exhaust opening as this may cause electric
shock, or re or damage to the heater.
13. Always unplug or disconnect the appliance from the mains
power supply when not in use or when moving or cleaning it.
14. Do not pull the cord to unplug the heater.
15. Do not immerse the cord, plug or any part of the appliance
in water or any other liquid.
16.
Do not attempt to repair, disassemble or modify the appliance.
There are no user-serviceable parts inside.
17.
The heater must not be located immediately below a socket-
outlet.
18. This appliance can be used by children aged from 8 years
and above and persons with reduced physical, sensory or
mental capabilities or lack of experience and knowledge if
they have been given supervision or instruction concerning
use of the appliance in a safe way and understand the
hazards involved. Children shall not play with the appliance.
Cleaning and user maintenance shall not be made by
children without supervision.
19.
Children of less than 3 years should be kept away unless
continuously supervised. Children aged from 3 years and less
than 8 years shall only switch on/off the appliance provided
that it has been placed or installed in its intended normal
operating position and they have been given supervision or
instruction concerning use of the appliance in a safe way
and understand the hazards involved. Children aged from 3
years and less than 8 years shall not plug in, regulate and
clean the appliance or perform user maintenance.
20.
If the supply cord is damaged, it must be replaced by the
manufacturer, its service agent or similarly qualied persons
in order to avoid a hazard.
21. CAUTION — Some parts of this product can become very
hot and cause burns. Particular attention has to be given
where children and vulnerable people are present.
22. CAUTION – If using an extension lead please ensure you
do not exceed the maximum rated running wattage/load of
the extension lead.
23. This IPX0 appliance cannot be installed in a bathroom.
24.
CAUTION: In order to avoid a hazard due to inadvertent
resetting of the thermal cutout, this appliance must not be
supplied through an external switching device, such as a
timer, or connected to a circuit that is regularly switched on
and off by the utility.
25.
Regarding the installation and maintenance information
refer to page 14-17.
26. Do not use this heater in the immediate surroundings of a
bath, a shower or a swimming pool.
27. Means for disconnection having a contact separation in all
poles must be incorporated in the xed wiring in accordance
with the wiring rules.
WARNING! In order to avoid overheating, do not cover
the heater.
WARNING! DO NOT COVER THIS APPLIANCE WITH
ITEMS SUCH AS CLOTHING, BLANKETS OR PLACE
IT NEXT TO CURTAINS OR NETS/BLINDS.

6 7
NDY-19MA-E NDY-19MA-E
Getting Started . . .
Getting Started . . .
Assembly
>
This product comes fully assembled, before using please ensure that all components
and xings are secure, and make sure the appliance is in perfect condition before
operation.
You will need
Screwdriver x 1
AAA 1.5V Battery x 2
Intended use
1. This product is intended for indoor use only. It is not intended for commercial use.
2. This product is intended for xed installation only. Do not use it as a free standing
heater.
3.
This product contains no user serviceable parts and requires little maintenance.
Leave any servicing or repairs to qualied personnel only. The LEDs contained in
this product are non-replaceable.
4. Before connecting the appliance to the power supply, check that the power supply
voltage and current rating corresponds with the power supply details shown on the
appliance rating label.
Installation
Installation steps (page 7-8)
> Ensure that the appliance is switched off and disconnected from the socket outlet.
CAUTION! Make sure not to damage any wiring that could be potentially behind
the back panel e.g. mantel.
1. Secure the appliance to the wall using the supplied brackets and screws.
2.
Press each bracket against the inside wall of the appliance, ensuring that the bracket
is located as high as possible.
3. Mark the location of the 2 holes on the inside wall.
4.
Carefully drill two 5 mm deep holes using a 2 mm drill bit. Do not exceed 5 mm depth
to prevent damage to the outside surface of the appliance. This hole is to ensure
that you do not crack the wood when using the self tapping screws to x the bracket
onto the appliance.
5. Place the bracket on the 2 holes and secure it in place with 2 screws (C).
Thermal Cut-Out
1. CAUTION! This product has one non-self-resetting overheat protection devices. In
the event that the heater stops working as a result of overheating take the following
immediate steps: switch the electricity off at the socket and remove the plug. Remove
any objects that are covering the product.
2. CAUTION! Do not touch the heater as it will be hot.
3.
Set the heater switches to O (off position) and leave the heater to cool. Once
completely cool, reconnect the heater and switch it on.
Things to check before you start
1. For domestic use only.
2. Never allow children or persons unable to operate the appliance safely to use this
appliance without supervision.
3. Please dispose of plastic bags carefully and keep them away from children.
4.
IMPORTANT: When in use never cover the heater in any way or place it close to
combustible materials. The heater will get hot, never touch it whilst in use. Always
keep children and pets at a safe distance and never leave unsupervised in a room
with a heater that is working.
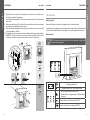
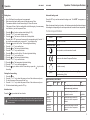
Your product
[01] x 1
[A] x 2 [B] x 2 [C] x 4
[02] x 1
[D] x 2
Your product / InstallationSafety information / Before you start / Your product

8 9
NDY-19MA-E NDY-19MA-E
In more detail . . .
Getting Started . . .
6.
Repeat this for the other side of the appliance, so that you have 1 bracket on the
left and on the right of the appliance.
7.
Carefully place the appliance on the wall and mark the holes of the brackets on
either side.
8. Using a 8 mm diameter drill bit, drill two 40 mm deep holes where the two markings
are, and place the wall plugs (A) in the holes.
9.
Place the replace aligning the two holes with the brackets, and use 2 screws (B)
to x the replace to the wall.
10.
The replace must be secure so that it is not possible to pull away using normal loads.
11.
WARNING: This product is heavy. Failure to install this product securely and in
accordance with these instructions could lead to a serious or fatal injury!
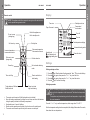
[A] 4
2
3
[C]
[D]
[01]
1
01
[B]
02
The controls
Switching on/off
Use the on/off switch to power on the appliance (set it to standby mode).
In standby mode, the appliance can be operated either manually, by the switches located
on the front bottom left hand side of the appliance or by the supplied remote control.
Manual control
NOTE: The appliance only starts working, if the set temperature is higher than
the ambient room temperature.
Appliance powered off
Appliance powered on, set to standby mode
> Press to switch the ame effect on/off.
>
Press and hold to toggle between 5 different ame
dim levels
Press to activate low level heating (1000 W)
Press to activate high level heating (2000 W)
Installation Operation
[C] x 4
[D] x 2
[01] x 1
[B] x 2
[A] x 2

10 11
NDY-19MA-E NDY-19MA-E
In more detail . . .
In more detail . . .
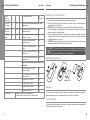
Remote control
NOTE: The appliance should be powered on using the on/off switch before it
can be operated using remote control.
- Switch the appliance on
- Set to standby mode
Go up in menu
(change day)
Set timer key
Cancel key
Timer on/off key
Toggle between 5 different
ame dim levels
Press to activate low
level heating
Press to activate
high level heating
Go down in menu
(change day)
Set day/time
Conrm selection
- Decrease temperature
- Decrease hour/minute
- Increase temperature
- Increase hour/minute
Set automatic heating
mode
> The remote control requires 2x AAA size batteries (not included)
>
Open the battery compartment by sliding the cover down and insert the batteries
noting the polarity indicated in the battery compartment.
> Keep batteries out of reach of children.
> Remote control operations are identical to the functions on the control panel.
> The remote control must be point directly at the sensor on control pad.
Display
Temperature/
timer number
Standby mode icon
Timer off
Timer on
Time/temperature display
Automatic heating mode
Flame dim level
Heating level
- low heating level
- high heating level
Day of the week
Timer icon
Settings
Setting weekday and time
1.
Press the key. When the date is ashing press the “▲” or “▼” key to select the day.
2. Press the key again, then press the “+” or “-” key to set the hour.
3. Press the key again, then press the “+” or “-” key to set the minute.
4. Press the key to conrm the setting.
Setting temperature
NOTE: This setting is only applicable for the temperature in standard heating
mode, not for the temperature in the timer mode. The default set temperature
is 20 °C.
The appliance only starts working, when the set temperature is higher than
the room temperature.
Press the “+” or “-” key to set the temperature, which ranges from 15 to 30 °C.
After the temperature setting has been completed, the display ashes about 5 seconds,
then shows the room temperature.
Operation Operation

12 13
NDY-19MA-E NDY-19MA-E
In more detail . . .
In more detail . . .
Setting timer
• Up to 10 different timer settings can be programmed.
• Each timer setting has its date, power-on time and power-off time.
• The maximum duration of each timer setting is 23 hours 50 minutes.
• If the power-off time of the timer setting falls on the following day, it is unnecessary
to set the date – just set the power-off time.
1. Press the key, the timer number starts blinking (01-10).
2. Press the “+” or “-” key to select a timer number.
3. Press the key. The cursor on the left side of the day blinks.
4.
Press the “▲” or “▼” key to move the cursor to the corresponding day. Press the “+”
key to add a corresponding day, or press the “-” key to delete a day.
5. Press the key to set the on time. The hour digit starts blinking.
6. Press the “+” or “-” key to set the hour.
7. Press the key. The minute digit starts blinking.
8. Press the “+” or “-” key to set the minute.
9. Press the key, to set the off time. The hour digit starts blinking.
10. Press the “+” or “-” key to set the hour.
11. Press the key. The minute digit starts blinking.
12. Press the “+” or “-” key to set the minute.
13. Press the key. The temperature digit starts blinking.
14. Press the “+” or “-” key to set the temperature.
15. Press the key to continue with the Timer setting or press the key to conrm
the setting.
Viewing the timer setting
1. Press the key.
2. Press the “+” or “-” key to check the power-on time of the set timers one by one.
3. To check the power-off time, press the “▲” key.
4. Press the “+” or “-” key to check the power-off time of the set timers one by one.
5. To delete selected setting, press the “C” key.
Activation timer
Press the key to activate the timer function.
NOTE: When the timer is active, the heating level must be manually selected.
If the heater function is not selected, only the ame effect goes on at the set
power-on time.
Automatic heating mode
Press the “IC” key to activate automatic heating mode. The “AUTO” icon appears on
the display.
When the automatic heating is turned on, the replace automatically activates/changes
the heating level depending on the set temperature and the ambient room temperature.
Technical specication
Model: NDY-19MA-E
Rated voltage: 220 - 240 V~, 50 Hz
Rated power input: 2000 W
Class I product, must be connected to earth.
Conforms to all relevant European Directives.
For indoor use only.
yyWxx
Manufacturing date code; year of manufacturing (20yy) and week
of manufacturing (Wxx).
Model identier(s): NDY-19MA-E
Item Symbol Value Unit Item Unit
Heat output Type of heat input, for electric storage local
space heaters only (select one)
Nominal heat
output
Pnom 2 kW manual heat charge control, with
integrated thermostat
Not
applicable
Minimum
heat output
(indicative)
Pmin 1 kW manual heat charge control with
room and/or outdoor temperature
feedback
Not
applicable
Maximum
continuous
heat output
Pmax,c 2 kW electronic heat charge control with
room and/or outdoor temperature
feedback
Not
applicable
Operation / Technical specications
Operation

14 15
NDY-19MA-E NDY-19MA-E
In more detail . . .
In more detail . . .
Cleaning and maintenance
Auxiliary
electricity
consumption
fan assisted heat output Not
applicable
At nominal
heat output
elmax 0.014 kW Type of heat output/room temperature control
(select one)
At minimum
heat output
elmin 0.014 kW single stage heat output and no room
temperature control
[no]
In standby
mode
elSB 0.48 W Two or more manual stages, no room
temperature control
[no]
with mechanic thermostat room
temperature control
[no]
with electronic room temperature
control
[no]
electronic room temperature control
plus day timer
[no]
electronic room temperature control
plus week timer
[yes]
Other control options (multiple selections
possible)
room temperature control, with
presence detection
[no]
room temperature control, with open
window detection
[no]
with distance control option [no]
with adaptive start control [yes]
with working time limitation [no]
with black bulb sensor [no]
Contact details Kingsher International Products Limited,
3 Sheldon Square, London, W2 6PX, United Kingdom
Cleaning and maintenance
1. Switch off and unplug from the power supply before cleaning.
2.
Using a soft, moist cloth, with or without a mild soap solution, carefully clean the
exterior surface of the product.
CAUTION: Allow the product to completely cool before handling or cleaning it.
3.
Do not allow water or other liquids to run into the interior of the product, as this could
create a re and/or electrical hazard.
4.
We also recommend the periodic cleaning of this appliance by lightly running a
vacuum cleaner nozzle over the guards to remove any dust or dirt that may have
accumulated inside or on the unit.
5.
CAUTION: Do not use harsh detergents, chemical cleaners or solvents as they may
damage the surface nish of the plastic components.
NOTE: This product contains no user serviceable parts and requires little
maintenance. Leave any servicing or repairs to qualied personnel only. The
LEDs contained in this product are non-replaceable.
Battery replacement
1
23
4
2 x AAA, 1.5 V
Storage
The product can be stored in the off-season, we recommend using the original (or
appropriately sized) box. It is important to keep it in a safe, dry location.
Transportation
It is recommended to transport the product in the original packaging that is appropriately
secured. Avoid excessive vibrations.
Technical specications
15

16
NDY-19MA-E
In more detail . . .
17
NDY-19MA-E
Plug replacement
This appliance is supplied with a BS1363 pin plug tted with a 13 Amp fuse. Should the
fuse require replacement, it must be replaced with a fuse rated at 13 Amp and approved
to BS1362. In the event the mains plug has to be removed/replaced for any reason,
please note: IMPORTANT: The wires in the mains lead are coloured in accordance with
the following code:
Blue or Black – N - (Neutral)
Brown or Red – L (Live)
Green / Yellow – E / (Earth)
Connect Blue
to N (Neutral)
Connect Green /
Yellow to E (earth)
13 AMP fuse
approved to
BS 1362
Brown L (Live)
Cable grip
Outer sleeve
rmly clamped
As the colours of the wires in the mains leadof this appliance may not correspond with
the coloured markings identifying the terminals in your plug, proceed as follows. The
blue wire must be connected to the terminal marked with an N or coloured black. The
brown wire must be connected to the terminal marked with an L or coloured red.
WARNING! Never connect live or neutral wires to the earth terminal of the plug.
Only t an approved 13 Amp BS 1363 or BS 1363/A plug and the correctly rated fuse.
If in doubt, consult a qualied electrician.
NOTE: If a moulded plug is tted and has to be removed take great care
in disposing of the plug and severed cable, it must be destroyed to prevent
engaging into a socket.
Recycling and disposal
This symbol is known as the 'Crossed-out Wheelie Bin Symbol'.
When this symbol is marked on a product or battery, it means that
it should not be disposed of with your general household waste.
Some chemicals contained within electrical/electronic products or
batteries can be harmful to health and the environment.
Only dispose of electrical/electronic/battery items in separate
collection schemes, which cater for the recovery and recycling of
materials contained within. Your co-operation is vital to ensure
the success of these schemes and for the protection of the
environment.
Recycling and disposal Cleaning and maintenance
16 17

Distributor:
B&Q plc,
Chandlers Ford, Hants,
SO53 3LE United Kingdom
www.diy.com
SFD Limited
Trade House, Mead Avenue
Yeovil
BA22 8RT, United Kingdom
www.screwx.com
Manufacturer, Fabricant, Producent,
Hersteller, Producător, Fabricante:
Kingsher International Products Limited
3 Sheldon Square
London
W2 6PX
United Kingdom
-
 1
1
-
 2
2
-
 3
3
-
 4
4
-
 5
5
-
 6
6
-
 7
7
-
 8
8
-
 9
9
-
 10
10


Blyss 3663602673026 Original Instructions Manual
- Category
- Fireplaces
- Type
- Original Instructions Manual
- This manual is also suitable for
Ask a question and I''ll find the answer in the document
Finding information in a document is now easier with AI
Other documents
-
 Olimpia Splendid Caldostile F User manual
-
 PRO ELEC PEL01220 Operating instructions
-
Easy Home 93761-U User manual
-
 RG Plug-N-Heat Personal Wall Heater User manual
-
screwfix 243PP User manual
-
Argo MARGE User manual
-
-
ANKO DL01D-T User manual
-
 DEVOLA 2.0KW GLASS PANEL HEATER Operating Instructions Manual
-
Focal Point LED Inset Electric Fire User manual


