Page is loading ...

NOTE: DIAGRAMS & ILLUSTRATIONS NOT TO SCALE.
1
HEARTH PRODUCTS
KITS AND ACCESSORIES
750215M
REV. E 01/2014
INSTALLATION INSTRUCTIONS FOR OPTIONAL STYLE VIEW™ DOOR KITS FOR USE WITH
SYMMETRY™, ELDV, MLDVT, MLDVTCD, MLBV, SLDVT AND SLBV GAS FIREPLACES
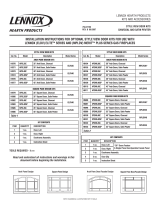
STYLE VIEW™ DOOR KITS
BLACK AND SATIN PEWTER
STYLE VIEW DOOR KITS
Cat. No. Model Description Model Series
ARCH PANE DESIGN KITS
H3970 APDL35C 35” Arch Doors, Black ELDV35
SYM35
H3971 APDL35SP 35” Arch Doors, Satin Pewter
H3973 APDL40C 40” Arch Doors, Black ELDV40
SYM40
H3974 APDL40SP 40” Arch Doors, Satin Pewter
H3976 APDL45C 45” Arch Doors, Black ELDV45
SYM45
H3977 APDL45SP 45” Arch Doors, Satin Pewter
Arch Pane Design Square Pane Design
SQUARE PANE DESIGN KITS
H3979 SPDL35C 35” Square Doors, Black ELDV35
SYM35
H3980 SPDL35SP 35” Square Doors, Satin Pewter
H3982 SPDL40C 40” Square Doors, Black ELDV40
SYM40
H3983 SPDL40SP 40” Square Doors, Satin Pewter
H3985 SPDL45C 45” Square Doors, Black ELDV45
SYM45
H3986 SPDL45SP 45” Square Doors, Satin Pewter
Table 1
KIT CONTENTS - Table 1
ITEM QUANTITY DESCRIPTION
1 1 ea. Door, Left
2 1 ea. Door, Right
3 1 ea. Doorframe Assembly
4 1 ea. Instruction Sheet
TOOLS REQUIRED - None
STYLE VIEW DOOR KITS
Cat. No. Model Description Model Series
ARCH PANE DESIGN KITS
H8529 APDML30C 30” Arch Doors, Black MLDVT-30*
SLDVT-30*
H8530 APDML30SP 30” Arch Doors, Satin Pewter
H8515 APDML35C 35” Arch Doors, Black MLDVT-35
SLDVT-35
MLDVTCD-35
MLBV-35
SLBV-35
H8514 APDML35SP 35” Arch Doors, Satin Pewter
H8512 APDML40C 40” Arch Doors, Black MLDVT-40
SLDVT-40
MLBV-40
SLBV-40
H8513 APDML40SP 40” Arch Doors, Satin Pewter
H8535 APDML45C 45” Arch Doors, Black MLDVT-45
SLDVT-45
H8536 APDML45SP 45” Arch Doors, Satin Pewter
SQUARE PANE DESIGN KITS
H8531 SPDML30C 30” Square Doors, Black MLDVT-30*
SLDVT-30*
H8532 SPDML30SP 30” Square Doors, Satin Pewter
H8510 SPDML35C 35” Square Doors, Black MLDVT-35
SLDVT-35
MLDVTCD-35
MLBV-35
SLBV-35
H8511 SPDML35SP 35” Square Doors, Satin Pewter
H8516 SPDML40C 40” Square Doors, Black MLDVT-40
SLDVT-40
MLBV-40
SLBV-40
H8517 SPDML40SP 40” Square Doors, Satin Pewter
H8534 SPDML45C 45” Square Doors, Black MLDVT-45
SLDVT-45
H8533 SPDML45SP 45” Square Doors, Satin Pewter
Table 2
KIT CONTENTS - Table 2
ITEM QUANTITY DESCRIPTION
1 1 ea. Door, Left *30” Doors Feature
A Single Piece Non-Operable Facade Panel
2 1 ea. Door, Right
3 1 ea. Doorframe Assembly
4 2 ea. Door Clip
5 1 ea. Instruction Sheet
Arch Pane Door/Facade Design Square Pane Door/Facade Design

NOTE: DIAGRAMS & ILLUSTRATIONS NOT TO SCALE.
2
* NOTE: The fireplace is equipped with a unit-mounted ON/OFF switch.
In most installations this switch is not used. If you desire to use the
switch and want to install these Style View Doors, you may desire to
relocate the switch into the bracket provided on the door frame. This is
OPTIONAL. If you desire to relocate the switch complete the optional
procedures indicated by the asterisks below. Steps 2, 4 and 5 refer
to ELDV and SYM Models only. For MLDVT, MLDVTCD, SLDVT, MLBV
AND SLBV Models, purchase a Rocker Switch kit model FRS (80L41).
*2. Remove the Piezo / Switch Bracket from fireplace control compartment
by pulling it forward as shown in Figure 2 (also see Figure 6).
Piezo & Switch
Bracket
*3. Disconnect the black and white wires from the ON/OFF switch.
*4. Remove the ON/OFF switch from the bracket by squeezing the flex
catches on sides of switch until it releases from bracket.
*5. Reinstall the bracket with the piezo (reverse Step 2).
6. Remove Doorframe from packaging. Install as follows:
*a. Position switch wires in front, inside of control compartment (so
they can easily be reached after doorframe is in position).
b.Position the bottom of the doorframe so that the bracket on the
inside of the doorframe locks behind the cabinet bottom flange as
shown in Figure 4.
*c. Feed the switch wires through the switch mounting bracket on
doorframe as shown in Figure 3.
Piezo & Switch
Locating Bracket
Wires for
ON/OFF switch
Figure 2
Figure 3
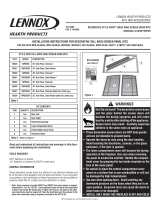
WARNING
Hot! Do not touch!
The decorative screen doors
and the glass behind the screen doors will
become hot during operation
and will retain
heat for a while after shutting off the appliance
.
Severe burns may result. Carefully supervise
children in the same room as appliance.
• These decorative screen doors are NOT heat guards
and are not intended to prevent burns.
• Operate the doors by only using the door handles.
Avoid touching the doorframe, screens, or the glass
enclosure, if the door is opened.
• Use care when opening doors. Avoid exerting any
downward pressure on the doors when they are in an
open position. Excessive force can cause the doors to
come loose or be damaged.
• INSTALL ONLY WHEN THE FIREPLACE IS OFF AND COLD!
GENERAL INFORMATION
These decorative screen doors are offered in two attractive finishes and
fit on the face of the appliance over the glass doorframe. If you encounter
any problems, need clarification of these instructions or are not qualified to
properly install this kit, contact you local distributor or dealer.
If you encounter any problems, need clarification of these instructions or are
not qualified to properly install this kit, contact you local distributor or dealer.
Read this instruction sheet in its entirety before beginning the installation.
ALL WARNINGS AND PRECAUTIONS IN THE INSTALLATION AND OP-
ERATION MANUAL PROVIDED WITH THE APPLIANCE APPLY TO THESE
INSTRUCTIONS.
TURN OFF THE APPLIANCE AND ALLOW IT TO COMPLETELY COOL BE-
FORE PROCEEDING.
Check the contents of the kits upon receipt and check for any damaged or
missing parts. If there is hidden damage, notify your freight company or
IHP dealer immediately.
Figure 1
INSTALLATION INSTRUCTIONS:
1. Remove and retain the Lower Panel per instructions in Figure 1.
Remove this lower panel
by lifting it up and out.
Retain the lower
panel for future use
in case the Style
View Door Kit is ever
removed.
Switch Mounting
Bracket on
Doorframe

NOTE: DIAGRAMS & ILLUSTRATIONS NOT TO SCALE.
3
Figure 4 - ELDV & SYM Models
Doorframe
Bracket
Locate the doorframe
bracket on the lower
front of the doorframe and
lock it behind the cabinet bottom
flange as shown here.
Tabs engage into
slots (both sides)
Tab
Doorframe
Fireplace
Slot
Locate slot on
each side
d. ELDV and SYM Models - Locate slots on each side of fireplace (see
Figure 4).
e. ELDV and SYM Models - Hold the top of the door frame slightly
away from the fireplace front while aligning the tabs on door frame
with the corresponding slots on fireplace. While the tabs engage,
slide the top of the door frame so that it goes over the top of glass
door assembly (see Figures 4 & 7).
f. MLDVT, MLDVTCD, SLDVT, MLBV AND SLBV Models - Locate
the top of the door frame and identify the return flange. Position
the door frame in front of the glass door assembly and hook the
door frame over it at the top. Let the door frame fall into place.
Position the door frame right to left and use the clips to engage
the door frame and glass door assembly, to lock it (lower left and
right corners of the opening). The clip will slide between the metal
frame of the glass door assembly and the glass. Refer to Figures
5 and 6.
*g. Connect the switch wires to the ON/OFF switch. Press the ON/OFF
switch down into the switch mounting bracket on door frame until
it locks in place (see Figure 8).
Hook Doorframe
Over Glass door
Figure 5 - MPLDV Models
Figure 6 - MLDVT, MLDVTCD, SLDVT, MLBV and SLBV Models
Door Clip In
Place Between
Doorframe And
Glass Door
Detail Showing
Glass Door Clip
Being Put Into
Place Between
Doorframe And
Glass Door

4
Printed in U.S.A. © 2006 IHP LLC
P/N 750215M REV. E 01/2014
NOTE: DIAGRAMS & ILLUSTRATIONS ARE NOT TO SCALE.
7. Remove the left and right side Style View doors from packaging. Install
them by aligning hinge pins on the doors with the hinge holes on the
doorframe and slide down (see Figure 9). Ensure the hinge pins are fully
seated onto the shoulders of the hinge holes.
NOTE: For MLDVT and SLDVT 30” models, remove single piece facade
panel and mount the four pins into the hinge shoulders.
ON/OFF switch
installed on door-
frame bracket
Door
Hinge
Pin
Insert Hinge Pins Into
Hinge Holes as Shown
Figure 9
Figure 10 - Completed Installation
8. Close Doors (see Figure 10).
ON
OFF
ON
OFF
ON/OFF Switch
Figure 8
ON/OFF Switch Original Location
ON/OFF Switch New Location
Figure 7 - Doorframe Installed
1508 Elm Hill Pike, Suite 108 • Nashville, TN 37210
IHP reserves the right to make changes at any time, without notice, in design, materials, specifica-
tions, and prices, and also to discontinue colors, styles, and products.
Consult your local distributor for fireplace code information.
/